SkiaSharp の 3D 回転
非アフィン変換を使用して、3D 空間で 2D オブジェクトを回転させます。
非アフィン変換の一般的な用途の 1 つは、3D 空間での 2D オブジェクトの回転をシミュレートすることです。

このジョブでは、3 次元回転を操作した後、これらの 3D 回転を実行する非アフィン SKMatrix 変換を派生させます。
この SKMatrix 変換を、2 次元内でのみ機能するように開発するのは困難です。 この 3 x 3 行列を、3D グラフィックスで使用される 4 x 4 行列から派生させると、ジョブがはるかに簡単になります。 SkiaSharp には、この目的のために SKMatrix44 クラスが用意されていますが、3D 回転と 4 x 4 変換行列を理解するには、3D グラフィックスの背景に関する知識が必要です。
3 次元座標系では、Z という 3 番目の軸が追加されます。概念的には、Z 軸は画面に対して直角です。 3D 空間の座標点は、3 つの数値 (x、y、z) で示されます。 この記事で使用する 3D 座標系では、2 次元と同様、X の値は右に向かって増加し、Y の値は下に向かって増加します。 正の Z 値が増加すると、画面の外に出てきます。 原点は、2D グラフィックスと同じように左上隅です。 画面は XY 平面と考えることができ、Z 軸はこの平面に対して直角になります。
これは左手座標系と呼ばれます。 左手の人差し指で X 座標の正の方向 (右) を指し、中指で Y 座標の正の方向 (下) を指すと、親指は Z 座標の正の方向、つまり画面から出るように外方向を指します。
3D グラフィックスで、変換は 4 x 4 行列に基づいています。 4 x 4 ID 行列を次に示します。
|  1  0  0  0  |
|  0  1  0  0  |
|  0  0  1  0  |
|  0  0  0  1  |
4 x 4 行列を操作する場合は、行番号と列番号でセルを識別すると便利です。
|  M11  M12  M13  M14  |
|  M21  M22  M23  M24  |
|  M31  M32  M33  M34  |
|  M41  M42  M43  M44  |
ただし、SkiaSharp Matrix44 クラスは少し異なります。 SKMatrix44 で個々のセルの値を設定または取得する唯一の方法が、Item インデクサーを使用することです。 行インデックスと列インデックスは、1 からではなく、0 から始まります。また、行と列は入れ替わります。 上の図のセル M14 には、SKMatrix44 オブジェクトのインデクサー [3, 0] を使用してアクセスします。
3D グラフィックス システムでは、3D ポイント (x、y、z) は、4 x 4 変換行列で乗算するために 1 x 4 行列に変換されます。
                 |  M11  M12  M13  M14  |
| x  y  z  1 | × |  M21  M22  M23  M24  | = | x'  y'  z'  w' |
                 |  M31  M32  M33  M34  |
                 |  M41  M42  M43  M44  |
3D 変換は、3 次元で行われる 2D 変換のように、4 次元で行われることが想定されます。 4 番目の次元は W と呼ばれ、3D 空間は、W 座標が 1 の 4D 空間内に存在すると見なされます。 変換数式は次のとおりです。
x' = M11·x + M21·y + M31·z + M41
y' = M12·x + M22·y + M32·z + M42
z' = M13·x + M23·y + M33·z + M43
w' = M14·x + M24·y + M34·z + M44
変換数式から、セル M11、M22、M33 が X、Y、Z 方向の拡大縮小係数であること、また M41、M42、M43 が X、Y、Z 方向の平行移動係数であることは明らかです。
これらの座標を、W が 1 の 3D 空間に変換して戻すために、x'、y'、z' 座標すべてが w' で除算されます。
x" = x' / w'
y" = y' / w'
z" = z' / w'
w" = w' / w' = 1
w' で除算することで、3D 空間のパースペクティブが提供されます。 w' が 1 の場合、パースペクティブは発生しません。
3D 空間での回転は非常に複雑になることがありますが、最も簡単な回転は X、Y、Z 軸を中心としたものです。 次の行列は、X 軸を中心とした角度αの回転です。
|  1     0       0     0  |
|  0   cos(α)  sin(α)  0  |
|  0  –sin(α)  cos(α)  0  |
|  0     0       0     1  |
この変換を行っても、X の値は同じです。 Y 軸を中心とした回転では、Y の値は変更されません。
|  cos(α)  0  –sin(α)  0  |
|    0     1     0     0  |
|  sin(α)  0   cos(α)  0  |
|    0     0     0     1  |
Z 軸を中心とした回転は、2D グラフィックスの場合と同じです。
|  cos(α)  sin(α)  0  0  |
| –sin(α)  cos(α)  0  0  |
|    0       0     1  0  |
|    0       0     0  1  |
回転の方向は、座標系の掌性によって暗黙的に示されます。 これは左手座標系であるため、左手の親指を、特定の軸の値が大きくなる方向 (X 軸を中心とした回転の場合は右、Y 軸を中心とした回転の場合は下、Z 軸を中心とした回転の場合は手前) に向けると、他の指の曲線は、正の角度の回転方向を示します。
SKMatrix44 には、一般化された静的 CreateRotation メソッドと CreateRotationDegrees メソッドがあり、回転の中心となる軸を指定できます。
public static SKMatrix44 CreateRotationDegrees (Single x, Single y, Single z, Single degrees)
X 軸を中心とした回転の場合は、最初の 3 つの引数を 1, 0, 0 に設定します。 Y 軸を中心とした回転の場合は 0, 1, 0 に、Z 軸を中心とした回転の場合は 0, 0, 1 に設定します。
4 x 4 の 4 番目の列はパースペクティブ用です。 SKMatrix44 にはパースペクティブ変換を作成するメソッドはありませんが、次のコードを使用して、自分で作成することができます。
SKMatrix44 perspectiveMatrix = SKMatrix44.CreateIdentity();
perspectiveMatrix[3, 2] = -1 / depth;
引数名 depth の理由は、すぐに明らかになります。 そのコードによって行列が作成されます。
|  1  0  0      0     |
|  0  1  0      0     |
|  0  0  1  -1/depth  |
|  0  0  0      1     |
変換数式では、w' は次のように計算されます。
w' = –z / depth + 1
これにより、Z の値が 0 より小さい (概念的には XY 平面の後ろにある) 場合は、X 座標と Y 座標を減少させ、Z の値が正の場合は、X 座標と Y 座標を増加させることができます。Z 座標が depth の場合、w' はゼロになり、座標は無限になります。 3 次元グラフィックス システムはカメラ メタファーを中心に構築され、ここでの depth 値は、座標系の原点からのカメラの距離を表します。 グラフィックス オブジェクトに、原点から depth 単位の Z 座標がある場合、それは概念的にはカメラのレンズに触れていることになり、無限に大きくなります。
この perspectiveMatrix 値は、回転行列と組み合わせて使用する可能性が高いことに注意してください。 回転するグラフィックス オブジェクトの X 座標または Y 座標が depth より大きい場合、3D 空間のこのオブジェクトの回転には、おそらく depth より大きい Z 座標が含まれます。 これは避けなければなりません。 perspectiveMatrix を作成するときは、グラフィックス オブジェクトの回転方法に関係なく、depth の値は、そのオブジェクト内のすべての座標に対して十分な大きさに設定する必要があります。 これにより、ゼロによる除算が行われることがなくなります。
3D 回転とパースペクティブを組み合わせるには、4 x 4 行列を乗算する必要があります。 SKMatrix44 では、この目的のために連結メソッドが定義されます。 A と B が SKMatrix44 オブジェクトの場合、次のコードにより、A と A x B と等しいことが設定されます。
A.PostConcat(B);
4 x 4 変換行列が 2D グラフィックス システムで使用されている場合、その行列は 2D オブジェクトに適用されます。 これらのオブジェクトは平面であり、Z 座標は 0 であると見なされます。 変換乗算は、前に示した変換よりも多少シンプルです。
                 |  M11  M12  M13  M14  |
| x  y  0  1 | × |  M21  M22  M23  M24  | = | x'  y'  z'  w' |
                 |  M31  M32  M33  M34  |
                 |  M41  M42  M43  M44  |
z の値が 0 の場合、行列の 3 行目にセルがない変換数式が作成されます。
x' = M11·x + M21·y + M41
y' = M12·x + M22·y + M42
z' = M13·x + M23·y + M43
w' = M14·x + M24·y + M44
また、ここでも z' 座標は無関係です。 2D グラフィックス システムに 3D オブジェクトが表示される場合、Z 座標の値は無視され、そのオブジェクトは 2 次元オブジェクトに折りたたまれます。 変換数式は、実際には次の 2 つだけです。
x" = x' / w'
y" = y' / w'
つまり、4 x 4 行列の 3 番目の行 "および" 3 番目の列は無視できます。
しかし、もしそうなら、そもそも 4 x 4 行列はなぜ必要なのでしょうか?
4 x 4 の 3 行目と 3 列目は 2 次元変換には関係ありませんが、その 3 行目と 3 列目はその前に、さまざまな SKMatrix44 値が乗算されるときにその役割を果たします。 たとえば、Y 軸を中心とした回転とパースペクティブ変換を乗算するとします。
|  cos(α)  0  –sin(α)  0  |   |  1  0  0      0     |   |  cos(α)  0  –sin(α)   sin(α)/depth  |
|    0     1     0     0  | × |  0  1  0      0     | = |    0     1     0           0        |
|  sin(α)  0   cos(α)  0  |   |  0  0  1  -1/depth  |   |  sin(α)  0   cos(α)  -cos(α)/depth  |
|    0     0     0     1  |   |  0  0  0      1     |   |    0     0     0           1        |
製品では、セル M14 にパースペクティブ値が含まれるようになりました。 その行列を 2D オブジェクトに適用する場合、3 行目と 3 列目は削除され、3 x 3 行列に変換されます。
|  cos(α)  0  sin(α)/depth  |
|    0     1       0        |
|    0     0       1        |
これで、2D ポイントの変換に使用できるようになりました。
                |  cos(α)  0  sin(α)/depth  |
|  x  y  1  | × |    0     1       0        | = |  x'  y'  z'  |
                |    0     0       1        |
変換数式は次のとおりです。
x' = cos(α)·x
y' = y
z' = (sin(α)/depth)·x + 1
次に、すべてを z' で除算します。
x" = cos(α)·x / ((sin(α)/depth)·x + 1)
y" = y / ((sin(α)/depth)·x + 1)
2D オブジェクトが Y 軸を中心に正の角度で回転すると、正の X 値は背景に後退し、負の X 値は前景に現れます。 X 軸は、Y 軸から最も遠い座標が、見る人から遠ざかったり近づいたりするにつれ、小さくなったり大きくなったりして、Y 軸 (コサイン値によって制御されます) に近づいていくように見えます。
SKMatrix44 を使用する場合は、さまざまな SKMatrix44 値を乗算して、すべての 3D 回転操作とパースペクティブ操作を実行します。 その後、SKMatrix44 クラスの Matrix プロパティを使用して、4 x 4 行列から 2 次元の 3 x 3 行列を抽出できます。 このプロパティは、使い慣れた SKMatrix 値を返します。
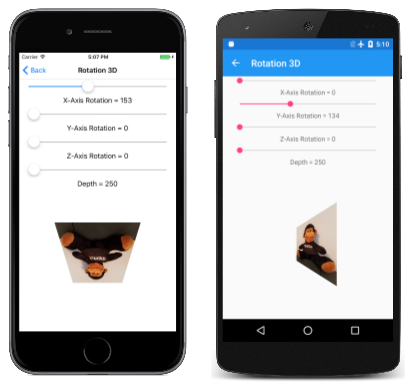
回転 3D ページでは、3D 回転を試すことができます。 Rotation3DPage.xaml ファイルにより、X、Y、Z 軸を中心とした回転と、depth 値を設定するための 4 つのスライダーのインスタンスが作成されます。
<ContentPage xmlns="http://xamarin.com/schemas/2014/forms"
             xmlns:x="http://schemas.microsoft.com/winfx/2009/xaml"
             xmlns:skia="clr-namespace:SkiaSharp.Views.Forms;assembly=SkiaSharp.Views.Forms"
             x:Class="SkiaSharpFormsDemos.Transforms.Rotation3DPage"
             Title="Rotation 3D">
    <Grid>
        <Grid.RowDefinitions>
            <RowDefinition Height="Auto" />
            <RowDefinition Height="Auto" />
            <RowDefinition Height="Auto" />
            <RowDefinition Height="Auto" />
            <RowDefinition Height="Auto" />
            <RowDefinition Height="Auto" />
            <RowDefinition Height="Auto" />
            <RowDefinition Height="Auto" />
            <RowDefinition Height="*" />
        </Grid.RowDefinitions>

        <Grid.Resources>
            <ResourceDictionary>
                <Style TargetType="Label">
                    <Setter Property="HorizontalTextAlignment" Value="Center" />
                </Style>

                <Style TargetType="Slider">
                    <Setter Property="Margin" Value="20, 0" />
                    <Setter Property="Maximum" Value="360" />
                </Style>
            </ResourceDictionary>
        </Grid.Resources>

        <Slider x:Name="xRotateSlider"
                Grid.Row="0"
                ValueChanged="OnSliderValueChanged" />

        <Label Text="{Binding Source={x:Reference xRotateSlider},
                              Path=Value,
                              StringFormat='X-Axis Rotation = {0:F0}'}"
               Grid.Row="1" />

        <Slider x:Name="yRotateSlider"
                Grid.Row="2"
                ValueChanged="OnSliderValueChanged" />

        <Label Text="{Binding Source={x:Reference yRotateSlider},
                              Path=Value,
                              StringFormat='Y-Axis Rotation = {0:F0}'}"
               Grid.Row="3" />

        <Slider x:Name="zRotateSlider"
                Grid.Row="4"
                ValueChanged="OnSliderValueChanged" />

        <Label Text="{Binding Source={x:Reference zRotateSlider},
                              Path=Value,
                              StringFormat='Z-Axis Rotation = {0:F0}'}"
               Grid.Row="5" />

        <Slider x:Name="depthSlider"
                Grid.Row="6"
                Maximum="2500"
                Minimum="250"
                ValueChanged="OnSliderValueChanged" />

        <Label Grid.Row="7"
               Text="{Binding Source={x:Reference depthSlider},
                              Path=Value,
                              StringFormat='Depth = {0:F0}'}" />

        <skia:SKCanvasView x:Name="canvasView"
                           Grid.Row="8"
                           PaintSurface="OnCanvasViewPaintSurface" />
    </Grid>
</ContentPage>
depthSlider が Minimum 値 250 で初期化されていることに注意してください。 これは、ここで回転する 2D オブジェクトの X 座標と Y 座標が、原点を中心とした半径 250 ピクセルで定義された円に制限されていることを意味します。 このオブジェクトを 3D 空間で回転させると必ず、座標の値は 250 未満になります。
Rotation3DPage.cs 分離コード ファイルは、300 ピクセルの正方形のビットマップに読み込まれます。
public partial class Rotation3DPage : ContentPage
{
    SKBitmap bitmap;

    public Rotation3DPage()
    {
        InitializeComponent();

        string resourceID = "SkiaSharpFormsDemos.Media.SeatedMonkey.jpg";
        Assembly assembly = GetType().GetTypeInfo().Assembly;

        using (Stream stream = assembly.GetManifestResourceStream(resourceID))
        {
            bitmap = SKBitmap.Decode(stream);
        }
    }

    void OnSliderValueChanged(object sender, ValueChangedEventArgs args)
    {
        if (canvasView != null)
        {
            canvasView.InvalidateSurface();
        }
    }
    ...
}
3D 変換がこのビットマップの中心にある場合、X 座標と Y 座標の範囲は –150 から 150 であり、コーナーは中央から 212 ピクセルであるため、すべてが半径 250 ピクセル内にあります。
PaintSurface ハンドラーにより、スライダーに基づいて SKMatrix44 オブジェクトが作成され、PostConcat を使用して乗算されます。 最終的な SKMatrix44 オブジェクトから抽出された SKMatrix 値は、移動変換によって囲まれ、回転の中心が画面の中央に配置されます。
public partial class Rotation3DPage : ContentPage
{
    SKBitmap bitmap;

    public Rotation3DPage()
    {
        InitializeComponent();

        string resourceID = "SkiaSharpFormsDemos.Media.SeatedMonkey.jpg";
        Assembly assembly = GetType().GetTypeInfo().Assembly;

        using (Stream stream = assembly.GetManifestResourceStream(resourceID))
        {
            bitmap = SKBitmap.Decode(stream);
        }
    }

    void OnSliderValueChanged(object sender, ValueChangedEventArgs args)
    {
        if (canvasView != null)
        {
            canvasView.InvalidateSurface();
        }
    }

    void OnCanvasViewPaintSurface(object sender, SKPaintSurfaceEventArgs args)
    {
        SKImageInfo info = args.Info;
        SKSurface surface = args.Surface;
        SKCanvas canvas = surface.Canvas;

        canvas.Clear();

        // Find center of canvas
        float xCenter = info.Width / 2;
        float yCenter = info.Height / 2;

        // Translate center to origin
        SKMatrix matrix = SKMatrix.MakeTranslation(-xCenter, -yCenter);

        // Use 3D matrix for 3D rotations and perspective
        SKMatrix44 matrix44 = SKMatrix44.CreateIdentity();
        matrix44.PostConcat(SKMatrix44.CreateRotationDegrees(1, 0, 0, (float)xRotateSlider.Value));
        matrix44.PostConcat(SKMatrix44.CreateRotationDegrees(0, 1, 0, (float)yRotateSlider.Value));
        matrix44.PostConcat(SKMatrix44.CreateRotationDegrees(0, 0, 1, (float)zRotateSlider.Value));

        SKMatrix44 perspectiveMatrix = SKMatrix44.CreateIdentity();
        perspectiveMatrix[3, 2] = -1 / (float)depthSlider.Value;
        matrix44.PostConcat(perspectiveMatrix);

        // Concatenate with 2D matrix
        SKMatrix.PostConcat(ref matrix, matrix44.Matrix);

        // Translate back to center
        SKMatrix.PostConcat(ref matrix,
            SKMatrix.MakeTranslation(xCenter, yCenter));

        // Set the matrix and display the bitmap
        canvas.SetMatrix(matrix);
        float xBitmap = xCenter - bitmap.Width / 2;
        float yBitmap = yCenter - bitmap.Height / 2;
        canvas.DrawBitmap(bitmap, xBitmap, yBitmap);
    }
}
4 番目のスライダーを試すと、異なる depth 設定によって、オブジェクトが見る人から遠ざかるのではなく、パースペクティブ効果のエクステントが変わることがわかります。
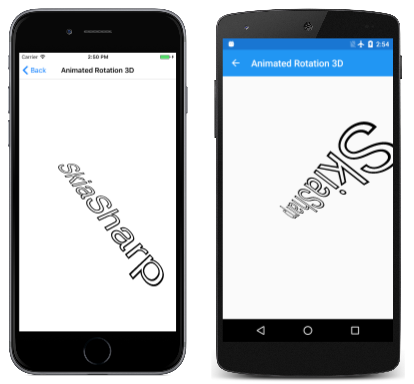
また、アニメーション回転 3D も、SKMatrix44 を使用して、3D 空間でテキスト文字列をアニメーション化します。 フィールドとして設定された textPaint オブジェクトは、コンストラクターで使用され、テキストの境界を決定します。
public class AnimatedRotation3DPage : ContentPage
{
    SKCanvasView canvasView;
    float xRotationDegrees, yRotationDegrees, zRotationDegrees;
    string text = "SkiaSharp";
    SKPaint textPaint = new SKPaint
    {
        Style = SKPaintStyle.Stroke,
        Color = SKColors.Black,
        TextSize = 100,
        StrokeWidth = 3,
    };
    SKRect textBounds;

    public AnimatedRotation3DPage()
    {
        Title = "Animated Rotation 3D";

        canvasView = new SKCanvasView();
        canvasView.PaintSurface += OnCanvasViewPaintSurface;
        Content = canvasView;

        // Measure the text
        textPaint.MeasureText(text, ref textBounds);
    }
    ...
}
OnAppearing オーバーライドは、3 つ Xamarin.FormsAnimation オブジェクトを定義し、xRotationDegrees、yRotationDegrees、zRotationDegrees フィールドを異なる速度でアニメーション化します。 これらのアニメーションの期間は素数 (5 秒、7 秒、11 秒) に設定されているため、組み合わせ全体は、385 秒ごとに、または 10 分以上繰り返されるだけであることに注意してください。
public class AnimatedRotation3DPage : ContentPage
{
    ...
    protected override void OnAppearing()
    {
        base.OnAppearing();

        new Animation((value) => xRotationDegrees = 360 * (float)value).
            Commit(this, "xRotationAnimation", length: 5000, repeat: () => true);

        new Animation((value) => yRotationDegrees = 360 * (float)value).
            Commit(this, "yRotationAnimation", length: 7000, repeat: () => true);

        new Animation((value) =>
        {
            zRotationDegrees = 360 * (float)value;
            canvasView.InvalidateSurface();
        }).Commit(this, "zRotationAnimation", length: 11000, repeat: () => true);
    }

    protected override void OnDisappearing()
    {
        base.OnDisappearing();
        this.AbortAnimation("xRotationAnimation");
        this.AbortAnimation("yRotationAnimation");
        this.AbortAnimation("zRotationAnimation");
    }
    ...
}
前のプログラムと同様、PaintCanvas ハンドラーによって、回転とパースペクティブの SKMatrix44 値が作成され、乗算されます。
public class AnimatedRotation3DPage : ContentPage
{
    ...
    void OnCanvasViewPaintSurface(object sender, SKPaintSurfaceEventArgs args)
    {
        SKImageInfo info = args.Info;
        SKSurface surface = args.Surface;
        SKCanvas canvas = surface.Canvas;

        canvas.Clear();

        // Find center of canvas
        float xCenter = info.Width / 2;
        float yCenter = info.Height / 2;

        // Translate center to origin
        SKMatrix matrix = SKMatrix.MakeTranslation(-xCenter, -yCenter);

        // Scale so text fits
        float scale = Math.Min(info.Width / textBounds.Width,
                               info.Height / textBounds.Height);
        SKMatrix.PostConcat(ref matrix, SKMatrix.MakeScale(scale, scale));

        // Calculate composite 3D transforms
        float depth = 0.75f * scale * textBounds.Width;

        SKMatrix44 matrix44 = SKMatrix44.CreateIdentity();
        matrix44.PostConcat(SKMatrix44.CreateRotationDegrees(1, 0, 0, xRotationDegrees));
        matrix44.PostConcat(SKMatrix44.CreateRotationDegrees(0, 1, 0, yRotationDegrees));
        matrix44.PostConcat(SKMatrix44.CreateRotationDegrees(0, 0, 1, zRotationDegrees));

        SKMatrix44 perspectiveMatrix = SKMatrix44.CreateIdentity();
        perspectiveMatrix[3, 2] = -1 / depth;
        matrix44.PostConcat(perspectiveMatrix);

        // Concatenate with 2D matrix
        SKMatrix.PostConcat(ref matrix, matrix44.Matrix);

        // Translate back to center
        SKMatrix.PostConcat(ref matrix,
            SKMatrix.MakeTranslation(xCenter, yCenter));

        // Set the matrix and display the text
        canvas.SetMatrix(matrix);
        float xText = xCenter - textBounds.MidX;
        float yText = yCenter - textBounds.MidY;
        canvas.DrawText(text, xText, yText, textPaint);
    }
}
この 3D 回転は複数の 2D 変換で囲まれ、回転の中心を画面の中心に移動し、テキスト文字列のサイズを、画面と同じ幅になるように拡大縮小します。

