Xamarin.iOS のコレクション ビュー
コレクション ビューを使用すると、任意のレイアウトを使ってコンテンツを表示できます。 カスタム レイアウトもサポートしながら、すぐに使えるグリッドのようなレイアウトを簡単に作成できます。
UICollectionView クラスで使用できるコレクション ビューは、レイアウトを使って画面上に複数の項目を表示する iOS 6 の新しい概念です。 UICollectionView にデータを提供して項目を作成し、それらの項目を操作するためのパターンは、iOS 開発でよく使用されるのと同じデリゲートおよびデータ ソース パターンに従います。
しかし、コレクション ビューは、UICollectionView 自体に依存しないレイアウト サブシステムで動作します。 したがって、別のレイアウトを指定するだけで、コレクション ビューの表示を簡単に変更できます。
iOS には、UICollectionViewFlowLayout というレイアウト クラスが用意されています。これにより、グリッドなどの線ベースのレイアウトを追加作業なしで作成できます。 また、カスタム レイアウトを作成して、想像できる任意のプレゼンテーションを可能にすることもできます。
UICollectionView の基本
UICollectionView クラスは、次の 3 つの異なる項目で構成されます。
- セル – 各項目のデータ ドリブン ビュー
- 補助ビュー – セクションに関連付けられたデータ ドリブン ビュー。
- 装飾ビュー – レイアウトによって作成された非データ ドリブン ビュー
セル
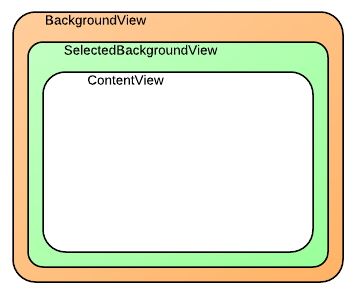
セルは、コレクション ビューで表示されるデータ セット内の単一項目を表すオブジェクトです。 各セルは、次の図に示すように、3 つの異なるビューで構成される UICollectionViewCell クラスのインスタンスです。
UICollectionViewCell クラスには、これらのビューごとに次のプロパティがあります。
ContentView– このビューには、セルで表示されるコンテンツが含まれます。 画面に最上位 z オーダーでレンダリングされます。SelectedBackgroundView– セルには、選択のサポートが組み込まれています。 このビューは、セルが選択されていることを視覚的に示すために使用されます。 セルを選択すると、ContentViewのすぐ下にレンダリングされます。BackgroundView- セルには、BackgroundViewによって表示される背景を表示することもできます。 このビューは、SelectedBackgroundViewの下にレンダリングされます。
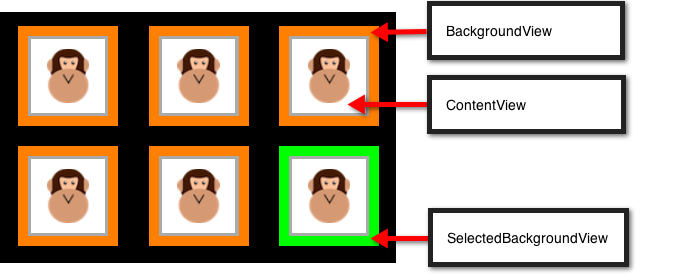
BackgroundView や SelectedBackgroundView よりも小さくなるように ContentView を設定すると、BackgroundView を使用してコンテンツを視覚的にフレーム化できますが、次に示すように、セルを選択すると SelectedBackgroundView が表示されます。
上のスクリーンショットのセルは、次のコードに示すように、UICollectionViewCell から継承し、ContentView、SelectedBackgroundView、および BackgroundView プロパティをそれぞれ設定することによって作成されます。
public class AnimalCell : UICollectionViewCell
{
        UIImageView imageView;

        [Export ("initWithFrame:")]
        public AnimalCell (CGRect frame) : base (frame)
        {
            BackgroundView = new UIView{BackgroundColor = UIColor.Orange};

            SelectedBackgroundView = new UIView{BackgroundColor = UIColor.Green};

            ContentView.Layer.BorderColor = UIColor.LightGray.CGColor;
            ContentView.Layer.BorderWidth = 2.0f;
            ContentView.BackgroundColor = UIColor.White;
            ContentView.Transform = CGAffineTransform.MakeScale (0.8f, 0.8f);

            imageView = new UIImageView (UIImage.FromBundle ("placeholder.png"));
            imageView.Center = ContentView.Center;
            imageView.Transform = CGAffineTransform.MakeScale (0.7f, 0.7f);

            ContentView.AddSubview (imageView);
        }

        public UIImage Image {
            set {
                imageView.Image = value;
            }
        }
}
補助ビュー
補助ビューは、UICollectionView の各セクションに関連付けられている情報を表示するビューです。 セルと同様に、補助ビューはデータドリブンです。 セルでデータ ソースの項目データが表示される場合、補助ビューでは、本棚の書籍のカテゴリや音楽ライブラリ内の音楽のジャンルなどのセクション データが表示されます。
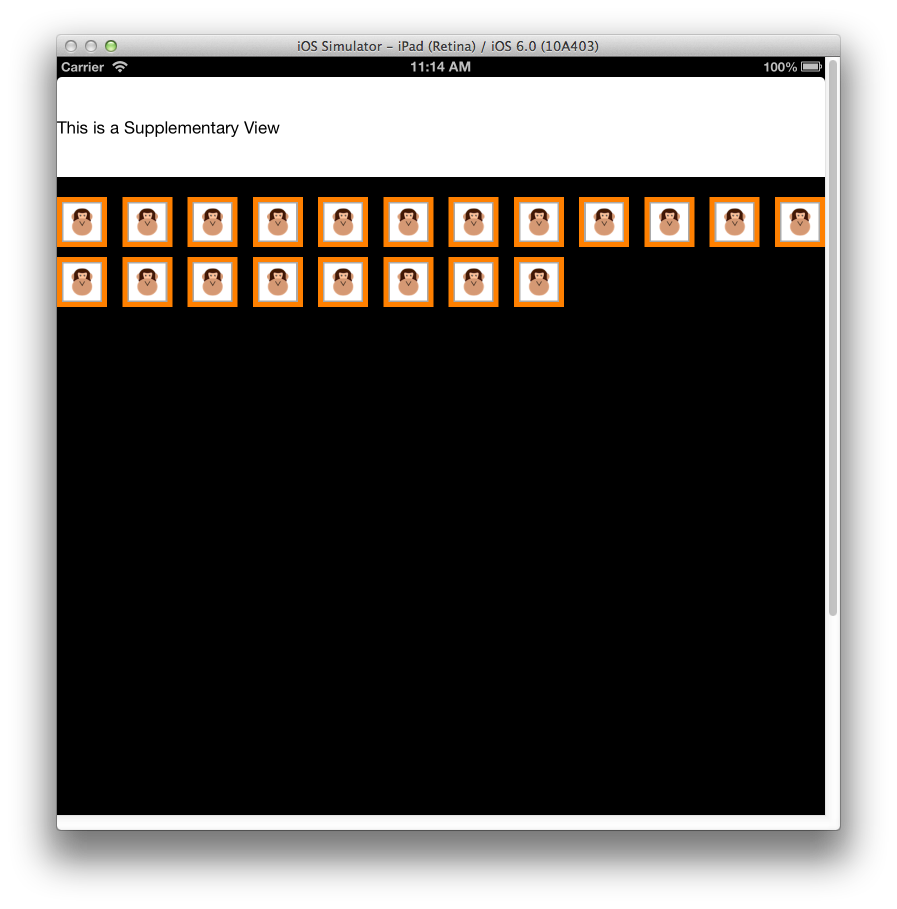
たとえば、次の図に示すように、補助ビューを使用して特定のセクションのヘッダーを表示できます。
補助ビューを使用するには、最初に ViewDidLoad メソッドに登録する必要があります。
CollectionView.RegisterClassForSupplementaryView (typeof(Header), UICollectionElementKindSection.Header, headerId);
その後、ビューは、GetViewForSupplementaryElement を使用して返され、DequeueReusableSupplementaryView を使って作成され、UICollectionReusableView から継承する必要があります。 次のコード スニペットでは、上のスクリーンショットに示されている補助ビューが生成されます。
public override UICollectionReusableView GetViewForSupplementaryElement (UICollectionView collectionView, NSString elementKind, NSIndexPath indexPath)
        {
            var headerView = (Header)collectionView.DequeueReusableSupplementaryView (elementKind, headerId, indexPath);
            headerView.Text = "Supplementary View";
            return headerView;
        }
補助ビューは、単なるヘッダーやフッターよりも一般的です。 コレクション ビュー内の任意の場所に配置でき、任意のビューで構成でき、外観を完全にカスタマイズできます。
装飾ビュー
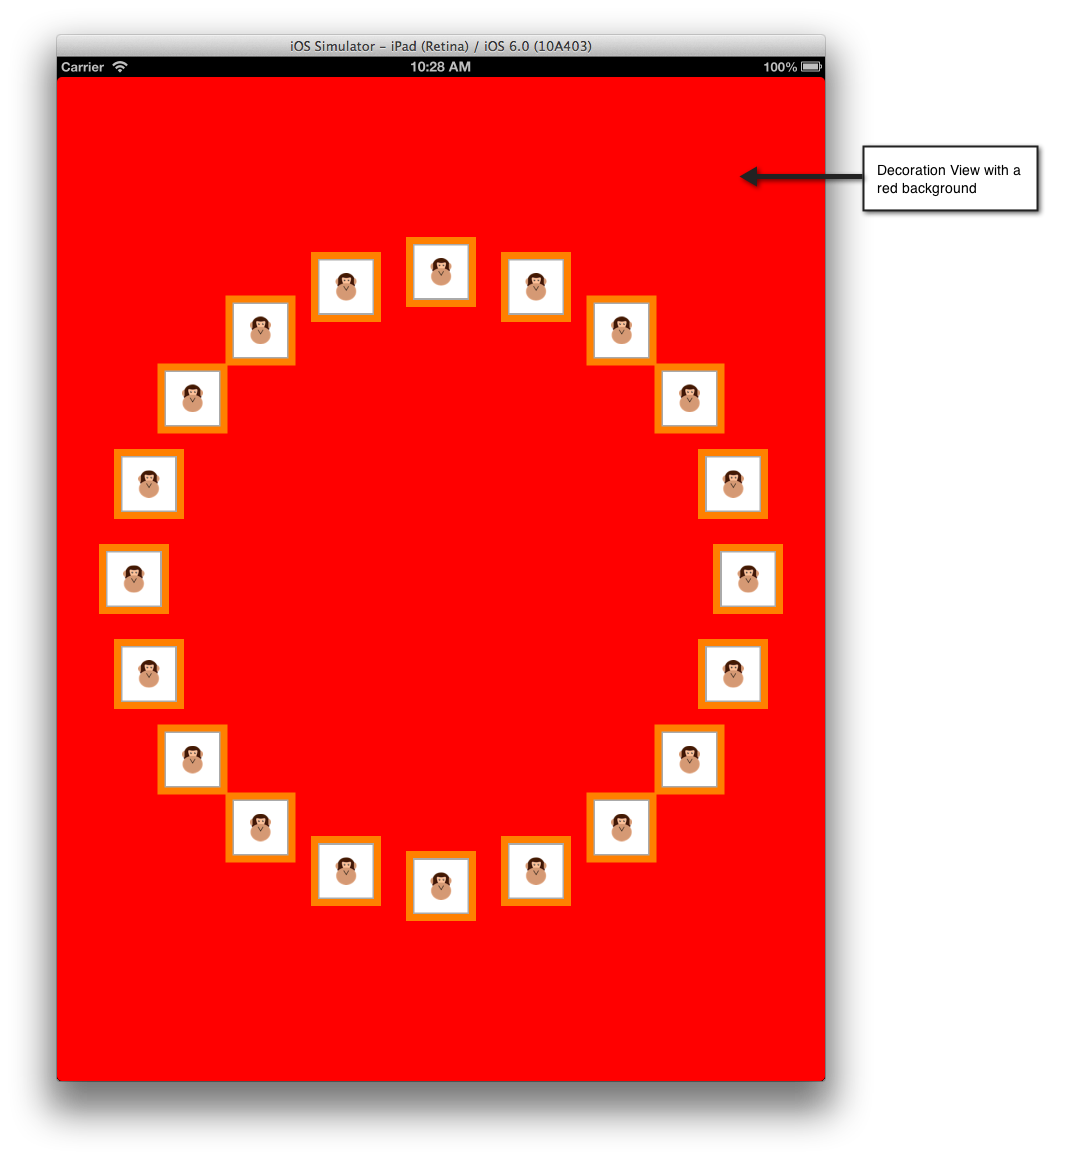
装飾ビューは、UICollectionView に表示できる純粋に視覚的なビューです。 セルや補助ビューとは異なり、これらはデータドリブンではありません。 これらは常にレイアウトのサブクラス内に作成され、その後、コンテンツのレイアウトとして変更される可能性があります。 たとえば、装飾ビューを使用すると、次に示すように、UICollectionView 内のコンテンツと共にスクロールする背景ビューを表示できます。
次のコード スニペットでは、サンプルの CircleLayout クラスの背景が赤に変更されます。
public class MyDecorationView : UICollectionReusableView
 {
   [Export ("initWithFrame:")]
   public MyDecorationView (CGRect frame) : base (frame)
   {
     BackgroundColor = UIColor.Red;
   }
 }
データ ソース
UITableView や MKMapView など、iOS の他の部分と同様に、UICollectionView では、UICollectionViewDataSource クラスを介して Xamarin.iOS で公開されている "データ ソース" からデータが取得されます。 このクラスには、次のようなコンテンツを UICollectionView に提供する役割があります。
- セル –
GetCellメソッドから返されます。 - 補助ビュー –
GetViewForSupplementaryElementメソッドから返されます。 - セクションの数 –
NumberOfSectionsメソッドから返されます。 実装されていない場合、既定値は 1 です。 - セクションあたりの項目数 –
GetItemsCountメソッドから返されます。
UICollectionViewController
便宜上、UICollectionViewController クラスを使用できます。これは、次のセクションで説明するデリゲートと、その UICollectionView ビューのデータ ソースの両方に自動的に構成されます。
UITableView と同様に、UICollectionView クラスでは、画面上の項目のセルを取得するためにそのデータ ソースのみを呼び出します。
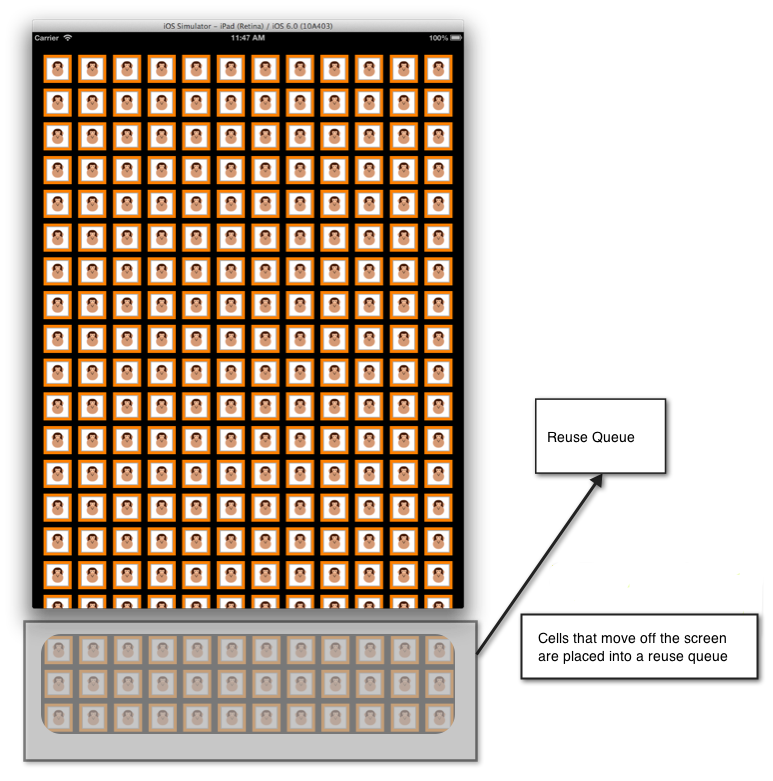
次の画像に示すように、画面からスクロールするセルは再利用のためにキューに配置されます。
セルの再利用は、UICollectionView と UITableView で簡略化されています。 セルはシステムに登録されるため、再利用キューで使用できない場合、データ ソースに直接セルを作成する必要がなくなりました。 再利用キューからセルを取り出す呼び出しを行うときにセルが使用できない場合、iOS によって、登録された型または nib に基づいて自動的に作成されます。
補助ビューでも同じ手法を使用できます。
たとえば、AnimalCell クラスを登録する次のコードを考えてみましょう。
static NSString animalCellId = new NSString ("AnimalCell");
CollectionView.RegisterClassForCell (typeof(AnimalCell), animalCellId);
UICollectionView でその項目が画面上にあるためにセルが必要な場合、UICollectionView ではそのデータ ソースの GetCell メソッドが呼び出されます。 UITableView での動作と同様に、このメソッドにはバッキング データからセルを構成する役割があります。この場合は、AnimalCell クラスになります。
次のコードは、AnimalCell インスタンスを返す GetCell の実装を示しています。
public override UICollectionViewCell GetCell (UICollectionView collectionView, Foundation.NSIndexPath indexPath)
{
        var animalCell = (AnimalCell)collectionView.DequeueReusableCell (animalCellId, indexPath);

        var animal = animals [indexPath.Row];

        animalCell.Image = animal.Image;

        return animalCell;
}
DequeReusableCell の呼び出しは、セルが再利用キューから取り出されるか、またはキューでセルが使用できない場合に、CollectionView.RegisterClassForCell の呼び出しに登録された型に基づいて作成されます。
この場合、AnimalCell クラスを登録することで、iOS によって、内部で新しい AnimalCell が作成され、セルをキューから取り出す呼び出しが行われたときにそれが返されます。その後、それは動物クラスに含まれる画像で構成され、UICollectionView に表示するために返されます。
委任
UICollectionView クラスでは、UICollectionViewDelegate 型のデリゲートを使用して、UICollectionView 内のコンテンツの操作がサポートされます。 これにより、次の制御が可能になります。
- セルの選択 – セルが選択されているかどうかを判断します。
- セルの強調表示 – セルが現在タッチされているかどうかを判断します。
- セルのメニュー – 長押しジェスチャに応じてセルに対して表示されるメニュー。
データ ソースと同様に、UICollectionViewController は既定で UICollectionView のデリゲートとして構成されます。
セルの強調表示
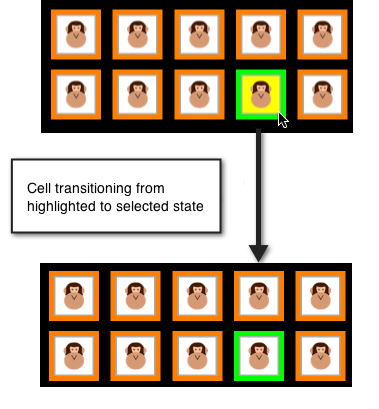
セルが押されると、そのセルは強調表示された状態に移り、ユーザーがセルから指を離すまで選択されません。 これにより、セルが実際に選択される前に、その外観を一時的に変更できます。 選択すると、セルの SelectedBackgroundView が表示されます。 次の図は、選択が行われる直前の強調表示された状態を示しています。
強調表示を実装するために、UICollectionViewDelegate の ItemHighlighted と ItemUnhighlighted メソッドを使用できます。 たとえば、次のコードでは、上の画像に示すように、セルが強調表示されているときに ContentView の黄色の背景が適用され、強調表示されていない場合は白い背景が適用されます。
public override void ItemHighlighted (UICollectionView collectionView, NSIndexPath indexPath)
{
        var cell = collectionView.CellForItem(indexPath);
        cell.ContentView.BackgroundColor = UIColor.Yellow;
}

public override void ItemUnhighlighted (UICollectionView collectionView, NSIndexPath indexPath)
{
        var cell = collectionView.CellForItem(indexPath);
        cell.ContentView.BackgroundColor = UIColor.White;
}
選択の無効化
UICollectionView では、既定で選択が有効になっています。 選択を無効にするには、ShouldHighlightItem をオーバーライドし、次に示すように false を返します。
public override bool ShouldHighlightItem (UICollectionView collectionView, NSIndexPath indexPath)
{
        return false;
}
強調表示を無効にすると、セルを選択するプロセスも無効になります。 さらに、選択を直接制御する ShouldSelectItem メソッドもありますが、ShouldHighlightItem が実装され、false を返す場合、ShouldSelectItem は呼び出されません。
ShouldSelectItem では、ShouldHighlightItem が実装されていない場合に、項目ごとに選択をオンまたはオフにすることができます。 また、ShouldHighlightItem が実装され、true を返しても、ShouldSelectItem が false を返す場合は、選択せずに強調表示することもできます。
セルのメニュー
UICollectionView 内の各セルでは、切り取り、コピー、貼り付けを必要に応じてサポートできるメニューを表示できます。 セルに編集メニューを作成するには:
ShouldShowMenuをオーバーライドし、項目にメニューを表示する必要がある場合は true を返します。CanPerformActionオーバーライドし、項目で実行できるすべてのアクション (切り取り、コピー、貼り付けのいずれかになります) に対して true を返します。PerformActionをオーバーライドし、編集、コピー、または貼り付け操作を実行します。
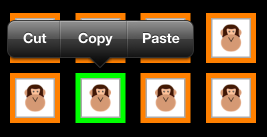
次のスクリーンショットは、セルが長押しされたときのメニューを示しています。
レイアウト
UICollectionView では、すべての要素、セル、補助ビュー、装飾ビューの配置を、UICollectionView 自体とは無関係に管理できるようにするレイアウト システムがサポートされています。
レイアウト システムを使用すると、アプリケーションでは、この記事で説明したグリッドのようなレイアウトをサポートしたり、カスタム レイアウトを指定したりできます。
レイアウトの基本
UICollectionView のレイアウトは、UICollectionViewLayout から継承されるクラスで定義されます。 レイアウトの実装には、UICollectionView 内のすべての項目のレイアウト属性を作成する役割があります。 レイアウトを作成するには、次の 2 つの方法があります。
- 組み込みの
UICollectionViewFlowLayoutを使用します。 UICollectionViewLayoutから継承してカスタム レイアウトを指定します。
フロー レイアウト
UICollectionViewFlowLayout クラスでは、ここで説明したセルのグリッドにコンテンツを配置するのに適した線ベースのレイアウトが提供されます。
フロー レイアウトを使用するには:
UICollectionViewFlowLayoutのインスタンスを作成します。
var layout = new UICollectionViewFlowLayout ();
UICollectionViewのコンストラクターにインスタンスを渡します。
simpleCollectionViewController = new SimpleCollectionViewController (layout);
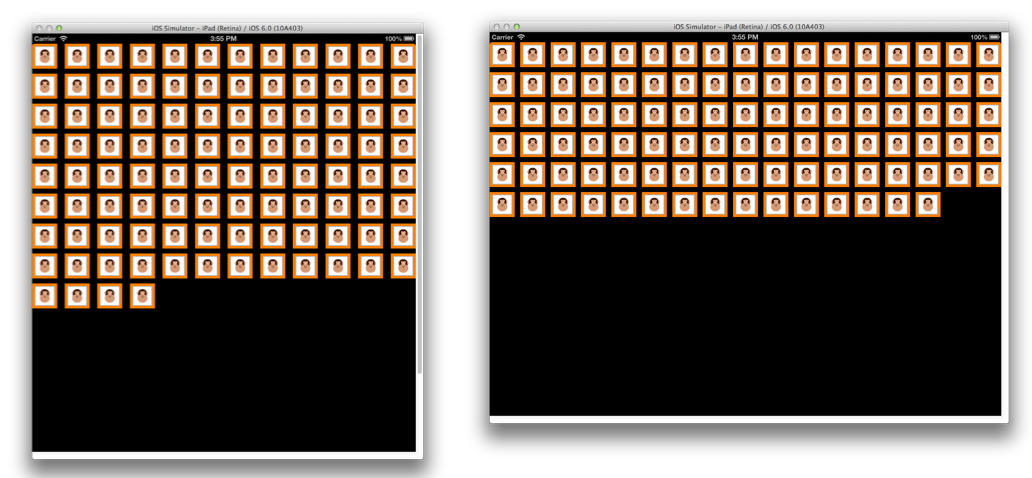
グリッドのコンテンツをレイアウトするために必要なことはこれだけです。 また、向きが変わると、次に示すように、UICollectionViewFlowLayout では適宜、コンテンツの再配置が処理されます。
セクション インセット
UIContentView の周囲にいくつかのスペースを提供するために、レイアウトには UIEdgeInsets 型の SectionInset プロパティがあります。 たとえば、次のコードでは、UICollectionViewFlowLayout によってレイアウトされるときに、UIContentView の各セクションの周囲に 50 ピクセルのバッファーが提供されます。
var layout = new UICollectionViewFlowLayout ();
layout.SectionInset = new UIEdgeInsets (50,50,50,50);
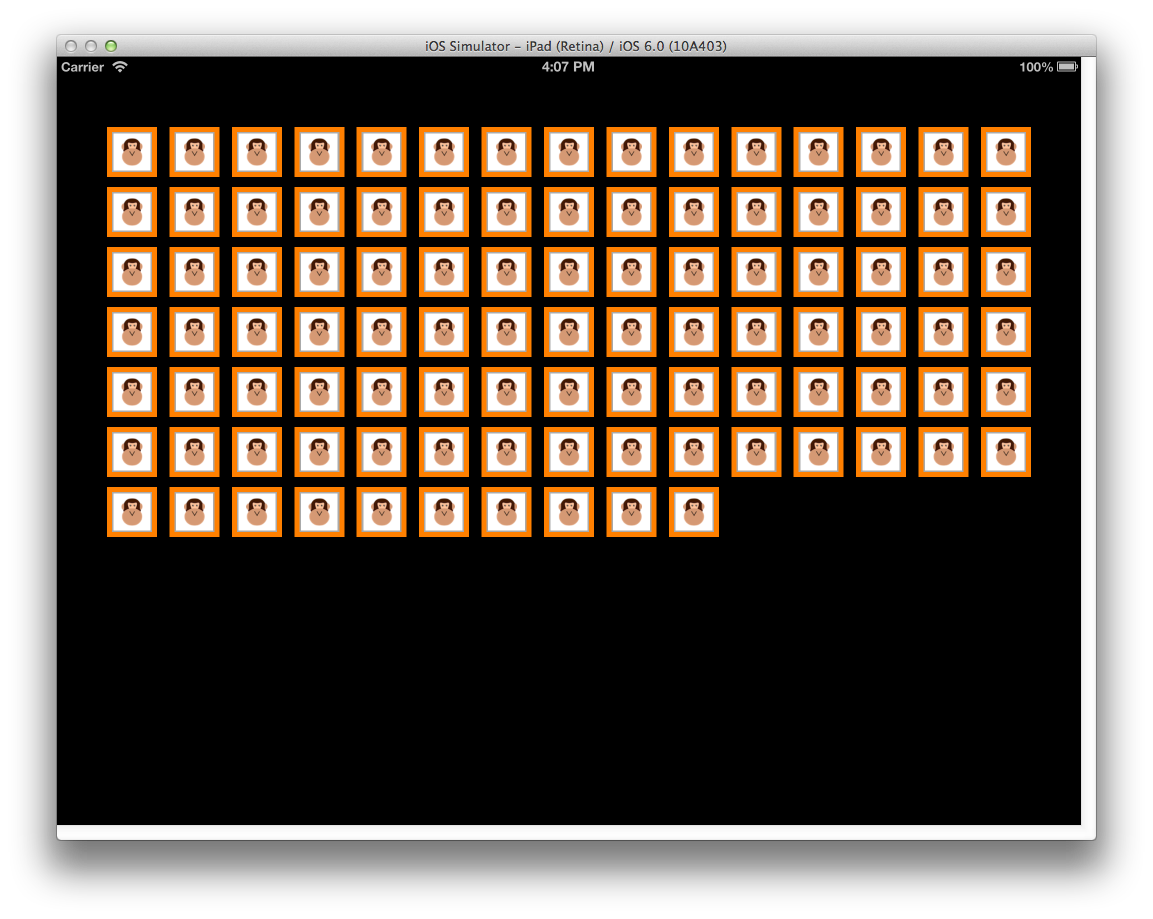
これにより、次に示すようにセクションの周囲にスペースが設定されます。
UICollectionViewFlowLayout のサブクラス化
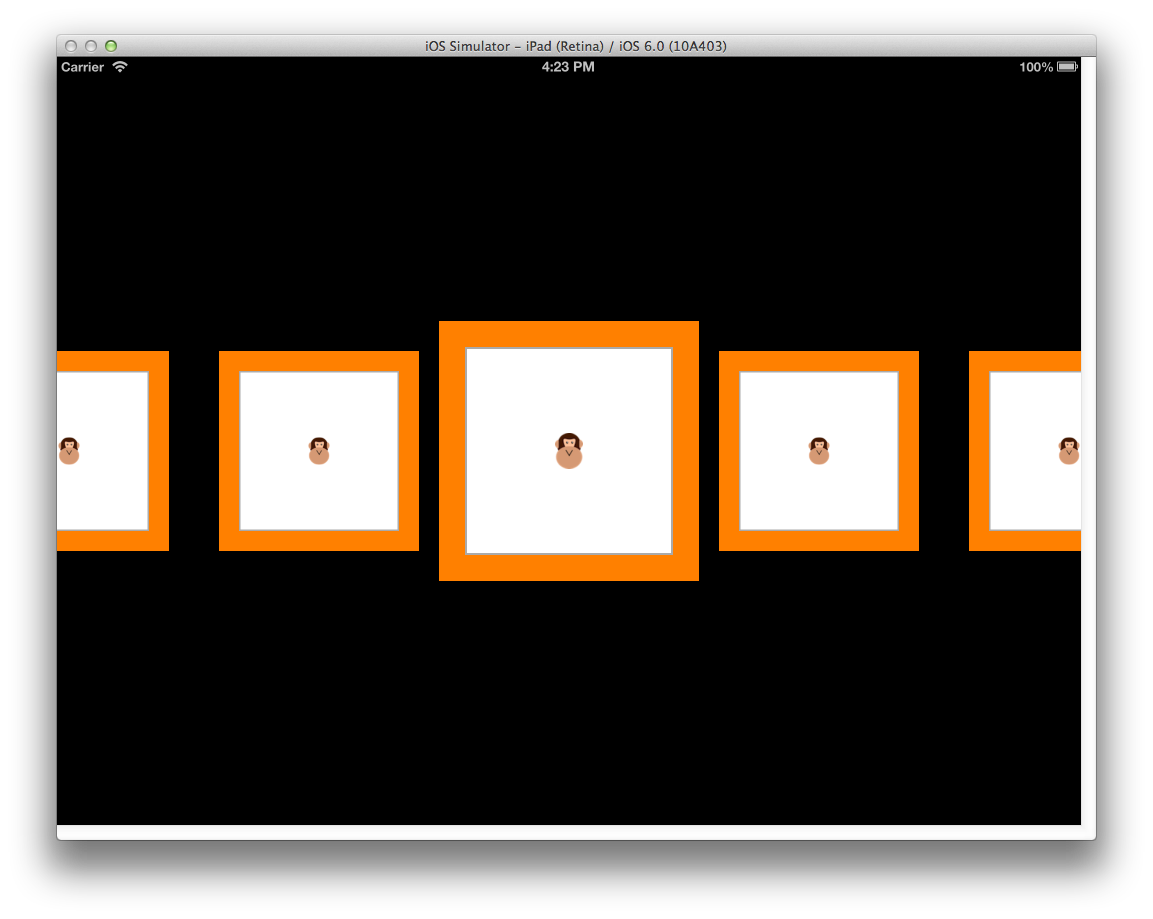
UICollectionViewFlowLayout を直接使用することに加え、線に沿ってコンテンツのレイアウトをさらにカスタマイズするためにサブクラス化することもできます。 たとえば、次に示すように、これを使用して、セルをグリッドにラップせず、水平にスクロールする 1 行を作成するレイアウトを作成できます。
UICollectionViewFlowLayout サブクラス化してこれを実装するには、以下が必要です。
- コンストラクター内のレイアウト自体またはレイアウト内のすべての項目に適用されるすべてのレイアウト プロパティを初期化する。
ShouldInvalidateLayoutForBoundsChangeをオーバーライドし、UICollectionViewの境界が変わったときにセルのレイアウトが再計算されるように true を返す。 これは、最も中央のセルに適用される変換用のコードがスクロール中に確実に適用されるようにする場合に使用されます。TargetContentOffsetをオーバーライドし、スクロールが停止したときに最も中央のセルがUICollectionViewの中心にスナップされるようにする。UICollectionViewLayoutAttributesの配列を返すようにLayoutAttributesForElementsInRectをオーバーライドする。 各UICollectionViewLayoutAttributeには、Center、Size、ZIndex、Transform3Dなどのプロパティを含む、特定の項目のレイアウト方法に関する情報が含まれています。
次のコードはこのような実装を示しています。
using System;
using CoreGraphics;
using Foundation;
using UIKit;
using CoreGraphics;
using CoreAnimation;

namespace SimpleCollectionView
{
  public class LineLayout : UICollectionViewFlowLayout
  {
    public const float ITEM_SIZE = 200.0f;
    public const int ACTIVE_DISTANCE = 200;
    public const float ZOOM_FACTOR = 0.3f;

    public LineLayout ()
    {
      ItemSize = new CGSize (ITEM_SIZE, ITEM_SIZE);
      ScrollDirection = UICollectionViewScrollDirection.Horizontal;
            SectionInset = new UIEdgeInsets (400,0,400,0);
      MinimumLineSpacing = 50.0f;
    }

    public override bool ShouldInvalidateLayoutForBoundsChange (CGRect newBounds)
    {
      return true;
    }

    public override UICollectionViewLayoutAttributes[] LayoutAttributesForElementsInRect (CGRect rect)
    {
      var array = base.LayoutAttributesForElementsInRect (rect);
            var visibleRect = new CGRect (CollectionView.ContentOffset, CollectionView.Bounds.Size);

      foreach (var attributes in array) {
        if (attributes.Frame.IntersectsWith (rect)) {
          float distance = (float)(visibleRect.GetMidX () - attributes.Center.X);
          float normalizedDistance = distance / ACTIVE_DISTANCE;
          if (Math.Abs (distance) < ACTIVE_DISTANCE) {
            float zoom = 1 + ZOOM_FACTOR * (1 - Math.Abs (normalizedDistance));
            attributes.Transform3D = CATransform3D.MakeScale (zoom, zoom, 1.0f);
            attributes.ZIndex = 1;
          }
        }
      }
      return array;
    }

    public override CGPoint TargetContentOffset (CGPoint proposedContentOffset, CGPoint scrollingVelocity)
    {
      float offSetAdjustment = float.MaxValue;
      float horizontalCenter = (float)(proposedContentOffset.X + (this.CollectionView.Bounds.Size.Width / 2.0));
      CGRect targetRect = new CGRect (proposedContentOffset.X, 0.0f, this.CollectionView.Bounds.Size.Width, this.CollectionView.Bounds.Size.Height);
      var array = base.LayoutAttributesForElementsInRect (targetRect);
      foreach (var layoutAttributes in array) {
        float itemHorizontalCenter = (float)layoutAttributes.Center.X;
        if (Math.Abs (itemHorizontalCenter - horizontalCenter) < Math.Abs (offSetAdjustment)) {
          offSetAdjustment = itemHorizontalCenter - horizontalCenter;
        }
      }
            return new CGPoint (proposedContentOffset.X + offSetAdjustment, proposedContentOffset.Y);
    }

  }
}
カスタム レイアウト
UICollectionViewFlowLayout の使用に加え、レイアウトは UICollectionViewLayout から直接継承することによって完全にカスタマイズすることもできます。
オーバーライドする主なメソッドは次のとおりです。
PrepareLayout– レイアウト プロセス全体で使用される初期幾何学的計算を実行するために使用されます。CollectionViewContentSize– コンテンツの表示に使用する領域のサイズを返します。LayoutAttributesForElementsInRect- 前に示した UICollectionViewFlowLayout の例と同様に、このメソッドを使用して、各項目のレイアウト方法に関する情報をUICollectionViewに提供します。 ただし、UICollectionViewFlowLayoutとは異なり、カスタム レイアウトを作成するときは、任意の項目を配置できます。
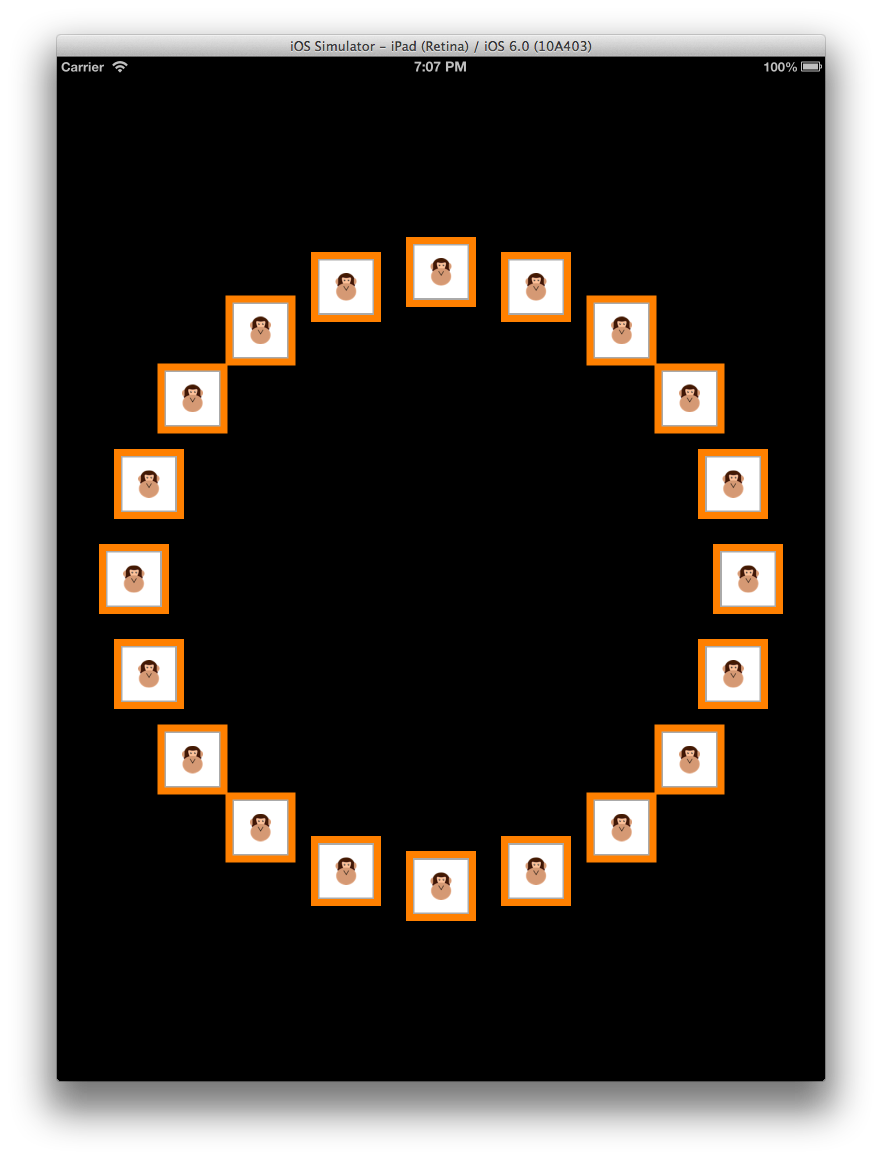
たとえば、次に示すように、同じコンテンツを円形レイアウトで表示できます。
レイアウトに関する強力な点は、グリッドのようなレイアウトから水平スクロール レイアウトに変更し、その後、この円形レイアウトに変更するには、UICollectionView に提供されるレイアウト クラスのみを変更する必要があるということです。 UICollectionView、そのデリゲートまたはデータ ソース コードは何も変更されません。
iOS 9 での変更点
iOS 9 では、コレクション ビュー (UICollectionView) で、新しい既定のジェスチャ認識エンジンといくつかの新しいサポート メソッドを追加することで、すぐに使える項目のドラッグによる並べ替えがサポートされるようになりました。
これらの新しいメソッドを使うと、コレクション ビューでドラッグによる並べ替えを簡単に実装でき、並べ替えプロセスのどの段階でも項目の外観をカスタマイズすることができます。
この記事では、Xamarin.iOS アプリケーションでのドラッグによる並べ替えの実装と、iOS 9 でコレクション ビュー コントロールに加えられたその他の変更の一部について説明します。
項目の並べ替え
前述のように、iOS 9 のコレクション ビューの最も重要な変更の 1 つは、すぐに使えるドラッグによる並べ替え機能の追加でした。
iOS 9 では、コレクション ビューに並べ替えを追加する最も簡単な方法は、UICollectionViewController を使用することです。
コレクション ビュー コントローラーに InstallsStandardGestureForInteractiveMovement プロパティが追加されました。これにより、コレクション内の項目のドラッグによる並べ替えをサポートする標準の "ジェスチャ認識エンジン" が追加されます。
既定値は true であるため、UICollectionViewDataSource クラスの MoveItem メソッドを実装するだけで、ドラッグによる並べ替えがサポートされます。 次に例を示します。
public override void MoveItem (UICollectionView collectionView, NSIndexPath sourceIndexPath, NSIndexPath destinationIndexPath)
{
  // Reorder our list of items
  ...
}
単純な並べ替えの例
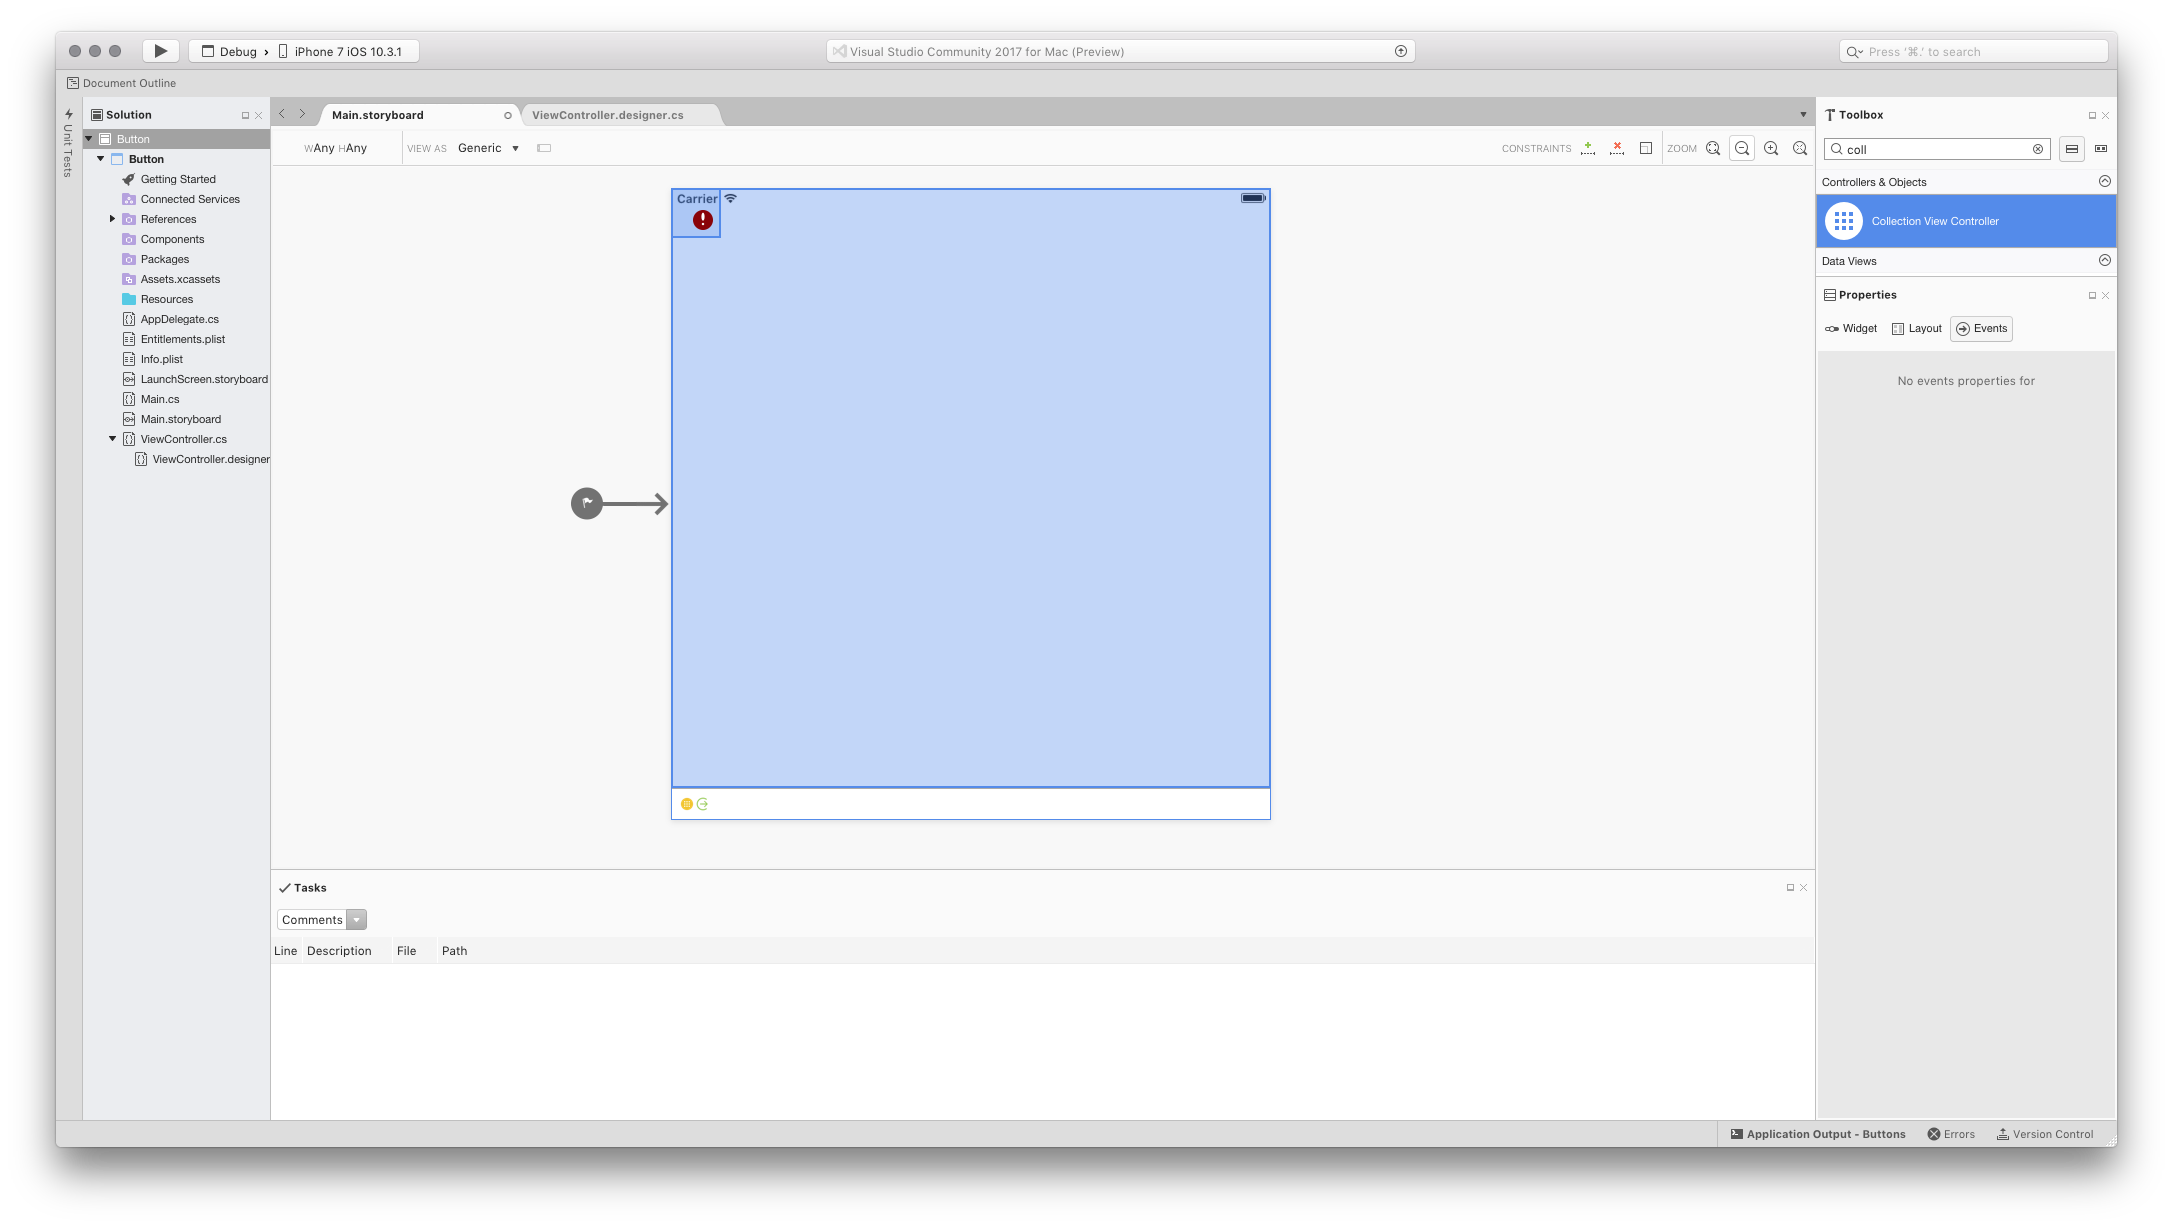
簡単な例として、新しい Xamarin.iOS プロジェクトを開始し、Main.storyboard ファイルを編集します。 UICollectionViewController をデザイン領域にドラッグします。
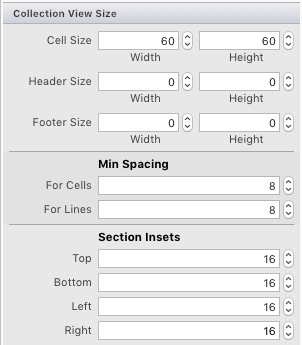
コレクション ビューを選択します (ドキュメント アウトラインからこれを行うのが最も簡単な場合があります)。 Properties Pad の [レイアウト] タブで、次のスクリーンショットに示すように、以下のサイズを設定します。
- セル サイズ: 幅 – 60 | 高さ – 60
- ヘッダー サイズ: 幅 – 0 | 高さ – 0
- フッター サイズ: 幅 – 0 | 高さ – 0
- 最小スペース: セルの場合 – 8 | 線の場合 – 8
- セクション インセット: 上 - 16 | 下 - 16 | 左 - 16 | 右 - 16
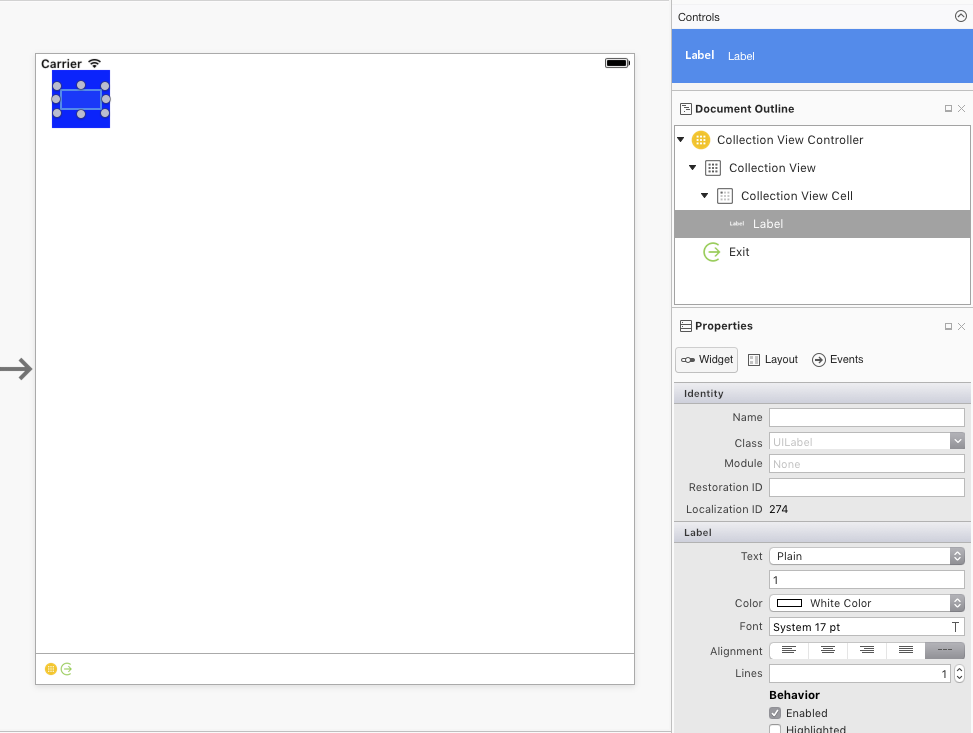
次に、既定のセルを編集します。
- 背景色を青に変更する
- セルのタイトルとして機能するラベルを追加する
- 再利用識別子をセルに設定する
サイズが変わってもラベルがセル内の中央に配置されるように制約を追加します。
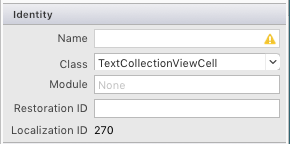
CollectionViewCell の Property Pad で、[クラス] を TextCollectionViewCell に設定します。
[コレクションの再利用可能なビュー] を Cell に設定します。
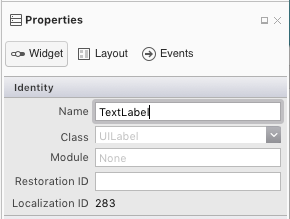
最後に、ラベルを選択し、TextLabel という名前を付けます。
TextCollectionViewCell クラスを編集し、次のプロパティを追加します。
using System;
using Foundation;
using UIKit;

namespace CollectionView
{
  public partial class TextCollectionViewCell : UICollectionViewCell
  {
    #region Computed Properties
    public string Title {
      get { return TextLabel.Text; }
      set { TextLabel.Text = value; }
    }
    #endregion

    #region Constructors
    public TextCollectionViewCell (IntPtr handle) : base (handle)
    {
    }
    #endregion
  }
}
ここでは、ラベルの Text プロパティがセルのタイトルとして公開されるため、コードから設定できます。
新しい C# クラスをプロジェクトに追加し、WaterfallCollectionSource という名前を付けます。 ファイルを編集し、次のようにします。
using System;
using Foundation;
using UIKit;
using System.Collections.Generic;

namespace CollectionView
{
  public class WaterfallCollectionSource : UICollectionViewDataSource
  {
    #region Computed Properties
    public WaterfallCollectionView CollectionView { get; set;}
    public List<int> Numbers { get; set; } = new List<int> ();
    #endregion

    #region Constructors
    public WaterfallCollectionSource (WaterfallCollectionView collectionView)
    {
      // Initialize
      CollectionView = collectionView;

      // Init numbers collection
      for (int n = 0; n < 100; ++n) {
        Numbers.Add (n);
      }
    }
    #endregion

    #region Override Methods
    public override nint NumberOfSections (UICollectionView collectionView) {
      // We only have one section
      return 1;
    }

    public override nint GetItemsCount (UICollectionView collectionView, nint section) {
      // Return the number of items
      return Numbers.Count;
    }

    public override UICollectionViewCell GetCell (UICollectionView collectionView, NSIndexPath indexPath)
    {
      // Get a reusable cell and set {~~it's~>its~~} title from the item
      var cell = collectionView.DequeueReusableCell ("Cell", indexPath) as TextCollectionViewCell;
      cell.Title = Numbers [(int)indexPath.Item].ToString();

      return cell;
    }

    public override bool CanMoveItem (UICollectionView collectionView, NSIndexPath indexPath) {
      // We can always move items
      return true;
    }

    public override void MoveItem (UICollectionView collectionView, NSIndexPath sourceIndexPath, NSIndexPath destinationIndexPath)
    {
      // Reorder our list of items
      var item = Numbers [(int)sourceIndexPath.Item];
      Numbers.RemoveAt ((int)sourceIndexPath.Item);
      Numbers.Insert ((int)destinationIndexPath.Item, item);
    }
    #endregion
  }
}
このクラスは、コレクション ビューのデータ ソースになり、コレクション内の各セルの情報が提供されます。
コレクション内の項目をドラッグして並べ替えることができるように、MoveItem メソッドが実装されていることに注目してください。
プロジェクトに別の新しい C# クラスを追加し、WaterfallCollectionDelegate という名前を付けます。 このファイルを編集し、次のようにします。
using System;
using Foundation;
using UIKit;
using System.Collections.Generic;

namespace CollectionView
{
  public class WaterfallCollectionDelegate : UICollectionViewDelegate
  {
    #region Computed Properties
    public WaterfallCollectionView CollectionView { get; set;}
    #endregion

    #region Constructors
    public WaterfallCollectionDelegate (WaterfallCollectionView collectionView)
    {

      // Initialize
      CollectionView = collectionView;

    }
    #endregion

    #region Overrides Methods
    public override bool ShouldHighlightItem (UICollectionView collectionView, NSIndexPath indexPath) {
      // Always allow for highlighting
      return true;
    }

    public override void ItemHighlighted (UICollectionView collectionView, NSIndexPath indexPath)
    {
      // Get cell and change to green background
      var cell = collectionView.CellForItem(indexPath);
      cell.ContentView.BackgroundColor = UIColor.FromRGB(183,208,57);
    }

    public override void ItemUnhighlighted (UICollectionView collectionView, NSIndexPath indexPath)
    {
      // Get cell and return to blue background
      var cell = collectionView.CellForItem(indexPath);
      cell.ContentView.BackgroundColor = UIColor.FromRGB(164,205,255);
    }
    #endregion
  }
}
これは、コレクション ビューのデリゲートとして機能します。 ユーザーがコレクション ビューでセルを操作するときにそれを強調表示するために、メソッドがオーバーライドされました。
プロジェクトに最後の 1 つの C# クラスを追加し、WaterfallCollectionView という名前を付けます。 このファイルを編集し、次のようにします。
using System;
using UIKit;
using System.Collections.Generic;
using Foundation;

namespace CollectionView
{
  [Register("WaterfallCollectionView")]
  public class WaterfallCollectionView : UICollectionView
  {

    #region Constructors
    public WaterfallCollectionView (IntPtr handle) : base (handle)
    {
    }
    #endregion

    #region Override Methods
    public override void AwakeFromNib ()
    {
      base.AwakeFromNib ();

      // Initialize
      DataSource = new WaterfallCollectionSource(this);
      Delegate = new WaterfallCollectionDelegate(this);

    }
    #endregion
  }
}
上で作成した DataSource と Delegate は、コレクション ビューがストーリーボード (または .xib ファイル) から構築されるときに設定されることに注目してください。
Main.storyboard ファイルをもう一度編集し、コレクション ビューを選択し、[プロパティ] に切り替えます。 [クラス] を、上で定義したカスタム WaterfallCollectionView クラスに設定します。
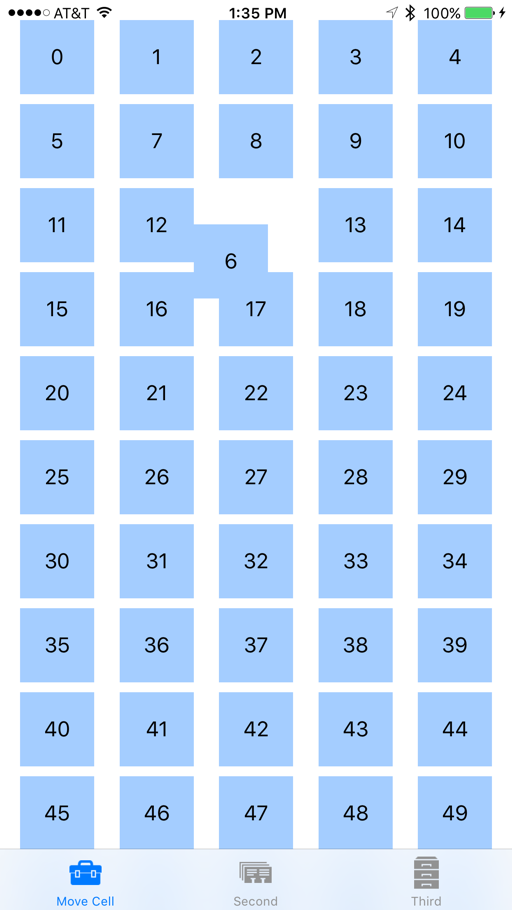
UI に加えた変更を保存し、アプリを実行します。 ユーザーがリストからある項目を選択して新しい場所にドラッグした場合、他の項目は、その項目の邪魔にならないように移動したときに自動的にアニメーション化されます。 ユーザーが新しい場所で項目をドロップすると、その場所に固定されます。 次に例を示します。
カスタム ジェスチャ認識エンジンの使用
UICollectionViewController を使用できず、通常の UIViewController を使う必要がある場合、またはドラッグ アンド ドロップ ジェスチャをより詳細に制御する場合は、独自のカスタム ジェスチャ認識エンジンを作成し、ビューが読み込まれるときにコレクション ビューに追加できます。 次に例を示します。
public override void ViewDidLoad ()
{
  base.ViewDidLoad ();

  // Create a custom gesture recognizer
  var longPressGesture = new UILongPressGestureRecognizer ((gesture) => {

    // Take action based on state
    switch(gesture.State) {
    case UIGestureRecognizerState.Began:
      var selectedIndexPath = CollectionView.IndexPathForItemAtPoint(gesture.LocationInView(View));
      if (selectedIndexPath !=null) {
        CollectionView.BeginInteractiveMovementForItem(selectedIndexPath);
      }
      break;
    case UIGestureRecognizerState.Changed:
      CollectionView.UpdateInteractiveMovementTargetPosition(gesture.LocationInView(View));
      break;
    case UIGestureRecognizerState.Ended:
      CollectionView.EndInteractiveMovement();
      break;
    default:
      CollectionView.CancelInteractiveMovement();
      break;
    }

  });

  // Add the custom recognizer to the collection view
  CollectionView.AddGestureRecognizer(longPressGesture);
}
ここでは、コレクション ビューに追加されたいくつかの新しいメソッドを使用して、ドラッグ操作を実装および制御します。
BeginInteractiveMovementForItem- 移動操作の開始をマークします。UpdateInteractiveMovementTargetPosition- 項目の場所が更新されると送信されます。EndInteractiveMovement- 項目移動の終了をマークします。CancelInteractiveMovement- 移動操作をキャンセルしているユーザーをマークします。
アプリケーションを実行すると、ドラッグ操作は、コレクション ビューに付属する既定のドラッグ ジェスチャ認識エンジンとまったく同じように動作します。
カスタム レイアウトと並べ替え
iOS 9 では、コレクション ビューでドラッグによる並べ替えとカスタム レイアウトを操作するための新しいメソッドがいくつか追加されました。 この機能について調べるために、カスタム レイアウトをコレクションに追加しましょう。
まず、WaterfallCollectionLayout という新しい C# クラスをプロジェクトに追加します。 それを編集し、次のようにします。
using System;
using Foundation;
using UIKit;
using System.Collections.Generic;
using CoreGraphics;

namespace CollectionView
{
  [Register("WaterfallCollectionLayout")]
  public class WaterfallCollectionLayout : UICollectionViewLayout
  {
    #region Private Variables
    private int columnCount = 2;
    private nfloat minimumColumnSpacing = 10;
    private nfloat minimumInterItemSpacing = 10;
    private nfloat headerHeight = 0.0f;
    private nfloat footerHeight = 0.0f;
    private UIEdgeInsets sectionInset = new UIEdgeInsets(0, 0, 0, 0);
    private WaterfallCollectionRenderDirection itemRenderDirection = WaterfallCollectionRenderDirection.ShortestFirst;
    private Dictionary<nint,UICollectionViewLayoutAttributes> headersAttributes = new Dictionary<nint, UICollectionViewLayoutAttributes>();
    private Dictionary<nint,UICollectionViewLayoutAttributes> footersAttributes = new Dictionary<nint, UICollectionViewLayoutAttributes>();
    private List<CGRect> unionRects = new List<CGRect>();
    private List<nfloat> columnHeights = new List<nfloat>();
    private List<UICollectionViewLayoutAttributes> allItemAttributes = new List<UICollectionViewLayoutAttributes>();
    private List<List<UICollectionViewLayoutAttributes>> sectionItemAttributes = new List<List<UICollectionViewLayoutAttributes>>();
    private nfloat unionSize = 20;
    #endregion

    #region Computed Properties
    [Export("ColumnCount")]
    public int ColumnCount {
      get { return columnCount; }
      set {
        WillChangeValue ("ColumnCount");
        columnCount = value;
        DidChangeValue ("ColumnCount");

        InvalidateLayout ();
      }
    }

    [Export("MinimumColumnSpacing")]
    public nfloat MinimumColumnSpacing {
      get { return minimumColumnSpacing; }
      set {
        WillChangeValue ("MinimumColumnSpacing");
        minimumColumnSpacing = value;
        DidChangeValue ("MinimumColumnSpacing");

        InvalidateLayout ();
      }
    }

    [Export("MinimumInterItemSpacing")]
    public nfloat MinimumInterItemSpacing {
      get { return minimumInterItemSpacing; }
      set {
        WillChangeValue ("MinimumInterItemSpacing");
        minimumInterItemSpacing = value;
        DidChangeValue ("MinimumInterItemSpacing");

        InvalidateLayout ();
      }
    }

    [Export("HeaderHeight")]
    public nfloat HeaderHeight {
      get { return headerHeight; }
      set {
        WillChangeValue ("HeaderHeight");
        headerHeight = value;
        DidChangeValue ("HeaderHeight");

        InvalidateLayout ();
      }
    }

    [Export("FooterHeight")]
    public nfloat FooterHeight {
      get { return footerHeight; }
      set {
        WillChangeValue ("FooterHeight");
        footerHeight = value;
        DidChangeValue ("FooterHeight");

        InvalidateLayout ();
      }
    }

    [Export("SectionInset")]
    public UIEdgeInsets SectionInset {
      get { return sectionInset; }
      set {
        WillChangeValue ("SectionInset");
        sectionInset = value;
        DidChangeValue ("SectionInset");

        InvalidateLayout ();
      }
    }

    [Export("ItemRenderDirection")]
    public WaterfallCollectionRenderDirection ItemRenderDirection {
      get { return itemRenderDirection; }
      set {
        WillChangeValue ("ItemRenderDirection");
        itemRenderDirection = value;
        DidChangeValue ("ItemRenderDirection");

        InvalidateLayout ();
      }
    }
    #endregion

    #region Constructors
    public WaterfallCollectionLayout ()
    {
    }

    public WaterfallCollectionLayout(NSCoder coder) : base(coder) {

    }
    #endregion

    #region Public Methods
    public nfloat ItemWidthInSectionAtIndex(int section) {

      var width = CollectionView.Bounds.Width - SectionInset.Left - SectionInset.Right;
      return (nfloat)Math.Floor ((width - ((ColumnCount - 1) * MinimumColumnSpacing)) / ColumnCount);
    }
    #endregion

    #region Override Methods
    public override void PrepareLayout ()
    {
      base.PrepareLayout ();

      // Get the number of sections
      var numberofSections = CollectionView.NumberOfSections();
      if (numberofSections == 0)
        return;

      // Reset collections
      headersAttributes.Clear ();
      footersAttributes.Clear ();
      unionRects.Clear ();
      columnHeights.Clear ();
      allItemAttributes.Clear ();
      sectionItemAttributes.Clear ();

      // Initialize column heights
      for (int n = 0; n < ColumnCount; n++) {
        columnHeights.Add ((nfloat)0);
      }

      // Process all sections
      nfloat top = 0.0f;
      var attributes = new UICollectionViewLayoutAttributes ();
      var columnIndex = 0;
      for (nint section = 0; section < numberofSections; ++section) {
        // Calculate section specific metrics
        var minimumInterItemSpacing = (MinimumInterItemSpacingForSection == null) ? MinimumColumnSpacing :
          MinimumInterItemSpacingForSection (CollectionView, this, section);

        // Calculate widths
        var width = CollectionView.Bounds.Width - SectionInset.Left - SectionInset.Right;
        var itemWidth = (nfloat)Math.Floor ((width - ((ColumnCount - 1) * MinimumColumnSpacing)) / ColumnCount);

        // Calculate section header
        var heightHeader = (HeightForHeader == null) ? HeaderHeight :
          HeightForHeader (CollectionView, this, section);

        if (heightHeader > 0) {
          attributes = UICollectionViewLayoutAttributes.CreateForSupplementaryView (UICollectionElementKindSection.Header, NSIndexPath.FromRowSection (0, section));
          attributes.Frame = new CGRect (0, top, CollectionView.Bounds.Width, heightHeader);
          headersAttributes.Add (section, attributes);
          allItemAttributes.Add (attributes);

          top = attributes.Frame.GetMaxY ();
        }

        top += SectionInset.Top;
        for (int n = 0; n < ColumnCount; n++) {
          columnHeights [n] = top;
        }

        // Calculate Section Items
        var itemCount = CollectionView.NumberOfItemsInSection(section);
        List<UICollectionViewLayoutAttributes> itemAttributes = new List<UICollectionViewLayoutAttributes> ();

        for (nint n = 0; n < itemCount; n++) {
          var indexPath = NSIndexPath.FromRowSection (n, section);
          columnIndex = NextColumnIndexForItem (n);
          var xOffset = SectionInset.Left + (itemWidth + MinimumColumnSpacing) * (nfloat)columnIndex;
          var yOffset = columnHeights [columnIndex];
          var itemSize = (SizeForItem == null) ? new CGSize (0, 0) : SizeForItem (CollectionView, this, indexPath);
          nfloat itemHeight = 0.0f;

          if (itemSize.Height > 0.0f && itemSize.Width > 0.0f) {
            itemHeight = (nfloat)Math.Floor (itemSize.Height * itemWidth / itemSize.Width);
          }

          attributes = UICollectionViewLayoutAttributes.CreateForCell (indexPath);
          attributes.Frame = new CGRect (xOffset, yOffset, itemWidth, itemHeight);
          itemAttributes.Add (attributes);
          allItemAttributes.Add (attributes);
          columnHeights [columnIndex] = attributes.Frame.GetMaxY () + MinimumInterItemSpacing;
        }
        sectionItemAttributes.Add (itemAttributes);

        // Calculate Section Footer
        nfloat footerHeight = 0.0f;
        columnIndex = LongestColumnIndex();
        top = columnHeights [columnIndex] - MinimumInterItemSpacing + SectionInset.Bottom;
        footerHeight = (HeightForFooter == null) ? FooterHeight : HeightForFooter(CollectionView, this, section);

        if (footerHeight > 0) {
          attributes = UICollectionViewLayoutAttributes.CreateForSupplementaryView (UICollectionElementKindSection.Footer, NSIndexPath.FromRowSection (0, section));
          attributes.Frame = new CGRect (0, top, CollectionView.Bounds.Width, footerHeight);
          footersAttributes.Add (section, attributes);
          allItemAttributes.Add (attributes);
          top = attributes.Frame.GetMaxY ();
        }

        for (int n = 0; n < ColumnCount; n++) {
          columnHeights [n] = top;
        }
      }

      var i =0;
      var attrs = allItemAttributes.Count;
      while(i < attrs) {
        var rect1 = allItemAttributes [i].Frame;
        i = (int)Math.Min (i + unionSize, attrs) - 1;
        var rect2 = allItemAttributes [i].Frame;
        unionRects.Add (CGRect.Union (rect1, rect2));
        i++;
      }

    }

    public override CGSize CollectionViewContentSize {
      get {
        if (CollectionView.NumberOfSections () == 0) {
          return new CGSize (0, 0);
        }

        var contentSize = CollectionView.Bounds.Size;
        contentSize.Height = columnHeights [0];
        return contentSize;
      }
    }

    public override UICollectionViewLayoutAttributes LayoutAttributesForItem (NSIndexPath indexPath)
    {
      if (indexPath.Section >= sectionItemAttributes.Count) {
        return null;
      }

      if (indexPath.Item >= sectionItemAttributes [indexPath.Section].Count) {
        return null;
      }

      var list = sectionItemAttributes [indexPath.Section];
      return list [(int)indexPath.Item];
    }

    public override UICollectionViewLayoutAttributes LayoutAttributesForSupplementaryView (NSString kind, NSIndexPath indexPath)
    {
      var attributes = new UICollectionViewLayoutAttributes ();

      switch (kind) {
      case "header":
        attributes = headersAttributes [indexPath.Section];
        break;
      case "footer":
        attributes = footersAttributes [indexPath.Section];
        break;
      }

      return attributes;
    }

    public override UICollectionViewLayoutAttributes[] LayoutAttributesForElementsInRect (CGRect rect)
    {
      var begin = 0;
      var end = unionRects.Count;
      List<UICollectionViewLayoutAttributes> attrs = new List<UICollectionViewLayoutAttributes> ();

      for (int i = 0; i < end; i++) {
        if (rect.IntersectsWith(unionRects[i])) {
          begin = i * (int)unionSize;
        }
      }

      for (int i = end - 1; i >= 0; i--) {
        if (rect.IntersectsWith (unionRects [i])) {
          end = (int)Math.Min ((i + 1) * (int)unionSize, allItemAttributes.Count);
          break;
        }
      }

      for (int i = begin; i < end; i++) {
        var attr = allItemAttributes [i];
        if (rect.IntersectsWith (attr.Frame)) {
          attrs.Add (attr);
        }
      }

      return attrs.ToArray();
    }

    public override bool ShouldInvalidateLayoutForBoundsChange (CGRect newBounds)
    {
      var oldBounds = CollectionView.Bounds;
      return (newBounds.Width != oldBounds.Width);
    }
    #endregion

    #region Private Methods
    private int ShortestColumnIndex() {
      var index = 0;
      var shortestHeight = nfloat.MaxValue;
      var n = 0;

      // Scan each column for the shortest height
      foreach (nfloat height in columnHeights) {
        if (height < shortestHeight) {
          shortestHeight = height;
          index = n;
        }
        ++n;
      }

      return index;
    }

    private int LongestColumnIndex() {
      var index = 0;
      var longestHeight = nfloat.MinValue;
      var n = 0;

      // Scan each column for the shortest height
      foreach (nfloat height in columnHeights) {
        if (height > longestHeight) {
          longestHeight = height;
          index = n;
        }
        ++n;
      }

      return index;
    }

    private int NextColumnIndexForItem(nint item) {
      var index = 0;

      switch (ItemRenderDirection) {
      case WaterfallCollectionRenderDirection.ShortestFirst:
        index = ShortestColumnIndex ();
        break;
      case WaterfallCollectionRenderDirection.LeftToRight:
        index = ColumnCount;
        break;
      case WaterfallCollectionRenderDirection.RightToLeft:
        index = (ColumnCount - 1) - ((int)item / ColumnCount);
        break;
      }

      return index;
    }
    #endregion

    #region Events
    public delegate CGSize WaterfallCollectionSizeDelegate(UICollectionView collectionView, WaterfallCollectionLayout layout, NSIndexPath indexPath);
    public delegate nfloat WaterfallCollectionFloatDelegate(UICollectionView collectionView, WaterfallCollectionLayout layout, nint section);
    public delegate UIEdgeInsets WaterfallCollectionEdgeInsetsDelegate(UICollectionView collectionView, WaterfallCollectionLayout layout, nint section);

    public event WaterfallCollectionSizeDelegate SizeForItem;
    public event WaterfallCollectionFloatDelegate HeightForHeader;
    public event WaterfallCollectionFloatDelegate HeightForFooter;
    public event WaterfallCollectionEdgeInsetsDelegate InsetForSection;
    public event WaterfallCollectionFloatDelegate MinimumInterItemSpacingForSection;
    #endregion
  }
}
このクラスを使用して、カスタムの 2 列のウォーターフォール型のレイアウトをコレクション ビューに提供できます。
このコードでは、キーと値のコーディングを (WillChangeValue と DidChangeValue メソッドを介して) 使用して、このクラスの計算済みプロパティのデータ バインディングを提供します。
次に、WaterfallCollectionSource を編集し、次の変更と追加を行います。
private Random rnd = new Random();
...

public List<nfloat> Heights { get; set; } = new List<nfloat> ();
...

public WaterfallCollectionSource (WaterfallCollectionView collectionView)
{
  // Initialize
  CollectionView = collectionView;

  // Init numbers collection
  for (int n = 0; n < 100; ++n) {
    Numbers.Add (n);
    Heights.Add (rnd.Next (0, 100) + 40.0f);
  }
}
これにより、リストに表示される項目ごとにランダムな高さが作成されます。
次に、WaterfallCollectionView クラスを編集し、次のヘルパー プロパティを追加します。
public WaterfallCollectionSource Source {
  get { return (WaterfallCollectionSource)DataSource; }
}
これにより、カスタム レイアウトからデータ ソース (および項目の高さ) をより簡単に取得できるようになります。
最後に、ビュー コントローラーを編集し、次のコードを追加します。
public override void AwakeFromNib ()
{
  base.AwakeFromNib ();

  var waterfallLayout = new WaterfallCollectionLayout ();

  // Wireup events
  waterfallLayout.SizeForItem += (collectionView, layout, indexPath) => {
    var collection = collectionView as WaterfallCollectionView;
    return new CGSize((View.Bounds.Width-40)/3,collection.Source.Heights[(int)indexPath.Item]);
  };

  // Attach the custom layout to the collection
  CollectionView.SetCollectionViewLayout(waterfallLayout, false);
}
これにより、カスタム レイアウトのインスタンスが作成され、各項目のサイズを提供するようにイベントが設定され、新しいレイアウトがコレクション ビューにアタッチされます。
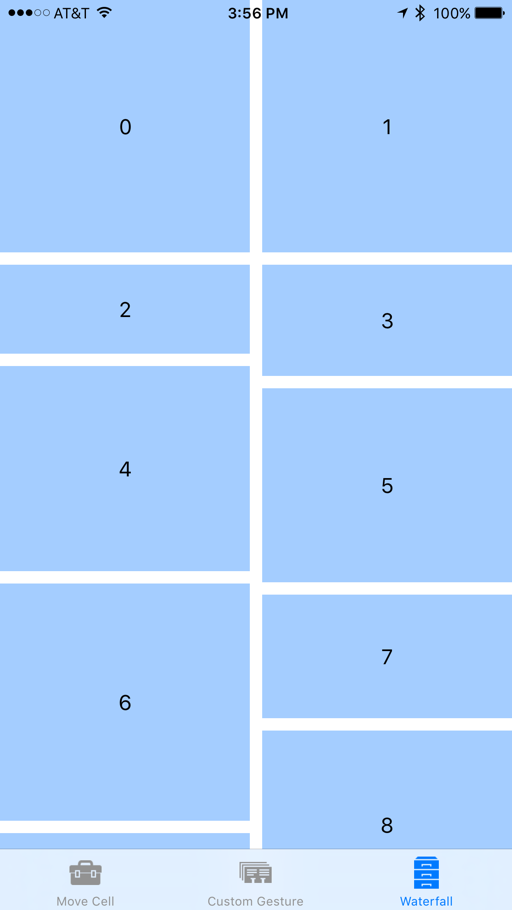
Xamarin.iOS アプリをもう一度実行すると、コレクション ビューは次のようになります。
以前と同様に引き続き項目をドラッグして並べ替えることができますが、項目がドロップされたときに新しい場所に合わせてサイズが変更されるようになります。
コレクション ビューの変更
以降のセクションでは、iOS 9 でコレクション ビューの各クラスに加えられた変更について詳しく説明します。
UICollectionView
iOS 9 の UICollectionView クラスに次の変更または追加が行われました。
BeginInteractiveMovementForItem– ドラッグ操作の開始をマークします。CancelInteractiveMovement– ユーザーがドラッグ操作をキャンセルしたことをコレクション ビューに通知します。EndInteractiveMovement– ユーザーがドラッグ操作を完了したことをコレクション ビューに通知します。GetIndexPathsForVisibleSupplementaryElements- コレクション ビュー セクションのヘッダーまたはフッターのindexPathを返します。GetSupplementaryView– 指定されたヘッダーまたはフッターを返します。GetVisibleSupplementaryViews– 表示されているすべてのヘッダーとフッターのリストを返します。UpdateInteractiveMovementTargetPosition– ユーザーがドラッグ操作中に項目を移動したか、移動していることをコレクション ビューに通知します。
UICollectionViewController
iOS 9 の UICollectionViewController クラスに対して、次の変更または追加が行われました。
InstallsStandardGestureForInteractiveMovement-trueの場合は、ドラッグによる並べ替えを自動的にサポートする新しいジェスチャ認識エンジンが使用されます。CanMoveItem– 特定の項目をドラッグして並べ替えることができるかどうかをコレクション ビューに通知します。GetTargetContentOffset– 特定のコレクション ビュー項目のオフセットを取得するために使用されます。GetTargetIndexPathForMove- ドラッグ操作の特定の項目のindexPathを取得します。MoveItem– リスト内の特定の項目の順序を移動します。
UICollectionViewDataSource
iOS 9 の UICollectionViewDataSource クラスに対して、次の変更または追加が行われました。
CanMoveItem– 特定の項目をドラッグして並べ替えることができるかどうかをコレクション ビューに通知します。MoveItem– リスト内の特定の項目の順序を移動します。
UICollectionViewDelegate
iOS 9 の UICollectionViewDelegate クラスに対して、次の変更または追加が行われました。
GetTargetContentOffset– 特定のコレクション ビュー項目のオフセットを取得するために使用されます。GetTargetIndexPathForMove- ドラッグ操作の特定の項目のindexPathを取得します。
UICollectionViewFlowLayout
iOS 9 の UICollectionViewFlowLayout クラスに対して、次の変更または追加が行われました。
SectionFootersPinToVisibleBounds- セクション フッターを、表示されているコレクション ビューの境界に固定します。SectionHeadersPinToVisibleBounds– セクション ヘッダーを、表示されているコレクション ビューの境界に固定します。
UICollectionViewLayout
iOS 9 の UICollectionViewLayout クラスに対して、次の変更または追加が行われました。
GetInvalidationContextForEndingInteractiveMovementOfItems– ユーザーがドラッグを終了またはキャンセルしたときに、ドラッグ操作の終了時に無効化コンテキストを返します。GetInvalidationContextForInteractivelyMovingItems– ドラッグ操作の開始時に無効化コンテキストを返します。GetLayoutAttributesForInteractivelyMovingItem– 項目のドラッグ中に特定の項目のレイアウト属性を取得します。GetTargetIndexPathForInteractivelyMovingItem- 項目のドラッグ時に特定の位置にある項目のindexPathを返します。
UICollectionViewLayoutAttributes
iOS 9 の UICollectionViewLayoutAttributes クラスに対して、次の変更または追加が行われました。
CollisionBoundingPath– ドラッグ操作中の 2 つの項目の競合パスを返します。CollisionBoundsType- ドラッグ操作中に発生した競合の種類を (UIDynamicItemCollisionBoundsTypeとして) 返します。
UICollectionViewLayoutInvalidationContext
iOS 9 の UICollectionViewLayoutInvalidationContext クラスに対して、次の変更または追加が行われました。
InteractiveMovementTarget– ドラッグ操作のターゲット項目を返します。PreviousIndexPathsForInteractivelyMovingItems- ドラッグによる並べ替え操作に関係する他の項目のindexPathsを返します。TargetIndexPathsForInteractivelyMovingItems- ドラッグによる並べ替え操作の結果として並べ替えられる項目のindexPathsを返します。
UICollectionViewSource
iOS 9 の UICollectionViewSource クラスに対して、次の変更または追加が行われました。
CanMoveItem– 特定の項目をドラッグして並べ替えることができるかどうかをコレクション ビューに通知します。GetTargetContentOffset– ドラッグによる並べ替える操作によって移動される項目のオフセットを返します。GetTargetIndexPathForMove- ドラッグによる並べ替え操作中に移動される項目のindexPathを返します。MoveItem– リスト内の特定の項目の順序を移動します。
まとめ
この記事では、iOS 9 でのコレクション ビューの変更についてと、Xamarin.iOS でそれらを実装する方法について説明しました。 コレクション ビューでの単純なドラッグによる並べ替えアクションの実装、ドラッグによる並べ替えでのカスタムジェスチャ認識エンジンの使用、ドラッグによる並べ替えがどのようにカスタム コレクション ビューのレイアウトに影響するかについて説明しました。
![[コレクションの再利用可能なビュー] を [セル] に設定します](uicollectionview-images/quick06.png)
