How to: Add nodes to the workspace from the XML Schema Explorer
Applies to: ![]() Visual Studio
Visual Studio ![]() Visual Studio for Mac
Visual Studio for Mac
Note
This article applies to Visual Studio 2017. If you're looking for the latest Visual Studio documentation, see Visual Studio documentation. We recommend upgrading to the latest version of Visual Studio. Download it here
This topic explains how to add nodes to the XML Schema Designer workspace from the XML Schema Explorer. This can be achieved by dragging and dropping nodes from the XML Schema Explorer onto an XSD Designer view, or by using the XML Schema Explorer's context menu. You can also add nodes that are highlighted as a result of a search performed by the XML Schema Explorer. For more information, see How to: Add schema set search result nodes to the workspace.
Note
Only global nodes can be added to the XML Schema Designer workspace.
To add nodes through the XML Explorer context menu
Follow the steps in How to: Create and edit an XSD schema file.
Right click on the
PurchaseOrderTypenode in the XSD Explorer. Select Show in Graph View.The
purchaseOrderTypenode appears on the design surface of the Graph View.
To drag and drop a node on to a view
Right-click on the
PurchaseOrderTypenode in the Graph View. Select Show in XML Schema Explorer.The node is highlighted in the XML Schema Explorer.
Right click on the
PurchaseOrderTypenode in the XML Schema Explorer and select Show All References.The
purchaseOrdernode is highlighted.Drag the
purchaseOrdernode on to the Graph View.The
purchaseOrdernode and thePurchaseOrderTypenode appear next to each other on the design surface of the Graph View. Because the two nodes are related (thepurchaseOrderelement is of thePurchaseOrderTypetype), an arrow is drawn between them.
To add nodes using the Schema Explorer search capability
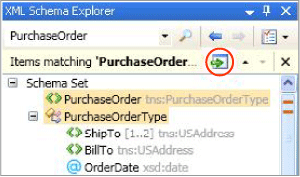
Type "purchaseOrder" in the search text box of the XML Explorer toolbar and click on the search button.

The search results are highlighted in the XML Schema Explorer and marked by ticks on the vertical scroll bar.
Add the search results to the workspace by clicking the Add highlighted nodes to Workspace button on the summary results pane.

The
purchaseOrdernode and thePurchaseOrderTypenode appear next to each other on the design surface of the Graph View. Because the two nodes are related (thepurchaseOrderelement is of thePurchaseOrderTypetype), an arrow is drawn between them.