サンプル: CRUD 操作を使用したカスタム仮想テーブル プロバイダー
このサンプルは、カスタム データ プロバイダーを実装して、作成、取得、更新、および削除操作をサポートする仮想テーブルの作成方法を表しています。 これらの操作ごとに、汎用プラグインを実装し、プラグイン登録ツールを使用してそれらを登録し、仮想テーブル データ ソースが仮想テーブルを作成できるようにします。
データ プロバイダーとプラグイン開発の詳細については、カスタム データ プロバイダー を参照してください
データ ソースの詳細
このチュートリアルでは、外部 SQL Server に単純なテーブルを設定して、仮想テーブルを作成します。 この例で使用しているテーブル名は VETicket です。
ヒント
テーブルまたは列の名前を変更する場合は、プラグイン コードを更新します。
| 列名 | データの種類 | 目的 |
|---|---|---|
| チケット ID | 一意の識別子、主キー | テーブルの主キー。 |
| 重要度 | Integer | チケットの重大度。 |
| 件名 | String | チケットの説明です。 |
カスタム データ プロバイダーが仮想テーブルを作成できるようにするには、4 つの手順があります。
手順 1: CRUD プラグインを実装してアセンブリを登録する
手順 2: データ プロバイダーを作成し、プロバイダーにプラグインを追加する
手順 3: Dataverse 環境で仮想テーブルを作成する
手順 4: 仮想テーブルを使用してレコードを作成、更新、表示、および削除する
手順 1: CRUD プラグインを実装してアセンブリを登録する
プラグイン プロジェクトを作成し、次の NuGet パッケージをインストールします。 この例のソリューションの名前は StubProvider です。
組み立て URL Microsoft.CrmSdk.CoreAssemblies https://www.nuget.org/packages/Microsoft.CrmSdk.CoreAssemblies Microsoft.CrmSdk.Data https://www.nuget.org/packages/Microsoft.CrmSdk.Data Microsoft.CrmSdk.Deployment https://www.nuget.org/packages/Microsoft.CrmSdk.Deployment Microsoft.CrmSdk.Workflow https://www.nuget.org/packages/Microsoft.CrmSdk.Workflow Microsoft.CrmSdk.XrmTooling.CoreAssembly https://www.nuget.org/packages/Microsoft.CrmSdk.XrmTooling.CoreAssembly Microsoft.IdentityModel.Clients.ActiveDirectory https://www.nuget.org/packages/Microsoft.IdentityModel.Clients.ActiveDirectory Microsoft.Rest.ClientRuntime https://www.nuget.org/packages/Microsoft.Rest.ClientRuntime Newtonsoft.Json https://www.nuget.org/packages/Newtonsoft.Json/13.0.1-beta2 次の 6 つのクラス ファイルをソリューションに追加します。 各クラス ファイルに、次の using ステートメントを追加します
using System;
using System.Collections.Generic;
using System.Data.SqlClient;
using System.Linq; using System.Text;
using System.Threading.Tasks;
using Microsoft.Xrm.Sdk;
using Microsoft.Xrm.Sdk.Extensions;
using Microsoft.Xrm.Sdk.Data.Exceptions;
using Newtonsoft.Json;
ヒント
これらの各クラス ファイルで、設定したソース テーブル名と一致するようにテーブル名を更新します。 この例では、VETicket をソース テーブル名として使用しています。
クラス ファイル名 目的 Connection.cs このクラスには、外部 SQL データ ソースへの接続を作成および管理するためのコードが含まれています。 これには、外部データベースに固有の接続文字列パラメーターと、接続を確立するために必要な SQL ベースの認証情報が含まれます。 Dataverse で仮想テーブルを作成するデータベース サーバー、ユーザー ID、パスワード、およびテーブル名に対応する値を置き換えます。 CreatePlugin.cs このクラスには、仮想テーブルの作成操作を処理するコードが含まれています。 UpdatePlugin.cs このクラスには、仮想テーブルでレコードの更新を処理するコードが含まれています。 RetrievePlugin.cs このクラスには、仮想テーブルから特定のレコードを取得するコードが含まれています。 RetrieveMultiplePlugin.cs このクラスには、仮想テーブルから複数のレコードをフェッチするためのコードが含まれています。 DeletePlugin.cs このクラスには、仮想テーブルのレコードを削除できるコードが含まれています。
アプリケーション コードでの接続文字列またはユーザー名/パスワード認証の使用については、次の重要な情報をお読みください。
重要
Microsoft では、利用可能な最も安全な認証フローを使用することをお勧めします。 この記事で説明する認証フローは、アプリケーションに対する非常に高い信頼を必要とし、他のフローには存在しないリスクを伴います。 このフローは、マネージド ID など、他のより安全なフローが実行できない場合にのみ使用してください。
Connection.cs のコード
 public static class Connection
{
   public static SqlConnection GetConnection()
   {
       try
       {
           //sample database to connect to
           SqlConnectionStringBuilder builder = new SqlConnectionStringBuilder();
           builder.DataSource = "Enter name or network address of the SQL Server";
           builder.UserID = "Enter User Name";
           builder.Password = "Enter password";
           builder.InitialCatalog = "Enter database details";
           SqlConnection connection = new SqlConnection(builder.ConnectionString);
           return connection;
       }
       catch (SqlException e)
       {
           Console.WriteLine(e.ToString());
           throw;
       }
   }
}
CreatePlugin.cs のコード
public class CreatePlugin : IPlugin
{
    public void Execute(IServiceProvider serviceProvider)
    {
        var context = serviceProvider.Get<IPluginExecutionContext>();
        if (context.InputParameters.Contains("Target") && context.InputParameters["Target"] is Entity)
        {
            Entity entity = (Entity)context.InputParameters["Target"];
            Guid id = Guid.NewGuid();
            //change the table name below to the source table name you have created
            string cmdString = "INSERT INTO VETicket (TicketID,Name,Severity) VALUES (@TicketID, @Name, @Severity)";
            SqlConnection connection = Connection.GetConnection();
            using (SqlCommand command = connection.CreateCommand())
            {
                command.CommandText = cmdString;
                command.Parameters.AddWithValue("@TicketID", id);
                command.Parameters.AddWithValue("@Name", entity["new_name"]);
                command.Parameters.AddWithValue("@Severity", entity["new_severity"]);
                connection.Open();
                try
                {
                    var numRecords = command.ExecuteNonQuery();
                    Console.WriteLine("inserted {0} records", numRecords);
                }
                finally
                {
                    connection.Close();
                }
                // other codes.
            }
            context.OutputParameters["id"] = id;
        }
    }
}
UpdatePlugin.cs のコード
public class UpdatePlugin: IPlugin {
    public void Execute(IServiceProvider serviceProvider)
    {
        var context = serviceProvider.Get<IPluginExecutionContext>();
        Guid id = Guid.Empty;
        if (context.InputParameters.Contains("Target") && context.InputParameters["Target"] is Entity)
        {
            Entity entity = (Entity)context.InputParameters["Target"];
            //change the table name below to the source table name you have created
            string cmdString = "UPDATE VETicket SET {0} WHERE TicketID=@TicketID";
            SqlConnection connection = Connection.GetConnection();
            using (SqlCommand command = connection.CreateCommand())
            {
                command.Parameters.AddWithValue("@TicketID", entity["new_ticketid"]);
                List<string> setList = new List<string>();
                if (entity.Attributes.Contains("new_name"))
                {
                    command.Parameters.AddWithValue("@Name", entity["new_name"]);
                    setList.Add("Name=@Name");
                }
                if (entity.Attributes.Contains("new_severity"))
                {
                    command.Parameters.AddWithValue("@Severity", entity["new_severity"]);
                    setList.Add("Severity=@Severity");
                }
                command.CommandText = string.Format(cmdString, string.Join(",", setList)); connection.Open();
                try
                {
                    var numRecords = command.ExecuteNonQuery();
                    Console.WriteLine("updated {0} records", numRecords);
                }
                finally
                {
                    connection.Close();
                }
                // other codes.
            }
        }
    }
}
RetrievePlugin.cs のコード
public class RetrievePlugin : IPlugin
{
    public void Execute(IServiceProvider serviceProvider)
    {
        var context = serviceProvider.Get<IPluginExecutionContext>();
        Guid id = Guid.Empty;
        if (context.InputParameters.Contains("Target") && context.InputParameters["Target"] is EntityReference)
        {
            EntityReference entityRef = (EntityReference)context.InputParameters["Target"];
            Entity e = new Entity("new_ticket");
            //change the table name below to the source table name you have created
            string cmdString = "SELECT TicketID, Severity, Name FROM VETicket WHERE TicketID=@TicketID";
            SqlConnection connection = Connection.GetConnection();
            using (SqlCommand command = connection.CreateCommand())
            {
                command.CommandText = cmdString;
                command.Parameters.AddWithValue("@TicketID", entityRef.Id);
                connection.Open();
                try
                {
                    using (SqlDataReader reader = command.ExecuteReader())
                    {
                        if (reader.Read())
                        {
                            e.Attributes.Add("new_ticketid", reader.GetGuid(0));
                            e.Attributes.Add("new_severity", reader.GetInt32(1));
                            e.Attributes.Add("new_name", reader.GetString(2));
                        }
                    }
                }
                finally
                {
                    connection.Close();
                }
                // other codes.
            }
            context.OutputParameters["BusinessEntity"] = e;
        }
    }
}
RetrieveMultiplePlugin.cs のコード
public class RetrieveMultiplePlugin : IPlugin
{
    public void Execute(IServiceProvider serviceProvider)
    {
        var context = serviceProvider.Get<IPluginExecutionContext>();
        EntityCollection collection = new EntityCollection();
        //change the table name below to the source table name you have created
        string cmdString = "SELECT TicketID, Severity, Name FROM VETicket";
        SqlConnection connection = Connection.GetConnection();
        using (SqlCommand command = connection.CreateCommand())
        {
            command.CommandText = cmdString;
            connection.Open();
            try
            {
                using (SqlDataReader reader = command.ExecuteReader())
                {
                    while (reader.Read())
                    {
                        Entity e = new Entity("new_ticket");
                        e.Attributes.Add("new_ticketid", reader.GetGuid(0));
                        e.Attributes.Add("new_severity", reader.GetInt32(1));
                        e.Attributes.Add("new_name", reader.GetString(2));
                        collection.Entities.Add(e);
                    }
                }
            }
            finally
            {
                connection.Close();
            }
            context.OutputParameters["BusinessEntityCollection"] = collection;
        }
    }
}
DeletePlugin.cs のコード
public class DeletePlugin : IPlugin
{
    public void Execute(IServiceProvider serviceProvider)
    {
        var context = serviceProvider.Get<IPluginExecutionContext>();
        //comment
        Guid id = Guid.Empty;
        if (context.InputParameters.Contains("Target") && context.InputParameters["Target"] is EntityReference)
        {
            EntityReference entityRef = (EntityReference)context.InputParameters["Target"];
            id = entityRef.Id;
            //change the table name below to the source table name you have created
            string cmdString = "DELETE VETicket WHERE TicketID=@TicketID";
            SqlConnection connection = Connection.GetConnection();
            using (SqlCommand command = connection.CreateCommand())
            {
                command.CommandText = cmdString; command.Parameters.AddWithValue("@TicketID", id);
                connection.Open();
                try
                {
                    var numRecords = command.ExecuteNonQuery();
                    Console.WriteLine("deleted {0} records", numRecords);
                }
                finally
                {
                    connection.Close();
                }
                // other codes.
            }
        }
    }
}
ソリューションをコンパイルし、ビルドします。 これで、Dataverse 環境で登録するために使用できるアセンブリ ファイル (.dll) ができました。 このファイルは、solution folder/bin/Debug ディレクトリにあります。

プラグイン登録ツールを使用してアセンブリを登録します。 最新のプラグイン登録ツール パッケージは、NuGet で入手できます。
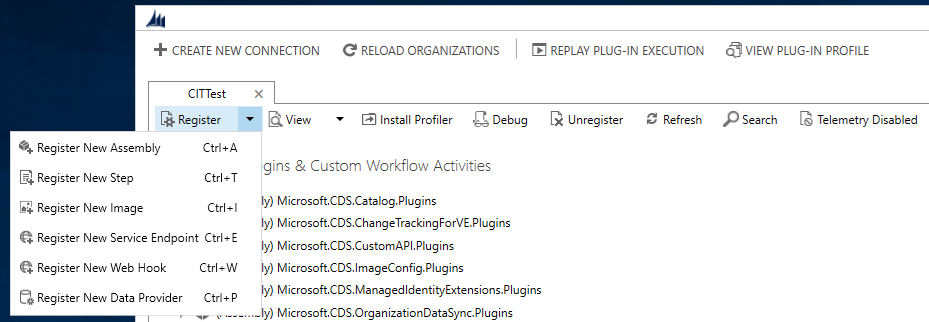
プラグイン登録ツールを開く。 アセンブリを登録するには、システム管理者権限が必要です。新しい接続を作成する を選択して、利用している Dataverse 環境に接続します。 登録 ドロップダウンを選択してから 新しいアセンブリの登録 を選択します。
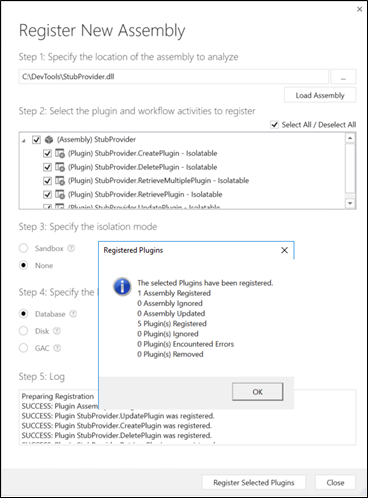
アセンブリ ファイルを選択し、プラグインを登録します。すべてのプラグイン (Create、Update、Delete、Retrieve、RetrieveMultiple プラグイン) が選択されていることを確認してください。
手順 2: データ プロバイダーを作成し、プロバイダーにプラグインを追加する
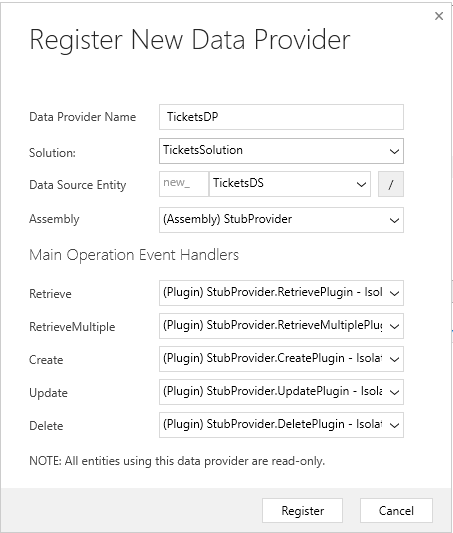
登録 ドロップダウンを選択してから 新しいデータ プロバイダーの登録 を選択します。
新しいデータ プロバイダーを登録する ダイアログで、次の詳細を入力します。
データ プロバイダー名 を入力します。
ソリューション オプションで、既存のソリューションを選択するか、ドロップダウンで新しいソリューションを作成します。 新しいソリューションを作成する場合は、ドロップダウンから NewSolution オプションを選択します。 新しいソリューションを作成する ダイアログで、必要な詳細を入力してから 保存 を選択します。
データ ソース テーブル (エンティティ) オプションで、新しいデータ ソースを作成する を選択します。 詳細を入力します。 データ ソースが、作成または選択したソリューションの一部であることを確認してください。
ヒント
Dataverse のデータ ソーステーブルは、プロバイダー プラグインに渡されるデータ ソース レコードの構成データを保持します。
登録された各プラグインをそれぞれの操作にマップします。
新しいデータ プロバイダーを登録します。
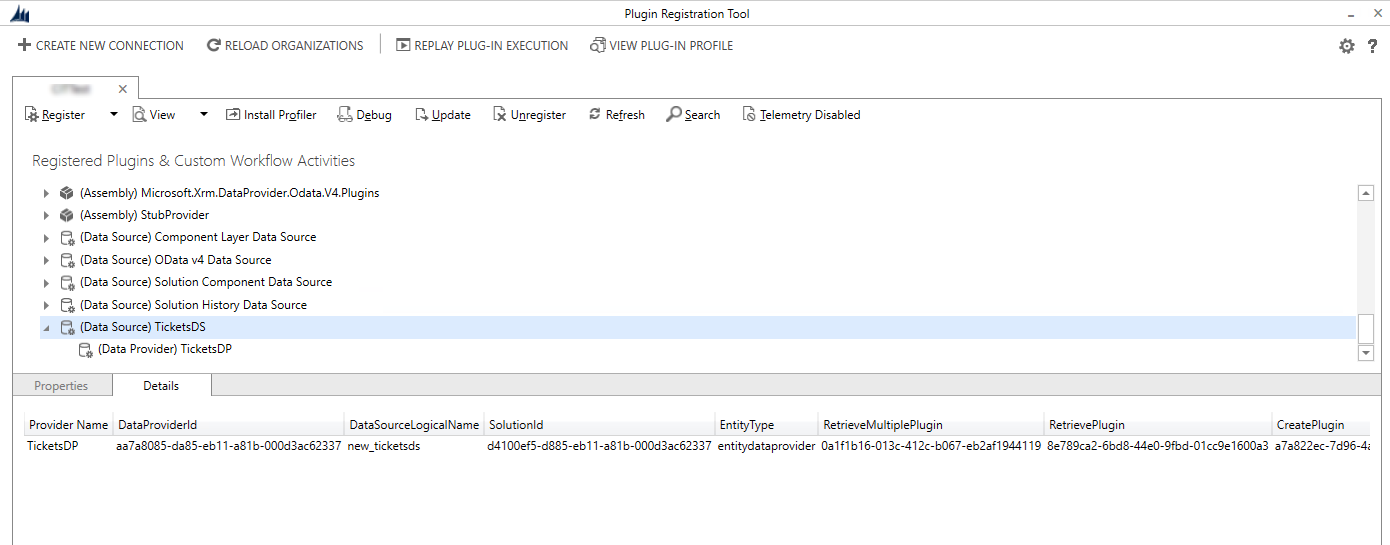
プラグイン登録ツールには、新しいデータ ソース レコードと関連するデータ プロバイダーが表示されます。 データ ソースを選択すると、プラグインとその登録済み GUID を含む詳細が表示されます。
手順 3: Dataverse 環境で仮想テーブルを作成する
設定>管理>仮想テーブル (エンティティ) データ ソース の順に移動して、新しい仮想テーブル データ ソースを作成します。
新規 を選択してから、前の手順で作成したデータ プロバイダーをドロップダウンから選択します。
データ ソースの名前を入力し、保存して閉じる を選択します。
これで、外部データ ソースを表す仮想テーブルを作成する準備が整いました。 これを実行するには、設定>システムをカスタマイズする の順に移動します。
ソリューション エクスプローラーの左側ナビゲーション ウィンドウで、テーブル (エンティティ) を選択してから 新規 を選択します。
次の詳細情報を入力します:
Column 内容 データ ソース 前の手順で作成したデータ ソースを選択します。 表示名 仮想テーブル名。 複数名 表示名に基づいて値が自動設定されます。 件名 これも、表示名で入力した値に基づいて自動作成されます。 外部名 ソース テーブル名。 外部コレクション名 複数名の列から同じ値を使用できます。 保存して閉じるを選択します。
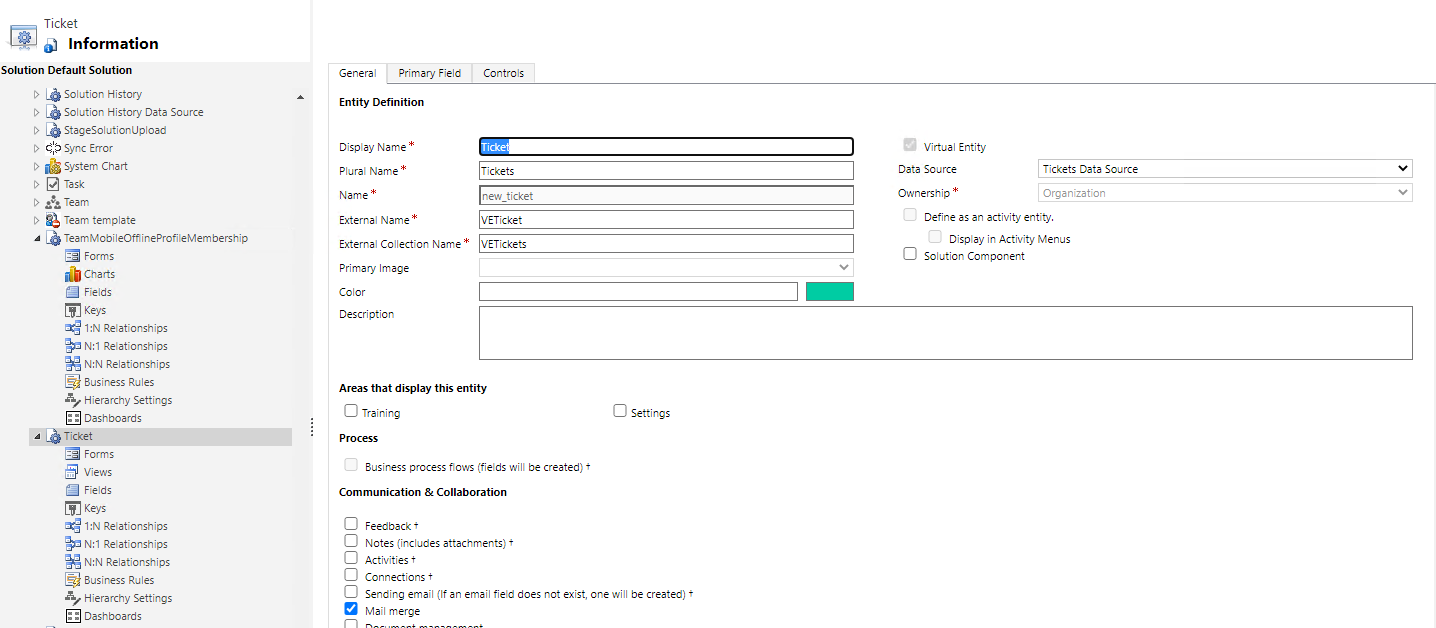
左側のナビゲーション ウィンドウで、作成した仮想テーブルを選択して展開します。
フィールド を選択して、外部ソースを表す新しい列を更新および作成します。
仮想テーブルの 主キー 列を選択して、編集 を選択します。
外部名 列を更新して、外部データ ソースの列名と一致させます。 この例では、外部列名は TicketID です。
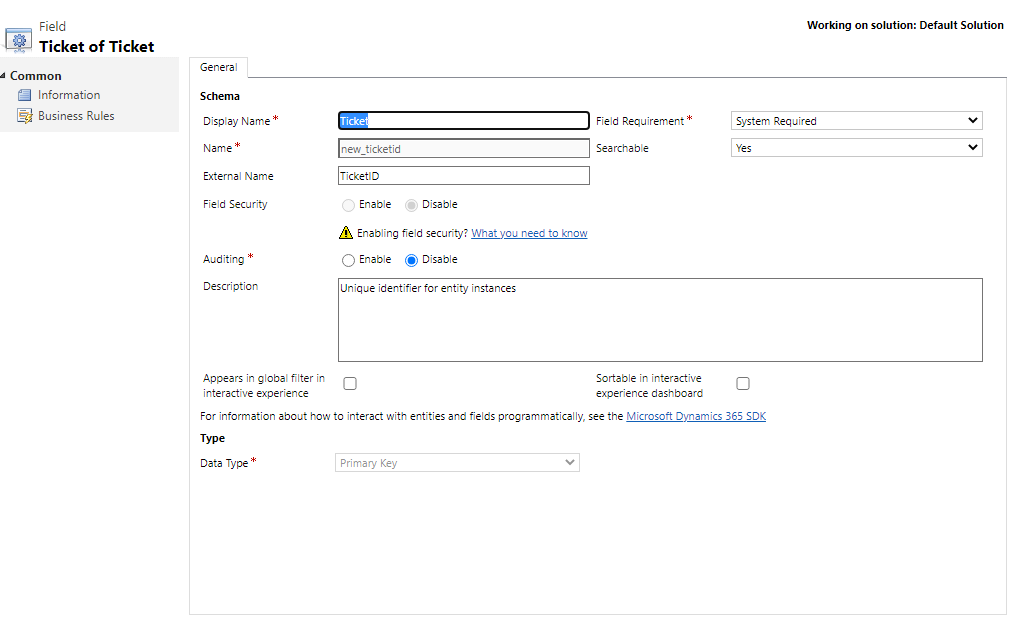
保存して閉じる を選択します。
仮想テーブルの 主キー フィールドを選択して、編集 を選択します。
外部名 フィールドを更新して、外部データ ソースのフィールド名と一致させます。 この例では、外部列名は 名前 です。
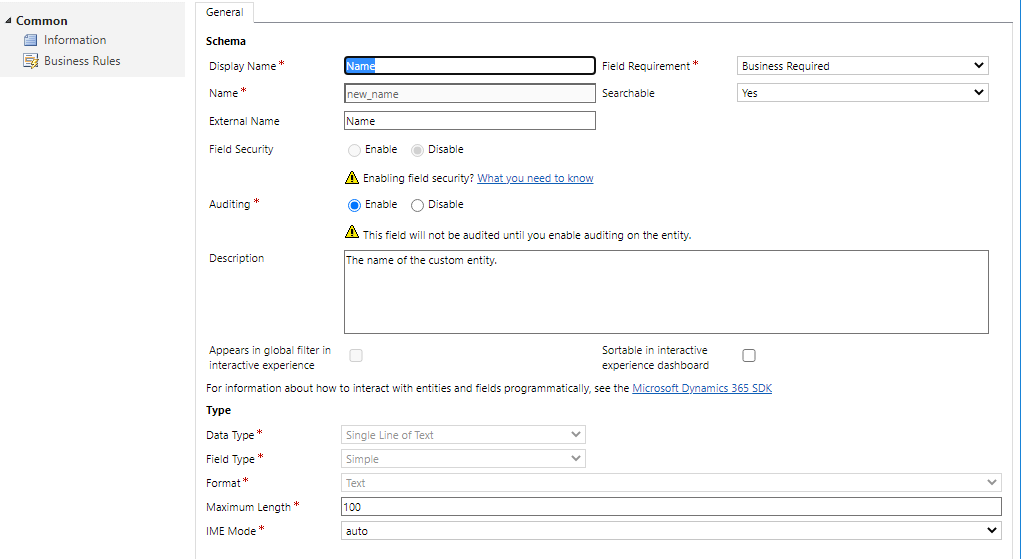
保存して閉じる を選択します。
新規 を選択して、仮想テーブルで新しい列を作成します。 この列は、外部データ ソースの重大度列を表します。
新しい列に関する次の情報を入力します。
列名 値 表示名 重要度 件名 new_severity 外部名 重要度 フィールド要件 必須項目 データ型 整数 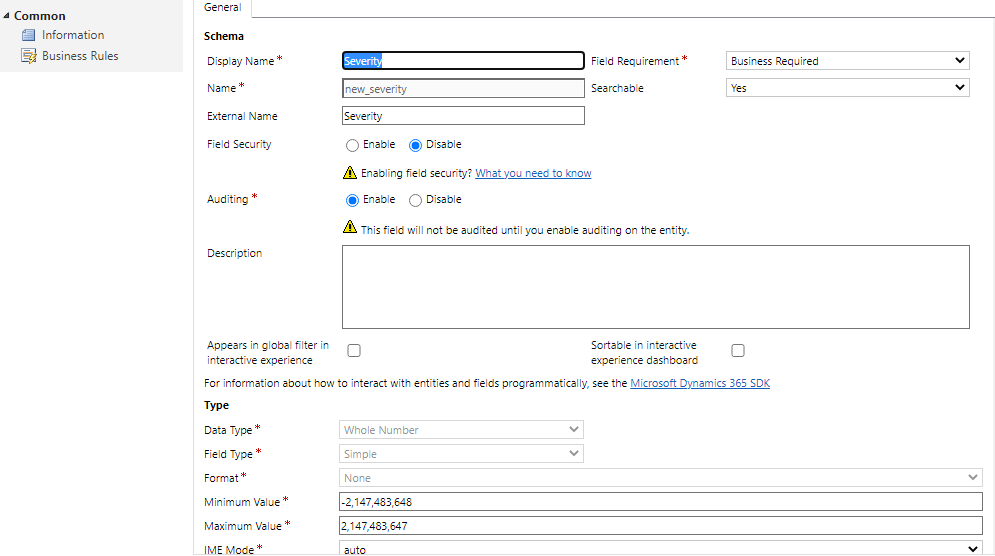
保存して閉じる を選択します。
手順 4: 仮想テーブルを使用してレコードを作成、更新、表示、および削除する
モデル駆動型アプリを作成し、仮想テーブルをサイト マップに追加します。 次に、仮想テーブルのメイン フォームと [詳細] フィールド ビューを選択します。 アプリを公開します。 詳細: 初めてモデル駆動型アプリを自分ですべて構築する
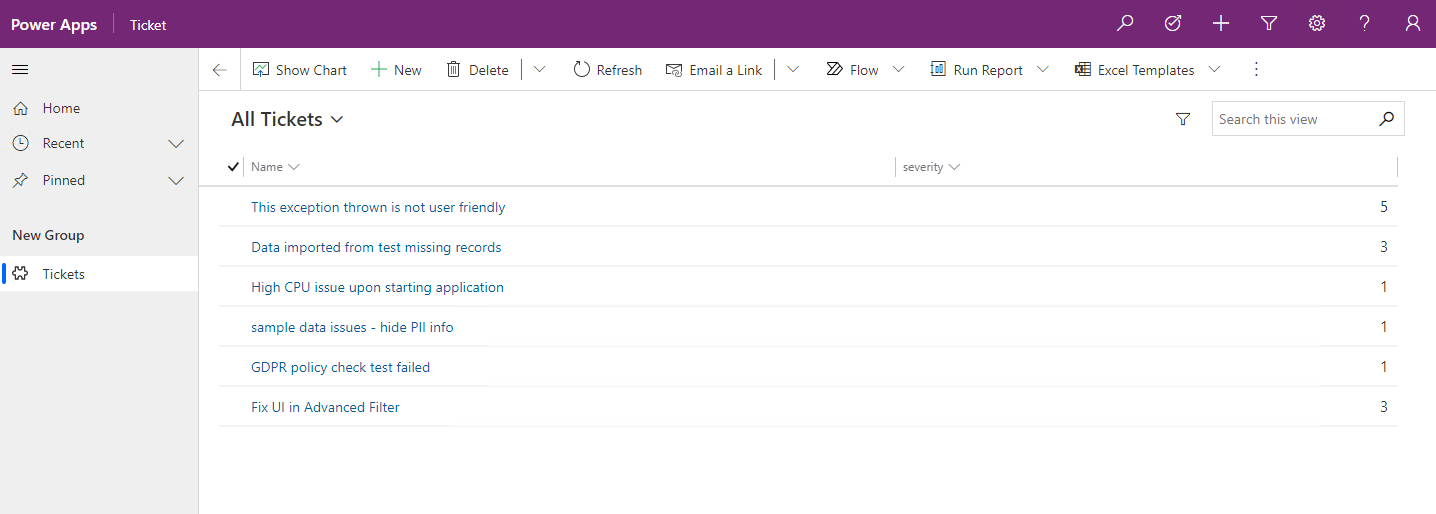
アプリケーション ユーザーは、Microsoft Dataverse にある他のテーブルと同じように、仮想テーブルを使用して読み取り、作成、更新、削除操作を実行できます。
関連項目
仮想テーブルの使用を開始する
仮想テーブルの API に関する考慮事項
カスタム仮想テーブル データ プロバイダー
OData v4 データ プロバイダーを使用した仮想テーブルに関するチュートリアル