Visual Studio を使用して最初のWord作業ウィンドウ アドインをビルドする
この記事では、Word の作業ウィンドウ アドインを作成するプロセスを紹介します。
前提条件
Office/SharePoint 開発ワークロードがインストールされた Visual Studio 2019 以降。
注:
既に Visual Studio がインストールされている場合は、Visual Studio インストーラーを使用して、Office/SharePoint 開発ワークロードがインストールされていることを確認してください。
Microsoft 365 サブスクリプションに接続されている Office (Office for the web を含む)。
アドイン プロジェクトの作成
Visual Studio で、[新しいプロジェクトの作成] を選択します。
検索ボックスを使用して、アドインと入力します。 [Word Web アドイン] を選択し、[次へ] を選択します。
プロジェクトに名前を付けて、[作成] を選択します。
ソリューションが Visual Studio によって作成され、2 つのプロジェクトがソリューション エクスプローラーに表示されます。 Home.html ファイルが Visual Studio で開きます。
Visual Studio ソリューションについて理解する
ウィザードの完了後、Visual Studio によって 2 つのプロジェクトを含むソリューションが作成されます。
| Project | 説明 |
|---|---|
| アドイン プロジェクト | XML 形式のアドイン専用マニフェスト ファイルのみが含まれます。このファイルには、アドインを記述するすべての設定が含まれています。 これらの設定は、Office アプリケーションがアドインのアクティブ化の時期とアドインの表示場所を特定するのに役立ちます。 プロジェクトを実行してすぐにアドインを使用できるように、Visual Studio は、このファイルの内容を生成します。 XML ファイルを変更することで、これらの設定をいつでも変更できます。 |
| Web アプリケーション プロジェクト | Office 対応の HTML および JavaScript ページを開発するために必要なすべてのファイルとファイル参照を含むアドインのコンテンツ ページが含まれます。 アドインを開発している間、Visual Studio は Web アプリケーションをローカル IIS サーバー上でホストします。 アドインを発行する準備が整ったら、この Web アプリケーション プロジェクトを Web サーバーに展開する必要があります。 |
コードを更新する
Home.html では、アドインの作業ウィンドウにレンダリングされる HTML を指定します。 Home.html で、
<body>要素を次のマークアップに置き換えて、ファイルを保存します。<body> <div id="content-header"> <div class="padding"> <h1>Welcome</h1> </div> </div> <div id="content-main"> <div class="padding"> <p>Choose the buttons below to add boilerplate text to the document by using the Word JavaScript API.</p> <br /> <h3>Try it out</h3> <button id="emerson">Add quote from Ralph Waldo Emerson</button> <br /><br /> <button id="checkhov">Add quote from Anton Chekhov</button> <br /><br /> <button id="proverb">Add Chinese proverb</button> </div> </div> <br /> <div id="supportedVersion"/> </body>Web アプリケーション プロジェクトのルートにあるファイル Home.js を開きます。 このファイルは、アドイン用のスクリプトを指定します。 すべての内容を次のコードに置き換え、ファイルを保存します。
'use strict';

(function () {

    Office.onReady(function() {
        // Office is ready.
        $(document).ready(function () {
            // The document is ready.
            // Use this to check whether the API is supported in the Word client.
            if (Office.context.requirements.isSetSupported('WordApi', '1.1')) {
                // Do something that is only available via the new APIs.
                $('#emerson').on("click", insertEmersonQuoteAtSelection);
                $('#checkhov').on("click", insertChekhovQuoteAtTheBeginning);
                $('#proverb').on("click", insertChineseProverbAtTheEnd);
                $('#supportedVersion').html('This code is using Word 2016 or later.');
            } else {
                // Lets you know that this code will not work with your version of Word.
                $('#supportedVersion').html('This code requires Word 2016 or later.');
            }
        });
    });

    async function insertEmersonQuoteAtSelection() {
        await Word.run(async (context) => {

            // Create a proxy object for the document.
            const thisDocument = context.document;

            // Queue a command to get the current selection.
            // Create a proxy range object for the selection.
            const range = thisDocument.getSelection();

            // Queue a command to replace the selected text.
            range.insertText('"Hitch your wagon to a star." - Ralph Waldo Emerson\n', Word.InsertLocation.replace);

            // Synchronize the document state by executing the queued commands,
            // and return a promise to indicate task completion.
            await context.sync();
            console.log('Added a quote from Ralph Waldo Emerson.');
        })
        .catch(function (error) {
            console.log('Error: ' + JSON.stringify(error));
            if (error instanceof OfficeExtension.Error) {
                console.log('Debug info: ' + JSON.stringify(error.debugInfo));
            }
        });
    }

    async function insertChekhovQuoteAtTheBeginning() {
        await Word.run(async (context) => {

            // Create a proxy object for the document body.
            const body = context.document.body;

            // Queue a command to insert text at the start of the document body.
            body.insertText('"Knowledge is of no value unless you put it into practice." - Anton Chekhov\n', Word.InsertLocation.start);

            // Synchronize the document state by executing the queued commands,
            // and return a promise to indicate task completion.
            await context.sync();
            console.log('Added a quote from Anton Chekhov.');
        })
        .catch(function (error) {
            console.log('Error: ' + JSON.stringify(error));
            if (error instanceof OfficeExtension.Error) {
                console.log('Debug info: ' + JSON.stringify(error.debugInfo));
            }
        });
    }

    async function insertChineseProverbAtTheEnd() {
        await Word.run(async (context) => {

            // Create a proxy object for the document body.
            const body = context.document.body;

            // Queue a command to insert text at the end of the document body.
            body.insertText('"To know the road ahead, ask those coming back." - Chinese proverb\n', Word.InsertLocation.end);

            // Synchronize the document state by executing the queued commands,
            // and return a promise to indicate task completion.
            await context.sync();
            console.log('Added a quote from a Chinese proverb.');
        })
        .catch(function (error) {
            console.log('Error: ' + JSON.stringify(error));
            if (error instanceof OfficeExtension.Error) {
                console.log('Debug info: ' + JSON.stringify(error.debugInfo));
            }
        });
    }
})();
Web アプリケーション プロジェクトのルートにあるファイル Home.css を開きます。 このファイルは、アドイン用のユーザー設定のスタイルを指定します。 すべての内容を次のコードに置き換え、ファイルを保存します。
#content-header {
    background: #2a8dd4;
    color: #fff;
    position: absolute;
    top: 0;
    left: 0;
    width: 100%;
    height: 80px;
    overflow: hidden;
}

#content-main {
    background: #fff;
    position: fixed;
    top: 80px;
    left: 0;
    right: 0;
    bottom: 0;
    overflow: auto;
}

.padding {
    padding: 15px;
}
マニフェストを更新する
アドイン プロジェクトでアドインのみのマニフェスト ファイルを開きます。 このファイルは、アドインの設定と機能を定義します。
ProviderName要素にはプレースホルダー値が含まれています。 それを自分の名前に置き換えます。DisplayName要素のDefaultValue属性にはプレースホルダー値が含まれています。 これは、My Office Add-in に置き換えてください。Description要素のDefaultValue属性にはプレースホルダー値が含まれています。 これは、A task pane add-in for Word に置き換えてください。ファイルを保存します。
...
<ProviderName>John Doe</ProviderName>
<DefaultLocale>en-US</DefaultLocale>
<!-- The display name of your add-in. Used on the Store and various places of the Office UI such as the add-in's dialog. -->
<DisplayName DefaultValue="My Office Add-in" />
<Description DefaultValue="A task pane add-in for Word."/>
...
試してみる
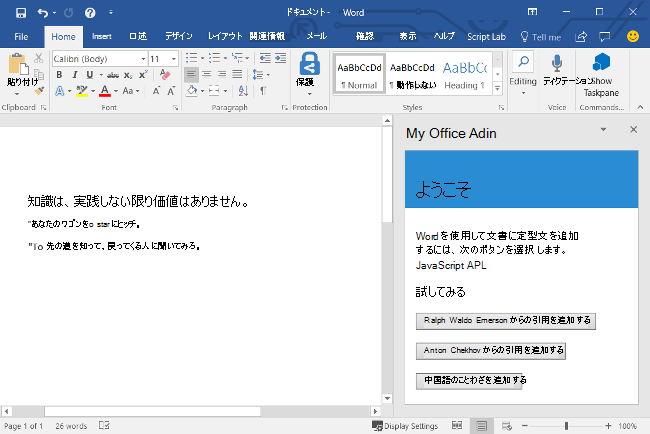
Visual Studio を使用して、新しく作成したWord アドインをテストするには、F5 キーを押すか、[デバッグ>デバッグの開始] を選択して、リボンに [タスクウィンドウ アドインの表示] ボタンを使用してWordを起動します。 アドインは IIS 上でローカルにホストされます。
Wordで、アドイン作業ウィンドウがまだ開いていない場合は、[ホーム] タブを選択し、リボンの [タスクウィンドウの表示] ボタンを選択してアドイン作業ウィンドウを開きます。 (ボリューム ライセンスの永続的バージョンの Office 2016 以前を使用している場合、カスタム ボタンはサポートされていません。代わりに、作業ウィンドウがすぐに開きます)。
![[タスクウィンドウの表示] ボタンが強調表示されているWord アプリケーション。](../images/word-quickstart-addin-0.png)
作業ウィンドウで、いずれかのボタンを選択してドキュメントに定型句を追加します。

注:
console.log の出力を表示するには、JavaScript コンソール用の開発者ツール セットを別途用意する必要があります。 F12 ツールと Microsoft Edge DevTools の詳細については、「Internet Explorer 用の開発者ツールを使用してアドインをデバッグする」を参照するか、「Edge Legacy 用の開発者ツールを使用してアドインをデバッグする」、または「Microsoft Edge(Chromiumベース)の開発者ツールを使用してアドインをデバッグする」を参照してください。
次の手順
おめでとうございます。 Word の作業ウィンドウ アドインが正常に作成されました。 次に、Visual Studio を使用した Office アドインの開発の詳細については、次の記事に進んでください。
トラブルシューティング
「開発環境のセットアップ」の手順に従って、環境が Office 開発の準備ができていることを確認 します。
一部のサンプル コードでは、ES6 JavaScript を使用しています。 これは、Trident (インターネット エクスプローラー 11) ブラウザー エンジンを使用する古いバージョンの Office と互換性がありません。 アドインでこれらのプラットフォームをサポートする方法については、「 古い Microsoft Webview と Office バージョンをサポートする」を参照してください。 開発に使用する Microsoft 365 サブスクリプションがまだない場合は、Microsoft 365 開発者プログラムを通じてMicrosoft 365 E5開発者サブスクリプションを受ける資格があります。詳細については、FAQ を参照してください。 または、 1 か月間の無料試用版にサインアップ するか、 Microsoft 365 プランを購入することもできます。
- アドインにエラーが表示された場合 (たとえば、"このアドインを開始できませんでした。このダイアログを閉じて問題を無視するか、[再起動] をクリックしてやり直してください。)F5 キーを押すか、[デバッグ] を選択した場合> Visual Studio でのデバッグの開始」を参照してください。その他のデバッグ オプションについては、「Visual Studio での Office アドインのデバッグ」を参照してください。
コード サンプル
- Word "Hello world" アドイン: マニフェスト、HTML Web ページ、ロゴのみを使用して単純な Office アドインを構築する方法について説明します。
関連項目
Office Add-ins