Microsoft Graph で React Native アプリを構築する
このチュートリアルでは、Microsoft React Native API を使用してユーザー Graphカレンダー情報を取得するアプリを作成する方法について説明します。
ヒント
完了したチュートリアルをダウンロードする場合は、リポジトリをダウンロードまたは複製GitHubできます。
前提条件
このチュートリアルを開始する前に、開発マシンに次の手順をインストールする必要があります。
- 以下のうち少なくとも 1 つ。
- Android Studio と Java開発キット (Android でサンプルを実行するために必要)
- Xcode (iOS でサンプルを実行するために必要)
- Node.js
また、Outlook.com 上のメールボックスを持つ個人用 Microsoft アカウント、または Microsoft の仕事用または学校用のアカウントを持っている必要があります。 Microsoft アカウントをお持ちでない場合は、無料アカウントを取得するためのオプションが 2 つご利用できます。
- 新しい 個人用 Microsoft アカウントにサインアップできます。
- 開発者プログラムにサインアップして、Microsoft 365サブスクリプションをMicrosoft 365できます。
注意
このチュートリアルは、オペレーティング システムとReact Nativeに応じて特定の前提条件を持つ、REACT NATIVE CLI を使用して記述されています。 開発React Native構成の手順については、「開始方法」を参照してください。 このチュートリアルで使用するバージョンを以下に示します。 このガイドの手順は、他のバージョンでも動作しますが、テストされていない場合があります。
- Android 9.0 SDK を使用した Android Studio バージョン 4.1
- Java開発キット バージョン 12.0.2
- Xcode バージョン 12.5.1
- Node.jsバージョン 14.15.0
フィードバック
このチュートリアルに関するフィードバックは、リポジトリのGitHubしてください。
React Native アプリを作成する
まず、新しいプロジェクトを作成React Nativeします。
プロジェクトを作成するディレクトリでコマンド ライン インターフェイス (CLI) を開きます。 次のコマンドを実行して、react-native-cli ツールを実行し、新しいReact Nativeします。
npx react-native init GraphTutorial --template react-native-template-typescriptオプション: プロジェクトを実行して、開発環境が正しく構成されていることを確認します。 CLI で、ディレクトリを作成した GraphTutorial ディレクトリに変更し、次のいずれかのコマンドを実行します。
- iOS の場合:
npx react-native run-ios - Android の場合: Android エミュレーター インスタンスを起動して実行する
npx react-native run-android
- iOS の場合:
依存関係のインストール
次に進む前に、後で使用する追加の依存関係をインストールします。
- アプリ内のビュー 間のナビゲーションを処理する react-navigation。
- react-native-gesture-handler、react-native-safe-area-context、react-native-screens、react-native-reanimate、および react-navigation に必要なマスクビュー。
- react-native-elements と react-native-vector-icons を 使用して、UI のアイコンを提供します。
- 認証とトークン管理を処理する react-native-app-auth 。
- トークンの記憶域を提供する async-storage 。
- datetimepicker を 使用して、UI に日付と時刻のピッカーを追加します。
- 日付と 時刻の解析と比較を処理するモーメント。
- windows-iana を使用して、Windowsを IANA 形式に変換します。
- Microsoft-graph-client を使用して Microsoft Graph。
プロジェクトのルート ディレクトリで CLI をReact Nativeします。
次のコマンドを実行します。
npm install @react-navigation/native@5.9.6 @react-navigation/drawer@5.12.7 @react-navigation/stack@5.14.7
npm install @react-native-community/masked-view@0.1.11 react-native-safe-area-context@3.3.0 windows-iana
npm install react-native-reanimated@2.2.0 react-native-screens@3.5.0 @react-native-async-storage/async-storage@1.15.5
npm install react-native-elements@3.4.2 react-native-vector-icons@8.1.0 react-native-gesture-handler@1.10.3
npm install react-native-app-auth@6.4.0 moment@2.29.1 moment-timezone @microsoft/microsoft-graph-client@3.0.0
npm install @react-native-community/datetimepicker@3.5.2
npm install @microsoft/microsoft-graph-types --save-dev
iOS の依存関係のリンクと構成
注意
iOS をターゲットにしていない場合は、このセクションをスキップできます。
GraphTutorial/ios ディレクトリで CLI を開 きます。
次のコマンドを実行します。
pod installテキスト エディター で GraphTutorial/ios/GraphTutorial/Info.plist ファイルを開きます。 ファイルの最後の行の直前に次
</dict>の項目を追加します。<key>UIAppFonts</key> <array> <string>AntDesign.ttf</string> <string>Entypo.ttf</string> <string>EvilIcons.ttf</string> <string>Feather.ttf</string> <string>FontAwesome.ttf</string> <string>FontAwesome5_Brands.ttf</string> <string>FontAwesome5_Regular.ttf</string> <string>FontAwesome5_Solid.ttf</string> <string>Foundation.ttf</string> <string>Ionicons.ttf</string> <string>MaterialIcons.ttf</string> <string>MaterialCommunityIcons.ttf</string> <string>SimpleLineIcons.ttf</string> <string>Octicons.ttf</string> <string>Zocial.ttf</string> </array>テキスト エディター で GraphTutorial/ios/GraphTutorial/AppDelegate.h ファイルを開きます。 その内容を次に置き換えてください。
#import <React/RCTBridgeDelegate.h>
#import <UIKit/UIKit.h>
#import "RNAppAuthAuthorizationFlowManager.h"

@interface AppDelegate : UIResponder <UIApplicationDelegate, RCTBridgeDelegate, RNAppAuthAuthorizationFlowManager>

@property (nonatomic, strong) UIWindow *window;
@property (nonatomic, weak) id<RNAppAuthAuthorizationFlowManagerDelegate> authorizationFlowManagerDelegate;

@end
Android の依存関係を構成する
注意
Android を対象としていない場合は、このセクションをスキップできます。
エディターで GraphTutorial/android/app/build.gradle ファイルを開きます。
エントリを見つけて
defaultConfig、内部に次のプロパティを追加しますdefaultConfig。manifestPlaceholders = [ appAuthRedirectScheme: 'graph-tutorial' ]エントリ
defaultConfigは次のようになります。defaultConfig { applicationId "com.graphtutorial" minSdkVersion rootProject.ext.minSdkVersion targetSdkVersion rootProject.ext.targetSdkVersion versionCode 1 versionName "1.0" manifestPlaceholders = [ appAuthRedirectScheme: 'graph-tutorial' ] }ファイルの末尾に次の行を追加します。
apply from: "../../node_modules/react-native-vector-icons/fonts.gradle"ファイルを保存します。
アプリを設計する
アプリケーションは、ナビゲーション ドロワー を使用して 、さまざまなビュー間を移動します。 この手順では、アプリで使用される基本的なビューを作成し、ナビゲーション ドロワーを実装します。
ビューの作成
このセクションでは、認証フローをサポートするアプリのビューを 作成します。
GraphTutorial/index.js を開き、他のステートメントの前に次の項目をファイルの上部に
import追加します。import 'react-native-gesture-handler';AuthContext.tsx という 名前の GraphTutorial ディレクトリに新しいファイルを作成し、次のコードを追加します。
import * as React from 'react';

type AuthContextType = {
  signIn: () => Promise<void>;
  signOut: () => void;
}

export const AuthContext = React.createContext<AuthContextType>({
  signIn: async () => {},
  signOut: () => {}
});
UserContext.tsx という 名前の GraphTutorial ディレクトリに新しいファイルを作成し、次のコードを追加します。
import * as React from 'react';
import { ImageSourcePropType } from 'react-native';

type UserContextType = {
  userLoading: boolean;
  userFirstName: string;
  userFullName: string;
  userEmail: string;
  userTimeZone: string;
  userPhoto: ImageSourcePropType;
}

export const UserContext = React.createContext<UserContextType>({
  userLoading: true,
  userFirstName: '',
  userFullName: '',
  userEmail: '',
  userTimeZone: '',
  userPhoto: require('./images/no-profile-pic.png')
});
画面という名前の GraphTutorial ディレクトリに新しい ディレクトリを作成 します。
HomeScreen.tsx という 名前の GraphTutorial/screen ディレクトリに新しいファイルを作成します。 次のコードをファイルに追加します。
import React from 'react';
import {
  ActivityIndicator,
  Platform,
  StyleSheet,
  Text,
  View,
} from 'react-native';
import { createStackNavigator } from '@react-navigation/stack';

import { UserContext } from '../UserContext';

const Stack = createStackNavigator();

const HomeComponent = () => {
  const userContext = React.useContext(UserContext);

  return (
    <View style={styles.container}>
      <ActivityIndicator
        color={Platform.OS === 'android' ? '#276b80' : undefined}
        animating={userContext.userLoading}
        size='large' />
      {userContext.userLoading ? null: <Text>Hello {userContext.userFirstName}!</Text>}
    </View>
  );
}

export default class HomeScreen extends React.Component {
  render() {
    return (
      <Stack.Navigator>
        <Stack.Screen name='Home'
          component={HomeComponent}
          options={{
            headerShown: false
          }} />
      </Stack.Navigator>
    );
  }
}

const styles = StyleSheet.create({
  container: {
    flex: 1,
    alignItems: 'center',
    justifyContent: 'center'
  }
});
CalendarScreen.tsx という 名前の GraphTutorial/screen ディレクトリに新しいファイルを作成します。 次のコードをファイルに追加します。
import React from 'react';
import {StyleSheet, Text, View} from 'react-native';
import {createStackNavigator} from '@react-navigation/stack';

const Stack = createStackNavigator();

// Temporary placeholder view
const CalendarComponent = () => (
  <View style={styles.container}>
    <Text>Calendar</Text>
  </View>
);

export default class CalendarScreen extends React.Component {
  render() {
    return (
      <Stack.Navigator>
        <Stack.Screen
          name='Calendar'
          component={CalendarComponent}
          options={{
            headerShown: false,
          }}
        />
      </Stack.Navigator>
    );
  }
}

const styles = StyleSheet.create({
  container: {
    flex: 1,
    alignItems: 'center',
    justifyContent: 'center',
  },
});
SignInScreen.tsx という 名前の GraphTutorial/screen ディレクトリに新しいファイルを作成します。 次のコードをファイルに追加します。
// Adapted from https://reactnavigation.org/docs/auth-flow
import React from 'react';
import {Alert, Button, StyleSheet, View} from 'react-native';
import {ParamListBase} from '@react-navigation/native';
import {StackNavigationProp} from '@react-navigation/stack';

import {AuthContext} from '../AuthContext';

type SignInProps = {
  navigation: StackNavigationProp<ParamListBase>;
};

export default class SignInScreen extends React.Component<SignInProps> {
  static contextType = AuthContext;

  _signInAsync = async () => {
    await this.context.signIn();
  };

  componentDidMount() {
    this.props.navigation.setOptions({
      title: 'Please sign in',
      headerShown: true,
    });
  }

  render() {
    return (
      <View style={styles.container}>
        <Button title='Sign In' onPress={this._signInAsync} />
      </View>
    );
  }
}

const styles = StyleSheet.create({
  container: {
    flex: 1,
    alignItems: 'center',
    justifyContent: 'center',
  },
});
AuthLoadingScreen.tsx という 名前の GraphTutorial/screen ディレクトリに新しいファイルを作成します。 次のコードをファイルに追加します。
// Adapted from https://reactnavigation.org/docs/auth-flow
import React from 'react';
import {
  ActivityIndicator,
  Platform,
  Text,
  StyleSheet,
  View,
} from 'react-native';

export default class AuthLoadingScreen extends React.Component {
  render() {
    return (
      <View style={styles.container}>
        <ActivityIndicator
          color={Platform.OS === 'android' ? '#276b80' : undefined}
          size='large' />
        <Text style={styles.statusText}>Logging in...</Text>
      </View>
    );
  }
}

const styles = StyleSheet.create({
  container: {
    flex: 1,
    alignItems: 'center',
    justifyContent: 'center'
  },
  statusText: {
    marginTop: 10
  }
});
ナビゲーション ドロワーの作成
このセクションでは、アプリケーションのメニューを作成し、リアクション ナビゲーションを使用して画面間を移動するアプリケーションを更新します。
メニューという名前の GraphTutorial ディレクトリに新しい ディレクトリ を作成します。
DrawerMenu.tsx という 名前の GraphTutorial/menus ディレクトリに新しいファイルを作成します。 次のコードをファイルに追加します。
import React, {FC} from 'react';
import {
  Alert,
  Image,
  StyleSheet,
  Text,
  View,
  ImageSourcePropType,
} from 'react-native';
import {
  createDrawerNavigator,
  DrawerContentScrollView,
  DrawerItem,
  DrawerItemList,
  DrawerContentComponentProps,
} from '@react-navigation/drawer';
import {ParamListBase} from '@react-navigation/native';
import {StackNavigationProp} from '@react-navigation/stack';

import {AuthContext} from '../AuthContext';
import {UserContext} from '../UserContext';
import HomeScreen from '../screens/HomeScreen';
import CalendarScreen from '../screens/CalendarScreen';

const Drawer = createDrawerNavigator();

type CustomDrawerContentProps = DrawerContentComponentProps & {
  userName: string;
  userEmail: string;
  userPhoto: ImageSourcePropType;
  signOut: () => void;
};

type DrawerMenuProps = {
  navigation: StackNavigationProp<ParamListBase>;
};

const CustomDrawerContent: FC<CustomDrawerContentProps> = props => (
  <DrawerContentScrollView {...props}>
    <View style={styles.profileView}>
      <Image
        source={props.userPhoto}
        resizeMode='contain'
        style={styles.profilePhoto}
      />
      <Text style={styles.profileUserName}>{props.userName}</Text>
      <Text style={styles.profileEmail}>{props.userEmail}</Text>
    </View>
    <DrawerItemList {...props} />
    <DrawerItem label='Sign Out' onPress={props.signOut} />
  </DrawerContentScrollView>
);

export default class DrawerMenuContent extends React.Component<DrawerMenuProps> {
  static contextType = AuthContext;

  state = {
    // TEMPORARY
    userLoading: true,
    userFirstName: 'Adele',
    userFullName: 'Adele Vance',
    userEmail: 'adelev@contoso.com',
    userTimeZone: 'UTC',
    userPhoto: require('../images/no-profile-pic.png'),
  };

  _signOut = async () => {
    this.context.signOut();
  };

  async componentDidMount() {
    this.props.navigation.setOptions({
      headerShown: false,
    });
  }

  render() {
    const userLoaded = !this.state.userLoading;

    return (
      <UserContext.Provider value={this.state}>
        <Drawer.Navigator
          drawerType='front'
          screenOptions={{
            headerShown: true,
            headerStyle: {
              backgroundColor: '#276b80',
            },
            headerTintColor: 'white',
          }}
          drawerContent={props => (
            <CustomDrawerContent
              {...props}
              userName={this.state.userFullName}
              userEmail={this.state.userEmail}
              userPhoto={this.state.userPhoto}
              signOut={this._signOut}
            />
          )}>
          <Drawer.Screen
            name='Home'
            component={HomeScreen}
            options={{drawerLabel: 'Home', headerTitle: 'Welcome'}}
          />
          {userLoaded && (
            <Drawer.Screen
              name='Calendar'
              component={CalendarScreen}
              options={{drawerLabel: 'Calendar'}}
            />
          )}
        </Drawer.Navigator>
      </UserContext.Provider>
    );
  }
}

const styles = StyleSheet.create({
  container: {
    flex: 1,
  },
  profileView: {
    alignItems: 'center',
    padding: 10,
  },
  profilePhoto: {
    width: 80,
    height: 80,
    borderRadius: 40,
  },
  profileUserName: {
    fontWeight: '700',
  },
  profileEmail: {
    fontWeight: '200',
    fontSize: 10,
  },
});
イメージという名前の GraphTutorial ディレクトリに新しい ディレクトリを作成 します。
このディレクトリに、no-profile-pic.pngという 名前の既定の プロファイル イメージを追加します。 任意のイメージを使用するか、このサンプル のイメージを使用できます。
GraphTutorial/App.tsx ファイルを 開き、コンテンツ全体を次に置き換えてください。
// Adapted from https://reactnavigation.org/docs/auth-flow
import * as React from 'react';
import {NavigationContainer, ParamListBase} from '@react-navigation/native';
import {
  createStackNavigator,
  StackNavigationProp,
} from '@react-navigation/stack';

import {AuthContext} from './AuthContext';
import SignInScreen from './screens/SignInScreen';
import DrawerMenuContent from './menus/DrawerMenu';
import AuthLoadingScreen from './screens/AuthLoadingScreen';

const Stack = createStackNavigator();

type Props = {
  navigation: StackNavigationProp<ParamListBase>;
};

export default function App({navigation}: Props) {
  const [state, dispatch] = React.useReducer(
    (prevState: any, action: any) => {
      switch (action.type) {
        case 'RESTORE_TOKEN':
          return {
            ...prevState,
            userToken: action.token,
            isLoading: false,
          };
        case 'SIGN_IN':
          return {
            ...prevState,
            isSignOut: false,
            userToken: action.token,
          };
        case 'SIGN_OUT':
          return {
            ...prevState,
            isSignOut: true,
            userToken: null,
          };
      }
    },
    {
      isLoading: true,
      isSignOut: false,
      userToken: null,
    },
  );

  React.useEffect(() => {
    const bootstrapAsync = async () => {
      let userToken = null;
      // TEMPORARY
      dispatch({type: 'RESTORE_TOKEN', token: userToken});
    };

    bootstrapAsync();
  }, []);

  const authContext = React.useMemo(
    () => ({
      signIn: async () => {
        dispatch({type: 'SIGN_IN', token: 'placeholder-token'});
      },
      signOut: async () => {
        dispatch({type: 'SIGN_OUT'});
      },
    }),
    [],
  );

  return (
    <AuthContext.Provider value={authContext}>
      <NavigationContainer>
        <Stack.Navigator>
          {state.isLoading ? (
            <Stack.Screen name='Loading' component={AuthLoadingScreen} />
          ) : state.userToken == null ? (
            <Stack.Screen name='SignIn' component={SignInScreen} />
          ) : (
            <Stack.Screen name='Main' component={DrawerMenuContent} />
          )}
        </Stack.Navigator>
      </NavigationContainer>
    </AuthContext.Provider>
  );
}
すべての変更を保存します。
エミュレーターでアプリケーションを再読み込みします。
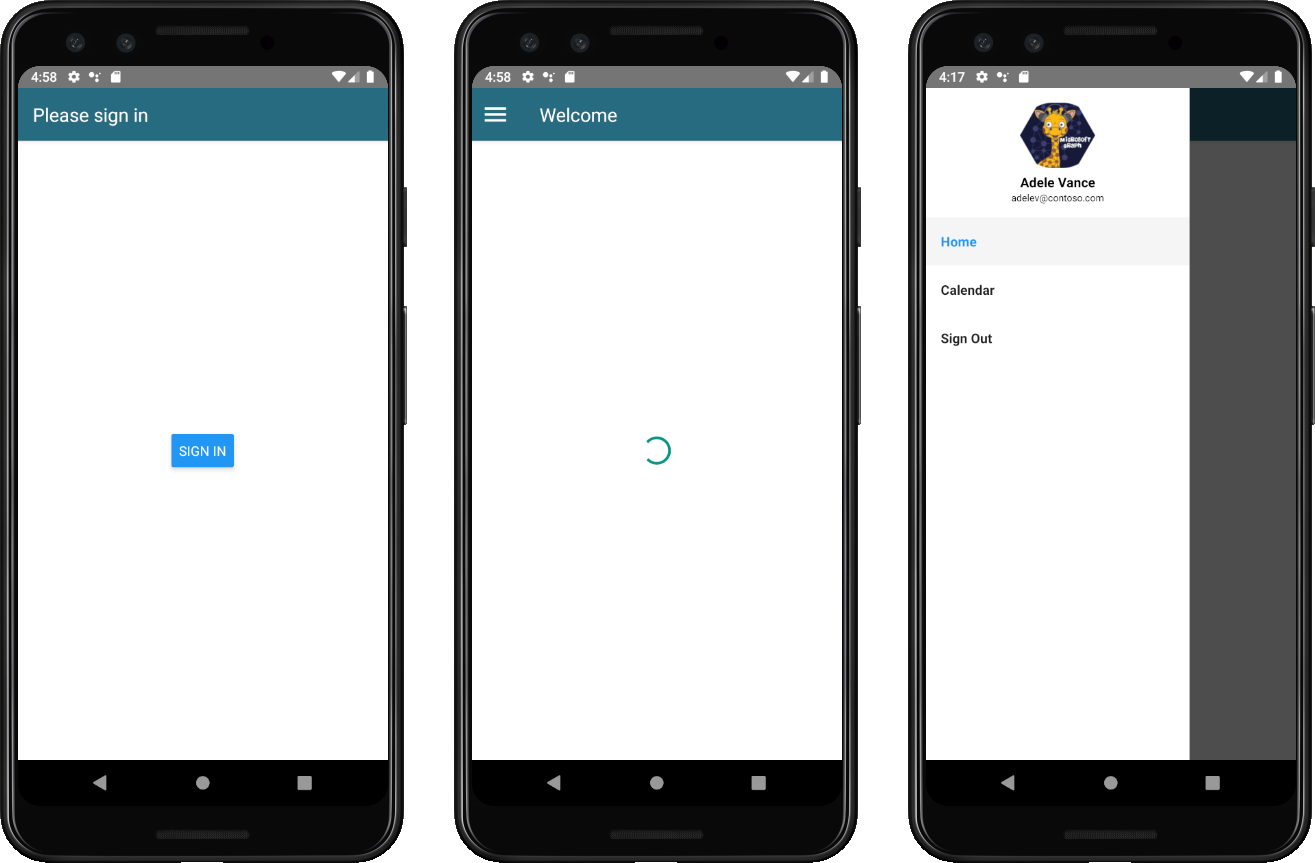
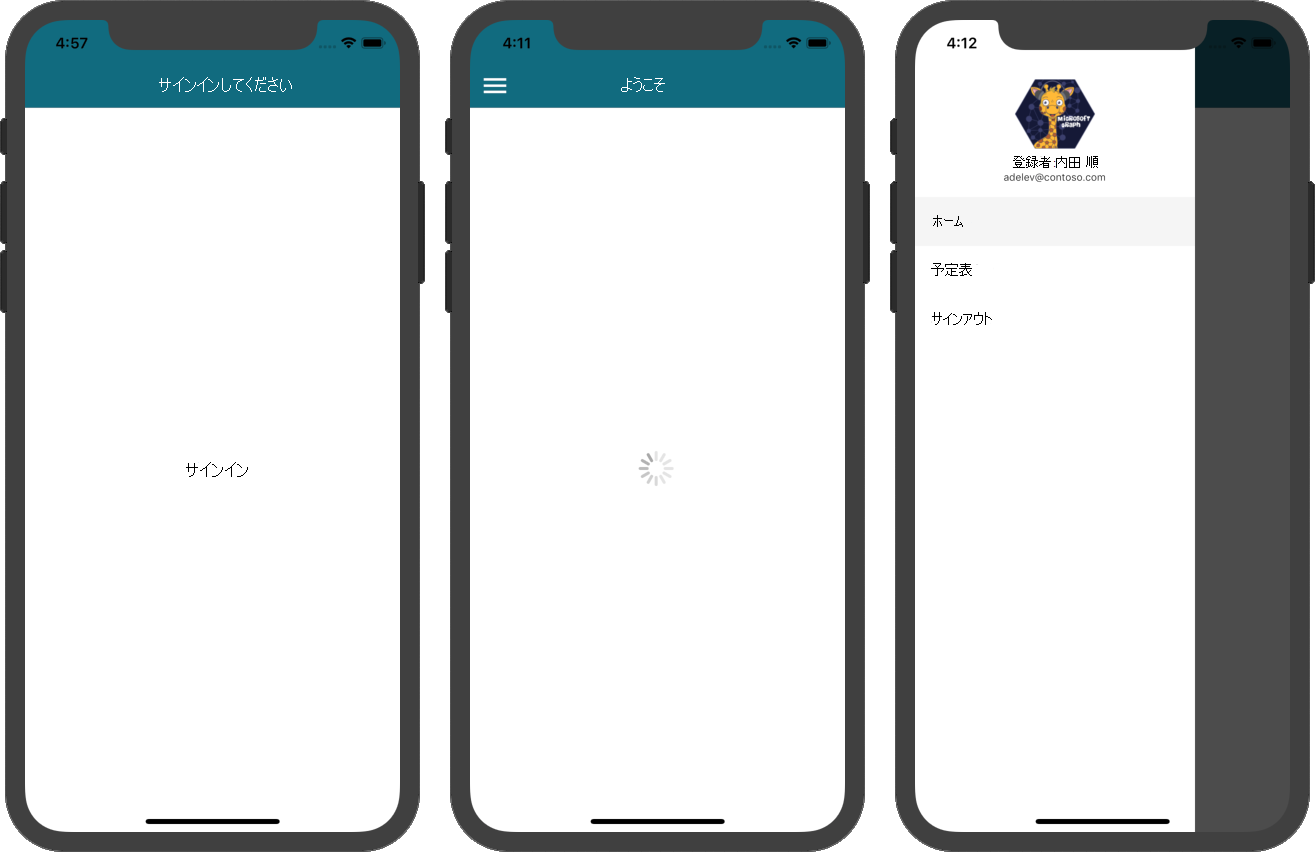
アプリのメニューは、2 つのフラグメント間を移動し、[サインイン] または [サインアウト] ボタンをタップ すると変更されます。
ポータルでアプリを登録する
この演習では、新しい Azure AD管理センターを使用Azure Active Directoryします。
ブラウザーを開き、Azure Active Directory 管理センターへ移動して、個人用アカウント (別名: Microsoft アカウント)、または 職場/学校アカウント を使用してログインします。
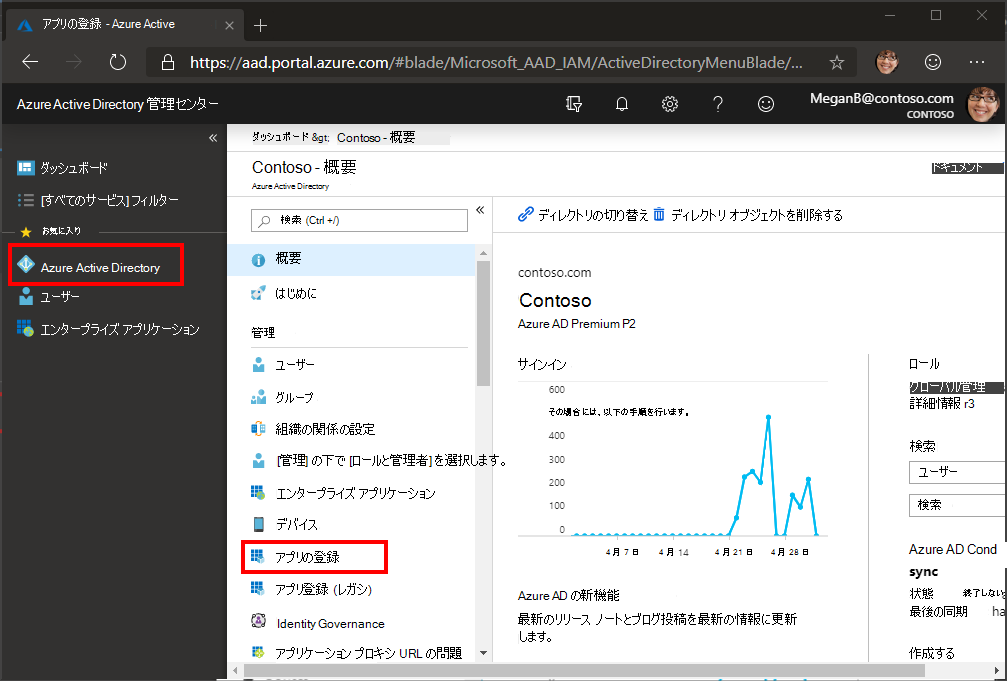
左側のナビゲーションで [Azure Active Directory] を選択し、それから [管理] で [アプリの登録] を選択します。
[新規登録] を選択します。 [アプリケーションを登録] ページで、次のように値を設定します。
React Native Graph Tutorialに [名前] を設定します。- [サポートされているアカウントの種類] を [任意の組織のディレクトリ内のアカウントと個人用の Microsoft アカウント] に設定します。
- [ リダイレクト URI] で、ドロップダウンを [パブリック クライアント (モバイル & デスクトップ) に変更し、値をに設定します
graph-tutorial://react-native-auth/。
![[アプリケーションを登録する] ページのスクリーンショット](react-native/tutorial/images/aad-register-an-app.png)
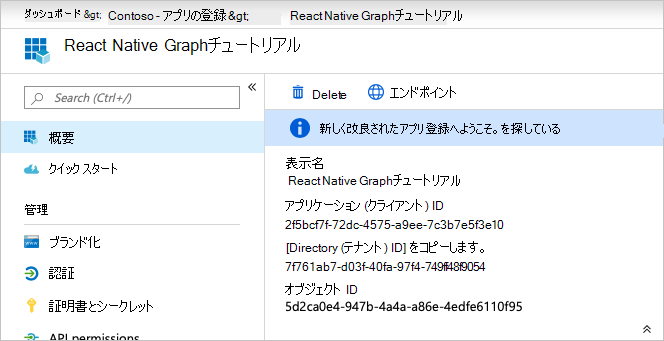
[登録] を選択します。 [チュートリアル React Native Graph] ページで、アプリケーション (クライアント) ID の値をコピーして保存します。次の手順で必要になります。
Azure AD 認証を追加する
この演習では、前の演習からアプリケーションを拡張して、アプリケーションの認証をサポートAzure AD。 これは、Microsoft サーバーを呼び出す必要がある OAuth アクセス トークンを取得するために必要Graph。 これを行うには、 react-native-app-auth ライブラリをアプリケーション に統合します。
auth という名前の GraphTutorial ディレクトリに新しい ディレクトリ を作成します。
AuthConfig.ts という 名前の GraphTutorial/auth ディレクトリに 新しいファイルを作成します。 次のコードをファイルに追加します。
export const AuthConfig = {
  appId: 'YOUR_APP_ID_HERE',
  appScopes: [
    'openid',
    'offline_access',
    'profile',
    'User.Read',
    'MailboxSettings.Read',
    'Calendars.ReadWrite'
  ]
};
アプリ
YOUR_APP_ID_HERE登録のアプリ ID に置き換える。
重要
git などのソース管理を使用している場合は、 AuthConfig.ts ファイルをソース管理から除外して、アプリ ID が誤って漏洩しないようにする良い時期です。
サインインの実装
このセクションでは、認証ヘルパー クラスを作成し、アプリを更新してサインインしてサインアウトします。
AuthManager.ts という 名前の GraphTutorial/auth ディレクトリ に新しいファイルを作成します。 次のコードをファイルに追加します。
import AsyncStorage from '@react-native-async-storage/async-storage';
import { authorize, refresh, AuthConfiguration } from 'react-native-app-auth';
import { Platform } from 'react-native';
import moment from 'moment';

import { AuthConfig } from './AuthConfig';

const config: AuthConfiguration = {
  clientId: AuthConfig.appId,
  redirectUrl: 'graph-tutorial://react-native-auth/',
  scopes: AuthConfig.appScopes,
  additionalParameters: { prompt: 'select_account' },
  serviceConfiguration: {
    authorizationEndpoint: 'https://login.microsoftonline.com/common/oauth2/v2.0/authorize',
    tokenEndpoint: 'https://login.microsoftonline.com/common/oauth2/v2.0/token',
  }
};

export class AuthManager {

  static signInAsync = async () => {
    const result = await authorize(config);

    console.log(result.accessToken);

    // Store the access token, refresh token, and expiration time in storage
    await AsyncStorage.setItem('userToken', result.accessToken);
    await AsyncStorage.setItem('refreshToken', result.refreshToken);
    await AsyncStorage.setItem('expireTime', result.accessTokenExpirationDate);
  }

  static signOutAsync = async () => {
    // Clear storage
    await AsyncStorage.removeItem('userToken');
    await AsyncStorage.removeItem('refreshToken');
    await AsyncStorage.removeItem('expireTime');
  }

  static getAccessTokenAsync = async() => {
    const expireTime = await AsyncStorage.getItem('expireTime');

    if (expireTime !== null) {
      // Get expiration time - 5 minutes
      // If it's <= 5 minutes before expiration, then refresh
      const expire = moment(expireTime).subtract(5, 'minutes');
      const now = moment();

      if (now.isSameOrAfter(expire)) {
        // Expired, refresh
        console.log('Refreshing token');
        const refreshToken = await AsyncStorage.getItem('refreshToken');
        console.log(`Refresh token: ${refreshToken}`);
        const result = await refresh(config, { refreshToken: refreshToken || '' });

        // Store the new access token, refresh token, and expiration time in storage
        await AsyncStorage.setItem('userToken', result.accessToken);
        await AsyncStorage.setItem('refreshToken', result.refreshToken || '');
        await AsyncStorage.setItem('expireTime', result.accessTokenExpirationDate);

        return result.accessToken;
      }

      // Not expired, just return saved access token
      const accessToken = await AsyncStorage.getItem('userToken');
      return accessToken;
    }

    return null;
  }
}
GraphTutorial/App.tsx ファイルを開き、次
importのステートメントをファイルの上部に追加します。import {AuthManager} from './auth/AuthManager';既存の宣言を次に
authContext置き換える。const authContext = React.useMemo( () => ({ signIn: async () => { await AuthManager.signInAsync(); const token = await AuthManager.getAccessTokenAsync(); dispatch({ type: 'SIGN_IN', token: token }); }, signOut: async () => { await AuthManager.signOutAsync(); dispatch({ type: 'SIGN_OUT' }); } }), [] );GraphTutorial/menus/DrawerMenu.tsx
importファイルを開き、次のステートメントをファイルの上部に追加します。import {AuthManager} from '../auth/AuthManager';関数に次のコードを追加
componentDidMountします。try { const accessToken = await AuthManager.getAccessTokenAsync(); // TEMPORARY this.setState({userFirstName: accessToken, userLoading: false}); } catch (error) { Alert.alert( 'Error getting token', JSON.stringify(error), [ { text: 'OK' } ], { cancelable: false } ); }変更を保存し、エミュレーターでアプリケーションを再読み込みします。
アプリにサインインすると、[ようこそ] 画面にアクセス トークンが 表示 されます。
ユーザーの詳細情報を取得する
このセクションでは、Graph クライアント ライブラリのカスタム認証プロバイダーを作成し、Microsoft Graph DrawerMenuContent へのすべての呼び出しを保持するヘルパー クラスを作成し、この新しいクラスを使用してログイン ユーザーを取得するクラスを更新します。
graph という名前の GraphTutorial ディレクトリに新しい ディレクトリを作成 します。
GraphAuthProvider.ts という 名前の GraphTutorial/graph ディレクトリに新しいファイルを作成します。 次のコードをファイルに追加します。
import { AuthManager } from '../auth/AuthManager';

// Used by Graph client to get access tokens
// See https://github.com/microsoftgraph/msgraph-sdk-javascript/blob/dev/docs/CustomAuthenticationProvider.md
export class GraphAuthProvider {
  getAccessToken = async() => {
    const token = await AuthManager.getAccessTokenAsync();
    return token || '';
  }
}
GraphManager.ts という 名前の GraphTutorial/graph ディレクトリに新しいファイルを作成します。 次のコードをファイルに追加します。
import {Client} from '@microsoft/microsoft-graph-client';
import {GraphAuthProvider} from './GraphAuthProvider';

// Set the authProvider to an instance
// of GraphAuthProvider
const clientOptions = {
  authProvider: new GraphAuthProvider(),
};

// Initialize the client
const graphClient = Client.initWithMiddleware(clientOptions);

export class GraphManager {
  static getUserAsync = async () => {
    // GET /me
    return await graphClient
      .api('/me')
      .select('displayName,givenName,mail,mailboxSettings,userPrincipalName')
      .get();
  };
}
GraphTutorial/views/DrawerMenu.tsx
importファイルを開き、ファイルの上部に次のステートメントを追加します。import {GraphManager} from '../graph/GraphManager'; import * as MicrosoftGraph from '@microsoft/microsoft-graph-types';メソッドを次
componentDidMountに置き換える。async componentDidMount() { this.props.navigation.setOptions({ headerShown: false, }); try { // Get the signed-in user from Graph const user: MicrosoftGraph.User = await GraphManager.getUserAsync(); // Update UI with display name and email this.setState({ userLoading: false, userFirstName: user.givenName!, userFullName: user.displayName!, // Work/School accounts have email address in mail attribute // Personal accounts have it in userPrincipalName userEmail: user.mail! || user.userPrincipalName!, userTimeZone: user.mailboxSettings?.timeZone! }); } catch(error) { Alert.alert( 'Error getting user', JSON.stringify(error), [ { text: 'OK' } ], { cancelable: false } ); } }
変更を保存してアプリを今すぐ再読み込みする場合は、サインイン後に UI がユーザーの表示名と電子メール アドレスで更新されます。
予定表ビューを取得する
この演習では、アプリケーションに Microsoft Graphを組み込む必要があります。 このアプリケーションでは、Microsoft Graph JavaScript クライアント ライブラリを使用して Microsoft クライアント ライブラリを呼び出Graph。
Outlook からカレンダー イベントを取得する
このセクションでは、クラスをGraphManager``CalendarScreen拡張して、現在の週のユーザーのイベントを取得し、これらの新しい関数を使用するために更新する関数を追加します。
GraphTutorial/graph/GraphManager.tsx ファイルを開き、次のメソッドをクラスに追加
GraphManagerします。static getCalendarView = async(start: string, end: string, timezone: string) => { // GET /me/calendarview return await graphClient.api('/me/calendarview') .header('Prefer', `outlook.timezone="${timezone}"`) .query({ startDateTime: start, endDateTime: end}) // $select='subject,organizer,start,end' // Only return these fields in results .select('subject,organizer,start,end') // $orderby=createdDateTime DESC // Sort results by when they were created, newest first .orderby('start/dateTime') .top(50) .get(); }注意
コードの実行を
getCalendarView検討します。- 呼び出される URL は
/v1.0/me/calendarViewです。 - この
header関数は、要求Prefer: outlook.timezoneにヘッダーを追加し、応答の時間をユーザーの優先タイム ゾーンに追加します。 - 関数
queryは、カレンダー ビューstartDateTimeのendDateTime時間ウィンドウを定義するパラメーターとパラメーターを追加します。 - この
select関数は、各イベントで返されるフィールドを、アプリが実際に使用するフィールドに制限します。 - 関数
orderbyは、開始時刻によって結果を並べ替える。 - この
top関数は、結果を最初の 50 イベントに制限します。
- 呼び出される URL は
GraphTutorial/views/CalendarScreen.tsx を開き、その内容全体を次のコードに置き換えます。
import React from 'react';
import {
  ActivityIndicator,
  Alert,
  FlatList,
  Modal,
  Platform,
  ScrollView,
  StyleSheet,
  Text,
  View,
} from 'react-native';
import {createStackNavigator} from '@react-navigation/stack';
import * as MicrosoftGraph from '@microsoft/microsoft-graph-types';
import moment from 'moment-timezone';
import {findIana} from 'windows-iana';

import {UserContext} from '../UserContext';
import {GraphManager} from '../graph/GraphManager';

const Stack = createStackNavigator();
const CalendarState = React.createContext<CalendarScreenState>({
  loadingEvents: true,
  events: [],
});

type CalendarScreenState = {
  loadingEvents: boolean;
  events: MicrosoftGraph.Event[];
};

// Temporary JSON view
const CalendarComponent = () => {
  const calendarState = React.useContext(CalendarState);

  return (
    <View style={styles.container}>
      <Modal visible={calendarState.loadingEvents}>
        <View style={styles.loading}>
          <ActivityIndicator
            color={Platform.OS === 'android' ? '#276b80' : undefined}
            animating={calendarState.loadingEvents}
            size='large'
          />
        </View>
      </Modal>
      <ScrollView>
        <Text>{JSON.stringify(calendarState.events, null, 2)}</Text>
      </ScrollView>
    </View>
  );
};

export default class CalendarScreen extends React.Component {
  static contextType = UserContext;

  state: CalendarScreenState = {
    loadingEvents: true,
    events: [],
  };

  async componentDidMount() {
    try {
      const tz = this.context.userTimeZone || 'UTC';
      // Convert user's Windows time zone ("Pacific Standard Time")
      // to IANA format ("America/Los_Angeles")
      // Moment.js needs IANA format
      const ianaTimeZone = findIana(tz)[0];

      // Get midnight on the start of the current week in the user's
      // time zone, but in UTC. For example, for PST, the time value
      // would be 07:00:00Z
      const startOfWeek = moment
        .tz(ianaTimeZone!.valueOf())
        .startOf('week')
        .utc();

      const endOfWeek = moment(startOfWeek).add(7, 'day');

      const events = await GraphManager.getCalendarView(
        startOfWeek.format(),
        endOfWeek.format(),
        tz,
      );

      this.setState({
        loadingEvents: false,
        events: events.value,
      });
    } catch (error) {
      Alert.alert(
        'Error getting events',
        JSON.stringify(error),
        [
          {
            text: 'OK',
          },
        ],
        {cancelable: false},
      );
    }
  }

  render() {
    return (
      <CalendarState.Provider value={this.state}>
        <Stack.Navigator>
          <Stack.Screen
            name='Calendar'
            component={CalendarComponent}
            options={{
              headerShown: false,
            }}
          />
        </Stack.Navigator>
      </CalendarState.Provider>
    );
  }
}

const styles = StyleSheet.create({
  container: {
    flex: 1,
  },
  loading: {
    flex: 1,
    justifyContent: 'center',
    alignItems: 'center',
  },
  eventItem: {
    padding: 10,
  },
  eventSubject: {
    fontWeight: '700',
    fontSize: 18,
  },
  eventOrganizer: {
    fontWeight: '200',
  },
  eventDuration: {
    fontWeight: '200',
  },
});
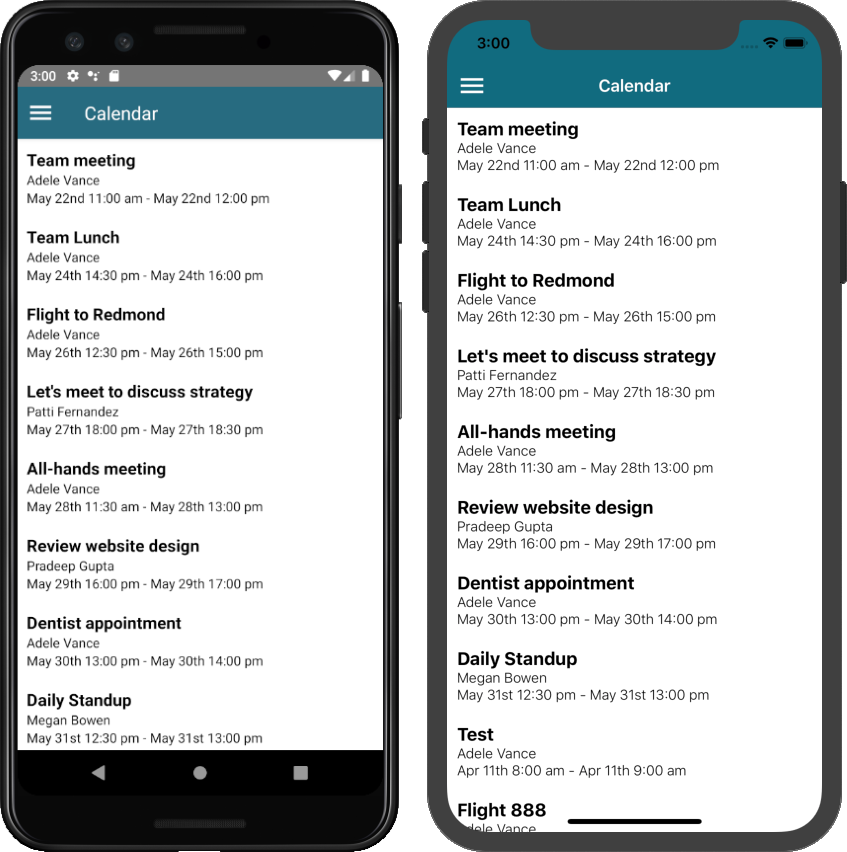
これで、アプリを実行し、サインインし、メニューの [予定表 ] ナビゲーション アイテムをタップできます。 アプリにイベントの JSON ダンプが表示されます。
結果の表示
これで、JSON ダンプを何かに置き換え、結果をユーザーフレンドリーに表示できます。 このセクションでは、カレンダー画面に a FlatList を追加してイベントをレンダリングします。
クラス宣言の上に 次の メソッドを
CalendarScreen追加します。const convertDateTime = (dateTime: string): string => { return moment(dateTime).format('MMM Do H:mm a'); };in メソッドを
ScrollView次にCalendarComponent置き換える。<FlatList data={calendarState.events} renderItem={({item}) => ( <View style={styles.eventItem}> <Text style={styles.eventSubject}>{item.subject}</Text> <Text style={styles.eventOrganizer}> {item.organizer!.emailAddress!.name} </Text> <Text style={styles.eventDuration}> {convertDateTime(item.start!.dateTime!)} -{' '} {convertDateTime(item.end!.dateTime!)} </Text> </View> )} />アプリを実行し、サインインし、[予定表] ナビゲーション アイテム を タップします。 イベントの一覧が表示されます。
新しいイベントを作成する
このセクションでは、ユーザーの予定表にイベントを作成する機能を追加します。
新しいイベント画面を作成する
./graph/GraphManager.ts を開き、次の関数をクラスに追加
GraphManagerします。static createEvent = async(newEvent: any) => { // POST /me/events await graphClient.api('/me/events') .post(newEvent); }この関数は、Graph SDK を使用して新しいイベントを作成します。
NewEventScreen.tsx という名前の ./screens に新しいファイルを作成し、次のコードを追加します。
import React from 'react';
import {
  ActivityIndicator,
  Alert,
  Button,
  Modal,
  Platform,
  ScrollView,
  StyleSheet,
  Text,
  View,
} from 'react-native';
import DateTimePicker from '@react-native-community/datetimepicker';
import { createStackNavigator } from '@react-navigation/stack';
import * as MicrosoftGraph from '@microsoft/microsoft-graph-types';
import moment from 'moment-timezone';

import { UserContext } from '../UserContext';
import { GraphManager } from '../graph/GraphManager';
import { TextInput } from 'react-native-gesture-handler';

const Stack = createStackNavigator();
const NewEventState = React.createContext<NewEventState>({
  isCreating: false,
  subject: '',
  attendees: '',
  body: '',
  timeZone: '',
  startDate: new Date(),
  endDate: new Date(),
  disableCreate: () => { return true },
  updateValue: () => {}
});

type NewEventState = {
  isCreating: boolean;
  subject: string;
  attendees: string;
  body: string;
  timeZone: string;
  startDate: Date;
  endDate: Date;
  disableCreate: () => boolean;
  updateValue: (newValue: string | Date | boolean, fieldName: string) => void;
}

type DateTimeInputProps = {
  value: Date;
  onChange: (event: Event, newValue: Date | undefined) => void;
}

// The picker acts very differently on Android and iOS
// iOS can use a single picker for both date and time,
// where Android requires two. Also the iOS version can
// be displayed all the time, while the Android version is a
// modal pop-up. Encapsulating this into a reusable component
const DateTimeInput = (props: DateTimeInputProps) => {
  const [showDatePicker, setShowDatePicker] = React.useState(false);
  const [showTimePicker, setShowTimePicker] = React.useState(Platform.OS === 'ios');

  return (
    <View style={Platform.OS === 'android' ? styles.dateTime : null}>
      { Platform.OS === 'android' &&
        <Text
          style={styles.time}
          onPress={()=>{setShowTimePicker(true)}}>
          {formatTime(props.value)}
        </Text>
      }
      { showTimePicker &&
        <DateTimePicker
          mode={Platform.OS === 'ios' ? 'datetime' : 'time'}
          value={props.value}
          onChange={(e, d) => {
            setShowTimePicker(Platform.OS === 'ios');
            if (d)
              props.onChange(e,d);
          }}
          />
      }
      { Platform.OS === 'android' &&
        <Text
          style={styles.date}
          onPress={()=>{setShowDatePicker(true)}}>
          {formatDate(props.value)}
        </Text>
      }
      { showDatePicker &&
        Platform.OS === 'android' &&
        <DateTimePicker
          mode='date'
          value={props.value}
          onChange={(e, d) => {
            setShowDatePicker(Platform.OS === 'ios');
            if (d)
              props.onChange(e,d);
          }}
          />
      }
    </View>
  )
}

const NewEventComponent = () => {
  const newEventState = React.useContext(NewEventState);

  const createEvent = async () => {
    newEventState.updateValue(true, 'isCreating');

    // Create a new Event object with the
    // required fields
    const newEvent: MicrosoftGraph.Event = {
      subject: newEventState.subject,
      start: {
        dateTime: moment(newEventState.startDate).format('YYYY-MM-DDTHH:mm:ss'),
        timeZone: newEventState.timeZone
      },
      end: {
        dateTime: moment(newEventState.endDate).format('YYYY-MM-DDTHH:mm:ss'),
        timeZone: newEventState.timeZone
      }
    };

    // Only add attendees if the user specified them
    if (newEventState.attendees.length > 0) {
      newEvent.attendees = [];

      // Value should be a ;-delimited list of email addresses
      // NOTE: The app does no validation of this
      const emails = newEventState.attendees.split(';')

      emails.forEach((email) => {
        newEvent.attendees!.push({
          emailAddress: { address: email }
        });
      });
    }

    // Only add body if the user specified one
    if (newEventState.body.length > 0) {
      newEvent.body = {
        content: newEventState.body,
        // For simplicity, add it as a plain-text body
        contentType: 'text'
      };
    }

    await GraphManager.createEvent(newEvent);

    Alert.alert('Success',
      'Event created',
      [
        {
          text: 'OK',
          onPress: () => {
            newEventState.updateValue(false, 'isCreating');
          }
        }
      ]
    );
  }

  return (
    <ScrollView style={styles.container}>
      <Modal visible={newEventState.isCreating}>
        <View style={styles.loading}>
          <ActivityIndicator
            color={Platform.OS === 'android' ? '#276b80' : undefined}
            animating={newEventState.isCreating}
            size='large' />
        </View>
      </Modal>
        <View style={styles.formField}>
          <Text style={styles.fieldLabel}>Subject</Text>
          <TextInput style={styles.textInput}
            value={newEventState.subject}
            onChangeText={(text) => newEventState.updateValue(text, 'subject')} />
        </View>
        <View style={styles.formField}>
          <Text style={styles.fieldLabel}>Attendees</Text>
          <TextInput style={styles.textInput}
            placeholder="Email (separate multiple with ';')"
            value={newEventState.attendees}
            onChangeText={(text) => newEventState.updateValue(text, 'attendees')} />
        </View>
        <View style={styles.formField}>
          <Text style={styles.fieldLabel}>Start</Text>
          <DateTimeInput
            value={newEventState.startDate}
            onChange={(e, date) => newEventState.updateValue(date!, 'startDate')} />
        </View>
        <View style={styles.formField}>
          <Text style={styles.fieldLabel}>End</Text>
          <DateTimeInput
            value={newEventState.endDate}
            onChange={(e, date) => newEventState.updateValue(date!, 'endDate')} />
        </View>
        <View style={styles.formField}>
          <TextInput style={styles.multiLineTextInput}
            multiline={true}
            textAlignVertical='top'
            placeholder='Body'
            value={newEventState.body}
            onChangeText={(text) => newEventState.updateValue(text, 'body')} />
        </View>
        <View style={styles.formField}>
          <Button title="Create"
            disabled={newEventState.disableCreate()}
            onPress={createEvent}/>
        </View>
    </ScrollView>
  );
}

const formatTime = (dateTime: Date): string => {
  return moment(dateTime).format('h:mm A');
}

const formatDate = (dateTime: Date): string => {
  return moment(dateTime).format('MMM D, YYYY');
}

// When first loading the form, set the start time
// to the nearest hour or half-hour
const getDefaultStart = (): Date => {
  const now = moment().startOf('minute');
  const offset = 30 - (now.minute() % 30);

  return now.add(offset, 'minutes').toDate();
}

// When first loading the form, set the end time
// to start + 30 min
const getDefaultEnd = (): Date => {
  return moment(getDefaultStart()).add(30, 'minutes').toDate();
}

export default class NewEventScreen extends React.Component {
  static contextType = UserContext;

  // Disable the create button if:
  // - App is waiting for the result of create request
  // - Subject is empty
  // - Start time is after end time
  disableCreate = () => {
    return this.state.isCreating ||
      this.state.subject.length <= 0 ||
      moment(this.state.startDate).isAfter(this.state.endDate);
  }

  onStateValueChange = (newValue: string | Date | boolean, fieldName: string) => {
    this.setState({ [fieldName]: newValue });
  }

  state: NewEventState = {
    isCreating: false,
    subject: '',
    attendees: '',
    body: '',
    timeZone: this.context.userTimeZone,
    startDate: getDefaultStart(),
    endDate: getDefaultEnd(),
    disableCreate: this.disableCreate,
    updateValue: this.onStateValueChange
  };

  render() {
    return (
      <NewEventState.Provider value={this.state}>
        <Stack.Navigator>
          <Stack.Screen name='NewEvent'
            component={ NewEventComponent }
            options={{
              headerShown: false
            }} />
        </Stack.Navigator>
      </NewEventState.Provider>
    );
  }
}

const styles = StyleSheet.create({
  container: {
    flex: 1
  },
  loading: {
    flex: 1,
    justifyContent: 'center',
    alignItems: 'center'
  },
  formField: {
    paddingHorizontal: 10,
    paddingVertical: 5
  },
  fieldLabel: {
    fontWeight: '700',
    marginBottom: 10
  },
  textInput: {
    borderColor: 'gray',
    borderWidth: 1,
    height: 40,
    padding: 10
  },
  multiLineTextInput: {
    borderColor: 'gray',
    borderWidth: 1,
    height: 200,
    padding: 10
  },
  time: {
    padding: 10,
    backgroundColor: '#e6e6e6',
    color: '#147efb',
    marginRight: 10
  },
  date: {
    padding: 10,
    backgroundColor: '#e6e6e6',
    color: '#147efb'
  },
  dateTime: {
    flexDirection: 'row'
  }
});
関数の動作を検討
createEventします。 フォームの値を使用MicrosoftGraph.Eventしてオブジェクトを作成し、そのオブジェクトを関数に渡GraphManager.createEventします。./menus/DrawerMenu.tsx を開き、ファイル
importの上部に次のステートメントを追加します。import NewEventScreen from '../screens/NewEventScreen';次のコードを、行の上
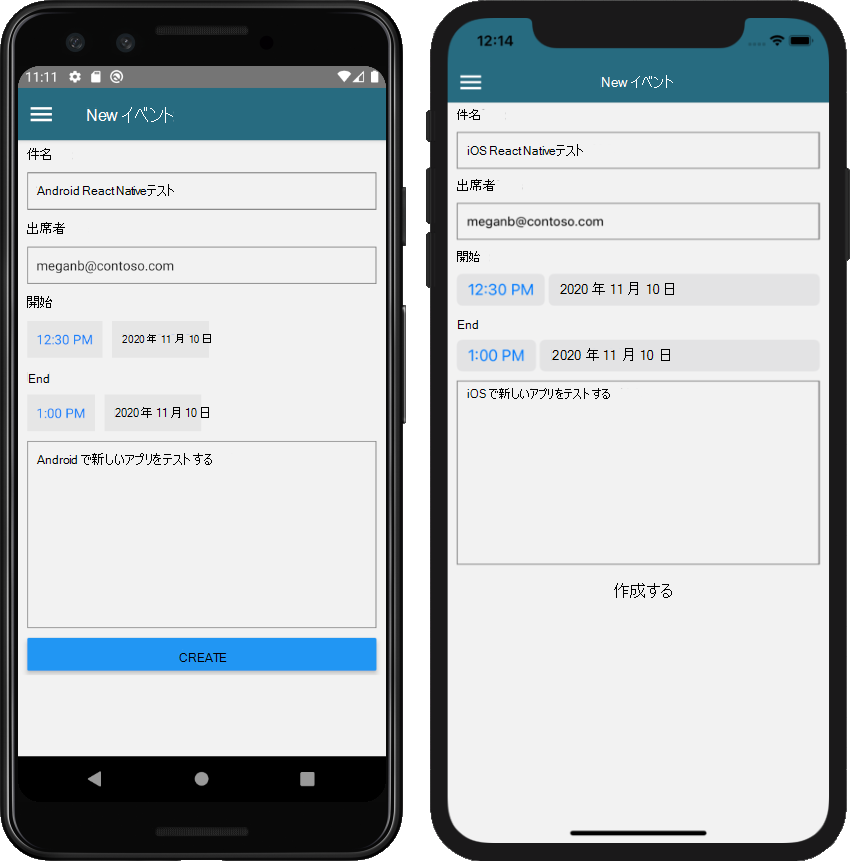
<Drawer.Navigator>の要素内に追加</Drawer.Navigator>します。{userLoaded && ( <Drawer.Screen name='NewEvent' component={NewEventScreen} options={{drawerLabel: 'New event'}} /> )}変更を保存し、アプリを再起動または更新します。 メニューの [新しいイベント ] オプションを選択して、新しいイベント フォームに移動します。
フォームに入力し、[作成] を 選択します。
おめでとうございます。
Microsoft のチュートリアルのReact Native完了Graphしました。 Microsoft Graphを呼び出す作業アプリが作成されたので、新しい機能を試して追加できます。 Microsoft Graphの概要を参照して、Microsoft Graphでアクセスできるすべてのデータを確認Graph。
フィードバック
このチュートリアルに関するフィードバックは、GitHubしてください。
このセクションに問題がある場合 このセクションを改善できるよう、フィードバックをお送りください。