Economy v2、Unity、Android の概要
Important
エコノミー v2 が一般提供になりました。 サポートとフィードバックについては、 PlayFab フォーラムにアクセスしてください。
このチュートリアルでは、PlayFab、Unity + IAP サービス、Android 課金 API を使用して、アプリ内購入 (IAP) を設定する方法を説明します。
開始の前に
以下の図は、Android 課金 API と PlayFab がどのように連動し、顧客に安定した IAP 体験を提供するかを示しています。
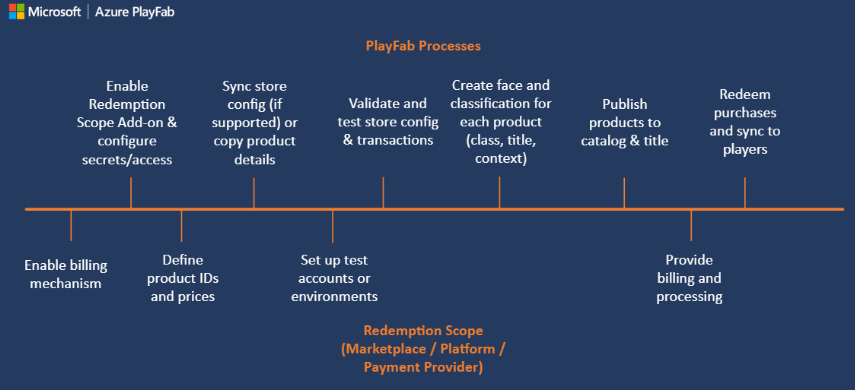
まず、PlayMarket で製品 ID と価格を設定します。 最初は、すべての製品が特定化されていません。プレイヤーが購入可能な単なるデジタル エンティティであり、PlayFab プレイヤーにとって何の意味もありません。
これらのエンティティを有益化するには、PlayFab アイテム カタログでミラー化する必要があります。 これによって、特定化されていないエンティティがバンドル、コンテナー、個別のアイテムとなります。
それぞれに次のような独自の側面があります:
- タイトル
- 説明
- Tags
- types
- Images
- ビヘイビア によって特徴付けられます。
ID を共有することで、これらすべてがマーケットの製品にリンクされます。
購入可能な実際の金額のアイテムにアクセスする最適な方法は、GetItems を使用することです。
アイテムの ID は、PlayFab と外部 IAP システム間のリンクです。 したがって、IAP サービスにアイテム ID を渡します。
この時点で、購入プロセスが開始します。 プレイヤーが IAP インターフェイスと通信し、購入が成功すると、領収書を取得できます。
PlayFab はその後その領収書を検証し、購入を登録して、購入アイテムをプレイヤーに付与します。
クライアント アプリケーションを設定する
このセクションでは、アプリケーションを構成し、PlayFab、UnityIAP、 Android 課金 API を使用した IAP をテストする方法を説明します。
前提条件:
- Unity プロジェクト。
- PlayFab Unity SDK がインポートされ、タイトルに対して動作するように構成されました。
- Visual Studio のようなエディターがインストールされ、Unity プロジェクトで動作するように構成されました。
まずは UnityIAP を設定します。
- [サービス] に移動します。
- [サービス] タブが選択されていることを確認してください。
- 自分の Unity サービスのプロフィールまたは組織を選択します。
- [作成] を選択します。
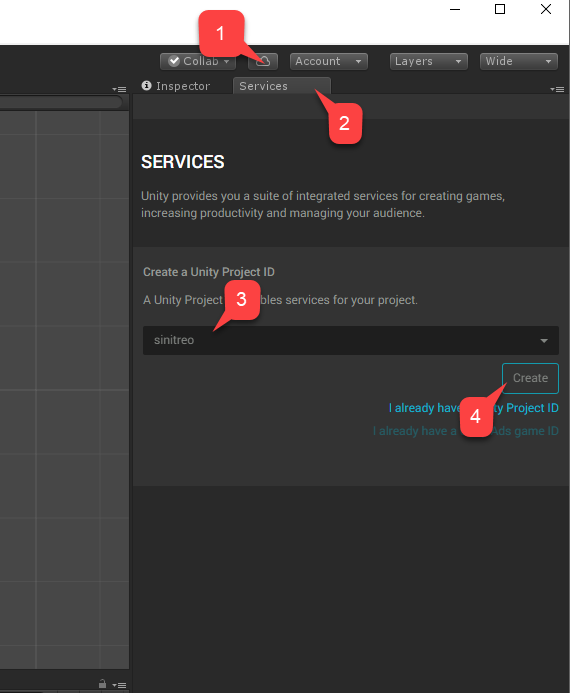
- 次に、[アプリ内購入 (IAP)] サービスに移動します。
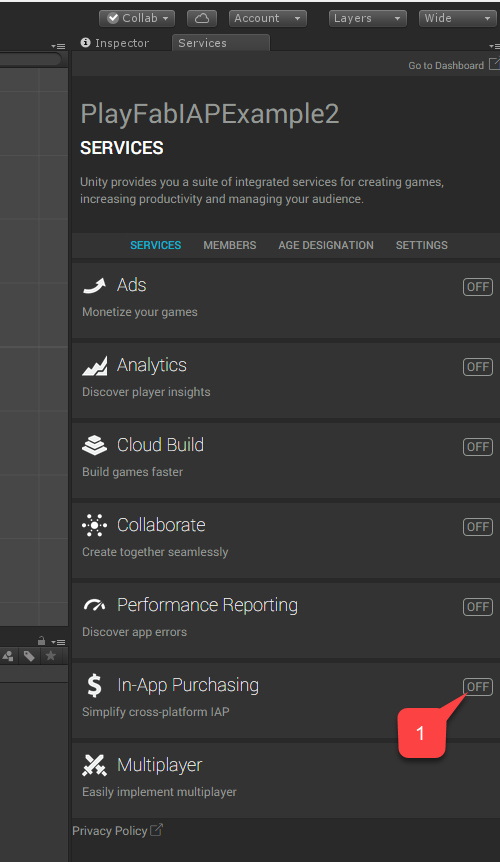
[Simplify cross-platform IAP (プラットフォーム間 IAP の簡素化)] の切り替えをオンにして、サービス を有効にします。
次に、[Continue (続ける)] を選択します。
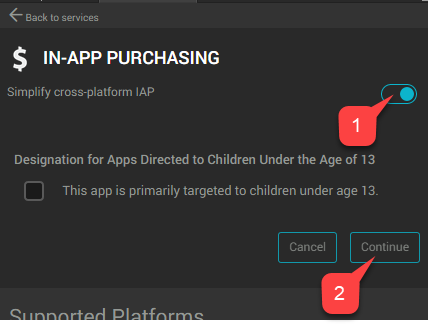
プラグインの一覧ページが表示されます。
- [Import (インポート)] を選択します。
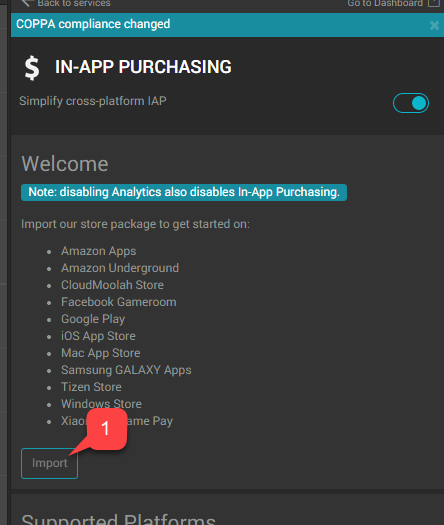
Uすべてのプラグインがインポートされる段階まで Unity のインストールとインポート手順を続行します。
- プラグインが揃っていることを確認してください。
- 次に AndroidIAPExample.cs という名前の新しいスクリプトを作成します。
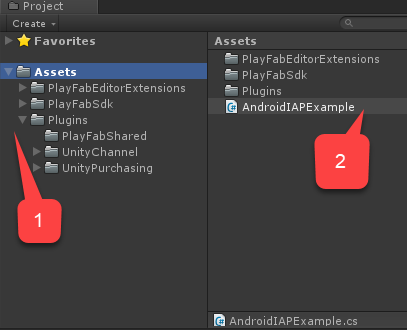
AndroidIAPExample.cs には、次のコードが含まれます (詳細については、コードのコメントを参照してください)。
using System;
using System.Collections.Generic;
using System.Linq;
using System.Threading.Tasks;

using UnityEngine;
using UnityEngine.Purchasing;
using UnityEngine.Purchasing.Extension;

using PlayFab;
using PlayFab.ClientModels;
using PlayFab.EconomyModels;

/// <summary>
/// Unity behavior that implements the the Unity IAP Store interface.
/// Attach as an asset to your Scene.
/// </summary>
public class AndroidIAPExample : MonoBehaviour, IDetailedStoreListener
{
    // Bundles for sale on the Google Play Store.
    private Dictionary<string, PlayFab.EconomyModels.CatalogItem> _googlePlayCatalog;

    // In-game items for sale at the example vendor.
    private Dictionary<string, PlayFab.EconomyModels.CatalogItem> _storefrontCatalog;

    private string _purchaseIdempotencyId = null;

    private PlayFabEconomyAPIAsyncResult _lastAPICallResult = null;

    private static readonly PlayFabEconomyAPIAsync s_economyAPI = new();

    private static IStoreController s_storeController;

    // TODO: This callback is for illustrations purposes, you should create one that fits your needs
    public delegate void PlayFabProcessPurchaseCallback(PurchaseProcessingResult result);

    /// <summary>
    /// Event that is triggered when a purchase is processed.
    /// </summary>
    /// <remarks>
    /// TODO: Subscribe to this event in your game code to handle purchase results.
    /// </remarks>
    public event PlayFabProcessPurchaseCallback PlayFabProcessPurchaseEvent;

    /// <summary>
    /// True if the Store Controller, extensions, and Catalog are set.
    /// </summary>
    public bool IsInitialized => s_storeController != null
                             && _googlePlayCatalog != null
                             && _storefrontCatalog != null;

    // Start is called before the first frame update.
    public void Start()
    {
        Login();
    }

    /// <summary>
    /// Attempts to log the player in via the Android Device ID.
    /// </summary>
    private void Login()
    {
        // TODO: it is better to use LoginWithGooglePlayGamesService or a similar platform-specific login method for final game code.

        // SystemInfo.deviceUniqueIdentifier will prompt for permissions on newer devices.
        // Using a non-device specific GUID and saving to a local file
        // is a better approach. PlayFab does allow you to link multiple
        // Android device IDs to a single PlayFab account.
        PlayFabClientAPI.LoginWithCustomID(new LoginWithCustomIDRequest()
        {
            CreateAccount = true,
            CustomId = SystemInfo.deviceUniqueIdentifier
        }, result => RefreshIAPItems(), PlayFabSampleUtil.OnPlayFabError);
    }

    /// <summary>
    /// Queries the PlayFab Economy Catalog V2 for updated listings
    /// and then fills the local catalog objects.
    /// </summary>
    private async void RefreshIAPItems()
    {
        _googlePlayCatalog = new Dictionary<string, PlayFab.EconomyModels.CatalogItem>();
        SearchItemsRequest googlePlayCatalogRequest = new()
        {
            Count = 50,
            Filter = "AlternateIds/any(t: t/type eq 'GooglePlay')"
        };

        SearchItemsResponse googlePlayCatalogResponse;
        do
        {
            googlePlayCatalogResponse = await s_economyAPI.SearchItemsAsync(googlePlayCatalogRequest);
            Debug.Log("Search response: " + JsonUtility.ToJson(googlePlayCatalogResponse));

            foreach (PlayFab.EconomyModels.CatalogItem item in googlePlayCatalogResponse.Items)
            {
                _googlePlayCatalog.Add(item.Id, item);
            }

        } while (!string.IsNullOrEmpty(googlePlayCatalogResponse.ContinuationToken));

        Debug.Log($"Completed pulling from PlayFab Economy v2 googleplay Catalog: {_googlePlayCatalog.Count()} items retrieved");

        _storefrontCatalog = new Dictionary<string, PlayFab.EconomyModels.CatalogItem>();
        GetItemRequest storeCatalogRequest = new()
        {
            AlternateId = new CatalogAlternateId()
            {
                Type = "FriendlyId",
                Value = "villagerstore"
            }
        };

        GetItemResponse storeCatalogResponse;
        storeCatalogResponse = await s_economyAPI.GetItemAsync(storeCatalogRequest);
        List<string> itemIds = new();

        foreach (CatalogItemReference item in storeCatalogResponse.Item.ItemReferences)
        {
            itemIds.Add(item.Id);
        }

        GetItemsRequest itemsCatalogRequest = new()
        {
            Ids = itemIds
        };

        GetItemsResponse itemsCatalogResponse = await s_economyAPI.GetItemsAsync(itemsCatalogRequest);
        foreach (PlayFab.EconomyModels.CatalogItem item in itemsCatalogResponse.Items)
        {
            _storefrontCatalog.Add(item.Id, item);
        }

        Debug.Log($"Completed pulling from PlayFab Economy v2 villagerstore store: {_storefrontCatalog.Count()} items retrieved");

        InitializePurchasing();
    }

    /// <summary>
    /// Initializes the Unity IAP system for the Google Play Store.
    /// </summary>
    private void InitializePurchasing()
    {
        if (IsInitialized) return;

        var builder = ConfigurationBuilder.Instance(StandardPurchasingModule.Instance(AppStore.GooglePlay));

        foreach (PlayFab.EconomyModels.CatalogItem item in _googlePlayCatalog.Values)
        {
            string googlePlayItemId = item.AlternateIds.FirstOrDefault(item => item.Type == "GooglePlay")?.Value;
            if (!string.IsNullOrWhiteSpace(googlePlayItemId))
            {
                builder.AddProduct(googlePlayItemId, ProductType.Consumable);
            }
        }

        UnityPurchasing.Initialize(this, builder);
    }

    /// <summary>
    /// Draw a debug IMGUI for testing examples.
    /// Use UI Toolkit for your production game runtime UI instead.
    /// </summary>
    public void OnGUI()
    {
        // Support high-res devices.
        GUI.matrix = Matrix4x4.TRS(new Vector3(0, 0, 0), Quaternion.identity, new Vector3(3, 3, 3));

        if (!IsInitialized)
        {
            GUILayout.Label("Initializing IAP and logging in...");
            return;
        }

        if (!string.IsNullOrEmpty(_purchaseIdempotencyId) && (!string.IsNullOrEmpty(_lastAPICallResult?.Message)
                                                           || !string.IsNullOrEmpty(_lastAPICallResult?.Error)))
        {
            GUILayout.Label(_lastAPICallResult?.Message + _lastAPICallResult?.Error);
        }

        GUILayout.Label("Shop for game currency bundles.");
        // Draw a purchase menu for each catalog item.
        foreach (PlayFab.EconomyModels.CatalogItem item in _googlePlayCatalog.Values)
        {
            // Use a dictionary to select the proper language.
            if (GUILayout.Button("Get " + (item.Title.ContainsKey("en-US") ? item.Title["en-US"] : item.Title["NEUTRAL"])))
            {
                BuyProductById(item.AlternateIds.FirstOrDefault(item => item.Type == "GooglePlay").Value);
            }
        }

        GUILayout.Label("Hmmm. (Translation: Welcome to my humble Villager store.)");
        // Draw a purchase menu for each catalog item.
        foreach (PlayFab.EconomyModels.CatalogItem item in _storefrontCatalog.Values)
        {
            // Use a dictionary to select the proper language.
            if (GUILayout.Button("Buy "
                + (item.Title.ContainsKey("en-US") ? item.Title["en-US"] : item.Title["NEUTRAL"]
                + ": "
                + item.PriceOptions.Prices.FirstOrDefault().Amounts.FirstOrDefault().Amount.ToString()
                + " Diamonds"
                )))
            {
                Task.Run(() => PlayFabPurchaseItemById(item.Id));
            }
        }
    }

    /// <summary>
    /// Integrates game purchasing with the Unity IAP API.
    /// </summary>
    public void BuyProductById(string productId)
    {
        if (!IsInitialized)
        {
            Debug.LogError("IAP Service is not initialized!");
            return;
        }

        s_storeController.InitiatePurchase(productId);
    }

    /// <summary>
    /// Purchases a PlayFab inventory item by ID.
    /// See the <see cref="PlayFabEconomyAPIAsync"/> class for details on error handling
    /// and calling patterns.
    /// </summary>
    async public Task<bool> PlayFabPurchaseItemById(string itemId)
    {
        if (!IsInitialized)
        {
            Debug.LogError("IAP Service is not initialized!");
            return false;
        }

        _lastAPICallResult = new();

        Debug.Log("Player buying product " + itemId);

        if (string.IsNullOrEmpty(_purchaseIdempotencyId))
        {
            _purchaseIdempotencyId = Guid.NewGuid().ToString();
        }

        GetItemRequest getVillagerStoreRequest = new()
        {
            AlternateId = new CatalogAlternateId()
            {
                Type = "FriendlyId",
                Value = "villagerstore"
            }
        };

        GetItemResponse getStoreResponse = await s_economyAPI.GetItemAsync(getVillagerStoreRequest);
        if (getStoreResponse == null || string.IsNullOrEmpty(getStoreResponse?.Item?.Id))
        {
            _lastAPICallResult.Error = "Unable to contact the store. Check your internet connection and try again in a few minutes.";
            return false;
        }

        CatalogPriceAmount price = _storefrontCatalog.FirstOrDefault(item => item.Key == itemId).Value.PriceOptions.Prices.FirstOrDefault().Amounts.FirstOrDefault();
        PurchaseInventoryItemsRequest purchaseInventoryItemsRequest = new()
        {
            Amount = 1,
            Item = new InventoryItemReference()
            {
                Id = itemId
            },
            PriceAmounts = new List<PurchasePriceAmount>
            {
                new()
                {
                    Amount = price.Amount,
                    ItemId = price.ItemId
                }
            },
            IdempotencyId = _purchaseIdempotencyId,
            StoreId = getStoreResponse.Item.Id
        };

        PurchaseInventoryItemsResponse purchaseInventoryItemsResponse = await s_economyAPI.PurchaseInventoryItemsAsync(purchaseInventoryItemsRequest);
        if (purchaseInventoryItemsResponse == null || purchaseInventoryItemsResponse?.TransactionIds.Count < 1)
        {
            _lastAPICallResult.Error = "Unable to purchase. Try again in a few minutes.";
            return false;
        }

        _purchaseIdempotencyId = "";
        _lastAPICallResult.Message = "Purchasing!";
        return true;
    }

    private void OnRegistration(LoginResult result)
    {
        PlayFabSettings.staticPlayer.ClientSessionTicket = result.SessionTicket;
    }

    public void OnInitialized(IStoreController controller, IExtensionProvider extensions)
    {
        s_storeController = controller;

        extensions.GetExtension<IGooglePlayStoreExtensions>().RestoreTransactions((result, error) => {
            if (result)
            {
                Debug.LogWarning("Restore transactions succeeded.");
            }
            else
            {
                Debug.LogWarning("Restore transactions failed.");
            }
        });
    }

    public void OnInitializeFailed(InitializationFailureReason error)
    {
        Debug.Log("OnInitializeFailed InitializationFailureReason:" + error);
    }

    public void OnInitializeFailed(InitializationFailureReason error, string message)
    {
        Debug.Log("OnInitializeFailed InitializationFailureReason:" + error + message);
    }

    public void OnPurchaseFailed(UnityEngine.Purchasing.Product product, PurchaseFailureReason failureReason)
    {
        Debug.Log($"OnPurchaseFailed: FAIL. Product: '{product.definition.storeSpecificId}', PurchaseFailureReason: {failureReason}");
    }

    public void OnPurchaseFailed(UnityEngine.Purchasing.Product product, PurchaseFailureDescription failureDescription)
    {
        Debug.Log($"OnPurchaseFailed: FAIL. Product: '{product.definition.storeSpecificId}', PurchaseFailureReason: {failureDescription}");
    }

    /// <summary>
    /// Callback for Store purchases. Subscribe to PlayFabProcessPurchaseEvent to handle the final PurchaseProcessingResult.
    /// <see href="https://docs.unity3d.com/Packages/com.unity.purchasing@4.8/api/UnityEngine.Purchasing.PurchaseProcessingResult.html"/>
    /// </summary>
    /// <remarks>
    /// This code does not account for purchases that were pending and are
    /// delivered on application start. Production code should account for these cases.
    /// </remarks>
    /// <returns>Complete immediately upon error. Pending if PlayFab Economy is handling final processing and will trigger PlayFabProcessPurchaseEvent with the final result.</returns>
    public PurchaseProcessingResult ProcessPurchase(PurchaseEventArgs purchaseEvent)
    {
        if (!IsInitialized)
        {
            Debug.LogWarning("Not initialized. Ignoring.");
            return PurchaseProcessingResult.Complete;
        }

        if (purchaseEvent.purchasedProduct == null)
        {
            Debug.LogWarning("Attempted to process purchase with unknown product. Ignoring.");
            return PurchaseProcessingResult.Complete;
        }

        if (string.IsNullOrEmpty(purchaseEvent.purchasedProduct.receipt))
        {
            Debug.LogWarning("Attempted to process purchase with no receipt. Ignoring.");
            return PurchaseProcessingResult.Complete;
        }

        Debug.Log("Attempting purchase with receipt " + purchaseEvent.purchasedProduct.receipt);
        GooglePurchase purchasePayload = GooglePurchase.FromJson(purchaseEvent.purchasedProduct.receipt);
        RedeemGooglePlayInventoryItemsRequest request = new()
        {
            Purchases = new List<GooglePlayProductPurchase>
            {
                new()
                {
                    ProductId = purchasePayload.PayloadData?.JsonData?.productId,
                    Token = purchasePayload.PayloadData?.JsonData?.purchaseToken
                }
            }
        };

        PlayFabEconomyAPI.RedeemGooglePlayInventoryItems(request, result =>
        {
            Debug.Log("Processed receipt validation.");

            if (result?.Failed.Count > 0)
            {
                Debug.Log($"Validation failed for {result.Failed.Count} receipts.");
                Debug.Log(JsonUtility.ToJson(result.Failed));
                PlayFabProcessPurchaseEvent?.Invoke(PurchaseProcessingResult.Pending);
            }
            else
            {
                Debug.Log("Validation succeeded!");
                PlayFabProcessPurchaseEvent?.Invoke(PurchaseProcessingResult.Complete);
                s_storeController.ConfirmPendingPurchase(purchaseEvent.purchasedProduct);
                Debug.Log("Confirmed purchase with Google Marketplace.");
            }
        },
        PlayFabSampleUtil.OnPlayFabError);

        return PurchaseProcessingResult.Pending;
    }
}

/// <summary>
/// Utility classes for the sample.
/// </summary>
public class PlayFabEconomyAPIAsyncResult
{
    public string Error { get; set; } = null;

    public string Message { get; set; } = null;
}

public static class PlayFabSampleUtil
{
    public static void OnPlayFabError(PlayFabError error)
    {
        Debug.LogError(error.GenerateErrorReport());
    }
}

/// <summary>
/// Example Async wrapper for PlayFab API's.
///
/// This is just a quick sample for example purposes.
///
/// Write your own customer Logger implementation to log and handle errors
/// for user-facing scenarios. Use tags and map which PlayFab errors require your
/// game to handle GUI or gameplay updates vs which should be logged to crash and
/// error reporting services.
/// </summary>
public class PlayFabEconomyAPIAsync
{
    /// <summary>
    /// <see href="https://learn.microsoft.com/rest/api/playfab/economy/catalog/get-item"/>
    /// </summary>
    public Task<GetItemResponse> GetItemAsync(GetItemRequest request)
    {
        TaskCompletionSource<GetItemResponse> getItemAsyncTaskSource = new();
        PlayFabEconomyAPI.GetItem(request, (response) => getItemAsyncTaskSource.SetResult(response), error =>
        {
            PlayFabSampleUtil.OnPlayFabError(error);
            getItemAsyncTaskSource.SetResult(default);
        });
        return getItemAsyncTaskSource.Task;
    }

    /// <summary>
    /// <see href="https://learn.microsoft.com/rest/api/playfab/economy/catalog/get-items"/>
    /// </summary>
    public Task<GetItemsResponse> GetItemsAsync(GetItemsRequest request)
    {
        TaskCompletionSource<GetItemsResponse> getItemsAsyncTaskSource = new();
        PlayFabEconomyAPI.GetItems(request, (response) => getItemsAsyncTaskSource.SetResult(response), error =>
        {
            PlayFabSampleUtil.OnPlayFabError(error);
            getItemsAsyncTaskSource.SetResult(default);
        });
        return getItemsAsyncTaskSource.Task;
    }

    /// <summary>
    /// <see href="https://learn.microsoft.com/rest/api/playfab/economy/inventory/purchase-inventory-items"/>
    /// </summary>
    public Task<PurchaseInventoryItemsResponse> PurchaseInventoryItemsAsync(PurchaseInventoryItemsRequest request)
    {
        TaskCompletionSource<PurchaseInventoryItemsResponse> purchaseInventoryItemsAsyncTaskSource = new();
        PlayFabEconomyAPI.PurchaseInventoryItems(request, (response) => purchaseInventoryItemsAsyncTaskSource.SetResult(response), error =>
        {
            PlayFabSampleUtil.OnPlayFabError(error);
            purchaseInventoryItemsAsyncTaskSource.SetResult(default);
        });
        return purchaseInventoryItemsAsyncTaskSource.Task;
    }

    /// <summary>
    /// <see href="https://learn.microsoft.com/rest/api/playfab/economy/catalog/search-items"/>
    /// </summary>
    public Task<SearchItemsResponse> SearchItemsAsync(SearchItemsRequest request)
    {
        TaskCompletionSource<SearchItemsResponse> searchItemsAsyncTaskSource = new();
        PlayFabEconomyAPI.SearchItems(request, (response) => searchItemsAsyncTaskSource.SetResult(response), error =>
        {
            PlayFabSampleUtil.OnPlayFabError(error);
            searchItemsAsyncTaskSource.SetResult(default);
        });
        return searchItemsAsyncTaskSource.Task;
    }
}

[Serializable]
public class PurchaseJsonData
{
    public string orderId;
    public string packageName;
    public string productId;
    public string purchaseToken;
    public long   purchaseTime;
    public int    purchaseState;
}

[Serializable]
public class PurchasePayloadData
{
    public PurchaseJsonData JsonData;

    public string signature;
    public string json;

    public static PurchasePayloadData FromJson(string json)
    {
        var payload = JsonUtility.FromJson<PurchasePayloadData>(json);
        payload.JsonData = JsonUtility.FromJson<PurchaseJsonData>(payload.json);
        return payload;
    }
}

[Serializable]
public class GooglePurchase
{
    public PurchasePayloadData PayloadData;

    public string Store;
    public string TransactionID;
    public string Payload;

    public static GooglePurchase FromJson(string json)
    {
        var purchase = JsonUtility.FromJson<GooglePurchase>(json);

        // Only fake receipts are returned in Editor play.
        if (Application.isEditor)
        {
            return purchase;
        }

        purchase.PayloadData = PurchasePayloadData.FromJson(purchase.Payload);
        return purchase;
    }
}
- Code と呼ばれる新しい GameObject を作成します。
-
AndroidIAPExampleコンポーネントを追加します (クリック アンド ドラッグ、または)。 - 必ずシーンを保存してください。
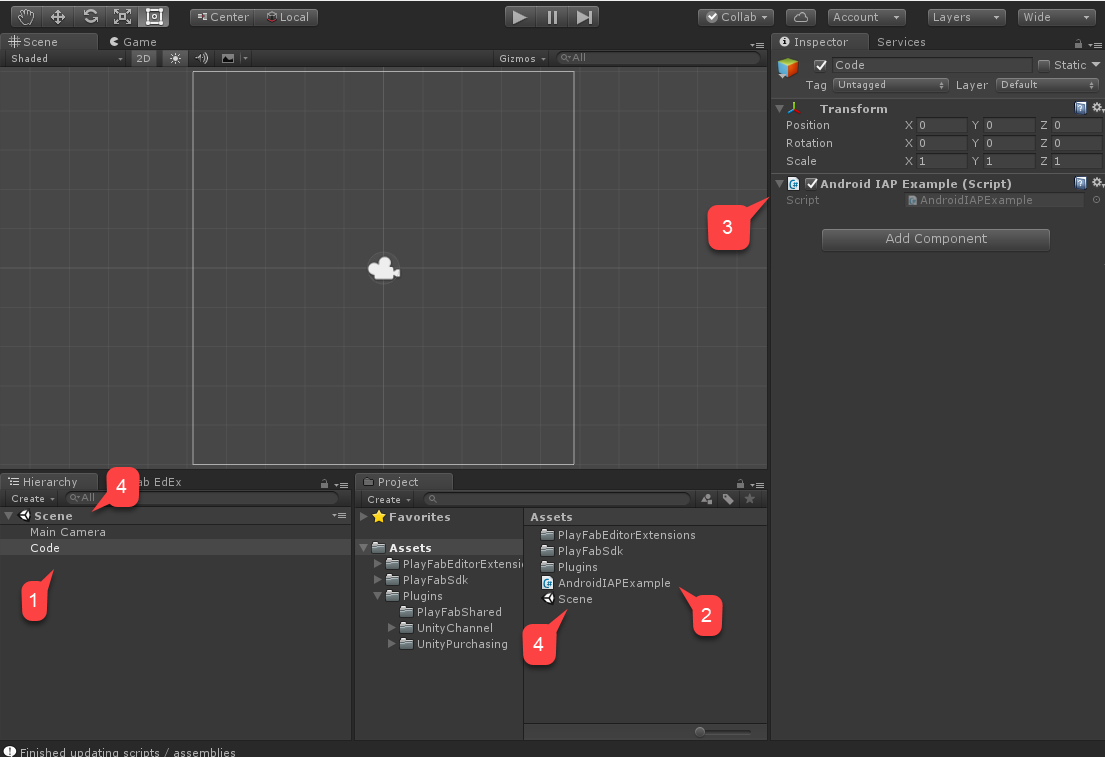
最後に、[Build Settings (ビルド設定)] に移動します。
- シーンが [Scenes In Build (ビルド中のシーン)] エリアに追加されたことを確認します。
- [Android] プラットフォームが選択されていることを確認します。
- [プレイヤーの設定] エリアに移動します。
- [パッケージ名] を割り当てます。
注意
PlayMarket の競合を避けるために、独自のパッケージ名を付けてください。
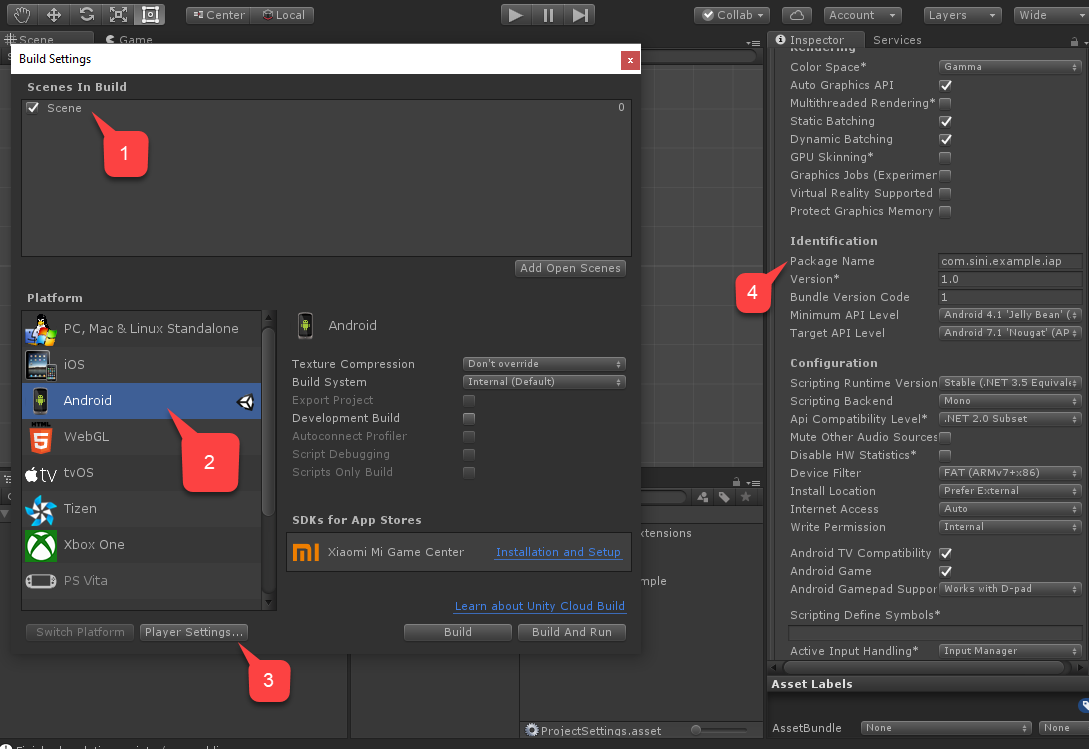
最後に、通常どおりにアプリケーションをビルドし、APK があることを確認します。
テストするには、PlayMarket と PlayFab を構成する必要があります。
IAP に向けて PlayMarket アプリケーションを設定する
このセクションでは、PlayMarket アプリケーションで IAP を有効にする方法の詳細を説明します。
注意
アプリケーション自体の設定は、このチュートリアルの範囲外です。 すでにアプリケーションがあり、少なくともアルファ版のリリースとして公開できるように構成されていると想定しています。

便利なメモ
- そのポイントに移動するには、APK をアップロードする必要があります。 前のセクションで構築した APK を使用してください。
- APK のアップロードを求められたら、[アルファ版] または [ベータ版] のアプリケーションとしてそれをアップロードし、IAP サンドボックスを有効にします。
- [コンテンツの規則] の構成には、アプリケーションでの IAP の有効化方法に関する質問が含まれます。
- PlayMarket では、 パブリッシャーが IAP を使用またはテストすることはできません。 テスト目的で別の Google アカウントを選択し、アルファ/ベータ ビルドのテスターとして追加します。
アプリケーション ビルドを発行します。
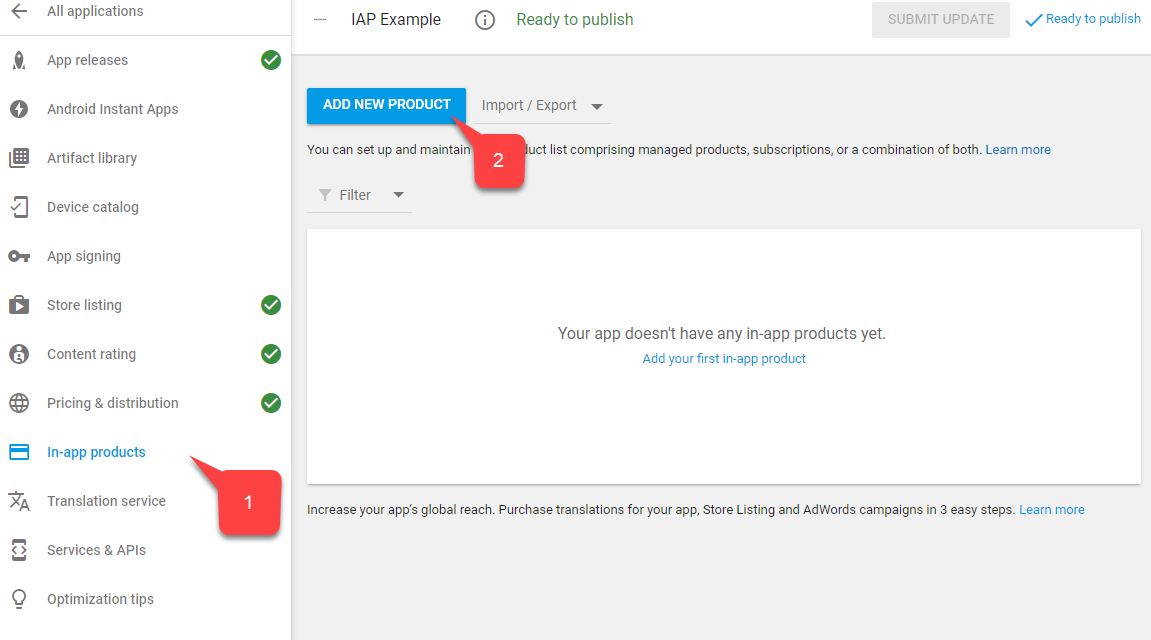
メニューから [In-app products (アプリ内製品)] を選択します。
- 販売アカウントを求められたら、リンクするか作成します。
[Add New Product (新しい製品の追加)] を選択します。
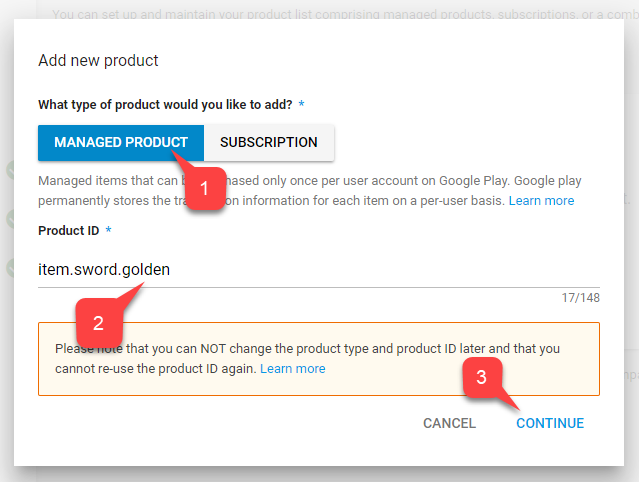
新しい製品画面で、[マネージド製品] を選択します。
100diamondsなど、わかりやすい製品 ID を指定します。[続行] を選択します。
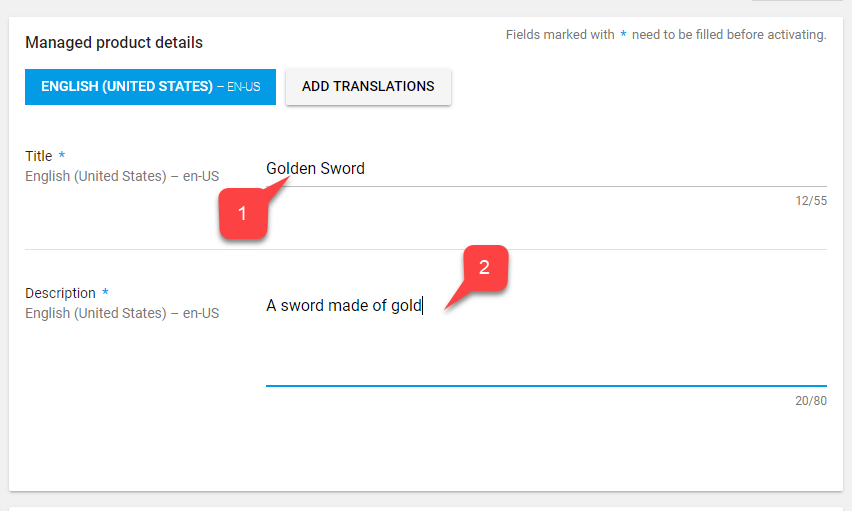
PlayMarket で、[Title (タイトル)] (1) と [Description (説明)] (2) を入力するように求められます (例:
100 DiamondsとA pack of 100 diamonds to spend in-game)。データ アイテム データは PlayFab サービスからのみ取得され、一致する ID のみが必要です。
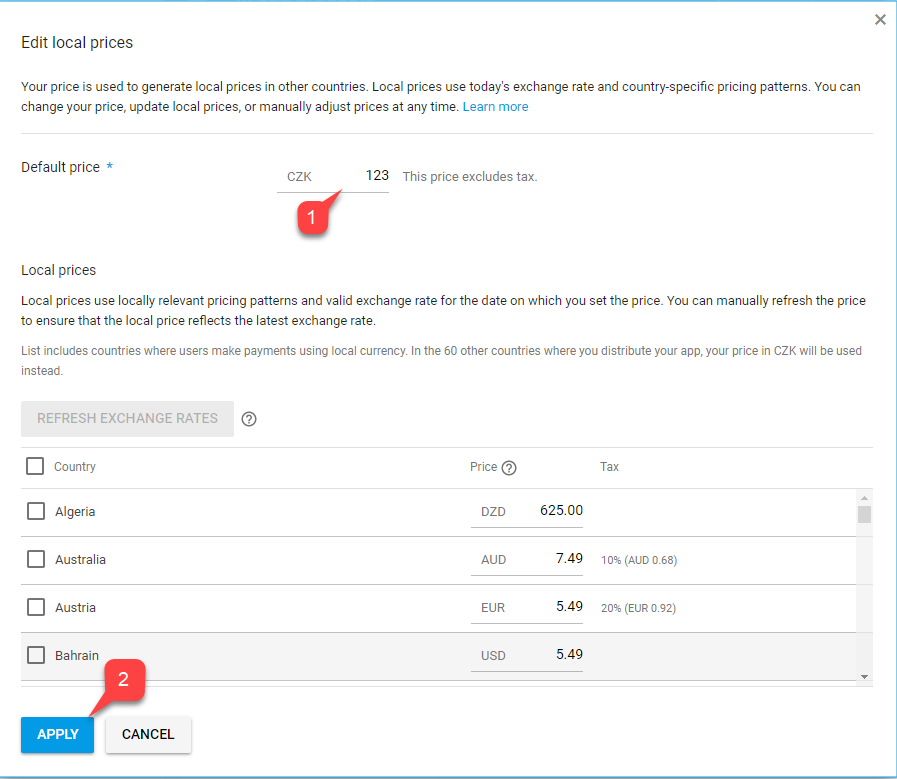
さらにスクロールし、[Add a price (価格を追加)] を選択します。
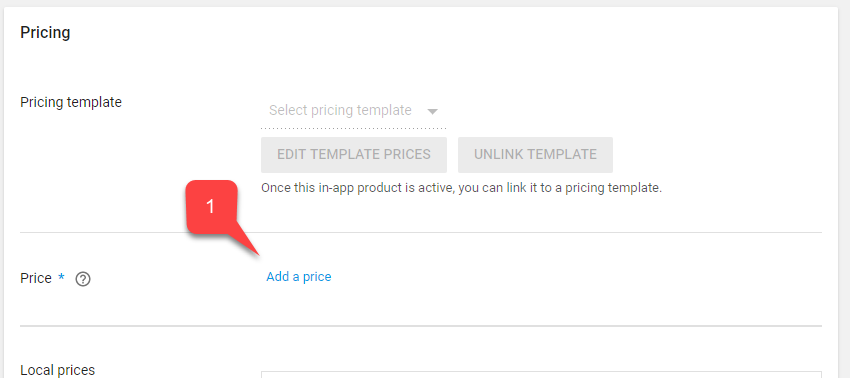
"$0.99" などの有効な価格を入力します (各国/地域に応じて、価格がどのように変換されるかに注意してください)。
[Apply (適用)] を選択します。
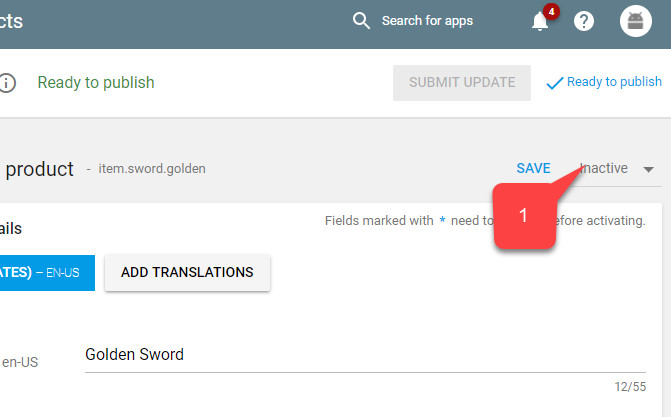
最後に、画面の一番上までスクロールし、アイテムのステータスを [Active (アクティブ)] に変更します。
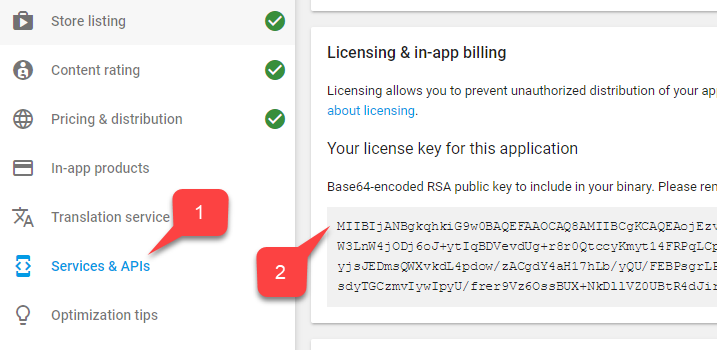
ライセンス キーを保存して、PlayFab を PlayMarket にリンクします。
メイン メニューの [Services & APIs (サービスと API)] に移動します。
次に、キー の Base64 バージョンを見つけて保存します。
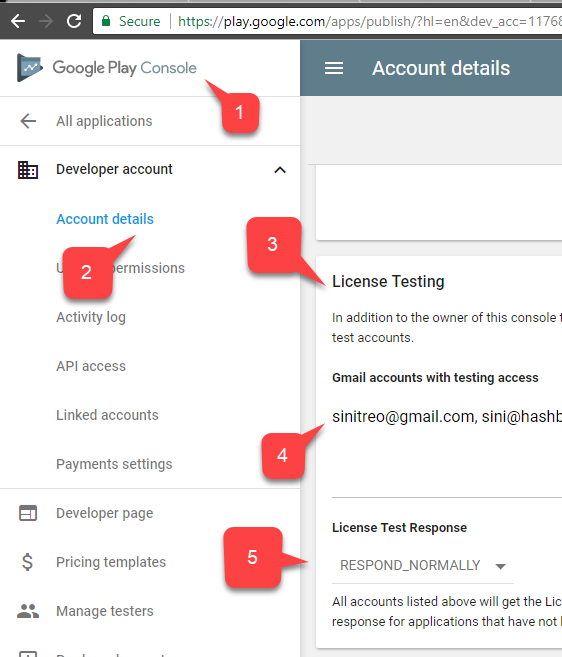
次の手順では、IAP のテストを有効にします。 アルファ版およびベータ版のビルドに対してサンドボックスは自動的に有効になりますが、アプリのテストのために承認されたアカウントを設定する必要があります。
- [ホーム] に移動します。
- 左側のメニューで、[Account details (アカウントの詳細)] を見つけて選択します。
- [License Testing (ライセンスのテスト)] エリアを見つけます。
- テスト アカウントが一覧にあることを確認します。
- [License Test Response (ライセンス テストの応答)]が RESPOND_NORMALLY に設定されていることを確認します。
設定を適用することを忘れないでください。
PlayMarket 側の統合は、この時点で設定する必要があります。
PlayFab タイトルを設定する
最後の手順では、PlayFab タイトルを構成して製品を反映させ、Google 課金 API と統合します。
- [アドオン] を選択します。
- 次に、Google 追加コンテンツを選択します。
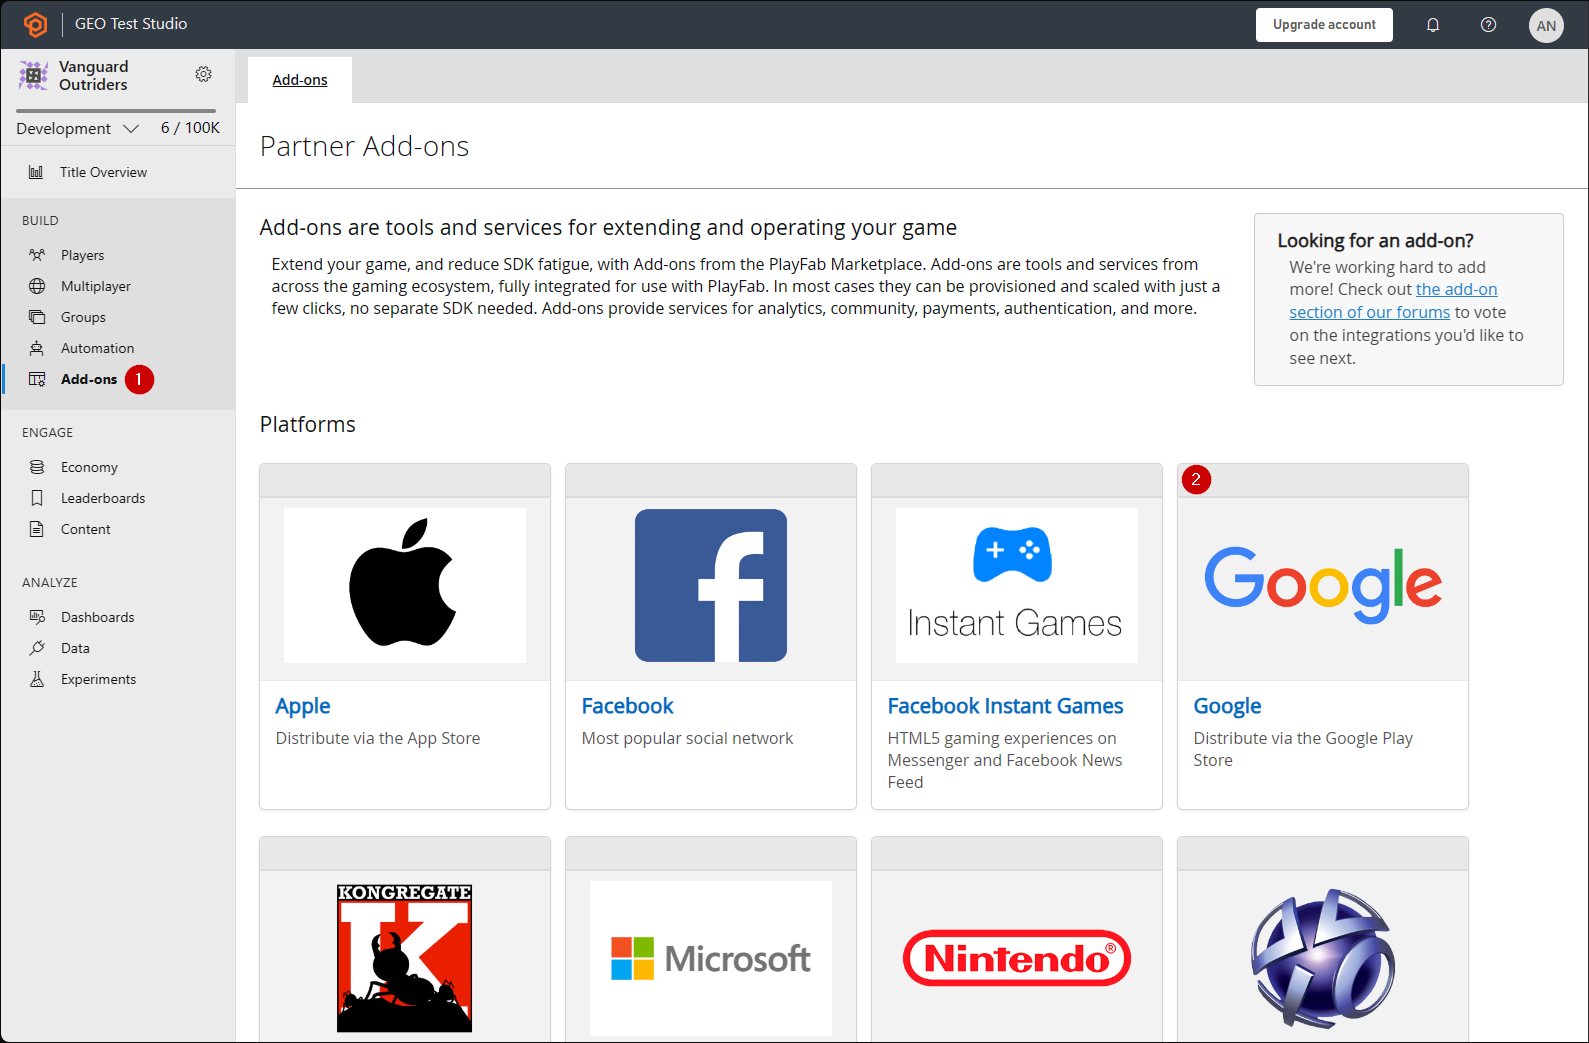
- [パッケージ ID] に入力します。
- 前のセクションで取得した [Google App License Key (Google アプリのライセンス キー)] を入力します。
- [Install Google (Google のインストール)] を選択して変更を確定します。
次の手順では、PlayFab で 100 個のダイヤモンド バンドルを反映します。
新しい経済カタログ (V2) 通貨を作成します。
タイトルを編集し、説明 (例:
Diamonds、Our in-game currency of choice.) を追加します。フレンドリ ID を追加して、通貨
diamondsを簡単に見つけられるようにします。[保存して発行] を選択して変更を完了します。
[通貨] リストで通貨を確認します。
次に、新しいエコノミー カタログ (V2) バンドルを作成します。
タイトルを編集し、説明 (例:
100 Diamonds Bundle、A pack of 100 diamonds to spend in-game.) を追加します。{ "NEUTRAL": "100 Diamonds Bundle", "en-US": "100 Diamonds Bundle", "en-GB": "100 Diamonds Bundle", "de-DE": "100 Diamantenbüschel" }注意
このデータは、Play マーケット アイテムのタイトルおよび説明とは何の関係もありません。独立したものであることに注意してください。
コンテンツ タイプを使用して、バンドル (例:
appstorebundles) を整理できます。 コンテンツ タイプは ⚙️ > [タイトルの設定] > [エコノミー (V2)] で管理できます。Display プロパティにローカライズされた価格を追加して、実際の価格を追跡します。
{
    "prices": [
        "en-us": 0.99,
        "en-gb": 0.85,
        "de-de": 0.45
    ]
}
バンドルに新しいアイテムを追加します。 フィルターで [通貨] を選択し、前のセットで作成した通貨を選択します。 このバンドルで販売する通貨の量と一致するように数量を設定します。
"GooglePlay" Marketplace 用の新しいプラットフォームを追加します。 GooglePlay Marketplace をまだお持ちでない場合は、[エコノミー設定] ページで作成できます。 前のセクションで作成した Google Play Console 製品 ID と一致するように Marketplace ID を設定します。
[保存して発行] を選択して変更を完了します。
バンドルの一覧でバンドルを確認します。
次に、プレイヤーが PlayFab ストアで通貨を使ってゲーム内 NPC ベンダーを表すように、ゲーム内購入を設定できます。
- 新しいエコノミー カタログ (V2) アイテムを作成します。
- タイトルを編集し、説明を追加します。たとえば、"Golden Sword"、"A sword made of gold."。
- プレイヤーがストアでアイテムを見つけるのに役立つローカライズされたキーワードを追加できます。 タグとコンテンツ タイプを追加して、後で API を使用して取得できるようにアイテムを整理するのに役立ちます。 Display プロパティを使用して、アーマー値、アートアセットへの相対パス、ゲームに格納する必要があるその他のデータなどのゲーム データを格納します。
- 新しい価格を追加し、前の手順で作成した通貨を選択します。 [金額] を既定で設定する価格に設定します。 価格は、後で作成した任意のストアでオーバーライドできます。
- [保存して発行] を選択して変更を完了します。
- Items リスト内のアイテムを確認します。
- 最後に、新しいエコノミー カタログ (V2) ストアを作成します。
-
タイトルを編集し、説明 (例:
Villager Store、A humble store run by a humble villager.) を追加します。 - 検索を容易にするために、
villagerstoreなどのフレンドリ ID を指定します。 - 前の手順で作成したアイテムをストアに追加します。 1 つのストアに複数のアイテムを追加し、必要に応じて既定の価格をオーバーライドできます。
- [保存して発行] を選択して変更を完了します。
- Stores の一覧でストアを確認します。
PlayFab タイトルのセットアップが完了しました。
テスト
テスト目的で、アルファ版/ベータ版 リリースを使用してアプリをダウンロードします。
- テスト アカウントと実際の Android デバイスを使用してください。
- アプリを開始すると、IAP が初期化されたことがわかり、アイテムを表す 1 つのボタンが表示されます。
- そのボタンを選択します。
![テスト アプリ - [100 個のダイヤモンドを購入] ボタン](../media/tutorials/unity-android-test-app-iap.png)
IAP の購入が開始されます。 正常に購入が完了するまで、Google Play の指示に従います。
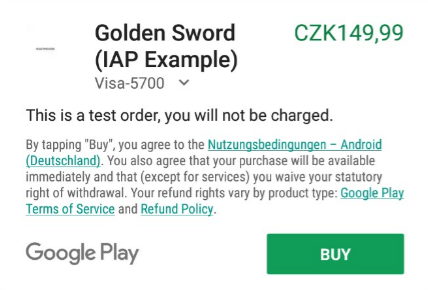
最後に、PlayFab ゲーム マネージャーのダッシュボードでタイトルに移動し、[New Events (新しいイベント)] を見つけます。
購入が提供、検証され、PlayFab エコシステムにパイプされたことを確認します。
UnityIAP と Android Billing API を PlayFab アプリケーションに正常に統合しました。
次の手順
- デモ IMGUI ディスプレイを置き換えるために、購入用の Unity UI Toolkit インターフェイスを構築します。
- PlayFab エラーを処理してユーザーに表示するカスタム Unity Logger を作成します。
- アイコン画像を PlayFab Items Images フィールドに追加して、Unity UI に表示します。