CloudScript の ES6 機能
CloudScript の実行時環境は、最新の ECMAScript 6 機能のほとんどをサポートしています。 これらの機能の大部分は構文的なトリックですが、これらを使用して CloudScript コードを改善および簡素化できます。
ES6 機能の完全な概要については、こちらのチート シートで確認できます。
このチュートリアルでは、CloudScript で使用できるいくつかのコツを紹介します。
注意
一部の機能では厳格なモードが必要となります。 CloudScript ファイルの最初の行に以下のコードを配置して、このモードを有効にしてください。use strict;
文字列補間
プレイヤーに対するメッセージを作成する際、複数行の補間文字列が必要な場合があります。
バッククォート記号を使用して補間文字列を作成します。 次に、${ variable } 構文を使用して、データを直接文字列に挿入できます。
これによって文字列の連結を避け、コードの読みやすさを改善できます。
注意
バッククォート文字列は逐語的で、複数行の場合があります。 これは、あらゆる余分なスペース/タブが文字列に含まれるため、すべてのインデントに注意する必要があること意味します。
function sendPushNotification(playerName, prizeAmount, newLevel) {
    let message = `Congratulations ${playerName}!
You have reached level ${newLevel}.
You get ${prizeAmount} coins for your efforts.`;
    // Use message variable and send push notification
    // ...
}
新しいメソッドとアロー関数
ES6 ではアロー演算子 => を使用して、新しい文字列で関数を定義できます。 以下のスニペットは、特定の演算子を使用した場合のおおよその変換です。
// The following snippets:
const add = (a,b) => a+b;

const add = (a,b) => {
    return a+b;
}

// Both translate into something like
function add(a, b) {
    return a+b;
}
この演算子と新しい Array.findIndexメソッドを組み合わせることで、以下の見栄えの良い簡潔なコードで、プリディケートによって検索できます。
const players = [...]; // Suppose this is an array of Player Profiles

// Search by predicate: find item in 'players' that has 'DisplayName' set to 'Bob':
const bobIndex = players.findIndex(p => p.DisplayName === 'Bob');
オブジェクトの割り当て
Object.assign メソッドでは、新しい一連のプロパティとメソッドで、あらゆるオブジェクトを簡単に拡張できます。
幅広い使用方法があるこのメソッドは、ハンドラー オブジェクトを拡張し、ハンドラーのグループを作成する際に特に便利です。
let TestHandlers = {
    TestLeaderboards : (args, ctx) => {
        // Test leaderboards code
    },
    TestPrizes : (args, ctx) => {
        // Test prizes code
    }
    // ...
}

let ProductionHandlers = {
    CleanUp : (args, ctx) => {
        // System clean up code
    },
    GrantTournamentAccess : (args, ctx) => {
        // Another useful production code
    }
    // ...
}

// Install both handler groups:
Object.assign(handlers, TestHandlers);
Object.assign(handlers, ProductionHandlers);

// Comment out the group to disable it but keep the relevant code
// Object.assign(handlers, SomeOtherHandlers);
これによってハンドラーのグループをすばやく有効化および無効化できるだけでなく、ハンドラーを処理し、例外処理などの役立つコードでラップするためのポイントを提供します。
以下のコードは、前回のスニペットを自動例外ロギングで拡張します。 例としてここでは問題をログ記録しますが (常に役立つとは限りません)、動作は好みに合わせて拡張できます。
// Handlers installer wraps the handler to catch error
function installHandlers(handlersObject) {
    for (let property in handlersObject) {
        handlersObject[property] = wrapHandler(handlersObject,property)
    }
    Object.assign(handlers, handlersObject);
}

// Utility
function wrapHandler(obj, key) {
    if (obj.hasOwnProperty(key) && typeof obj[key] === 'function') {
        let original = obj[key]; // Take the original function
        return function() { // return a new function that
            try { // Wraps the original invocation with try
                return original.apply(null,arguments); // Do not forget to pass arguments
            } catch (error) { // If error occurs
                log.error(error); // We log it, but you may want to retry / do something else
                throw error; // Rethrow to keep the original behaviour
            }
        }
    } else { // If property is not a function, ignore it
        return obj[key];
    }
}

// Install handler groups:
installHandlers(TestHandlers);
installHandlers(ProductionHandlers);
ゲッター
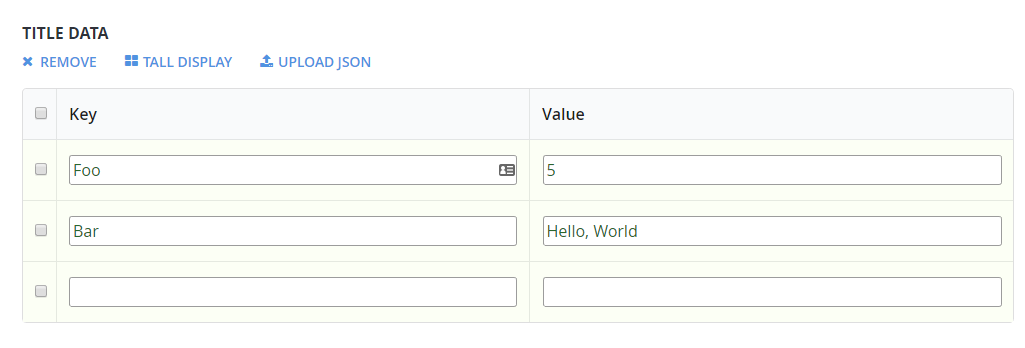
「ゲッター」を使用して、一般的な API コールをより構文的に適切な形式にカプセル化できます。 以下のタイトル データの状態を検討してください。

以下のスニペットは、TitleData から Foo と Bar のデータを取得し、それらを非常に簡単に使用する方法を示しています。
'use strict'

// Define
let App = {
    get TitleData() {
        // Please, consider limiting the query by defining certain keys that you need
        return server.GetTitleData({}).Data;
    },
}

// Use
handlers.TestFooBar = () => {
    // Client code is clean and does not show the fact of calling any functions / making api request
    var titleData = App.TitleData; // Note that this implementation makes an API call every time it's accessed
    log.debug(titleData.Foo);
    log.debug(titleData.Bar);
}