カスタム リソース属性でスケジュール ボードをカスタマイズする
スケジュール ボードは、カスタマイズと拡張が可能で、ビジネス ニーズに対応することができます。 たとえば、リソース情報、フィルター ペインのフィールド、並べ替えオプションなどです。
次のようなカスタマイズ シナリオが考えられます。
各の予約可能リソースには、勤続レベルや認定レベルのような要因に基づいてコストがかかります。 ディスパッチャーは、フィルター処理とコスト別の並べ替え能力だけでなく、リソースの一般的なコストの表示を希望します。 このシナリオでは、正確なリソースコストではなく、1 (リソースコストが最も低い) から 10 (リソースコストが最も高い) までの相対コストスコアを使用しています。 リソース セル、フィルター パネル、並べ替えオプションでスコープを使用します。
ステップ 1: 新しい属性を予約可能なリソース エンティティに追加します
カスタマイズ>システムをカスタマイズ>予約可能なリソース>フィールド から、スキーマ名 tsp_resourcecost を使用して、新しいフィールド名 リソース コスト を追加します。
データ型 オプション セット を使用し、既存のオプションセット 重要性レベル を選択し、1~10 までの値のリストを使用します。
変更を 公開 する前に、新しく作成したフィールドをフォームに追加します。
ステップ 2: スケジュール ボードを作成または更新する
新しいリソースのコスト属性を追加するスケジュール ボードに移動します。
ステップ 3: リソース セル テンプレートの変更
リソース コストのインジケーターは、リソース セルのテンプレートで表示されます。 Font Awesome は、€、$、£ などのアイコンを表示するのに使用できます。
HTML は初めに背景に 5 つの灰色のアイコンを描画し、前景に 5 つの黄色いアイコンを描画します。 前景アイコンの数は、リソース コストの値にマッピングされます。 たとえば、リソース コスト値 2 は、20% なので、5 つの黄色のユーロ アイコンのうち 1 つだけが表示されます。
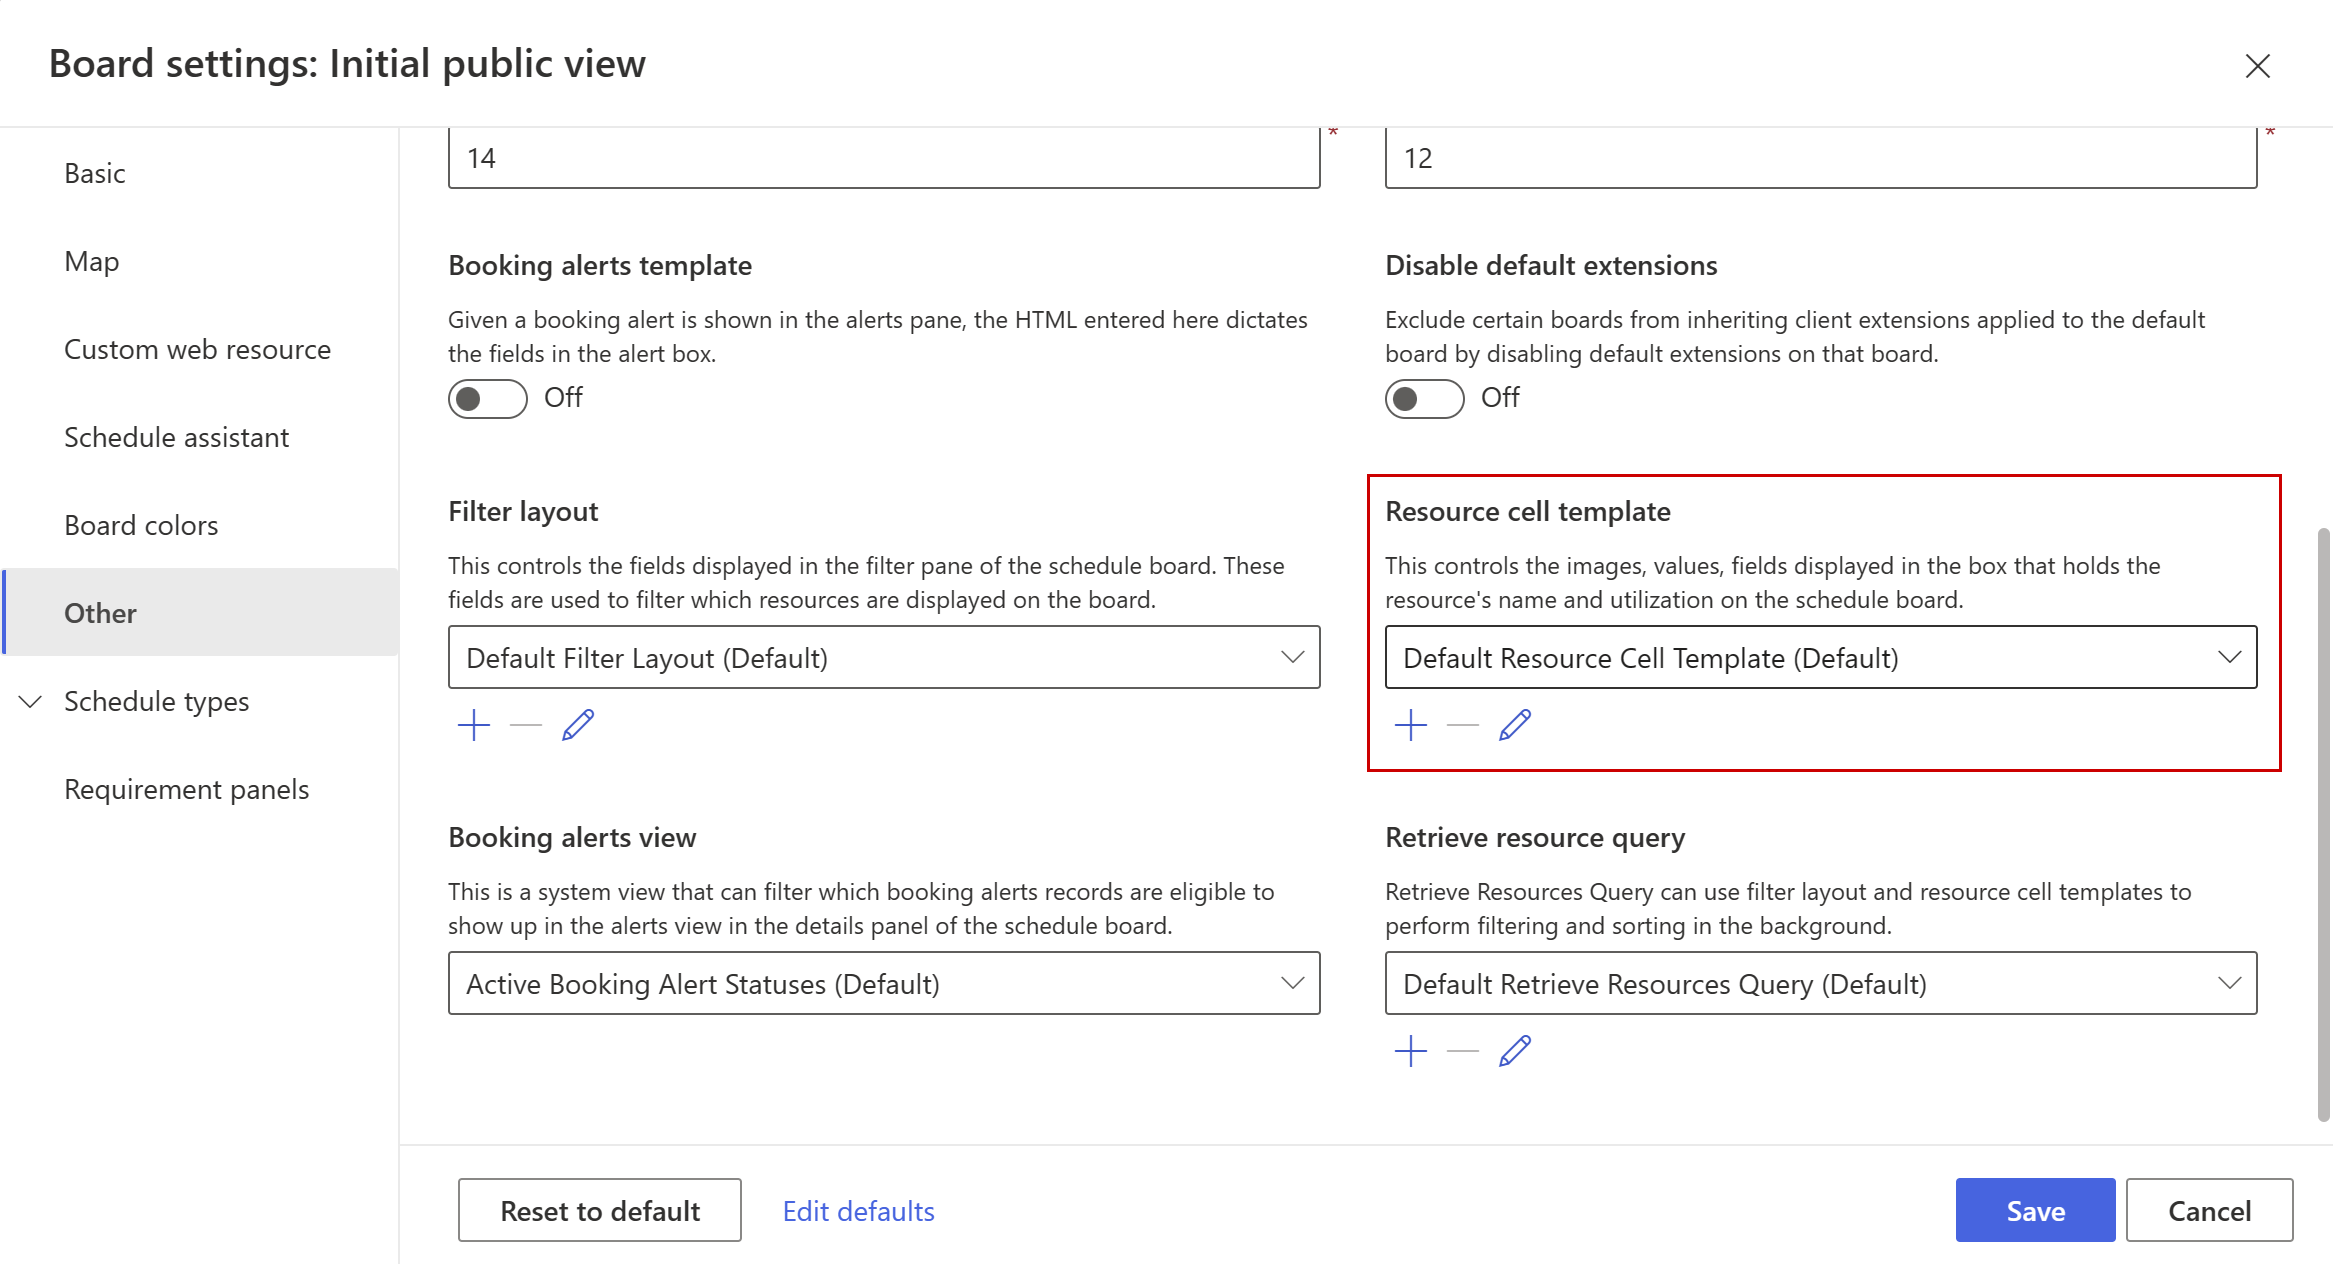
スケジュール ボードの設定を開き、その他 でカスタム リソース セル テンプレート を作成します。

次のコード スニペットをカスタム リソース セル テンプレートに挿入します。 fa-euro を置き換えて記号を変更します。
    <div class='resource-card-wrapper {{iif ResourceCellSelected "resource-cell-selected" ""}} {{iif ResourceUnavailable "resource-unavailable" ""}} {{iif IsMatchingAvailability "availability-match" ""}}'>
    {{#if imagepath}}
    <img class='resource-image' src='{{client-url}}{{imagepath}}' />
    {{else}}
    <div class='resource-image unknown-resource'></div>
    {{/if}}
    <div class='resource-info'>
        <div class='resource-name primary-text ellipsis' title='{{name}}'>{{name}}</div>

		<div class='secondary-text ellipsis'>
			<div class="back-stars" style="color: #EEEEEE; position: relative; display: inline-block;">
				<i class="fa fa-euro" aria-hidden="true"></i>
				<i class="fa fa-euro" aria-hidden="true"></i>
				<i class="fa fa-euro" aria-hidden="true"></i>
				<i class="fa fa-euro" aria-hidden="true"></i>
				<i class="fa fa-euro" aria-hidden="true"></i>

				<div class="resourcecost" style="width: {{resourcecost}}0%; color: #FFBC0B; position: absolute; top: 0; left:0; display: inline-block; overflow: hidden;">
					<i class="fa fa-euro" aria-hidden="true"></i>
					<i class="fa fa-euro" aria-hidden="true"></i>
					<i class="fa fa-euro" aria-hidden="true"></i>
					<i class="fa fa-euro" aria-hidden="true"></i>
					<i class="fa fa-euro" aria-hidden="true"></i>
				</div>
			</div>
		</div>

        <div class='secondary-text ellipsis'>
            {{#if (eq (is-sa-grid-view) false) }}
            <div class='booked-duration'>{{BookedDuration}}<div class='fo-sch-clock'></div></div>
            <div class='booked-percentage'>{{BookedPercentage}}%</div>
            {{/if}}
        </div>
        {{#if (eq (is-sa-grid-view) false) }}
        <div class='matching-indicator'></div>
        {{/if}}
    </div>
    {{#if (eq (is-sa-grid-view) false) }}
    {{> resource-map-pin-template this }}
    {{/if}}
    </div>
注意Note
Javascript はリソース セル テンプレートではサポートされていません。
ステップ 4: フィルターのレイアウトを変更
このステップでは、リソースをフィルタリングして検索し、コスト スコアでソートする際のコスト スコアの最大値を定義しています。
スケジュール ボード タブの設定で、 フィルター レイアウト に移動し、カスタム テンプレートを作成します。
カスタム フィルターのレイアウト テンプレートに、以下のコードスニペットを挿入します。
    <?xml version="1.0" encoding="utf-8" ?>
    <filter>
    <controls>
    <control type="characteristic" key="Characteristics" label-id="ScheduleAssistant.West.Skills" />

	<control type="combo" source="optionset" key="ResourceCost" label-id="Resource Cost Limit" entity="bookableresource" attribute="tsp_resourcecost" multi="false">
    </control>

    <control type="combo" source="entity" key="Roles" inactive-state="1" label-id="ScheduleAssistant.West.Roles" entity="bookableresourcecategory" multi="true" />
    <control type="combo" source="entity" key="Territories" unspecified-key="UnspecifiedTerritory" label-id="ScheduleAssistant.West.Territories" entity="territory" multi="true" />
    <control type="combo" source="entity" key="OrganizationalUnits" label-id="SB_FilterPanel_OrganizationalUnitsFilter_Title" inactive-state="1" entity="msdyn_organizationalunit" multi="true" />
    <control type="combo" source="optionset" key="ResourceTypes" label-id="SB_FilterPanel_ResourceTypesFilter_Title" entity="bookableresource" attribute="resourcetype" multi="true">
      <data>
        <value id="2" />
        <value id="3" />
        <value id="4" />
        <value id="5" />
      </data>
    </control>
    <control type="combo" source="entity" key="Teams" label-id="SB_FilterPanel_TeamsFilter_Title" entity="team" multi="true" />
    <control type="combo" source="entity" key="BusinessUnits" label-id="SB_FilterPanel_BusinessUnitsFilter_Title" entity="businessunit" multi="true" />
    <control type="order" key="Orders" label-id="FilterControl_OrderLabel">
      <order name="name" entity="bookableresource" attribute="name" />

      <order name="resourcecost" entity="bookableresource" attribute="tsp_resourcecost" />

      <order name="proficiencyscore" entity="bookableresourcecharacteristic" attribute="ratingvalue" />
    </control>
    </controls>
    </filter>
ステップ 5: クエリの変更
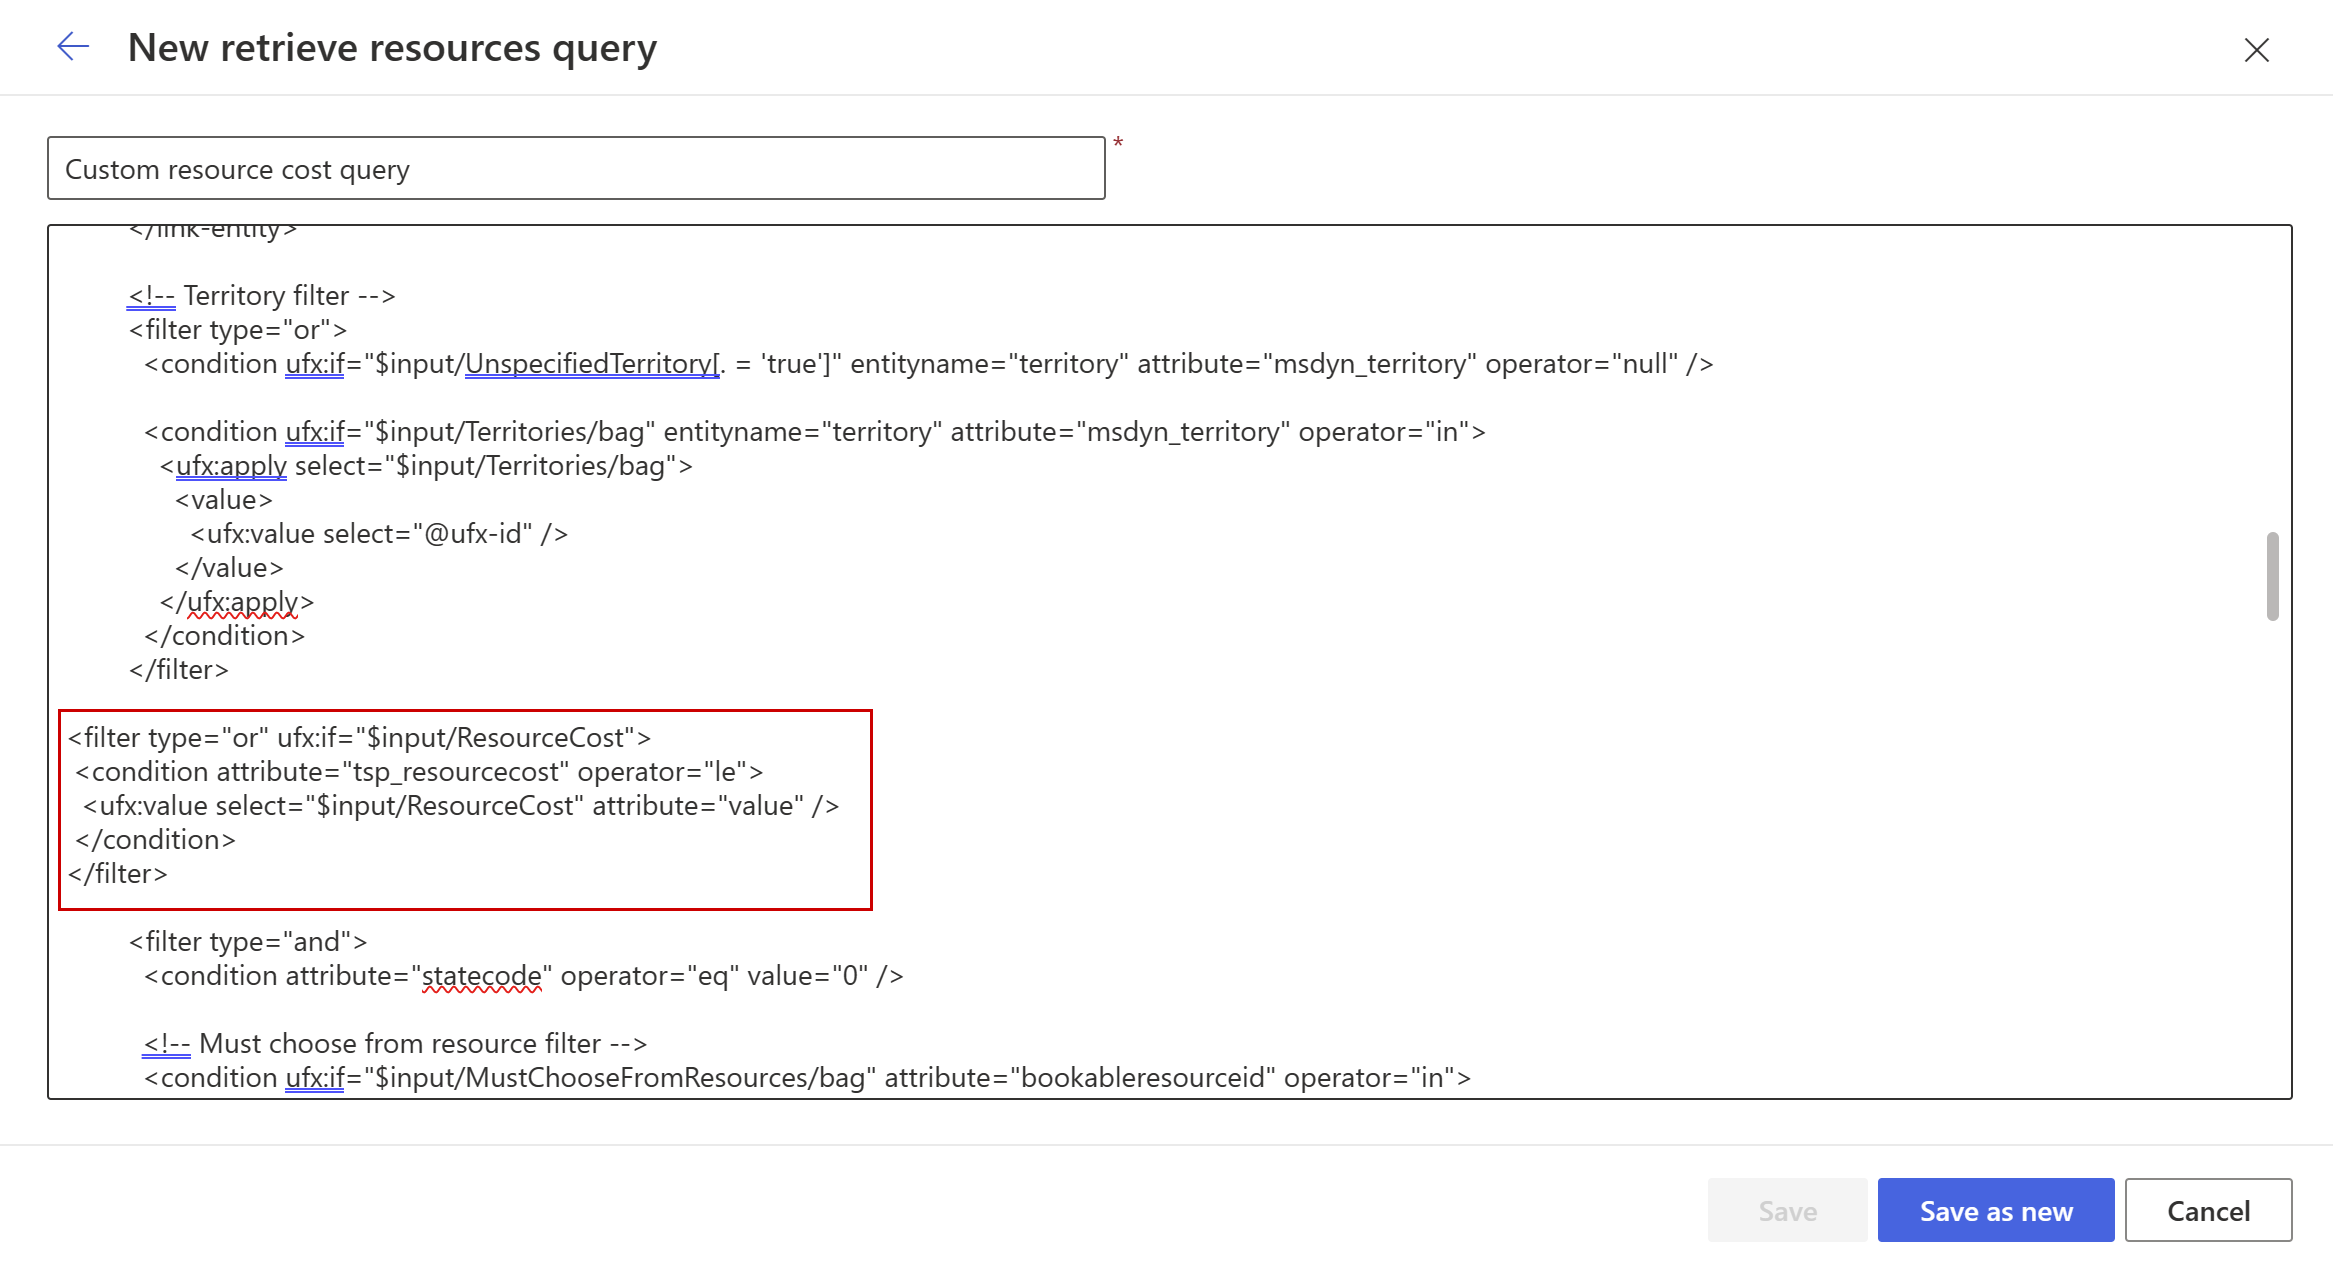
最後に、実際のクエリを変更し、新しいフィルターを含めます。 スケジュール タブの設定で、リソース クエリの取得 に移動し、既定のクエリを編集して、コード全体をコピーします。 次に、カスタム テンプレートを作成し、既定のコードを貼り付けます。 デフォルトのコードは長いです。 以下は、既存のリソース クエリ内に貼り付けるコード スニペットのみです。
<entity name="bookableresource"> の後に <attribute name="tsp_resourcecost" alias="resourcecost" groupby="true"/> を挿入します
the last </filter> tag of the <!-- Territory filter --> の後に、次のコード スニペットを挿入します:
<filter type="or" ufx:if="$input/ResourceCost">
 <condition attribute="tsp_resourcecost" operator="le">
  <ufx:value select="$input/ResourceCost" attribute="value" />
 </condition>
</filter>

ステップ 6: 新しいスケジュール ボードのテスト
スケジュール ボードでは、最大コスト係数 5 とコストに基づいた昇順の並べ替え順序を定義しました。