データ バインディングを作成する方法 (WPF .NET)
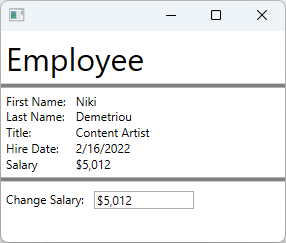
この記事では、バインディング XAML を作成する方法について説明します。 この例では、ある会社の 1 人の従業員を表すデータ オブジェクトを使用します。 このデータ オブジェクトは、TextBlock コントロールを使ってその従業員の詳細を一覧表示する XAML ウィンドウにバインドされています。 次の図のような UI を作成します。

データ バインディングの詳細については、WPF でのデータ バインディングの概要に関するページを参照してください。
データ オブジェクトを作成する
この例では、UI がバインドされているデータ オブジェクトとして、従業員が使用されています。
プロジェクトに新しいクラスを追加して、
Employeeという名前を付けます。コードを次のスニペットに置き換えます。
using System;
using System.ComponentModel;

namespace ArticleSample
{
    public class Employee : INotifyPropertyChanged
    {
        private decimal _salary;
        public event PropertyChangedEventHandler? PropertyChanged;

        public required string FirstName { get; set; }
        public required string LastName { get; set; }
        public required string Title { get; set; }
        public required DateTime HireDate { get; set; }

        public required decimal Salary
        {
            get => _salary;
            set
            {
                _salary = value;

                // Support TwoWay binding
                PropertyChanged?.Invoke(this, new PropertyChangedEventArgs(nameof(Salary)));
            }
        }
    }
}
Imports System.ComponentModel Public Class Employee Implements INotifyPropertyChanged Private _salary As Decimal Public Event PropertyChanged As PropertyChangedEventHandler Implements INotifyPropertyChanged.PropertyChanged Public Property FirstName As String Public Property LastName As String Public Property Title As String Public Property HireDate As DateTime Public Property Salary As Decimal Get Return _salary End Get Set(value As Decimal) _salary = value RaiseEvent PropertyChanged(Me, New PropertyChangedEventArgs(NameOf(Salary))) End Set End Property End Class
従業員データ オブジェクトは、ある従業員について説明するシンプルなクラスです。
- その従業員の氏名。
- その従業員の採用日。
- その従業員の会社の役職。
- その従業員の収入。
データ オブジェクトにバインドする
次の XAML のデモでは、Employee クラスがデータ オブジェクトとして使われています。 ルート要素の DataContext プロパティは、XAML で宣言された静的なリソースにバインドされています。 個々のコントロールは、Employee のプロパティにバインドされています。
プロジェクトに新しい Window を追加し、
EmployeeViewという名前を付けますXAML を次のスニペットに置き換えます。
重要
次のスニペットは、C# プロジェクトからの抜粋です。 Visual Basic を使用している場合は、
x:ClassをArticleSample名前空間なしで宣言する必要があります。 Visual Basic バージョンがどのようになるかはこちらで確認できます。<Window x:Class="ArticleSample.EmployeeView" xmlns="http://schemas.microsoft.com/winfx/2006/xaml/presentation" xmlns:x="http://schemas.microsoft.com/winfx/2006/xaml" xmlns:local="clr-namespace:ArticleSample" Title="" Height="250" Width="300"> <Window.Resources> <local:Employee x:Key="EmployeeExample" FirstName="Niki" LastName="Demetriou" HireDate="2022-02-16" Salary="5012.00" Title="Content Artist" /> </Window.Resources> <StackPanel DataContext="{StaticResource EmployeeExample}"> <Label FontSize="32">Employee</Label> <Border BorderBrush="Gray" BorderThickness="2" /> <Grid Grid.Row="1" Margin="5"> <Grid.RowDefinitions> <RowDefinition Height="Auto"/> <RowDefinition Height="Auto"/> <RowDefinition Height="Auto"/> <RowDefinition Height="Auto"/> <RowDefinition Height="Auto"/> </Grid.RowDefinitions> <Grid.ColumnDefinitions> <ColumnDefinition Width="Auto"/> <ColumnDefinition Width="*"/> </Grid.ColumnDefinitions> <TextBlock Text="First Name:" Grid.Row="0" Margin="0,0,10,0" /> <TextBlock Text="Last Name:" Grid.Row="1" /> <TextBlock Text="Title:" Grid.Row="2" /> <TextBlock Text="Hire Date:" Grid.Row="3" /> <TextBlock Text="Salary" Grid.Row="4" /> <TextBlock Text="{Binding FirstName}" Grid.Row="0" Grid.Column="1" /> <TextBlock Text="{Binding LastName}" Grid.Row="1" Grid.Column="1" /> <TextBlock Text="{Binding Title}" Grid.Row="2" Grid.Column="1" /> <TextBlock Text="{Binding HireDate, StringFormat=d}" Grid.Row="3" Grid.Column="1" /> <TextBlock Text="{Binding Salary, StringFormat=C0}" Grid.Row="4" Grid.Column="1" /> </Grid> <Border BorderBrush="Gray" BorderThickness="2" /> <StackPanel Margin="5,10" Orientation="Horizontal"> <TextBlock Text="Change Salary:" Margin="0,0,10,0" /> <TextBox Text="{Binding Salary, Mode=TwoWay, UpdateSourceTrigger=PropertyChanged, StringFormat=C0}" Width="100" /> </StackPanel> </StackPanel> </Window>
ArticleSample という名前のプロジェクトを作成していない場合、コードの名前空間はプロジェクトの名前空間と一致しません。 新しいプロジェクトを作成した場合は、Window.Resources とルート要素 (StackPanel) をコピーして、ご自分の MainWindow に貼り付けることができます。
以前の XAML でデータ バインディングがどのように使用されているかをより深く理解するために、次の点を考慮してください。
Employeeクラスのインスタンスを作成するのに、XAML リソースが使用されています。通常、データ オブジェクトは Window に渡されるか、Window と関連付けられています。 この例では、デモのために従業員をハードコーディングしています。
<Window.Resources>
    <local:Employee x:Key="EmployeeExample" FirstName="Niki" LastName="Demetriou"
                                            HireDate="2022-02-16" Salary="5012.00"
                                            Title="Content Artist" />
</Window.Resources>
ルート要素 (
StackPanel) のデータ コンテキストは、ハードコーディングされたEmployeeインスタンスに設定されています。明示的に設定されていない限り、子要素は
DataContextを親から継承します。<StackPanel DataContext="{StaticResource EmployeeExample}">Employeeインスタンスのプロパティは、TextBlockコントロールにバインドされています。BindingではBindingSourceが指定されていないため、DataContextがソースとして使用されます。<TextBlock Text="{Binding FirstName}" Grid.Row="0" Grid.Column="1" /> <TextBlock Text="{Binding LastName}" Grid.Row="1" Grid.Column="1" /> <TextBlock Text="{Binding Title}" Grid.Row="2" Grid.Column="1" /> <TextBlock Text="{Binding HireDate, StringFormat=d}" Grid.Row="3" Grid.Column="1" /> <TextBlock Text="{Binding Salary, StringFormat=C0}" Grid.Row="4" Grid.Column="1" />TextBoxコントロールがTwoWayモードでバインドされることで、TextBoxでEmployee.Salaryプロパティを変更できます。<TextBox Text="{Binding Salary, Mode=TwoWay, UpdateSourceTrigger=PropertyChanged, StringFormat=C0}" Width="100" />
関連するコンテンツ
.NET Desktop feedback
