DrawingGroup.Transform Property
Definition
Important
Some information relates to prerelease product that may be substantially modified before it’s released. Microsoft makes no warranties, express or implied, with respect to the information provided here.
Gets or sets the Transform that is applied to this DrawingGroup.
public:
 property System::Windows::Media::Transform ^ Transform { System::Windows::Media::Transform ^ get(); void set(System::Windows::Media::Transform ^ value); };
public System.Windows.Media.Transform Transform { get; set; }member this.Transform : System.Windows.Media.Transform with get, setPublic Property Transform As TransformProperty Value
The transformation to apply to this DrawingGroup. The default is null.
Examples
This example shows how to apply a Transform to a Drawing. To transform a Drawing object, you add it to a DrawingGroup and set the Transform property of the DrawingGroup object.
The DrawingGroup class is the only type of Drawing object that supports transforms. To apply multiple transforms to a single DrawingGroup, use a TransformGroup.
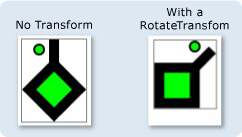
The following example uses a DrawingGroup to combine several GeometryDrawing objects and then transforms them by using a RotateTransform.
The illustration shows the DrawingGroup before and after the RotateTransform is applied.

using System;
using System.Windows;
using System.Windows.Controls;
using System.Windows.Media;
using System.Windows.Media.Animation;
using System.Windows.Shapes;

namespace SDKSample
{
    public class TransformExample : Page
    {

        public TransformExample()
        {

            //
            // Create a GeometryDrawing.
            //

            // Define the drawing's contents.
            PathFigure pLineFigure = new PathFigure();
            pLineFigure.StartPoint = new Point(25, 25);
            PolyLineSegment pLineSegment = new PolyLineSegment();
            pLineSegment.Points.Add(new Point(0, 50));
            pLineSegment.Points.Add(new Point(25, 75));
            pLineSegment.Points.Add(new Point(50, 50));
            pLineSegment.Points.Add(new Point(25, 25));
            pLineSegment.Points.Add(new Point(25, 0));
            pLineFigure.Segments.Add(pLineSegment);
            PathGeometry pGeometry = new PathGeometry();
            pGeometry.Figures.Add(pLineFigure);

            GeometryDrawing drawing1 = new GeometryDrawing(
                    Brushes.Lime,
                    new Pen(Brushes.Black, 10),
                    pGeometry
                );

            //
            // Create another GeometryDrawing.
            //
            GeometryDrawing drawing2 = new GeometryDrawing(
                    Brushes.Lime,
                    new Pen(Brushes.Black, 2),
                    new EllipseGeometry(new Point(10, 10), 5, 5)
                );

            // Create the DrawingGroup and add the
            // geometry drawings.
            DrawingGroup aDrawingGroup = new DrawingGroup();
            aDrawingGroup.Children.Add(drawing1);
            aDrawingGroup.Children.Add(drawing2);

            //
            // Create a RotateTransform and apply it to the
            // drawing group.
            //
            RotateTransform rotation = new RotateTransform(
                45, // Angle
                50, // CenterX
                75  // CenterY
                );
            aDrawingGroup.Transform = rotation;

            // Use an Image control and a DrawingImage to
            // display the drawing.
            DrawingImage aDrawingImage = new DrawingImage(aDrawingGroup);

            // Freeze the DrawingImage for performance benefits.
            aDrawingImage.Freeze();

            Image anImage = new Image();
            anImage.Source = aDrawingImage;
            anImage.Stretch = Stretch.None;
            anImage.HorizontalAlignment = HorizontalAlignment.Left;

            // Create a border around the images and add it to the
            // page.
            Border imageBorder = new Border();
            imageBorder.BorderBrush = Brushes.Gray;
            imageBorder.BorderThickness = new Thickness(1);
            imageBorder.VerticalAlignment = VerticalAlignment.Top;
            imageBorder.HorizontalAlignment = HorizontalAlignment.Left;
            imageBorder.Margin = new Thickness(20);
            imageBorder.Child = anImage;

            this.Background = Brushes.White;
            this.Margin = new Thickness(20);
            this.Content = imageBorder;
        }
    }
}
<Page
  xmlns="http://schemas.microsoft.com/winfx/2006/xaml/presentation"
  xmlns:x="http://schemas.microsoft.com/winfx/2006/xaml"
  xmlns:PresentationOptions="http://schemas.microsoft.com/winfx/2006/xaml/presentation/options"
  xmlns:mc="http://schemas.openxmlformats.org/markup-compatibility/2006"
  mc:Ignorable="PresentationOptions"
  Background="White" Margin="20">

  <Border BorderBrush="Gray" BorderThickness="1"
    HorizontalAlignment="Left" VerticalAlignment="Top"
    Margin="20">
    <Image Stretch="None" HorizontalAlignment="Left">
      <Image.Source>
        <DrawingImage PresentationOptions:Freeze="True">
          <DrawingImage.Drawing>

            <!-- A drawing group with a RotateTransform. -->
            <DrawingGroup>
              <GeometryDrawing Brush="Lime" Geometry="M 25,25 L 0,50 25,75 50,50 25,25 25,0">
                <GeometryDrawing.Pen>
                  <Pen Thickness="10" Brush="Black" />
                </GeometryDrawing.Pen>
              </GeometryDrawing>
              <GeometryDrawing Brush="Lime">
                <GeometryDrawing.Geometry>
                  <EllipseGeometry Center="10,10" RadiusX="5" RadiusY="5" />
                </GeometryDrawing.Geometry>
                <GeometryDrawing.Pen>
                  <Pen Thickness="2" Brush="Black" />
                </GeometryDrawing.Pen>
              </GeometryDrawing>

              <!-- Rotate the drawing 45 degrees about (50,75). -->
              <DrawingGroup.Transform>
                <RotateTransform CenterX="50" CenterY="75" Angle="45" />
              </DrawingGroup.Transform>

            </DrawingGroup>
          </DrawingImage.Drawing>
        </DrawingImage>
      </Image.Source>
    </Image>
  </Border>


</Page>
Remarks
To apply multiple transforms to a single DrawingGroup, use a TransformGroup.
DrawingGroup operations are applied in the following order:
Dependency Property Information
| Item | Value |
|---|---|
| Identifier field | TransformProperty |
Metadata properties set to true |
None |
Applies to
.NET
