データ バッファーへのポインターの取得 (C++/CX)
Windows ランタイム内の Windows::Storage::Streams::IBuffer インターフェイスは、言語に依存せずに、データ バッファーにアクセスするストリーム ベースの方法を提供します。 C++ では、robuffer.h 内で定義されている Windows ランタイム ライブラリの IBufferByteAccess インターフェイスを使用して、基になるバイト配列への生のポインターを取得できます。 この方法により、データの不要なコピーを作成せずに、バイト配列をその場で変更できます。
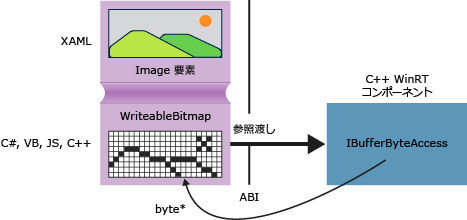
次の図では、ソースが Windows::UI::Xaml::Media::Imaging WriteableBitmapである XAML イメージ要素を示します。 どの言語で作成されたクライアント アプリケーションも、 WriteableBitmap への参照を C++ コードに渡すことができ、その後、C++ はその参照を使用して基になるバッファーでデータを取得できます。 C++ で記述されたユニバーサル Windows プラットフォーム アプリでは、次の例で示す関数を、Windows ランタイム コンポーネントでパッケージ化することなく、ソース コード内で直接使用できます。
GetPointerToPixelData
次のメソッドは、 Windows::Storage::Streams::IBuffer を受け入れ、基になるバイト配列への生のポインターを返します。 この関数を呼び出すには、 WriteableBitmap::PixelBuffer プロパティに渡します。
#include <wrl.h>
#include <robuffer.h>
using namespace Windows::Storage::Streams;
using namespace Microsoft::WRL;
typedef uint8 byte;
// Retrieves the raw pixel data from the provided IBuffer object.
// Warning: The lifetime of the returned buffer is controlled by
// the lifetime of the buffer object that's passed to this method.
// When the buffer has been released, the pointer becomes invalid
// and must not be used.
byte* Class1::GetPointerToPixelData(IBuffer^ pixelBuffer, unsigned int *length)
{
    if (length != nullptr)
    {
        *length = pixelBuffer ->Length;
    }
    // Query the IBufferByteAccess interface.
    ComPtr<IBufferByteAccess> bufferByteAccess;
    reinterpret_cast<IInspectable*>( pixelBuffer)->QueryInterface(IID_PPV_ARGS(&bufferByteAccess));

    // Retrieve the buffer data.
    byte* pixels = nullptr;
    bufferByteAccess->Buffer(&pixels);
    return pixels;
}
コード例全体
次の手順は、C++ Windows ランタイム コンポーネント DLL に WriteableBitmap を渡す C# ユニバーサル Windows プラットフォーム アプリの作成方法を示しています。 C++ コードでは、ピクセル バッファーへのポインターを取得し、イメージに対してその場で簡単な変更を実行します。 別の方法として、C# の代わりに、Visual Basic、JavaScript、または C++ のクライアント アプリケーションを作成することもできます。 C++ を使用する場合、コンポーネント DLL は必要ありません。それらのメソッドを MainPage クラスまたは定義した他のクラスに直接追加できます。
クライアントを作成する
空のアプリ プロジェクト テンプレートを使用して、C# ユニバーサル Windows プラットフォーム アプリを作成します。
MainPage.xaml 内で、次の手順に従います。
次の XAML を使用し、
Grid要素を置換します。<Grid Background="{StaticResource ApplicationPageBackgroundThemeBrush}"> <StackPanel HorizontalAlignment="Left" Margin="176,110,0,0" VerticalAlignment="Top" Width="932"> <Image x:Name="Pic"/> <Button Content="Process Image" HorizontalAlignment="Stretch" VerticalAlignment="Stretch" Height="47" Click="Button_Click_1"/> </StackPanel> </Grid>
MainPage.xaml.cs 内で、次の手順に従います。
次の名前空間宣言を追加します。
using Windows.Storage; using Windows.Storage.FileProperties; using Windows.UI.Xaml.Media.Imaging; using Windows.Storage.Streams; using Windows.Storage.Pickers;WriteableBitmapメンバー変数をMainPageクラスに追加し、m_bmという名前を付けます。private WriteableBitmap m_bm;次のコードを使用し、
OnNavigatedToメソッド スタブを置換します。 この結果、アプリケーションの起動時にファイル ピッカーが開きます (asyncキーワードを関数シグネチャに追加したことに注意してください)。async protected override void OnNavigatedTo(NavigationEventArgs e) { FileOpenPicker openPicker = new FileOpenPicker(); openPicker.ViewMode = PickerViewMode.Thumbnail; openPicker.SuggestedStartLocation = PickerLocationId.PicturesLibrary; openPicker.FileTypeFilter.Add(".jpg"); openPicker.FileTypeFilter.Add(".jpeg"); openPicker.FileTypeFilter.Add(".png"); StorageFile file = await openPicker.PickSingleFileAsync(); if (file != null) { // Get the size of the image for the WriteableBitmap constructor. ImageProperties props = await file.Properties.GetImagePropertiesAsync(); m_bm = new WriteableBitmap((int)props.Height, (int)props.Width); m_bm.SetSource(await file.OpenReadAsync()); Pic.Source = m_bm; } else { // Handle error... } }ボタン クリックに対応するイベント ハンドラーを追加します
ImageManipCPP名前空間参照をまだ作成していないので、エディター ウィンドウで波線が表示される可能性があります)。async private void Button_Click_1(object sender, RoutedEventArgs e) { ImageManipCPP.Class1 obj = new ImageManipCPP.Class1(); await obj.Negativize(m_bm); Pic.Source = m_bm; }
C++ コンポーネントの作成
新しい C++ Windows ランタイム コンポーネントを既存のソリューションに追加し、
ImageManipCPPという名前を付けます。 C# プロジェクト内でそのコンポーネントへの参照を追加するために、 ソリューション エクスプローラー でプロジェクトを右クリックし、 [追加]、 [参照]を選択します。Class1.h 内で、次の手順に従います。
typedefの直後に位置する 2 行目に、次の#pragma onceを追加します。typedef uint8 byte;WebHostHidden宣言の先頭部分のすぐ上にClass1属性を追加します。[Windows::Foundation::Metadata::WebHostHidden]次のパブリック メソッド シグネチャを
Class1に追加します。Windows::Foundation::IAsyncAction^ Negativize(Windows::UI::Xaml::Media::Imaging::WriteableBitmap^ bm);前のコード スニペットに示した
GetPointerToPixelDataメソッドから取得したシグネチャを追加します。 このメソッドがプライベートであることを確認します。
Class1.cpp 内で、次の手順に従います。
次の
#includeディレクティブ、および名前空間宣言を追加します。#include <ppltasks.h> #include <wrl.h> #include <robuffer.h> using namespace Windows::Storage; using namespace Windows::UI::Xaml::Media::Imaging; using namespace Windows::Storage::Streams; using namespace Microsoft::WRL;前のコード スニペットから
GetPointerToPixelDataの実装を追加します。Negativizeの実装を追加します。 このメソッドは、各ピクセルの RGB 値を反転することで、ネガ フィルムに似た効果を作成します。 より大きいイメージの場合、表示が完了するまでに比較的長い時間がかかる可能性があるため、このメソッドを非同期にします。IAsyncAction^ Class1::Negativize(WriteableBitmap^ bm) { unsigned int length; byte* sourcePixels = GetPointerToPixelData(bm->PixelBuffer, &length); const unsigned int width = bm->PixelWidth; const unsigned int height = bm->PixelHeight; return create_async([this, width, height, sourcePixels] { byte* temp = sourcePixels; for(unsigned int k = 0; k < height; k++) { for (unsigned int i = 0; i < (width * 4); i += 4) { int pos = k * (width * 4) + (i); temp[pos] = ~temp[pos]; temp[pos + 1] = ~temp[pos + 1] / 3; temp[pos + 2] = ~temp[pos + 2] / 2; temp[pos + 3] = ~temp[pos + 3]; } } }); }Note
AMP または並列パターン ライブラリを使用して操作を並列化すると、このメソッドの実行速度が向上する可能性があります。
画像フォルダーに少なくとも 1 枚の画像があることを確認し、その後 F5 キーを押してプログラムをコンパイルおよび実行します。