Azure Stack Edge Pro GPU デバイス上の Kubernetes クラスターで Azure Arc を有効にする
適用対象:  Azure Stack Edge Pro - GPU
 Azure Stack Edge Pro 2
 Azure Stack Edge Pro R
 Azure Stack Edge Mini R
この記事では、Azure Stack Edge Pro デバイス上の既存の Kubernetes クラスターで Azure Arc を有効にする方法について説明します。
この手順では、次の記事を読んで理解していることを前提としています。
前提条件
Azure Stack Edge Pro デバイスと、デバイスへのアクセスに使用するクライアントで次の前提条件が満たされていることを確認してください。
デバイスでは
1 ノードの Azure Stack Edge Pro デバイスに対するサインイン資格情報がある。
- デバイスがアクティブ化されている。 デバイスをアクティブにするに関する記事を参照してください。
- デバイスに、Azure portal を使用して構成されたコンピューティング ロールがあり、Kubernetes クラスターがある。 コンピューティングの構成に関する記事を参照してください。
サブスクリプションに対して所有者アクセス権がある。 サービス プリンシパルのロールの割り当て手順でこのアクセス権が必要になります。
デバイスにアクセスするクライアントの場合
Azure Stack Edge Pro デバイスへのアクセスに使用される Windows クライアント システムがある。
クライアントでは、Windows PowerShell 5.0 以降が実行されている。 Windows PowerShell の最新バージョンをダウンロードするには、「Windows PowerShell のインストール」を参照してください。
サポートされているオペレーティング システムが搭載されている他のクライアントを使用することもできます。 この記事では、Windows クライアントを使用する場合の手順について説明します。
Azure Stack Edge Pro デバイス上の Kubernetes クラスターへのアクセスに関する記事で説明されている手順を完了している。 完了した内容:
- クライアントに
kubectlがインストールされている。 kubectlクライアントのバージョンと、Azure Stack Edge Pro デバイスで実行されている Kubernetes マスターのバージョンの差が 1 未満であることを確認する。クライアントで実行されている kubectl のバージョンを確認するには、
kubectl versionを使用します。 完全なバージョンをメモしておきます。Azure Stack Edge Pro デバイスのローカル UI で、[ソフトウェア更新プログラム] に移動し、Kubernetes サーバーのバージョン番号をメモします。
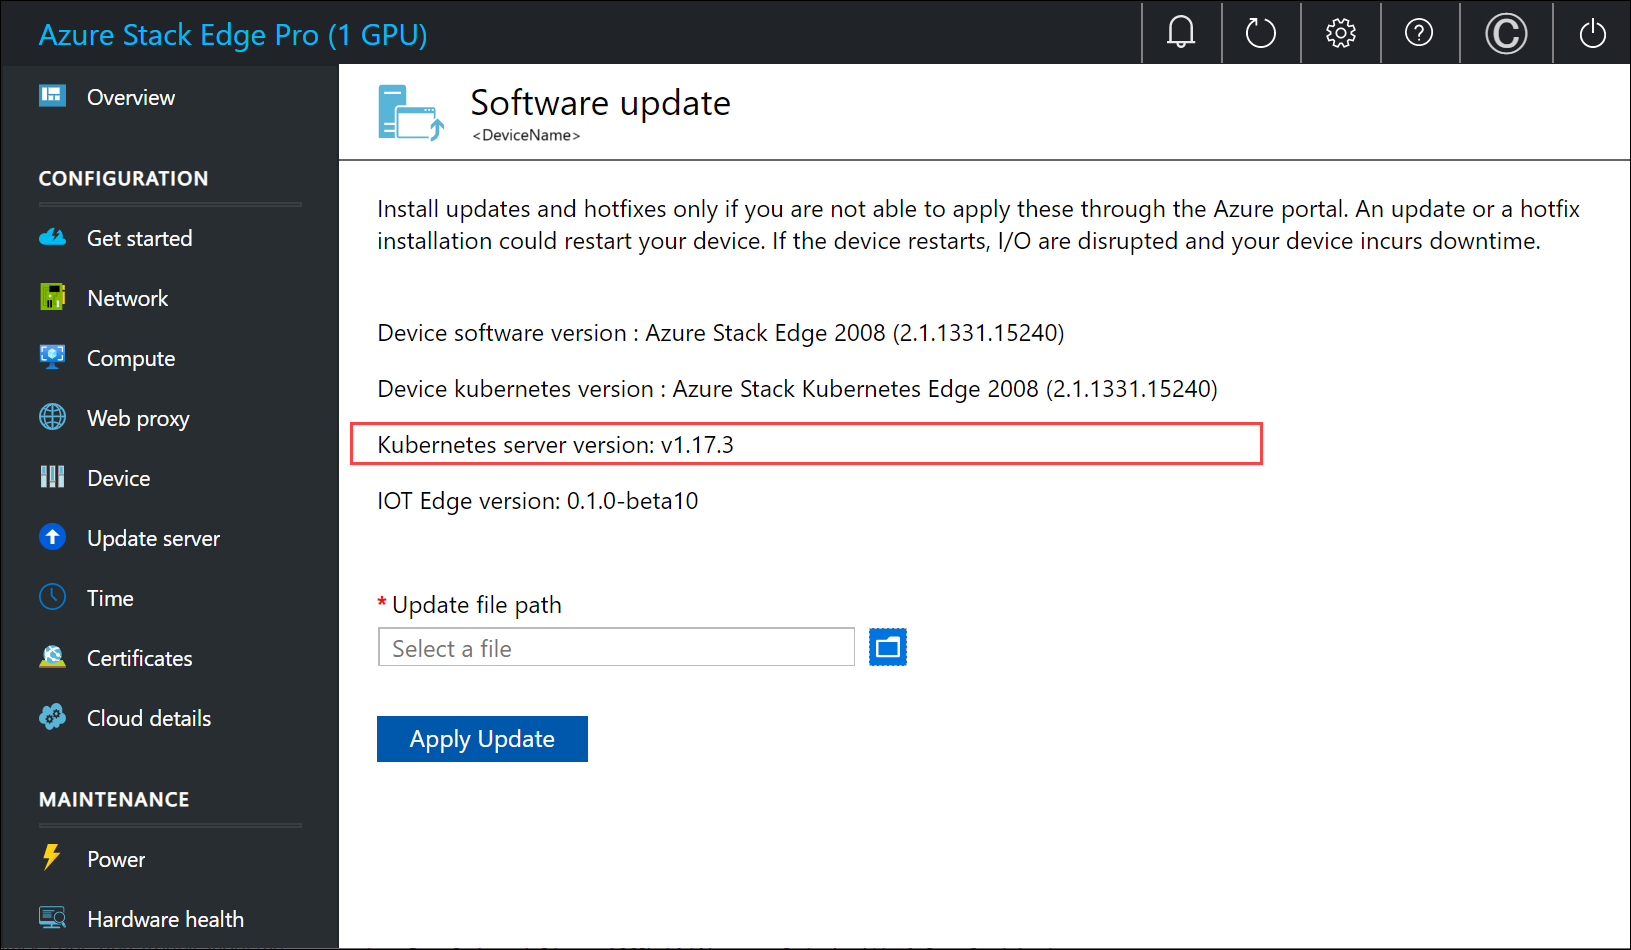
これら 2 つのバージョンに互換性があることを確認します。
- クライアントに
Kubernetes リソース プロバイダーを登録する
Kubernetes クラスターで Azure Arc を有効にする前に、サブスクリプションに対して Microsoft.Kubernetes と Microsoft.KubernetesConfiguration を有効にして登録する必要があります。
リソース プロバイダーを有効にするには、Azure portal で、デプロイに使用する予定のサブスクリプションに移動します。 [リソース プロバイダー] に移動します。
右側のペインで、追加するプロバイダーを検索します。 この例では、
Microsoft.KubernetesとMicrosoft.KubernetesConfigurationです。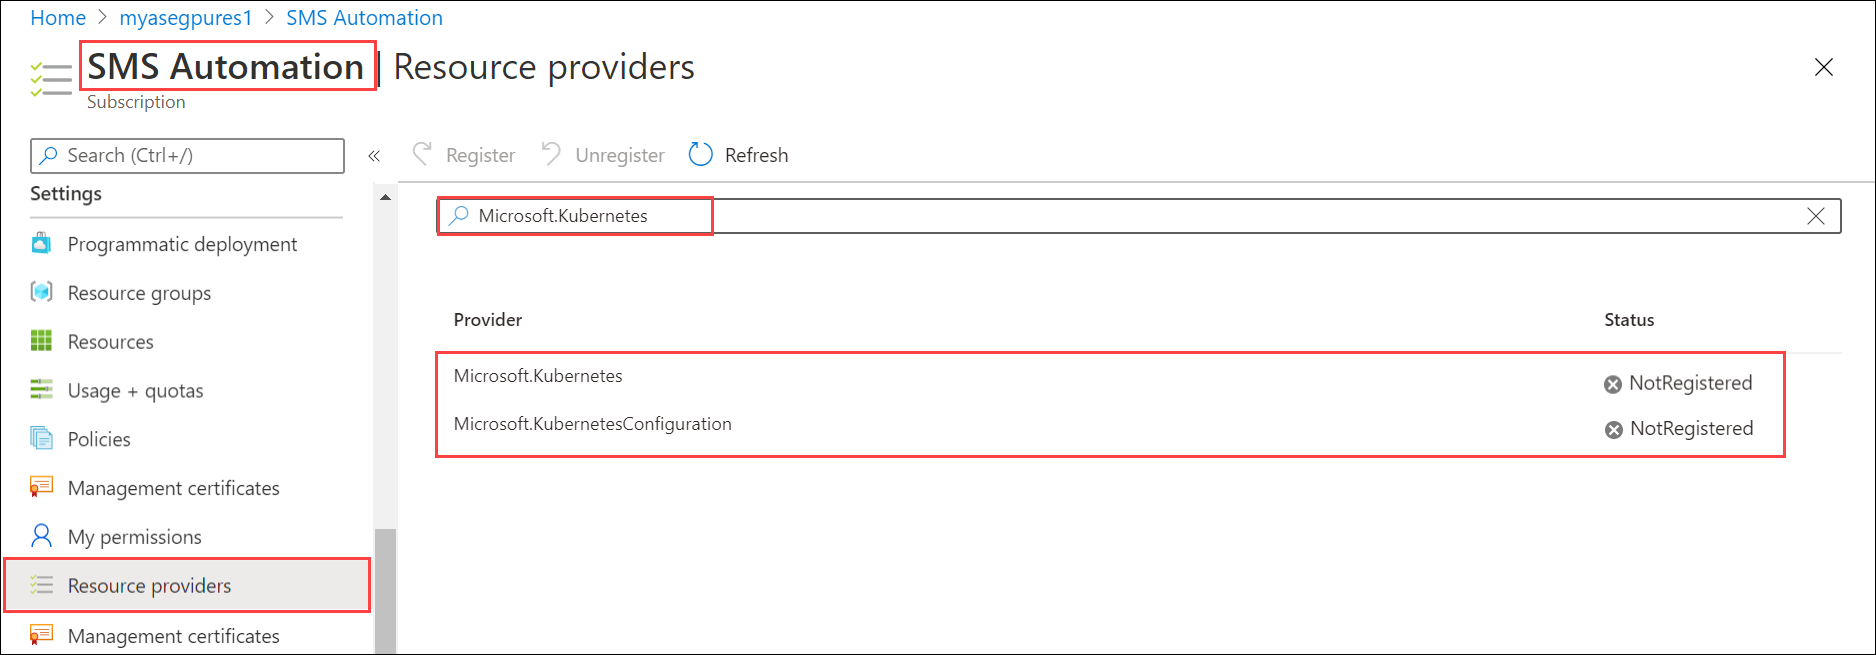
リソース プロバイダーを選択し、コマンド バーの上部から [登録] を選択します。 登録には数分かかります。
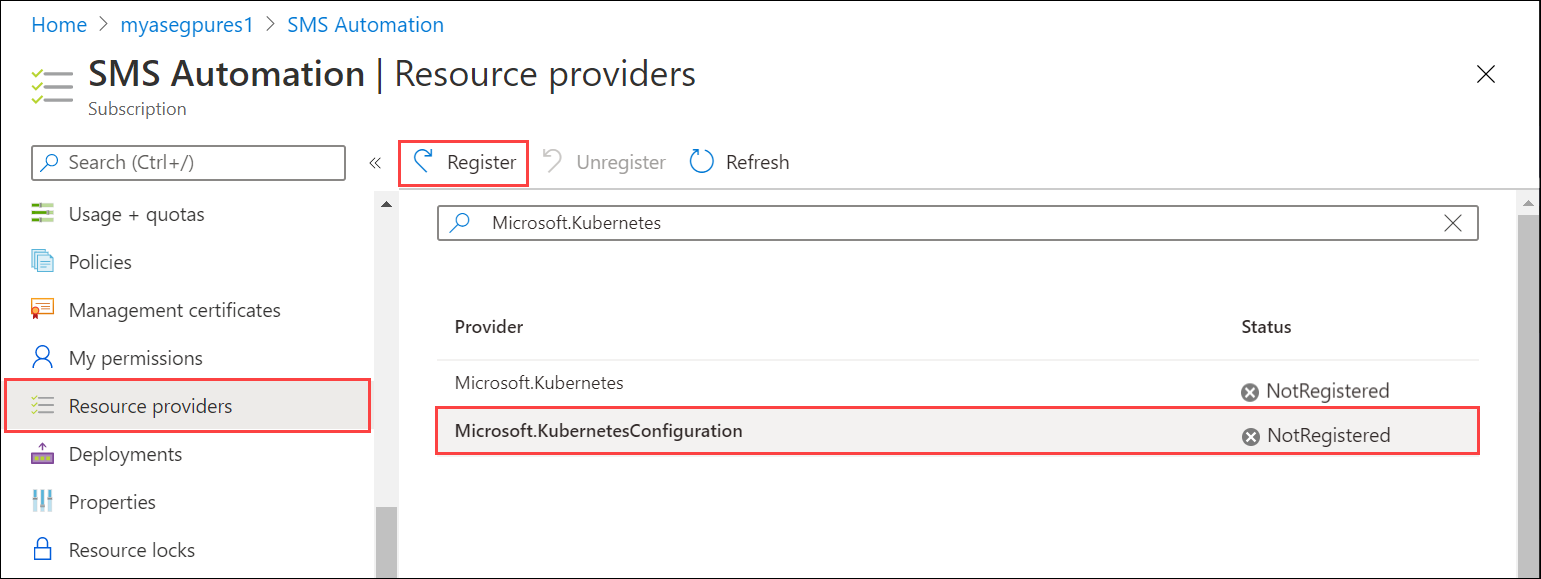
リソース プロバイダーが登録されていることがわかるまで、UI を最新の情報に更新します。 両方のリソース プロバイダーに対してこのプロセスを繰り返します。
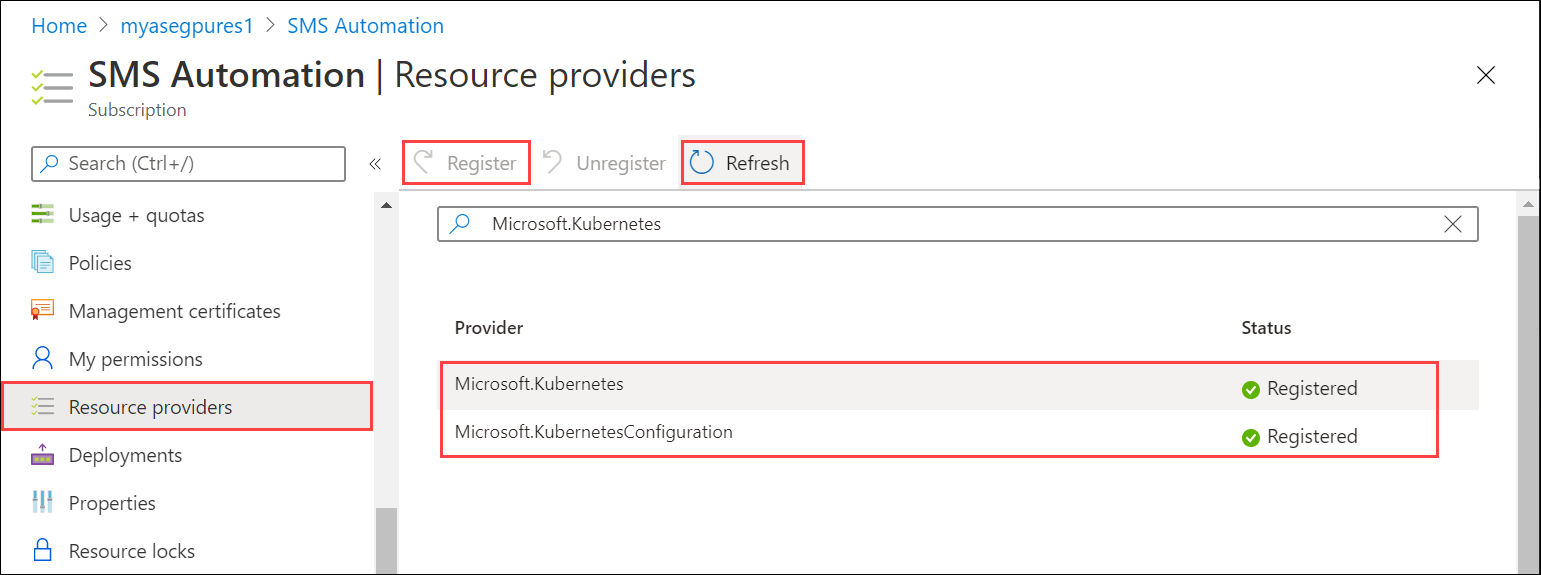
az cli を使用してリソース プロバイダーを登録することもできます。 詳細については、「Azure Arc 対応 Kubernetes 用の 2 つのプロバイダーを登録する」を参照してください。
サービス プリンシパルの作成、ロールの割り当て
Azure Stack Edge サービスのリソースのデプロイに使用した
Subscription IDとリソース グループの名前があることを確認します。 サブスクリプション ID を取得するには、Azure portal で Azure Stack Edge リソースに移動します。 [概要] > [基本] に移動します。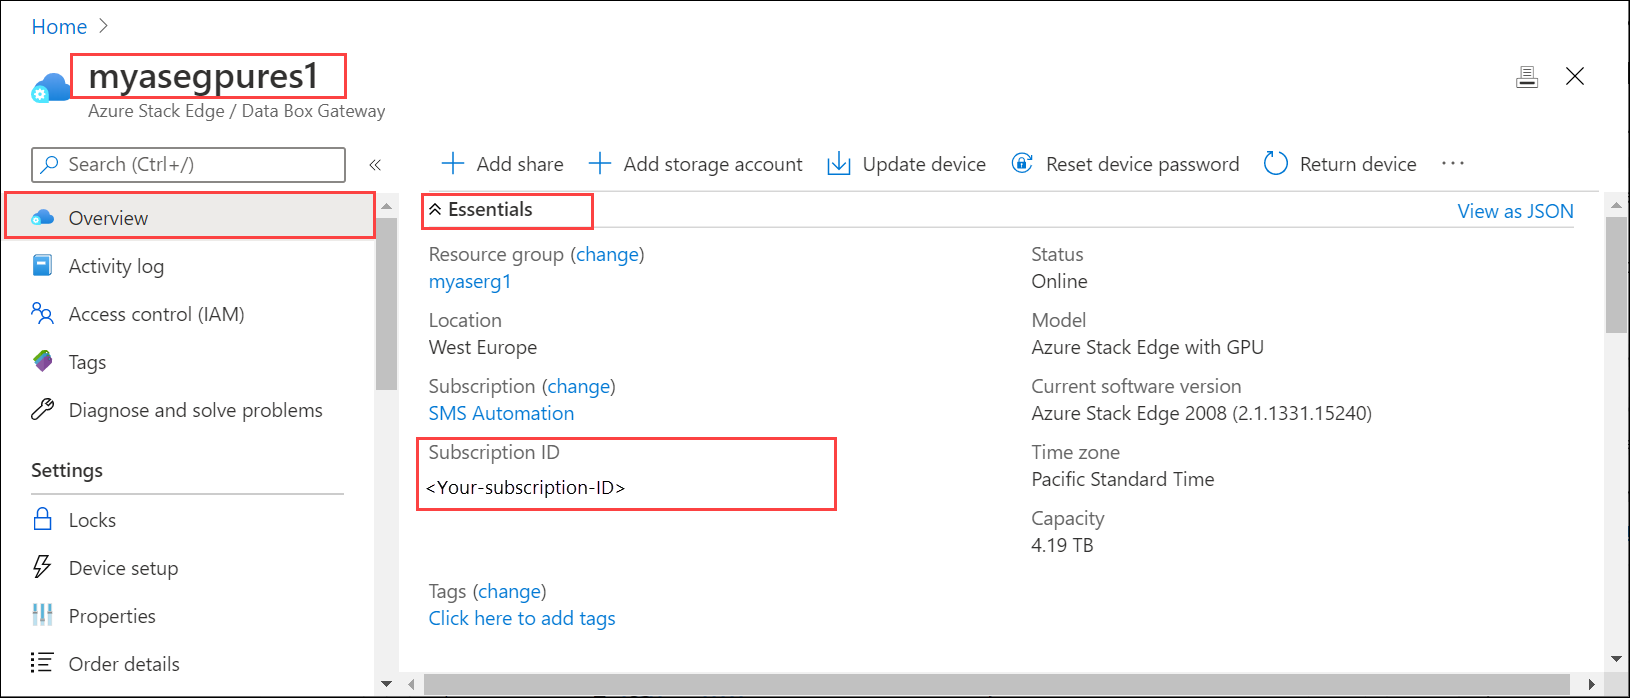
リソース グループ名を取得するには、[プロパティ] に移動します。
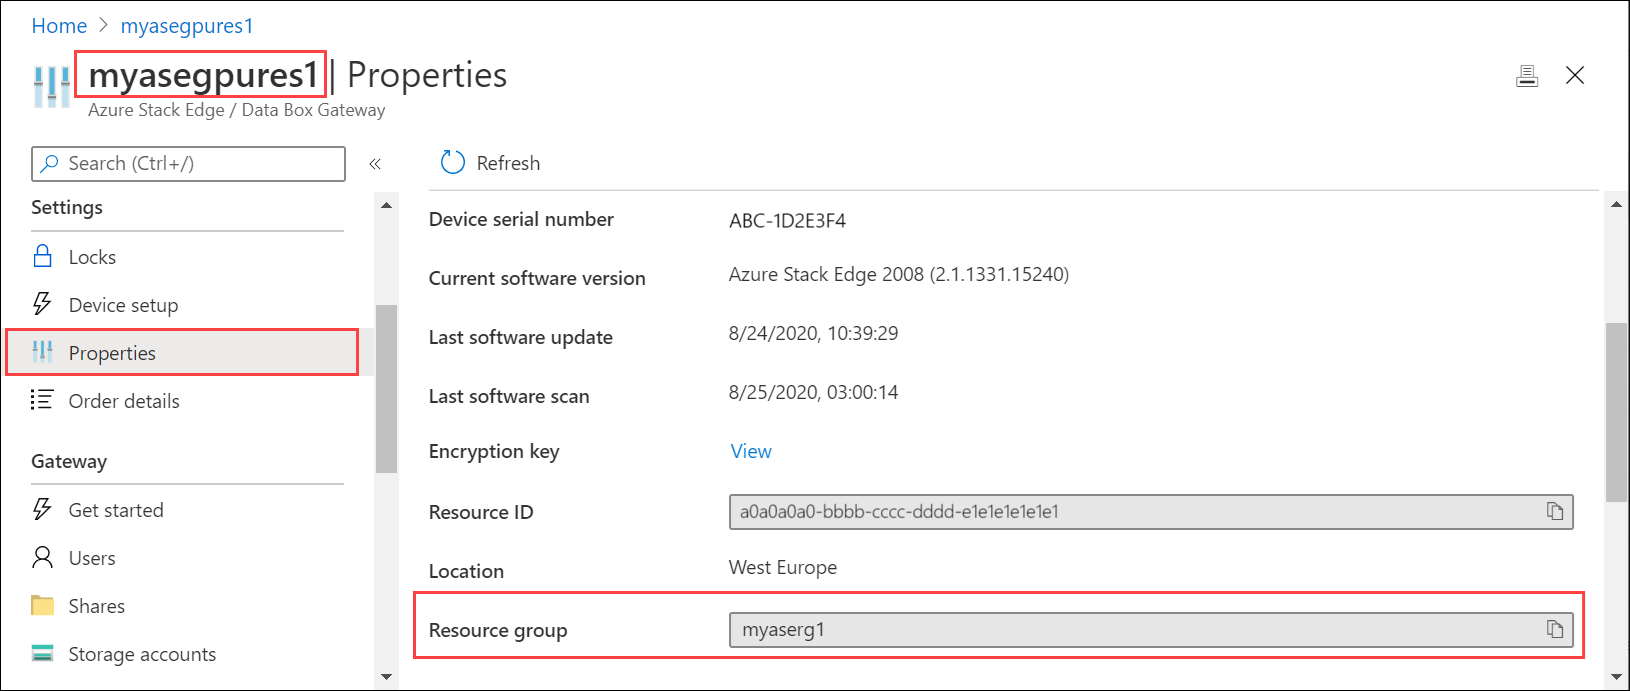
サービス プリンシパルを作成するには、
az cliで次のコマンドを使用します。az ad sp create-for-rbac --name "<Informative name for service principal>"az cliにログインする方法については、Azure portal で Cloud Shell を開始する方法に関する記事を参照してください。 ローカル クライアントでaz cliを使用してサービス プリンシパルを作成する場合は、バージョン 2.25 以降を実行していることを確認してください。次に例を示します。
PS /home/user> az ad sp create-for-rbac --name "https://azure-arc-for-ase-k8s"
{
  "appId": "xxxxxxxx-xxxx-xxxx-xxxx-xxxxxxxxxxxx",
  "displayName": "azure-arc-for-ase-k8s",
  "name": "https://azure-arc-for-ase-k8s",
  "password": "<password>",
  "tenant": "xxxxxxxx-xxxx-xxxx-xxxx-xxxxxxxxxxxx"
}
PS /home/user>
次のコマンドの入力としてこれらの値を使用するため、
appID、name、password、およびtenantIDをメモします。新しいサービス プリンシパルを作成したら、新しく作成したプリンシパルに
Kubernetes Cluster - Azure Arc Onboardingロールを割り当てます。 これは、アクセス許可が制限された組み込みの Azure ロールです (コマンドでロール ID を使用します)。 次のコマンドを使用します:az role assignment create --role 34e09817-6cbe-4d01-b1a2-e0eac5743d41 --assignee <appId-from-service-principal> --scope /subscriptions/<SubscriptionID>/resourceGroups/<Resource-group-name>次に例を示します。
PS /home/user> az role assignment create --role 34e09817-6cbe-4d01-b1a2-e0eac5743d41 --assignee xxxxxxxx-xxxx-xxxx-xxxx-xxxxxxxxxxxx --scope /subscriptions/xxxxxxxx-xxxx-xxxx-xxxx-xxxxxxxxxxxx/resourceGroups/myaserg1
{
  "canDelegate": null,
  "id": "/subscriptions/xxxxxxxx-xxxx-xxxx-xxxx-xxxxxxxxxxxx/resourceGroups/myaserg1/providers/Microsoft.Authorization/roleAssignments/00000000-0000-0000-0000-000000000000",
  "name": "xxxxxxxx-xxxx-xxxx-xxxx-xxxxxxxxxxxx",
  "principalId": "xxxxxxxx-xxxx-xxxx-xxxx-xxxxxxxxxxxx",
  "principalType": "ServicePrincipal",
  "resourceGroup": "myaserg1",
  "roleDefinitionId": "/subscriptions/xxxxxxxx-xxxx-xxxx-xxxx-xxxxxxxxxxxx/providers/Microsoft.Authorization/roleDefinitions/34e09817-6cbe-4d01-b1a2-e0eac5743d41",
  "scope": "/subscriptions/xxxxxxxx-xxxx-xxxx-xxxx-xxxxxxxxxxxx/resourceGroups/myaserg1",
  "type": "Microsoft.Authorization/roleAssignments"
}
PS /home/user>
Kubernetes クラスターで Arc を有効にする
Azure Arc 管理用に Kubernetes クラスターを構成するには、次の手順を実行します。
デバイスの PowerShell インターフェイスに接続します。
型:
Set-HcsKubernetesAzureArcAgent -SubscriptionId "<Your Azure Subscription Id>" -ResourceGroupName "<Resource Group Name>" -ResourceName "<Azure Arc resource name (shouldn't exist already)>" -Location "<Region associated with resource group>" -TenantId "<Tenant Id of service principal>" -ClientId "<App id of service principal>"このコマンドを実行すると、
ClientSecretを入力するフォローアップ プロンプトが表示されます。 サービス プリンシパルのパスワードを指定します。Azure パブリック以外のクラウドを使用している場合は、
CloudEnvironmentパラメーターを追加します。 このパラメーターは、AZUREPUBLICCLOUD、AZURECHINACLOUD、AZUREGERMANCLOUD、およびAZUREUSGOVERNMENTCLOUDに設定できます。Note
- お使いのデバイスに Azure Arc を展開するには、Azure Arc でサポートされているリージョンを使用していることを確認してください。
az account list-locationsコマンドを使用して、Set-HcsKubernetesAzureArcAgentコマンドレットで渡す正確な場所の名前を確認します。 場所の名前は通常、スペースなしの形式が使用されます。ClientIdとClientSecretは必須です。
次に例を示します。
[10.100.10.10]: PS>Set-HcsKubernetesAzureArcAgent -SubscriptionId "xxxxxxxx-xxxx-xxxx-xxxx-xxxxxxxxxxxx" -ResourceGroupName "myaserg1" -ResourceName "myasetestresarc" -Location "westeurope" -TenantId "xxxxxxxx-xxxx-xxxx-xxxx-xxxxxxxxxxxx" -ClientId "xxxxxxxx-xxxx-xxxx-xxxx-xxxxxxxxxxxx"

WARNING: A script or application on the remote computer 10.126.76.0 is sending a prompt request. When you are prompted,
enter sensitive information, such as credentials or passwords, only if you trust the remote computer and the
application or script that is requesting the data.

cmdlet Set-HcsKubernetesAzureArcAgent at command pipeline position 1

Supply values for the following parameters:
ClientSecret: **********************************
[10.100.10.10]: PS>
Azure portal で、前のコマンドで指定した名前でリソースを作成する必要があります。
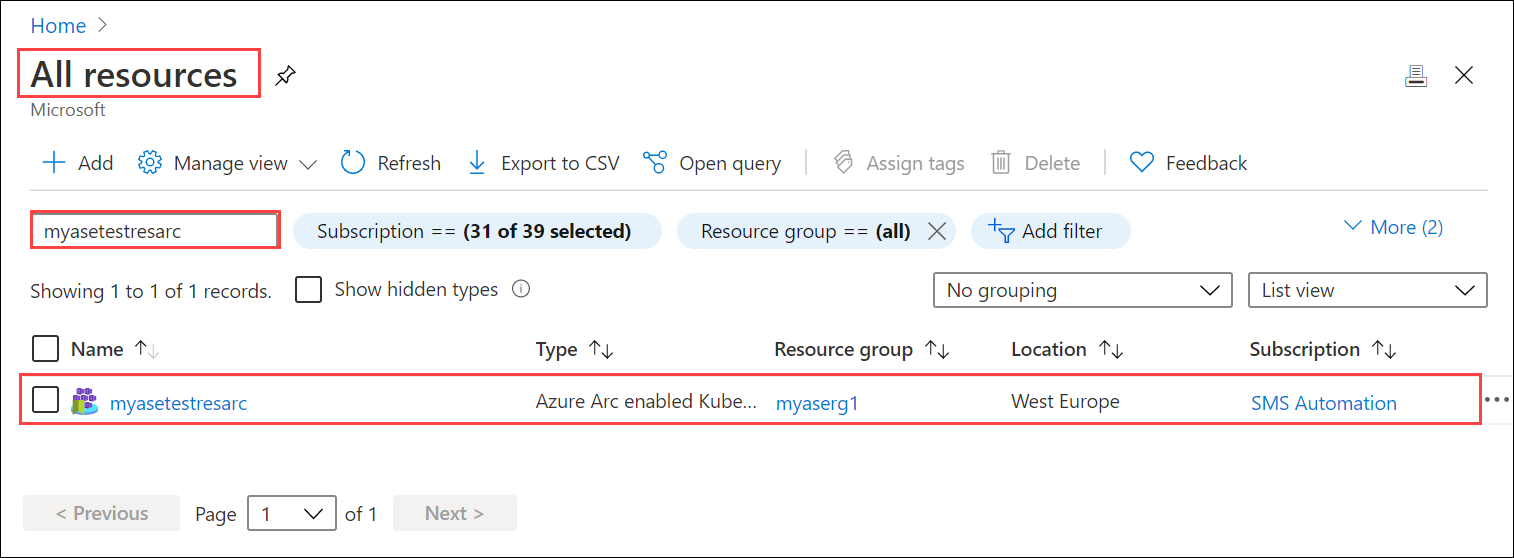
Azure Arc が正常に有効になったことを確認するには、PowerShell インターフェイスから次のコマンドを実行します。
kubectl get deployments,pods -n azure-arcこれは、
azure-arc名前空間の Kubernetes クラスターに展開された Azure Arc エージェントを示すサンプル出力です。[10.128.44.240]: PS>kubectl get deployments,pods -n azure-arc NAME READY UP-TO-DATE AVAILABLE AGE deployment.apps/cluster-metadata-operator 1/1 1 1 13d deployment.apps/clusterconnect-agent 1/1 1 1 13d deployment.apps/clusteridentityoperator 1/1 1 1 13d deployment.apps/config-agent 1/1 1 1 13d deployment.apps/controller-manager 1/1 1 1 13d deployment.apps/extension-manager 1/1 1 1 13d deployment.apps/flux-logs-agent 1/1 1 1 13d deployment.apps/kube-aad-proxy 1/1 1 1 13d deployment.apps/metrics-agent 1/1 1 1 13d deployment.apps/resource-sync-agent 1/1 1 1 13d NAME READY STATUS RESTARTS AGE pod/cluster-metadata-operator-9568b899c-2stjn 2/2 Running 0 13d pod/clusterconnect-agent-576758886d-vggmv 3/3 Running 0 13d pod/clusteridentityoperator-6f59466c87-mm96j 2/2 Running 0 13d pod/config-agent-7cbd6cb89f-9fdnt 2/2 Running 0 13d pod/controller-manager-df6d56db5-kxmfj 2/2 Running 0 13d pod/extension-manager-58c94c5b89-c6q72 2/2 Running 0 13d pod/flux-logs-agent-6db9687fcb-rmxww 1/1 Running 0 13d pod/kube-aad-proxy-67b87b9f55-bthqv 2/2 Running 0 13d pod/metrics-agent-575c565fd9-k5j2t 2/2 Running 0 13d pod/resource-sync-agent-6bbd8bcd86-x5bk5 2/2 Running 0 13d [10.128.44.240]: PS>
これらのエージェントの概念の概要については、こちらを参照してください。
Kubernetes クラスターから Arc を削除する
Azure Arc 管理を削除するには、次の手順を実行します。
-
- デバイスの PowerShell インターフェイスに接続します。
型:
Remove-HcsKubernetesAzureArcAgent
Note
Git リポジトリからリソース yamls を削除した場合、既定で Kubernetes クラスターから対応するリソースは削除されません。 Git リポジトリから削除したときにリソースが削除されるようにするには、Arc OperatorParams に --sync-garbage-collection を設定する必要があります。 詳細については、「構成を削除する」を参照してください。
次のステップ
Azure Arc デプロイを実行する方法については、GitOps を介し、Redis を使用してステートレス PHP Guestbook アプリケーションを Azure Stack Edge Pro デバイスにデプロイする方法に関するページを参照してください。