コンポーネント ダイアログを使用すると、大規模なダイアログ セットをより管理しやすい要素に分割して、特定のシナリオを処理する独立したダイアログを作成できます。 各要素には独自のダイアログ セットがあり、その要素外にあるダイアログ セットとの名前の競合を回避しています。 コンポーネント ダイアログは、次のことができるという点で再利用可能です。
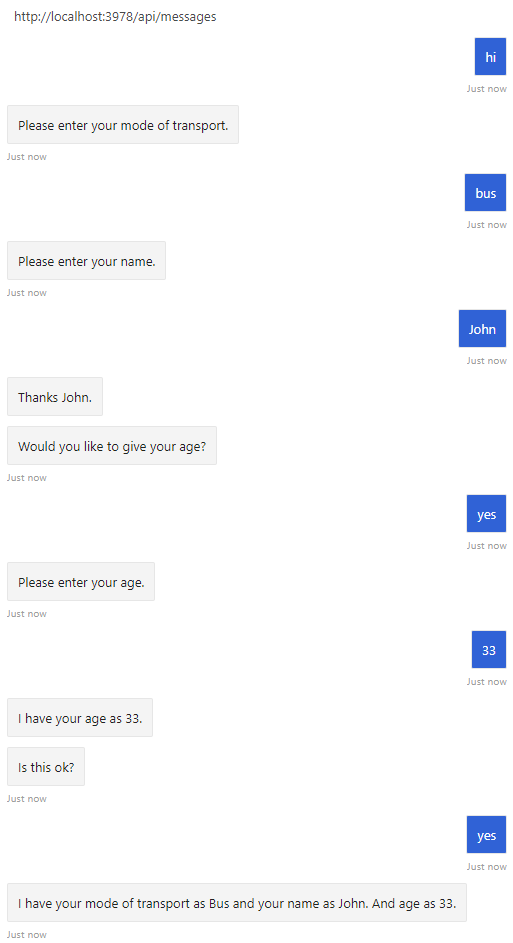
マルチターン プロンプト サンプルでは、ウォーターフォール ダイアログ、いくつかのプロンプト、および コンポーネント ダイアログを使用して、ユーザーに一連の質問を行う対話を作成します。 コードはダイアログを使用して、これらの手順を順番に切り替えます。
コンポーネント ダイアログによって 1 つ以上のダイアログがカプセル化されます。 コンポーネント ダイアログには内部ダイアログ セットがあり、この内部ダイアログ セットに追加したダイアログとプロンプトは独自の ID を持っています。これらの ID は、コンポーネント ダイアログ内からのみ表示できます。
ダイアログを使用するには、Microsoft.Bot.Builder.Dialogs NuGet パッケージをインストールします。
Dialogs\UserProfileDialog.cs
ここでは UserProfileDialog クラスは、ComponentDialog クラスから派生しています。
public class UserProfileDialog : ComponentDialog
コンストラクター内で、AddDialog メソッドによって、ダイアログとプロンプトがコンポーネント ダイアログに追加されます。 このメソッドで追加する最初のアイテムは、初期ダイアログとして設定されます。 InitialDialogIdプロパティを明示的に設定することで、初期ダイアログを変更できます。 コンポーネント ダイアログを開始すると、その initial dialog が開始されます。
public UserProfileDialog(UserState userState)
    : base(nameof(UserProfileDialog))
{
    _userProfileAccessor = userState.CreateProperty<UserProfile>("UserProfile");

    // This array defines how the Waterfall will execute.
    var waterfallSteps = new WaterfallStep[]
    {
        TransportStepAsync,
        NameStepAsync,
        NameConfirmStepAsync,
        AgeStepAsync,
        PictureStepAsync,
        SummaryStepAsync,
        ConfirmStepAsync,
    };

    // Add named dialogs to the DialogSet. These names are saved in the dialog state.
    AddDialog(new WaterfallDialog(nameof(WaterfallDialog), waterfallSteps));
    AddDialog(new TextPrompt(nameof(TextPrompt)));
    AddDialog(new NumberPrompt<int>(nameof(NumberPrompt<int>), AgePromptValidatorAsync));
    AddDialog(new ChoicePrompt(nameof(ChoicePrompt)));
    AddDialog(new ConfirmPrompt(nameof(ConfirmPrompt)));
    AddDialog(new AttachmentPrompt(nameof(AttachmentPrompt), PicturePromptValidatorAsync));

    // The initial child Dialog to run.
    InitialDialogId = nameof(WaterfallDialog);
}
次のコードは、ウォーターフォール ダイアログの最初の手順を表します。
private static async Task<DialogTurnResult> NameStepAsync(WaterfallStepContext stepContext, CancellationToken cancellationToken)
{
    stepContext.Values["transport"] = ((FoundChoice)stepContext.Result).Value;

    return await stepContext.PromptAsync(nameof(TextPrompt), new PromptOptions { Prompt = MessageFactory.Text("Please enter your name.") }, cancellationToken);
}
ウォーターフォール ダイアログの実装の詳細については、連続して行われる会話フローを実装する方法をご覧ください。
ダイアログを使用するには、ご自身のプロジェクトで botbuilder-dialogs npm パッケージをインストールする必要があります。
dialogs/userProfileDialog.js
ここでは UserProfileDialog クラスによって ComponentDialog が拡張されます。
class UserProfileDialog extends ComponentDialog {
コンストラクター内で、AddDialog メソッドによって、ダイアログとプロンプトがコンポーネント ダイアログに追加されます。 このメソッドで追加する最初のアイテムは、初期ダイアログとして設定されます。 InitialDialogIdプロパティを明示的に設定することで、初期ダイアログを変更できます。 コンポーネント ダイアログを開始すると、その initial dialog が開始されます。
constructor(userState) {
    super('userProfileDialog');

    this.userProfile = userState.createProperty(USER_PROFILE);

    this.addDialog(new TextPrompt(NAME_PROMPT));
    this.addDialog(new ChoicePrompt(CHOICE_PROMPT));
    this.addDialog(new ConfirmPrompt(CONFIRM_PROMPT));
    this.addDialog(new NumberPrompt(NUMBER_PROMPT, this.agePromptValidator));
    this.addDialog(new AttachmentPrompt(ATTACHMENT_PROMPT, this.picturePromptValidator));

    this.addDialog(new WaterfallDialog(WATERFALL_DIALOG, [
        this.transportStep.bind(this),
        this.nameStep.bind(this),
        this.nameConfirmStep.bind(this),
        this.ageStep.bind(this),
        this.pictureStep.bind(this),
        this.summaryStep.bind(this),
        this.confirmStep.bind(this)
    ]));

    this.initialDialogId = WATERFALL_DIALOG;
}
次のコードは、ウォーターフォール ダイアログの最初の手順を表します。
async transportStep(step) {
    // WaterfallStep always finishes with the end of the Waterfall or with another dialog; here it is a Prompt Dialog.
    // Running a prompt here means the next WaterfallStep will be run when the user's response is received.
    return await step.prompt(CHOICE_PROMPT, {
        prompt: 'Please enter your mode of transport.',
        choices: ChoiceFactory.toChoices(['Car', 'Bus', 'Bicycle'])
    });
}
ウォーターフォール ダイアログの実装の詳細については、連続して行われる会話フローを実装する方法をご覧ください。
UserProfileDialog.java
ここでは UserProfileDialog クラスは、ComponentDialog クラスから派生しています。
public class UserProfileDialog extends ComponentDialog {
コンストラクター内で、addDialog メソッドによって、ダイアログとプロンプトがコンポーネント ダイアログに追加されます。 このメソッドで追加する最初のアイテムは、初期ダイアログとして設定されます。 setInitialDialogIdメソッドを呼び出し、初期ダイアログの名前を指定すれば、初期ダイアログを変更することができます。 コンポーネント ダイアログを開始すると、その initial dialog が開始されます。
public UserProfileDialog(UserState withUserState) {
    super("UserProfileDialog");

    userProfileAccessor = withUserState.createProperty("UserProfile");

    WaterfallStep[] waterfallSteps = {
        UserProfileDialog::transportStep,
        UserProfileDialog::nameStep,
        this::nameConfirmStep,
        this::ageStep,
        UserProfileDialog::pictureStep,
        this::confirmStep,
        this::summaryStep
    };

    // Add named dialogs to the DialogSet. These names are saved in the dialog state.
    addDialog(new WaterfallDialog("WaterfallDialog", Arrays.asList(waterfallSteps)));
    addDialog(new TextPrompt("TextPrompt"));
    addDialog(new NumberPrompt<Integer>("NumberPrompt", UserProfileDialog::agePromptValidator, Integer.class));
    addDialog(new ChoicePrompt("ChoicePrompt"));
    addDialog(new ConfirmPrompt("ConfirmPrompt"));
    addDialog(new AttachmentPrompt("AttachmentPrompt", UserProfileDialog::picturePromptValidator));

    // The initial child Dialog to run.
    setInitialDialogId("WaterfallDialog");
}
次のコードは、ウォーターフォール ダイアログの最初の手順を表します。
private static CompletableFuture<DialogTurnResult> nameStep(WaterfallStepContext stepContext) {
    stepContext.getValues().put("transport", ((FoundChoice) stepContext.getResult()).getValue());

    PromptOptions promptOptions = new PromptOptions();
    promptOptions.setPrompt(MessageFactory.text("Please enter your name."));
    return stepContext.prompt("TextPrompt", promptOptions);
}
ウォーターフォール ダイアログの実装の詳細については、連続して行われる会話フローを実装する方法をご覧ください。
ダイアログを使用するには、ターミナルから pip install botbuilder-dialogs と pip install botbuilder-ai を実行して botbuilder-dialogs および botbuilder-ai PyPI パッケージをインストールします。
dialogs/user_profile_dialog.py
ここでは UserProfileDialog クラスによって ComponentDialog が拡張されます。
class UserProfileDialog(ComponentDialog):
コンストラクター内で、add_dialog メソッドによって、ダイアログとプロンプトがコンポーネント ダイアログに追加されます。 このメソッドで追加する最初のアイテムは、初期ダイアログとして設定されます。 initial_dialog_idプロパティを明示的に設定することで、初期ダイアログを変更できます。 コンポーネント ダイアログを開始すると、その initial dialog が開始されます。
class UserProfileDialog(ComponentDialog):
    def __init__(self, user_state: UserState):
        super(UserProfileDialog, self).__init__(UserProfileDialog.__name__)

        self.user_profile_accessor = user_state.create_property("UserProfile")

        self.add_dialog(
            WaterfallDialog(
                WaterfallDialog.__name__,
                [
                    self.transport_step,
                    self.name_step,
                    self.name_confirm_step,
                    self.age_step,
                    self.picture_step,
                    self.summary_step,
                    self.confirm_step,
                ],
            )
        )
        self.add_dialog(TextPrompt(TextPrompt.__name__))
        self.add_dialog(
            NumberPrompt(NumberPrompt.__name__, UserProfileDialog.age_prompt_validator)
        )
        self.add_dialog(ChoicePrompt(ChoicePrompt.__name__))
        self.add_dialog(ConfirmPrompt(ConfirmPrompt.__name__))
        self.add_dialog(
            AttachmentPrompt(
                AttachmentPrompt.__name__, UserProfileDialog.picture_prompt_validator
            )
        )

        self.initial_dialog_id = WaterfallDialog.__name__
次のコードは、ウォーターフォール ダイアログの最初の手順を表します。
async def transport_step(
    self, step_context: WaterfallStepContext
) -> DialogTurnResult:
    # WaterfallStep always finishes with the end of the Waterfall or with another dialog;
    # here it is a Prompt Dialog. Running a prompt here means the next WaterfallStep will
    # be run when the users response is received.
    return await step_context.prompt(
        ChoicePrompt.__name__,
        PromptOptions(
            prompt=MessageFactory.text("Please enter your mode of transport."),
            choices=[Choice("Car"), Choice("Bus"), Choice("Bicycle")],
        ),
    )
ウォーターフォール ダイアログの実装の詳細については、連続して行われる会話フローを実装する方法をご覧ください。
親コンテキストでは、コンポーネントがアクティブなダイアログとして表示されます。 しかし、コンポーネント内のコンテキストには、初期ダイアログがアクティブなダイアログに見えます。
コンポーネント ダイアログを追加した外部ダイアログ セットでは、コンポーネント ダイアログの ID は、それを作成したときに使用したものです。 外部セットでは、コンポーネントは 1 つのダイアログのように見えます。これはプロンプトの動作と似ています。
Bots\DialogBot.cs
サンプルでは、これはボットの OnMessageActivityAsync メソッドから呼び出される RunAsync メソッドを使用して行います。
protected override async Task OnMessageActivityAsync(ITurnContext<IMessageActivity> turnContext, CancellationToken cancellationToken)
{
    Logger.LogInformation("Running dialog with Message Activity.");

    // Run the Dialog with the new message Activity.
    await Dialog.RunAsync(turnContext, ConversationState.CreateProperty<DialogState>(nameof(DialogState)), cancellationToken);
}
dialogs/userProfileDialog.js
サンプルでは、run メソッドをユーザー プロファイル ダイアログに追加しました。
async run(turnContext, accessor) {
    const dialogSet = new DialogSet(accessor);
    dialogSet.add(this);

    const dialogContext = await dialogSet.createContext(turnContext);
    const results = await dialogContext.continueDialog();
    if (results.status === DialogTurnStatus.empty) {
        await dialogContext.beginDialog(this.id);
    }
}
bots/dialogBot.js
run メソッドは、ボットの onMessage メソッドから呼び出されます。
this.onMessage(async (context, next) => {
    console.log('Running dialog with Message Activity.');

    // Run the Dialog with the new message Activity.
    await this.dialog.run(context, this.dialogState);

    await next();
});
DialogBot.java
サンプルでは、これはボットの onMessageActivity メソッドから呼び出される run メソッドを使用して行います。
@Override
protected CompletableFuture<Void> onMessageActivity(
    TurnContext turnContext
) {
    LoggerFactory.getLogger(DialogBot.class).info("Running dialog with Message Activity.");

    // Run the Dialog with the new message Activity.
    return Dialog.run(dialog, turnContext, conversationState.createProperty("DialogState"));
}
helpers/dialog_helper.py
サンプルでは、run_dialog メソッドをユーザー プロファイル ダイアログに追加しました。
class DialogHelper:
    @staticmethod
    async def run_dialog(
        dialog: Dialog, turn_context: TurnContext, accessor: StatePropertyAccessor
    ):
        dialog_set = DialogSet(accessor)
        dialog_set.add(dialog)

        dialog_context = await dialog_set.create_context(turn_context)
        results = await dialog_context.continue_dialog()
        if results.status == DialogTurnStatus.Empty:
            await dialog_context.begin_dialog(dialog.id)
ボットの on_message_activity メソッドから呼び出される run_dialog メソッド。
bots/dialog_bot.py
async def on_message_activity(self, turn_context: TurnContext):
    await DialogHelper.run_dialog(
        self.dialog,
        turn_context,
        self.conversation_state.create_property("DialogState"),
    )
