チュートリアル: Azure Functions と Azure Web PubSub サービスを使用してサーバーレス通知アプリを作成する
[アーティクル] 12/17/2024
12 人の共同作成者
フィードバック
この記事の内容
Azure Web PubSub サービスは、WebSocket を使用して、リアルタイム メッセージング Web アプリケーションを作成するのに役立ちます。 Azure Functions は、インフラストラクチャを管理することなくコードを実行できるサーバーレス プラットフォームです。 このチュートリアルでは、Azure Web PubSub サービスと Azure Functions を使用して、通知シナリオでリアルタイム メッセージングを使用したサーバーレス アプリケーションを作成する方法について説明します。
このチュートリアルでは、以下の内容を学習します。
サーバーレス通知アプリを作成する
Web PubSub 関数の入力および出力のバインドを使用する
サンプル関数をローカルで実行する
関数を Azure Function App にデプロイする
重要
この記事に示す生の接続文字列は、デモンストレーションのみを目的としています。
接続文字列には、アプリケーションが Azure Web PubSub サービスにアクセスするために必要な認可情報が含まれています。 接続文字列内のアクセス キーは、サービスのルート パスワードに似ています。 運用環境では、常にアクセス キーを保護してください。 Azure Key Vault を使ってキーの管理とローテーションを安全に行い、WebPubSubServiceClient を使って接続をセキュリティ保護します
アクセス キーを他のユーザーに配布したり、ハードコーディングしたり、他のユーザーがアクセスできるプレーンテキストで保存したりしないでください。 キーが侵害された可能性があると思われる場合は、キーをローテーションしてください。
前提条件
Azure サブスクリプション をお持ちでない場合は、開始する前に Azure 無料アカウント を作成してください。
Azure へのサインイン
Azure アカウントで Azure Portal (https://portal.azure.com/ ) にサインインします。
Azure Web PubSub サービス インスタンスを作成する
アプリケーションは Azure 内の Web PubSub サービス インスタンスに接続します。
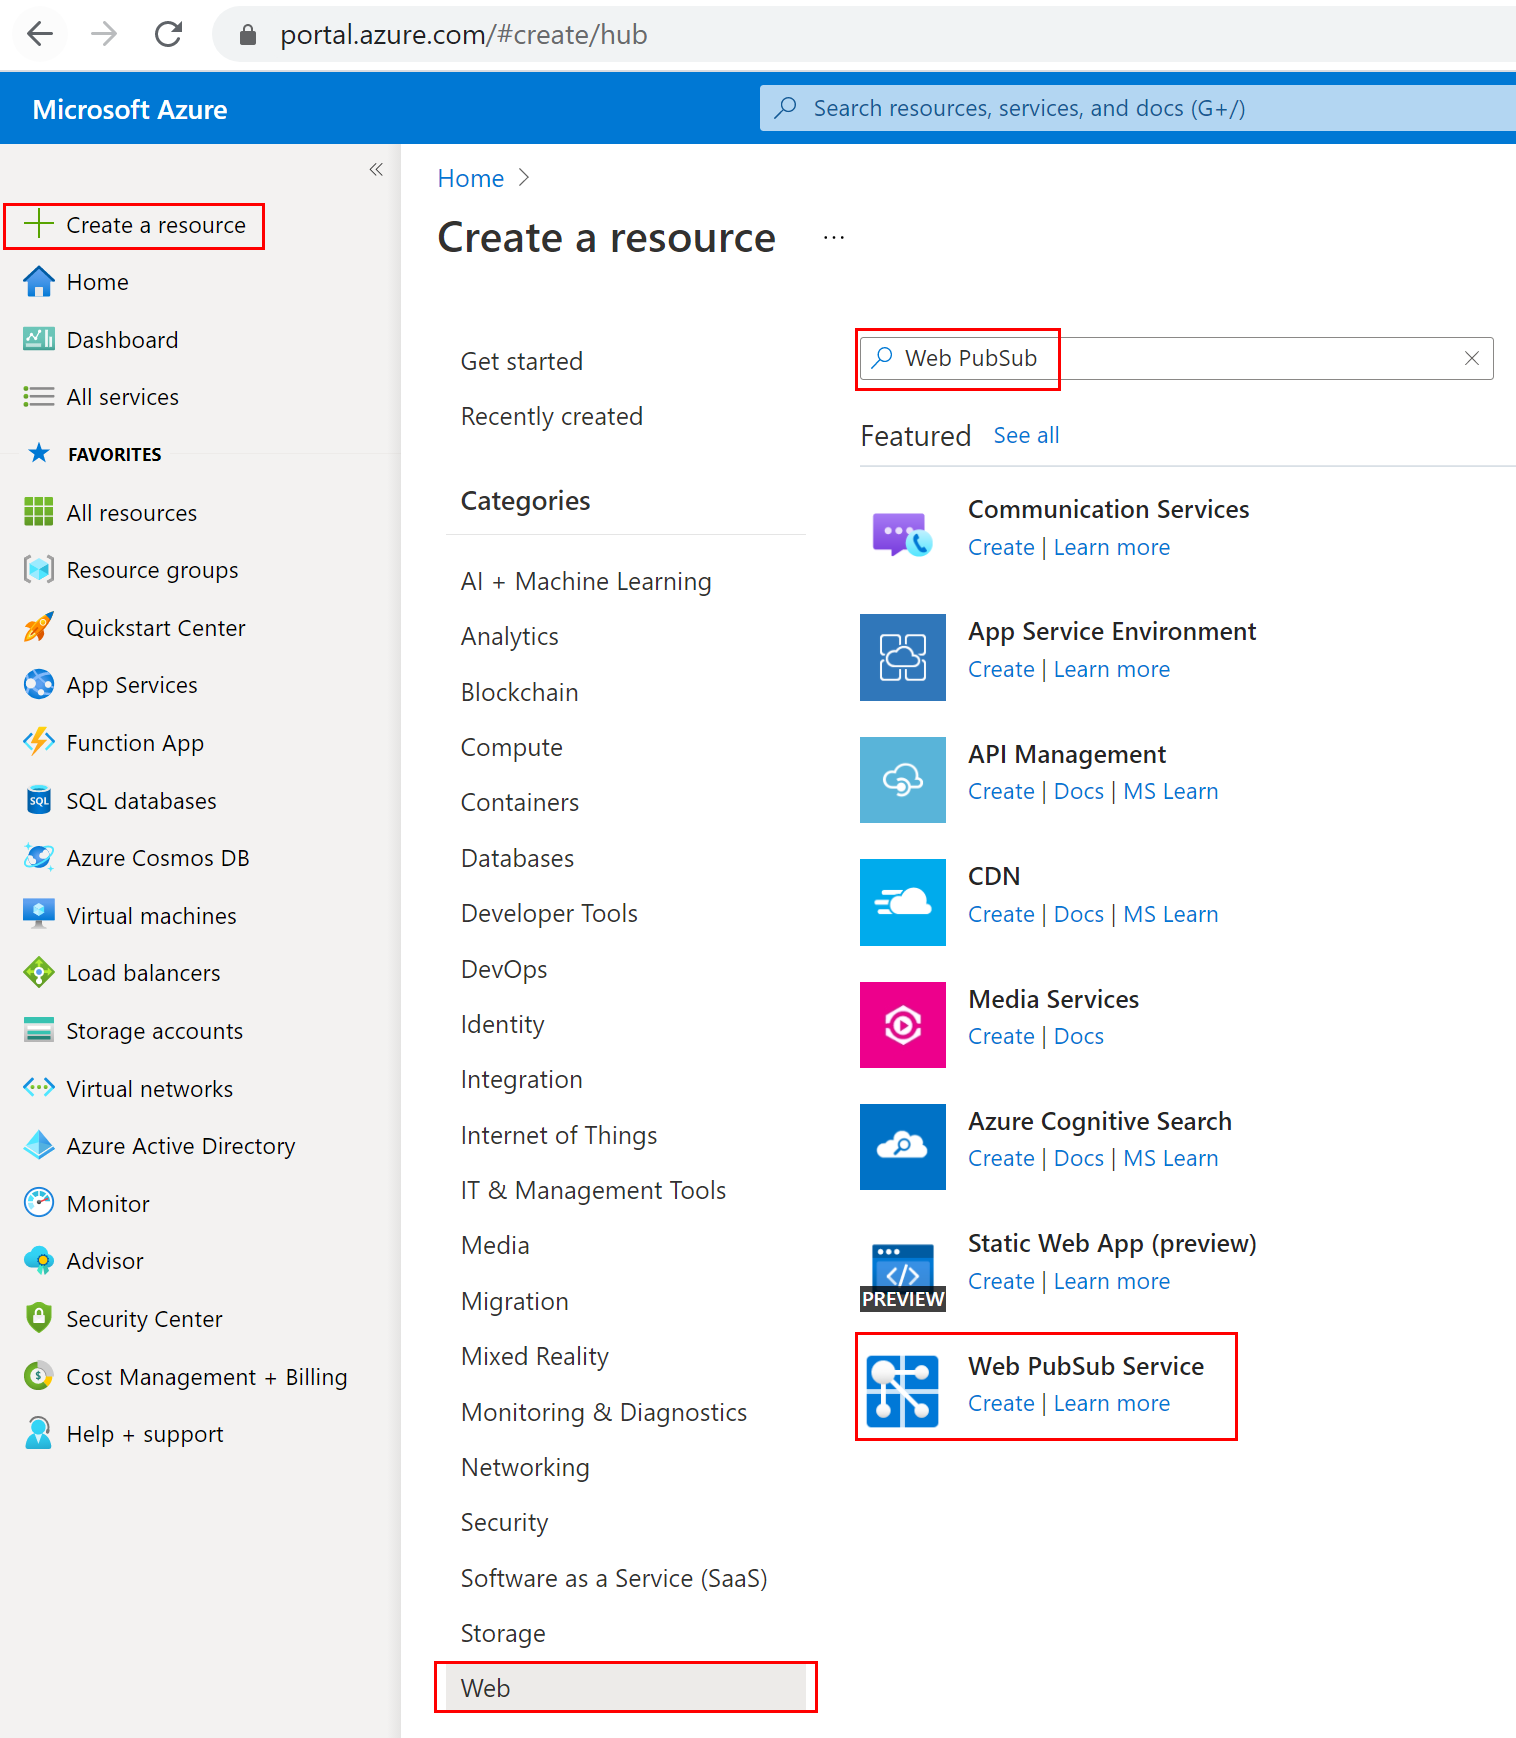
Azure portal の左上にある [新規] ボタンを選択します。 [新規] 画面で、検索ボックスに「Web PubSub 」と入力して Enter キーを押します。 (Azure Web PubSub を Web カテゴリから検索することもできます)。
検索結果の [Web PubSub] を選択し、 [作成] を選択します。
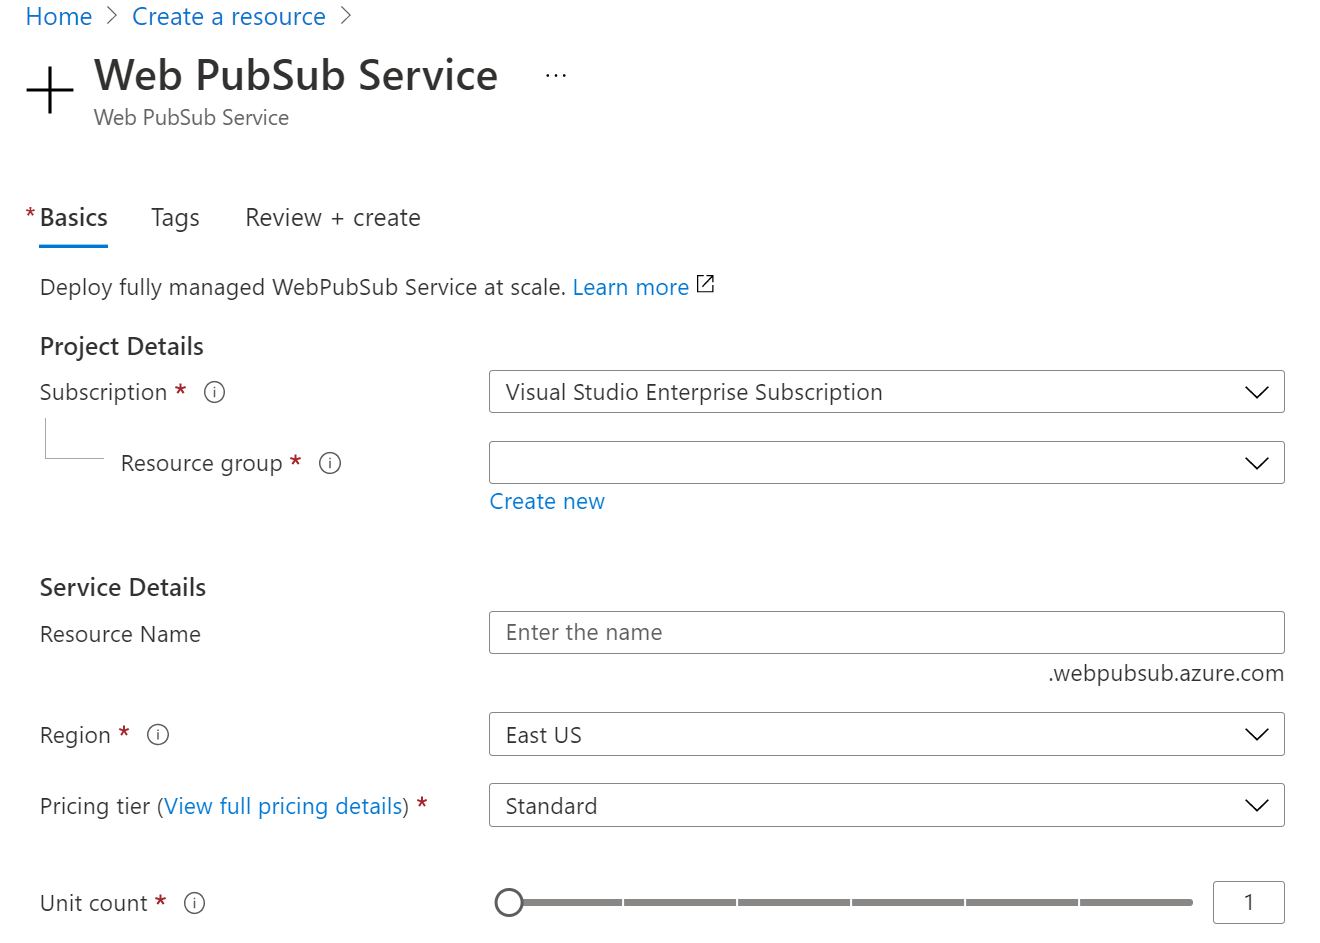
次の設定を入力します。
設定
提案された値
説明
リソース名
グローバルに一意の名前
新しい Web PubSub サービス インスタンスを識別するグローバルで一意の名前。 有効な文字は、a-z、A-Z、0-9、- です。
サブスクリプション
該当するサブスクリプション
この新しい Web PubSub インスタンスが作成される Azure サブスクリプション。
リソース グループ
myResourceGroup
Web PubSub サービス インスタンスの作成先となる新しいリソース グループの名前。
場所
米国西部
近くのリージョン を選択します。
[価格レベル]
無料
まず Azure Web PubSub サービスを無料でお試しいただけます。
Azure Web PubSub サービスの価格レベル の詳細をご覧ください。
[ユニット数]
-
ユニット数は、Web PubSub サービス インスタンスで受け入れることができる接続の数を指定します。 各ユニットで最大 1,000 のコンカレント接続がサポートされます。 Standard レベルでのみ構成可能です。
[作成] を選択して Web PubSub サービス インスタンスのデプロイを開始します。
関数をローカルで作成して実行する
Azure Functions Core Tools がインストールされていることを確認します。 次に、プロジェクト用の空のディレクトリを作成します。 この作業ディレクトリの下でコマンドを実行します。 以下のオプションのいずれかを使用します。
func init --worker-runtime javascript --model V4
func init --worker-runtime javascript --model V3
func init --worker-runtime dotnet
func init --worker-runtime dotnet-isolated
func init --worker-runtime python --model V1
手順に従って Microsoft.Azure.WebJobs.Extensions.WebPubSub をインストールします。
Web PubSub サポートを受けるには、host.json の extensionBundle がバージョン 4.* 以降であることを確認または更新します。
host.json を更新するには、エディターでファイルを開き、既存のバージョンの extensionBundle をバージョン 4.* 以降に置き換えます。
{
    "extensionBundle": {
        "id": "Microsoft.Azure.Functions.ExtensionBundle",
        "version": "[4.*, 5.0.0)"
    }
}
Web PubSub サポートを受けるには、host.json の extensionBundle がバージョン 3.3.0 以降であることを確認または更新します。
host.json を更新するには、エディターでファイルを開き、既存のバージョンの extensionBundle をバージョン 3.3.0 以降に置き換えます。
{
    "extensionBundle": {
        "id": "Microsoft.Azure.Functions.ExtensionBundle",
        "version": "[3.3.*, 4.0.0)"
    }
}
dotnet add package Microsoft.Azure.WebJobs.Extensions.WebPubSub
dotnet add package Microsoft.Azure.Functions.Worker.Extensions.WebPubSub --prerelease
host.json の extensionBundle をバージョン 3.3.0 以降に更新し、Web PubSub サポートを取得します。
host.json を更新するには、エディターでファイルを開き、既存のバージョンの extensionBundle をバージョン 3.3.0 以降に置き換えます。
{
    "extensionBundle": {
        "id": "Microsoft.Azure.Functions.ExtensionBundle",
        "version": "[3.3.*, 4.0.0)"
    }
}
クライアントの静的 Web ページを読み取ってホストする index 関数を作成します。
func new -n index -t HttpTrigger
src/functions/index.js を更新して次のコードをコピーします。
const { app } = require('@azure/functions');
const { readFile } = require('fs/promises');

app.http('index', {
    methods: ['GET', 'POST'],
    authLevel: 'anonymous',
    handler: async (context) => {
        const content = await readFile('index.html', 'utf8', (err, data) => {
            if (err) {
                context.err(err)
                return
            }
        });

        return {
            status: 200,
            headers: {
                'Content-Type': 'text/html'
            },
            body: content,
        };
    }
});
index/function.json を更新して次の json コードをコピーします。
{
  "bindings": [
    {
      "authLevel": "anonymous",
      "type": "httpTrigger",
      "direction": "in",
      "name": "req",
      "methods": [
        "get",
        "post"
      ]
    },
    {
      "type": "http",
      "direction": "out",
      "name": "res"
    }
  ]
}
index/index.js を更新して次のコードをコピーします。
var fs = require('fs');
var path = require('path');

module.exports = function (context, req) {
    var index = context.executionContext.functionDirectory + '/../index.html';
    context.log("index.html path: " + index);
    fs.readFile(index, 'utf8', function (err, data) {
        if (err) {
            console.log(err);
            context.done(err);
        }
        context.res = {
            status: 200,
            headers: {
                'Content-Type': 'text/html'
            },
            body: data
        };
        context.done();
    });
}
index.cs を更新して Run 関数を次のコードに置き換えます。
[FunctionName("index")]
public static IActionResult Run([HttpTrigger(AuthorizationLevel.Anonymous)] HttpRequest req, ExecutionContext context, ILogger log)
{
    var indexFile = Path.Combine(context.FunctionAppDirectory, "index.html");
    log.LogInformation($"index.html path: {indexFile}.");
    return new ContentResult
    {
        Content = File.ReadAllText(indexFile),
        ContentType = "text/html",
    };
}
index.cs を更新して Run 関数を次のコードに置き換えます。
[Function("index")]
public HttpResponseData Run([HttpTrigger(AuthorizationLevel.Anonymous, "get", "post")] HttpRequestData req, FunctionContext context)
{
    var path = Path.Combine(context.FunctionDefinition.PathToAssembly, "../index.html");
    _logger.LogInformation($"index.html path: {path}.");

    var response = req.CreateResponse();
    response.WriteString(File.ReadAllText(path));
    response.Headers.Add("Content-Type", "text/html");
    return response;
}
index/function.json を更新して次の json コードをコピーします。
{
  "scriptFile": "__init__.py",
  "bindings": [
    {
      "authLevel": "anonymous",
      "type": "httpTrigger",
      "direction": "in",
      "name": "req",
      "methods": [
        "get",
        "post"
      ]
    },
    {
      "type": "http",
      "direction": "out",
      "name": "$return"
    }
  ]
}
index/__init__.py を更新して次のコードをコピーします。
import os

import azure.functions as func

def main(req: func.HttpRequest) -> func.HttpResponse:
    f = open(os.path.dirname(os.path.realpath(__file__)) + '/../index.html')
    return func.HttpResponse(f.read(), mimetype='text/html')
クライアントがアクセス トークンを含むサービス接続 URL を取得するのに役立つ negotiate 関数を作成します。
func new -n negotiate -t HttpTrigger
src/functions/negotiate.js を更新して次のコードをコピーします。
const { app, input } = require('@azure/functions');

const connection = input.generic({
    type: 'webPubSubConnection',
    name: 'connection',
    hub: 'notification'
});

app.http('negotiate', {
    methods: ['GET', 'POST'],
    authLevel: 'anonymous',
    extraInputs: [connection],
    handler: async (request, context) => {
        return { body: JSON.stringify(context.extraInputs.get('connection')) };
    },
});
negotiate/function.json を更新して次の json コードをコピーします。
{
  "bindings": [
    {
      "authLevel": "anonymous",
      "type": "httpTrigger",
      "direction": "in",
      "name": "req"
    },
    {
      "type": "http",
      "direction": "out",
      "name": "res"
    },
    {
      "type": "webPubSubConnection",
      "name": "connection",
      "hub": "notification",
      "direction": "in"
    }
  ]
}
フォルダー negotiate を作成し、negotiate/index.js を更新して次のコードをコピーします。
module.exports = function (context, req, connection) {
    context.res = { body: connection };
    context.done();
};
negotiate.cs を更新して Run 関数を次のコードに置き換えます。
[FunctionName("negotiate")]
public static WebPubSubConnection Run(
    [HttpTrigger(AuthorizationLevel.Anonymous, "get", "post", Route = null)] HttpRequest req,
    [WebPubSubConnection(Hub = "notification")] WebPubSubConnection connection,
    ILogger log)
{
    log.LogInformation("Connecting...");

    return connection;
}
ヘッダーに using ステートメントを追加し、必要な依存関係を解決します。
using Microsoft.Azure.WebJobs.Extensions.WebPubSub;
negotiate.cs を更新して Run 関数を次のコードに置き換えます。
[Function("negotiate")]
public HttpResponseData Run([HttpTrigger(AuthorizationLevel.Anonymous, "get", "post")] HttpRequestData req,
    [WebPubSubConnectionInput(Hub = "notification")] WebPubSubConnection connectionInfo)
{
    var response = req.CreateResponse(HttpStatusCode.OK);
    response.WriteAsJsonAsync(connectionInfo);
    return response;
}
フォルダー negotiate を作成し、negotiate/function.json を更新して次の json コードをコピーします。
{
  "scriptFile": "__init__.py",
  "bindings": [
    {
      "authLevel": "anonymous",
      "type": "httpTrigger",
      "direction": "in",
      "name": "req"
    },
    {
      "type": "http",
      "direction": "out",
      "name": "$return"
    },
    {
      "type": "webPubSubConnection",
      "name": "connection",
      "hub": "notification",
      "direction": "in"
    }
  ]
}
negotiate/__init__.py を更新して次のコードをコピーします。
import logging

import azure.functions as func


def main(req: func.HttpRequest, connection) -> func.HttpResponse:
    return func.HttpResponse(connection)
TimerTrigger を使用して通知を生成する notification 関数を作成します。
func new -n notification -t TimerTrigger
src/functions/notification.js を更新して次のコードをコピーします。
const { app, output } = require('@azure/functions');

const wpsAction = output.generic({
    type: 'webPubSub',
    name: 'action',
    hub: 'notification'
});

app.timer('notification', {
    schedule: "*/10 * * * * *",
    extraOutputs: [wpsAction],
    handler: (myTimer, context) => {
        context.extraOutputs.set(wpsAction, {
            actionName: 'sendToAll',
            data: `[DateTime: ${new Date()}] Temperature: ${getValue(22, 1)}\xB0C, Humidity: ${getValue(40, 2)}%`,
            dataType: 'text',
        });
    },
});

function getValue(baseNum, floatNum) {
    return (baseNum + 2 * floatNum * (Math.random() - 0.5)).toFixed(3);
}
notification/function.json を更新して次の json コードをコピーします。
{
  "bindings": [
    {
      "name": "myTimer",
      "type": "timerTrigger",
      "direction": "in",
      "schedule": "*/10 * * * * *"
    },
    {
      "type": "webPubSub",
      "name": "actions",
      "hub": "notification",
      "direction": "out"
    }
  ]
}
notification/index.js を更新して次のコードをコピーします。
module.exports = function (context, myTimer) {
    context.bindings.actions = {
        "actionName": "sendToAll",
        "data": `[DateTime: ${new Date()}] Temperature: ${getValue(22, 1)}\xB0C, Humidity: ${getValue(40, 2)}%`,
        "dataType": "text"
    }
    context.done();
};

function getValue(baseNum, floatNum) {
    return (baseNum + 2 * floatNum * (Math.random() - 0.5)).toFixed(3);
}
notification.cs を更新して Run 関数を次のコードに置き換えます。
[FunctionName("notification")]
public static async Task Run([TimerTrigger("*/10 * * * * *")]TimerInfo myTimer, ILogger log,
    [WebPubSub(Hub = "notification")] IAsyncCollector<WebPubSubAction> actions)
{
    await actions.AddAsync(new SendToAllAction
    {
        Data = BinaryData.FromString($"[DateTime: {DateTime.Now}] Temperature: {GetValue(23, 1)}{'\xB0'}C, Humidity: {GetValue(40, 2)}%"),
        DataType = WebPubSubDataType.Text
    });
}

private static string GetValue(double baseNum, double floatNum)
{
    var rng = new Random();
    var value = baseNum + floatNum * 2 * (rng.NextDouble() - 0.5);
    return value.ToString("0.000");
}
ヘッダーに using ステートメントを追加し、必要な依存関係を解決します。
using System.Threading.Tasks;
using Microsoft.Azure.WebJobs.Extensions.WebPubSub;
using Microsoft.Azure.WebPubSub.Common;
notification.cs を更新して Run 関数を次のコードに置き換えます。
[Function("notification")]
[WebPubSubOutput(Hub = "notification")]
public SendToAllAction Run([TimerTrigger("*/10 * * * * *")] MyInfo myTimer)
{
    return new SendToAllAction
    {
        Data = BinaryData.FromString($"[DateTime: {DateTime.Now}] Temperature: {GetValue(23, 1)}{'\xB0'}C, Humidity: {GetValue(40, 2)}%"),
        DataType = WebPubSubDataType.Text
    };
}

private static string GetValue(double baseNum, double floatNum)
{
    var rng = new Random();
    var value = baseNum + floatNum * 2 * (rng.NextDouble() - 0.5);
    return value.ToString("0.000");
}
フォルダー notification を作成し、notification/function.json を更新して次の json コードをコピーします。
{
  "scriptFile": "__init__.py",
  "bindings": [
    {
      "name": "myTimer",
      "type": "timerTrigger",
      "direction": "in",
      "schedule": "*/10 * * * * *"
    },
    {
      "type": "webPubSub",
      "name": "actions",
      "hub": "notification",
      "direction": "out"
    }
  ]
}
notification/__init__.py を更新して次のコードをコピーします。
import datetime
import random
import json

import azure.functions as func

def main(myTimer: func.TimerRequest, actions: func.Out[str]) -> None:
    time = datetime.datetime.now().strftime("%A %d-%b-%Y %H:%M:%S")
    actions.set(json.dumps({
        'actionName': 'sendToAll',
        'data': '\x5B DateTime: {0} \x5D Temperature: {1:.3f} \xB0C, Humidity: {2:.3f} \x25'.format(time, 22 + 2 * (random.random() - 0.5), 44 + 4 * (random.random() - 0.5)),
        'dataType': 'text'
    }))
プロジェクトのルート フォルダーにクライアントのシングル ページ index.html を追加し、コンテンツをコピーします。
<html>
    <body>
    <h1>Azure Web PubSub Notification</h1>
    <div id="messages"></div>
    <script>
        (async function () {
            let messages = document.querySelector('#messages');
            let res = await fetch(`${window.location.origin}/api/negotiate`);
            let url = await res.json();
            let ws = new WebSocket(url.url);
            ws.onopen = () => console.log('connected');

            ws.onmessage = event => {
                let m = document.createElement('p');
                m.innerText = event.data;
                messages.appendChild(m);
            };
        })();
    </script>
    </body>
</html>
C# プロジェクトではファイルが別の出力フォルダーにコンパイルされるため、コンテンツ ページがそれに対応するように *.csproj を更新する必要があります。
<ItemGroup>
    <None Update="index.html">
        <CopyToOutputDirectory>PreserveNewest</CopyToOutputDirectory>
    </None>
</ItemGroup>
C# プロジェクトではファイルが別の出力フォルダーにコンパイルされるため、コンテンツ ページがそれに対応するように *.csproj を更新する必要があります。
<ItemGroup>
    <None Update="index.html">
        <CopyToOutputDirectory>PreserveNewest</CopyToOutputDirectory>
    </None>
</ItemGroup>
Azure Function アプリを構成して実行する
この記事では、デモ目的でのみ生の接続文字列が表示されます。 運用環境では、常にアクセス キーを保護してください。 Azure Key Vault を使ってキーの管理とローテーションを安全に行い、WebPubSubServiceClient を使って接続をセキュリティ保護します
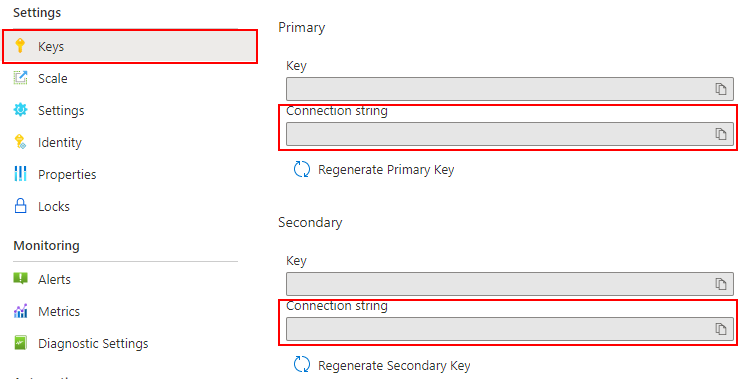
ブラウザーで Azure portal を開き、先ほどデプロイした Web PubSub サービス インスタンスが正常に作成されていることを確認します。 そのインスタンスに移動します。
[キー] を選択し、接続文字列をコピーします。
関数フォルダーでコマンドを実行して、サービス接続文字列を設定します。
<connection-string> を、必要に応じて自分の値に置き換えます。
func settings add WebPubSubConnectionString "<connection-string>"
Note
このサンプルで使用している TimerTrigger には Azure Storage への依存関係がありますが、Function がローカルで実行されているときは、ローカル ストレージ エミュレーターを使用することができます。
There was an error performing a read operation on the Blob Storage Secret Repository. Please ensure the 'AzureWebJobsStorage' connection string is valid. のようなエラーが発生した場合は、Storage Emulator をダウンロードして有効にする必要があります。
これで、ローカル関数をコマンドで実行できます。
func start --port 7071
実行中のログを確認するには、http://localhost:7071/api/index にアクセスしてローカル ホストの静的ページにアクセスします。
Note
一部のブラウザーでは、間違った URL に至る https に自動的にリダイレクトされます。 レンダリングが成功しない場合は、Edge を使用して URL を再確認することをお勧めします。
Azure に関数アプリをデプロイする
関数コードを Azure にデプロイする前に、3 つのリソースを作成する必要があります。
リソース グループ。関連リソースの論理コンテナーです。
ストレージ アカウント。関数についての情報 (状態など) を維持する目的で使用されます。
関数アプリ。関数コードを実行するための環境となります。 関数アプリは、ローカルの関数プロジェクトと対応関係にあります。これを使用すると、リソースの管理、デプロイ、共有を容易にするための論理ユニットとして関数をグループ化できます。
以下のコマンドを使用してこれらの項目を作成します。
Azure にサインインします。
az login
リソース グループを作成します。または、Azure Web PubSub サービスのいずれかを再利用してスキップできます。
az group create -n WebPubSubFunction -l <REGION>
リソース グループとリージョン内に汎用ストレージ アカウントを作成します。
az storage account create -n <STORAGE_NAME> -l <REGION> -g WebPubSubFunction
Azure に関数アプリを作成します。
az functionapp create --resource-group WebPubSubFunction --consumption-plan-location <REGION> --runtime node --runtime-version 18 --functions-version 4 --name <FUNCIONAPP_NAME> --storage-account <STORAGE_NAME>
az functionapp create --resource-group WebPubSubFunction --consumption-plan-location <REGION> --runtime node --runtime-version 18 --functions-version 4 --name <FUNCIONAPP_NAME> --storage-account <STORAGE_NAME>
az functionapp create --resource-group WebPubSubFunction --consumption-plan-location <REGION> --runtime dotnet --functions-version 4 --name <FUNCIONAPP_NAME> --storage-account <STORAGE_NAME>
az functionapp create --resource-group WebPubSubFunction --consumption-plan-location <REGION> --runtime dotnet-isolated --functions-version 4 --name <FUNCIONAPP_NAME> --storage-account <STORAGE_NAME>
az functionapp create --resource-group WebPubSubFunction --consumption-plan-location <REGION> --runtime python --runtime-version 3.9 --functions-version 4 --name <FUNCIONAPP_NAME> --os-type linux --storage-account <STORAGE_NAME>
Azure に関数プロジェクトをデプロイする:
Azure で関数アプリを作成したら、func azure functionapp publish コマンドを使用してローカル関数プロジェクトを配置することができます。
func azure functionapp publish <FUNCIONAPP_NAME> --publish-local-settings
Note
ここでは、ローカル設定 local.settings.json をコマンド パラメーター --publish-local-settings と共にデプロイしています。 Microsoft Azure ストレージ エミュレーターを使用している場合は、プロンプト メッセージ App setting AzureWebJobsStorage is different between azure and local.settings.json, Would you like to overwrite value in azure? [yes/no/show] に続いて「no」と入力して、 Azure でこの値の上書きをスキップできます。 さらに、Function App の設定を [Azure portal] ->[設定] ->[構成] で更新できます。
これで、URL (https://<FUNCIONAPP_NAME>.azurewebsites.net/api/index) に移動して、Azure Function App から自分のサイトを確認できます。
リソースをクリーンアップする
このアプリの使用を続けない場合は、次の手順に従って、このドキュメントで作成したすべてのリソースを削除して、課金が発生しないようにします。
Azure Portal の左端で [リソース グループ] を選択し、作成したリソース グループを選択します。 代わりに、検索ボックスを使用して、名前でリソース グループを検索します。
表示されたウィンドウでリソース グループを選択し、 [リソース グループの削除] を選択します。
新しいウィンドウで、削除するリソース グループの名前を入力し、 [削除] を選択します。
次のステップ
このクイックスタートでは、サーバーレス チャット アプリケーションを実行する方法について説明しました。 これで、独自のアプリケーションの作成を始められます。


