チュートリアル: ASP.NET Core アプリケーションでバリアント機能フラグを使用する
このチュートリアルでは、バリアント機能フラグを使用して、Quote of the Day というサンプル アプリケーションでさまざまなユーザー セグメントのエクスペリエンスを管理します。 「バリアント機能フラグを使用する」で作成したバリアント機能フラグを利用します。 作業を始める前に、App Configuration ストアに Greeting というバリアント機能フラグを作成していることを確認してください。
前提条件
- .NET CLI がマシンにインストールされていることを確認します。
- 「バリアント機能フラグを使用する」チュートリアルに従って、Greeting というバリアント機能フラグを作成します。
ASP.NET Core Web アプリケーションの作成
コマンド プロンプトで次のコードを実行します。 このコマンドを実行すると、個人アカウント認証を使用して ASP.NET Core に新しい Razor Pages アプリケーションを作成し、それを QuoteOfTheDay という出力フォルダーに配置することができます。
dotnet new razor --auth Individual -o QuoteOfTheDayQuoteOfTheDay ディレクトリに移動し、次のコマンドを実行して、アプリケーションのユーザー シークレットを作成します。
<your-App-Configuration-endpoint>プレースホルダーを実際の App Configuration ストアのエンドポイントに置き換えます。 エンドポイントは、Azure portal の App Configuration ストアの [概要] ブレードで確認できます。dotnet user-secrets init dotnet user-secrets set Endpoints:AppConfiguration "<your-App-Configuration-endpoint>"必要なパッケージの最新バージョンを追加します。
dotnet add package Azure.Identity
dotnet add package Microsoft.Extensions.Configuration.AzureAppConfiguration
dotnet add package Microsoft.FeatureManagement.AspNetCore
機能管理のために App Configuration に接続する
Program.cs を開き、次の using ステートメントを追加します。
using Azure.Identity;
using Microsoft.Extensions.Configuration.AzureAppConfiguration;
using Microsoft.FeatureManagement;
次のコードを追加します。これは、App Configuration ストアに接続し、
UseFeatureFlagsを呼び出して、ラベルのないすべての機能フラグをプルダウンします。DefaultAzureCredentialを使って、App Configuration ストアに対する認証を行います。 手順に従って、資格情報に App Configuration データ閲覧者ロールを割り当てます。 アプリケーションを実行する前に、アクセス許可が伝わるのに十分な時間をおいてください。var builder = WebApplication.CreateBuilder(args); // Retrieve the endpoint string endpoint = builder.Configuration.GetValue<string>("Endpoints:AppConfiguration") ?? throw new InvalidOperationException("The setting `Endpoints:AppConfiguration` was not found."); // Load configuration and feature flags from Azure App Configuration builder.Configuration .AddAzureAppConfiguration(options => { options.Connect(new Uri(endpoint), new DefaultAzureCredential()) .UseFeatureFlags(); });Azure App Configuration と機能管理サービスを追加し、機能管理のターゲット設定を有効にします。
// Add Azure App Configuration and feature management services to the container.
builder.Services.AddAzureAppConfiguration()
    .AddFeatureManagement()
    .WithTargeting();
行
var app = builder.Build();の下に、動的構成更新用の Azure App Configuration ミドルウェアを追加します。// Use Azure App Configuration middleware for dynamic configuration refresh. app.UseAzureAppConfiguration();
バリアント機能フラグを使用する
QuoteOfTheDay>Pages>Index.cshtml.cs を開き、内容を次のコードに置き換えます。
using Microsoft.AspNetCore.Mvc; using Microsoft.AspNetCore.Mvc.RazorPages; using Microsoft.FeatureManagement; namespace QuoteOfTheDay.Pages; public class Quote { public string Message { get; set; } public string Author { get; set; } } public class IndexModel(IVariantFeatureManagerSnapshot featureManager) : PageModel { private readonly IVariantFeatureManagerSnapshot _featureManager = featureManager; private Quote[] _quotes = [ new Quote() { Message = "You cannot change what you are, only what you do.", Author = "Philip Pullman" }]; public Quote? Quote { get; set; } public string GreetingMessage { get; set; } public async void OnGet() { Quote = _quotes[new Random().Next(_quotes.Length)]; Variant variant = await _featureManager.GetVariantAsync("Greeting", HttpContext.RequestAborted); if (variant != null) { GreetingMessage = variant.Configuration?.Get<string>() ?? ""; } else { _logger.LogWarning("No variant given. Either the feature flag named 'Greeting' is not defined or the variants are not defined properly."); } } }GetVariantAsyncを呼び出して、現在のユーザーの Greeting 機能フラグのバリアントを取得し、その値をページ モデルのGreetingMessageプロパティに割り当てます。QuoteOfTheDay>Pages>Shared>_Layout.cshtml で、
QuoteOfTheDay.styles.cssが追加された位置の下に、font-awesome CSS ライブラリへの次の参照を追加します。<link rel="stylesheet" href="https://cdnjs.cloudflare.com/ajax/libs/font-awesome/5.15.3/css/all.min.css">index.cshtml を開き、その内容を次のコードに置き換えます。
@page @model IndexModel @{ ViewData["Title"] = "Home page"; ViewData["Username"] = User.Identity?.Name ?? string.Empty; } <style> body { font-family: Arial, sans-serif; background-color: #f4f4f4; color: #333; } .quote-container { background-color: #fff; margin: 2em auto; padding: 2em; border-radius: 8px; max-width: 750px; box-shadow: 0px 4px 8px rgba(0, 0, 0, 0.2); display: flex; justify-content: space-between; align-items: start; position: relative; } .vote-container { position: absolute; top: 10px; right: 10px; display: flex; gap: 0em; } .vote-container .btn { background-color: #ffffff; /* White background */ border-color: #ffffff; /* Light blue border */ color: #333 } .vote-container .btn:focus { outline: none; box-shadow: none; } .vote-container .btn:hover { background-color: #F0F0F0; /* Light gray background */ } .greeting-content { font-family: 'Georgia', serif; /* More artistic font */ } .quote-content p.quote { font-size: 2em; /* Bigger font size */ font-family: 'Georgia', serif; /* More artistic font */ font-style: italic; /* Italic font */ color: #4EC2F7; /* Medium-light blue color */ } </style> <div class="quote-container"> <div class="quote-content"> <h3 class="greeting-content">@(Model.GreetingMessage)</h3> <br /> <p class="quote">“@(Model.Quote?.Message ?? "< Quote not found >")”</p> <p>- <b>@(Model.Quote?.Author ?? "Unknown")</b></p> </div> <div class="vote-container"> <button class="btn btn-primary" onclick="heartClicked(this)"> <i class="far fa-heart"></i> <!-- Heart icon --> </button> </div> </div> <script> function heartClicked(button) { var icon = button.querySelector('i'); icon.classList.toggle('far'); icon.classList.toggle('fas'); } </script>このコードを実行すると、Quote of the Day アプリケーションの UI が表示され、ページ モデルの
GreetingMessageが表示されます。 ハート ボタンがクリックされると、JavaScript ハンドラーheartClickedがトリガーされます。
アプリをビルドして実行する
アプリケーションをビルドして実行します。
dotnet build
dotnet run
アプリケーションが読み込まれたら、右上の [登録] を選択して新しいユーザーを登録します。
![今日の名言アプリの [登録] を示すスクリーンショット。](media/howto-variant-feature-flags-aspnet-core/register.png)
usera@contoso.com という名前の新しいユーザーを登録します。
ユーザー情報を入力した後、ここをクリックしてメールを検証してくださいと示されたリンクを選択します。

同じ手順を繰り返して、userb@contoso.com という 2 人目のユーザーを登録します。
Note
このチュートリアルの目的上、これらの名前を正確に使用することが重要です。 機能が想定どおりに構成されている限り、この 2 人のユーザーには異なるバリアントが表示されます。
右上の [ログイン] を選択して、usera@contoso.com としてサインインします。
![今日の名言アプリの [ログイン] を示すスクリーンショット。](media/howto-variant-feature-flags-aspnet-core/login.png)
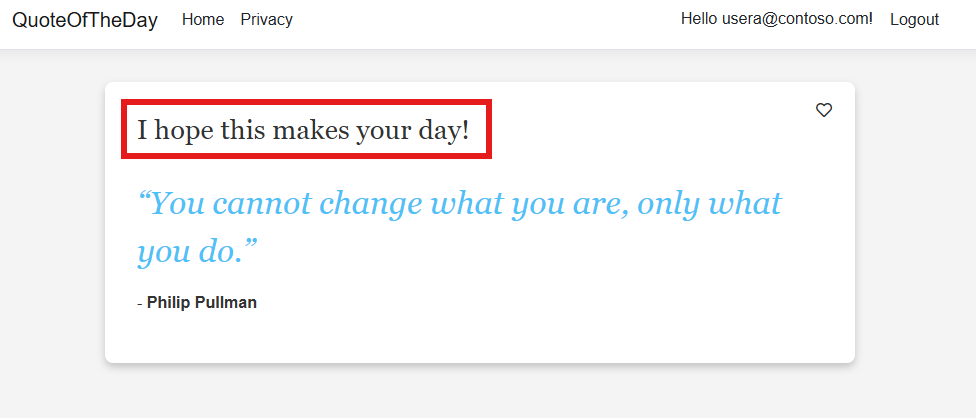
ログインすると、usera@contoso.com の長いあいさつメッセージが表示されます

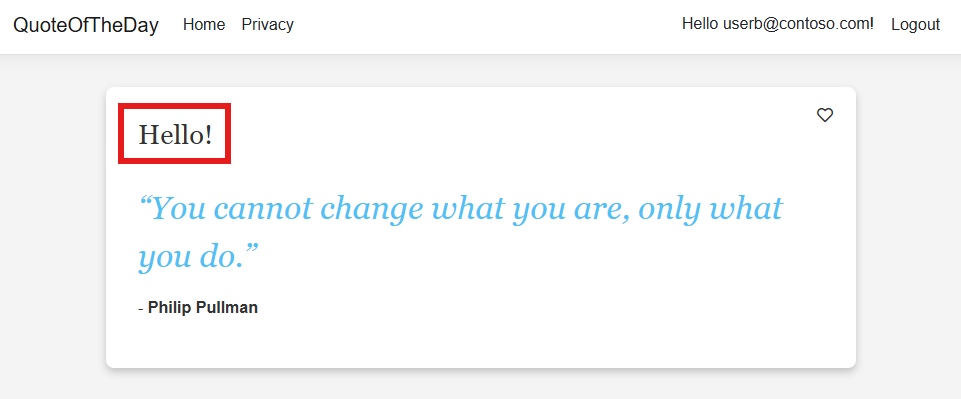
[ログアウト] をクリックし、userb@contoso.com としてログインすると、簡単なあいさつメッセージが表示されます。

次のステップ
.NET 機能管理ライブラリの詳細な機能の説明については、次のドキュメントを参照してください。