Application Gateway for Containers を使用した複数サイトのホスティング - イングレス API
このドキュメントでは、イングレス API を使用するサンプル アプリケーションを設定して、同じ Kubernetes イングレス リソース/Application Gateway for Containers フロントエンドで複数のサイトをホストするデモンストレーションを行います。 手順については、以下で説明します。
- 2 つのホストを持つイングレスリソースを作成します。
背景
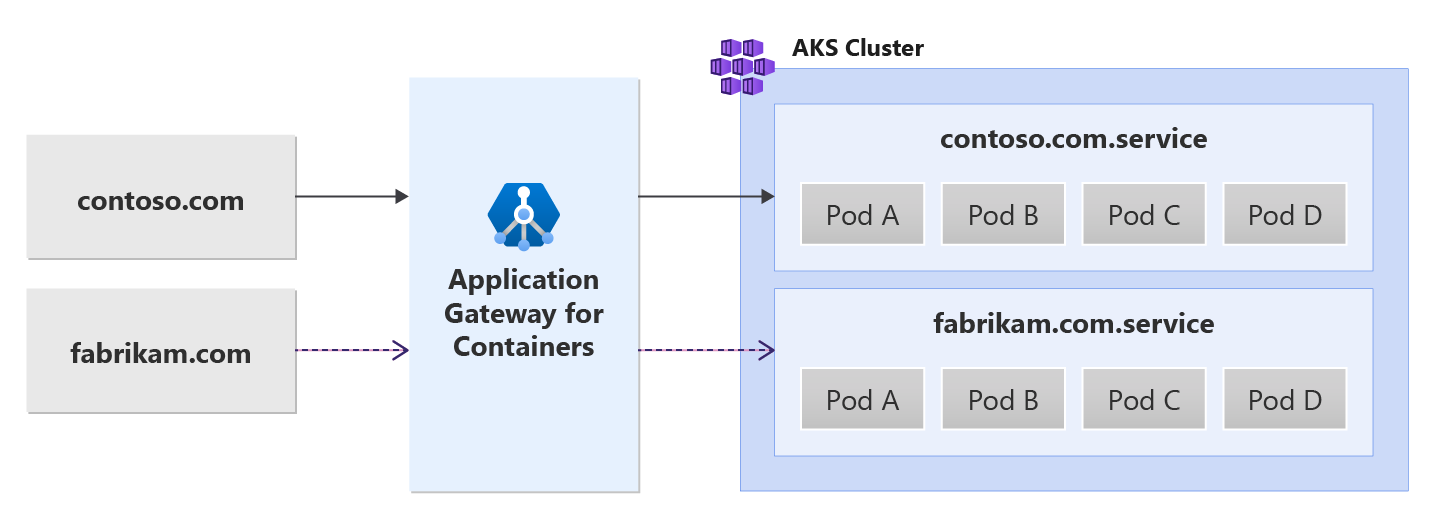
Application Gateway for Containers を使用することで、同じポートで複数の Web アプリケーションを構成できることにより、複数サイトをホストできるようになります。 一意のバックエンド サービスを使用して、2 つ以上の一意のサイトをホストできます。 次のシナリオ例を参照してください。

前提条件
BYO デプロイ戦略を使用した場合は、Application Gateway for Containers リソースと ALB コントローラーを設定していることを確認します。
ALB マネージド デプロイ戦略を使用した場合は、ApplicationLoadBalancer カスタム リソースを使用して、ALB コントローラーをプロビジョニングし、Application Gateway for Containers リソースをプロビジョニングしていることを確認します。
サンプル HTTP アプリケーションをデプロイする:
クラスターに次の deployment.yaml ファイルを適用し、パス、クエリ、ヘッダーベースのルーティングのデモンストレーションを行うサンプル Web アプリケーションを作成します。kubectl apply -f https://raw.githubusercontent.com/MicrosoftDocs/azure-docs/refs/heads/main/articles/application-gateway/for-containers/examples/traffic-split-scenario/deployment.yamlこのコマンドによって、クラスターに次のものが作成されます。
test-infraと呼ばれる名前空間test-infra名前空間のbackend-v1およびbackend-v2と呼ばれる 2 つのサービスtest-infra名前空間のbackend-v1およびbackend-v2と呼ばれる 2 つのデプロイ
必要なイングレス リソースをデプロイする
- イングレスを作成する
kubectl apply -f - <<EOF
apiVersion: networking.k8s.io/v1
kind: Ingress
metadata:
  name: ingress-01
  namespace: test-infra
  annotations:
    alb.networking.azure.io/alb-name: alb-test
    alb.networking.azure.io/alb-namespace: alb-test-infra
spec:
  ingressClassName: azure-alb-external
  rules:
    - host: contoso.com
      http:
        paths:
          - path: /
            pathType: Prefix
            backend:
              service:
                name: backend-v1
                port:
                  number: 8080
    - host: fabrikam.com
      http:
        paths:
          - path: /
            pathType: Prefix
            backend:
              service:
                name: backend-v2
                port:
                  number: 8080
EOF
イングレス リソースが作成されたら、状態にロード バランサーのホスト名が表示され、どちらのポートも要求をリッスンしていることを確認します。
kubectl get ingress ingress-01 -n test-infra -o yaml
イングレスの作成に成功した出力例。
apiVersion: networking.k8s.io/v1
kind: Ingress
metadata:
  annotations:
    alb.networking.azure.io/alb-frontend: FRONTEND_NAME
    alb.networking.azure.io/alb-id: /subscriptions/aaaa0a0a-bb1b-cc2c-dd3d-eeeeee4e4e4e/resourcegroups/yyyyyyyy/providers/Microsoft.ServiceNetworking/trafficControllers/zzzzzz
    kubectl.kubernetes.io/last-applied-configuration: |
      {"apiVersion":"networking.k8s.io/v1","kind":"Ingress","metadata":{"annotations":{"alb.networking.azure.io/alb-frontend":"FRONTEND_NAME","alb.networking.azure.io/alb-id":"/subscriptions/aaaa0a0a-bb1b-cc2c-dd3d-eeeeee4e4e4e/resourcegroups/yyyyyyyy/providers/Microsoft.ServiceNetworking/trafficControllers/zzzzzz"},"name"
:"ingress-01","namespace":"test-infra"},"spec":{"ingressClassName":"azure-alb-external","rules":[{"host":"example.com","http":{"paths":[{"backend":{"service":{"name":"echo","port":{"number":80}}},"path":"/","pathType":"Prefix"}]}}],"tls":[{"hosts":["example.com"],"secretName":"listener-tls-secret"}]}}
  creationTimestamp: "2023-07-22T18:02:13Z"
  generation: 2
  name: ingress-01
  namespace: test-infra
  resourceVersion: "278238"
  uid: 17c34774-1d92-413e-85ec-c5a8da45989d
spec:
  ingressClassName: azure-alb-external
  rules:
    - host: contoso.com
      http:
        paths:
          - path: /
            pathType: Prefix
            backend:
              service:
                name: backend-v1
                port:
                  number: 8080
    - host: fabrikam.com
      http:
        paths:
          - path: /
            pathType: Prefix
            backend:
              service:
                name: backend-v2
                port:
                  number: 8080
status:
  loadBalancer:
    ingress:
    - hostname: xxxxxxxxxxxxxxxxxxxxxxxxxxxxxxxx.fzyy.alb.azure.com
      ports:
      - port: 80
        protocol: TCP
アプリケーションへのアクセスをテストする
これで、フロントエンドに割り当てられた FQDN を使用して、サンプル アプリケーションにトラフィックを送信する準備ができました。 次のコマンドを実行して、FQDN を取得します。
fqdn=$(kubectl get ingress ingress-01 -n test-infra -o jsonpath='{.status.loadBalancer.ingress[0].hostname}')
次に、curl コマンドを使用してサーバー名インジケーターを指定し、フロントエンド FQDN に contoso.com を指定すると、バックエンド v1 サービスからの応答が返されるはずです。
fqdnIp=$(dig +short $fqdn)
curl -k --resolve contoso.com:80:$fqdnIp http://contoso.com
応答を介して、次の内容が表示されます。
{
 "path": "/",
 "host": "contoso.com",
 "method": "GET",
 "proto": "HTTP/1.1",
 "headers": {
  "Accept": [
   "*/*"
  ],
  "User-Agent": [
   "curl/7.81.0"
  ],
  "X-Forwarded-For": [
   "xxx.xxx.xxx.xxx"
  ],
  "X-Forwarded-Proto": [
   "http"
  ],
  "X-Request-Id": [
   "dcd4bcad-ea43-4fb6-948e-a906380dcd6d"
  ]
 },
 "namespace": "test-infra",
 "ingress": "",
 "service": "",
 "pod": "backend-v1-5b8fd96959-f59mm"
}
次に、curl コマンドを使用してサーバー名インジケーターを指定し、フロントエンド FQDN に fabrikam.com を指定すると、バックエンド v1 サービスからの応答が返されるはずです。
fqdnIp=$(dig +short $fqdn)
curl -k --resolve fabrikam.com:80:$fqdnIp http://fabrikam.com
応答を介して、次の内容が表示されます。
{
 "path": "/",
 "host": "fabrikam.com",
 "method": "GET",
 "proto": "HTTP/1.1",
 "headers": {
  "Accept": [
   "*/*"
  ],
  "User-Agent": [
   "curl/7.81.0"
  ],
  "X-Forwarded-For": [
   "xxx.xxx.xxx.xxx"
  ],
  "X-Forwarded-Proto": [
   "http"
  ],
  "X-Request-Id": [
   "adae8cc1-8030-4d95-9e05-237dd4e3941b"
  ]
 },
 "namespace": "test-infra",
 "ingress": "",
 "service": "",
 "pod": "backend-v2-594bd59865-ppv9w"
}
これで、ALB コントローラーをインストールし、バックエンド アプリケーションをデプロイして、Application Gateway for Containers のイングレス API で異なるホスト名を使用して 2 つの異なるバックエンド サービスにトラフィックをルーティングすることができました。