LangChain と Azure AI Foundry を使用してアプリケーションを開発する
LangChain は、論理的に思考するアプリケーションを開発者が可能な限り簡単にビルドできるようにする開発エコシステムです。 このエコシステムは複数のコンポーネントによって構成されています。 ほとんどのコンポーネントは単体で使用できるため、好きなものを選んで組み合わせることができます。
Azure AI Foundry にデプロイされたモデルは、次の 2 つの方法で LangChain と共に使用できます。
Azure AI モデル推論 API の使用: Azure AI Foundry にデプロイされたすべてのモデルは、Azure AI モデル推論 API をサポートします。この API は、カタログ内のほとんどのモデルで使用できる共通の機能セットを提供します。 この API の利点は、すべてのモデルに対して同じであるために、あるモデルから別のモデルへの変更は、使用中のモデル デプロイを変更するのと同じく簡単であるということです。 コードにそれ以上変更を加える必要はありません。 LangChain を使用するときは、拡張機能
langchain-azure-aiをインストールします。モデルのプロバイダー固有の API を使用する: OpenAI、Cohere、Mistral などの一部のモデルでは、LlamaIndex 用に独自の API と拡張機能のセットを提供します。 これらの拡張機能には、そのモデルがサポートする特定の機能が含まれている可能性があるため、それらを利用する場合には拡張機能が適しています。 LangChain を使用するときは、
langchain-openaiやlangchain-cohereなど、使用するモデルに固有の拡張機能をインストールします。
このチュートリアルでは、パッケージ langchain-azure-ai を使用して LangChain でアプリケーションをビルドする方法について説明します。
前提条件
このチュートリアルを実行するには、次のものが必要です。
Azure AI Model Inference API をサポートするモデル デプロイがデプロイされていること。 この例では、Azure AI モデル推論で
Mistral-Large-2407デプロイを使用します。Python 3.9 以降 (PIP を含む) がインストールされている。
LangChain がインストールされていること。 これは、次を使用して行います。
pip install langchain-coreこの例では、Azure AI モデル推論 API を使用しているため、次のパッケージをインストールします。
pip install -U langchain-azure-ai
環境を構成する
Azure AI Foundry ポータルにデプロイされた LLM を使用するには、エンドポイントと資格情報を使用してこれに接続する必要があります。 使用するモデルから必要な情報を取得するには、次の手順に従います。
Azure AI Foundry に移動します。
モデルがデプロイされているプロジェクトをまだ開いていない場合は開きます。
[モデル + エンドポイント] に移動し、前提条件に示されているように、デプロイしたモデルを選択します。
エンドポイントの URL とキーをコピーします。
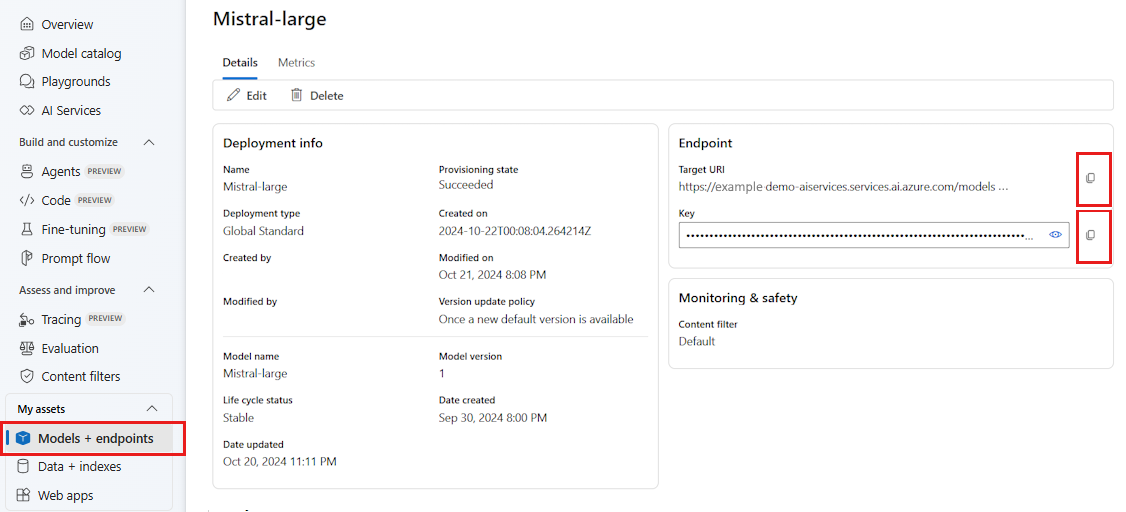
ヒント
モデルが Microsoft Entra ID サポートを使用してデプロイされた場合は、キーは必要ありません。

このシナリオでは、エンドポイント URL とキーの両方を次の環境変数に配置しました。
export AZURE_INFERENCE_ENDPOINT="<your-model-endpoint-goes-here>"
export AZURE_INFERENCE_CREDENTIAL="<your-key-goes-here>"
構成したら、エンドポイントに接続するクライアントを作成します。 今回は、チャットの入力候補モデルを使用しているため、クラス AzureAIChatCompletionsModel をインポートします。
import os
from langchain_azure_ai.chat_models import AzureAIChatCompletionsModel

model = AzureAIChatCompletionsModel(
    endpoint=os.environ["AZURE_INFERENCE_ENDPOINT"],
    credential=os.environ["AZURE_INFERENCE_CREDENTIAL"],
    model="mistral-large-2407",
)
ヒント
Azure OpenAI モデルの場合、「Azure OpenAI モデルを使用する」で示されているようにクライアントを構成します。
エンドポイントが Microsoft Entra ID をサポートしている場合は、次のコードを使用してクライアントを作成できます。
import os
from azure.identity import DefaultAzureCredential
from langchain_azure_ai.chat_models import AzureAIChatCompletionsModel

model = AzureAIChatCompletionsModel(
    endpoint=os.environ["AZURE_INFERENCE_ENDPOINT"],
    credential=DefaultAzureCredential(),
    model_name="mistral-large-2407",
)
Note
Microsoft Entra ID を使用する場合は、その認証方法でエンドポイントがデプロイされており、エンドポイントを呼び出すために必要なアクセス許可があることを確認してください。
非同期呼び出しを使用する予定の場合は、ベスト プラクティスとして、資格情報に対して非同期バージョンを使用することをお勧めします。
from azure.identity.aio import (
    DefaultAzureCredential as DefaultAzureCredentialAsync,
)
from langchain_azure_ai.chat_models import AzureAIChatCompletionsModel

model = AzureAIChatCompletionsModel(
    endpoint=os.environ["AZURE_INFERENCE_ENDPOINT"],
    credential=DefaultAzureCredentialAsync(),
    model_name="mistral-large-2407",
)
エンドポイントがサーバーレス API エンドポイントと同様に 1 つのモデルにサービスを提供している場合は、model_name パラメーターを指定する必要はありません。
import os
from langchain_azure_ai.chat_models import AzureAIChatCompletionsModel

model = AzureAIChatCompletionsModel(
    endpoint=os.environ["AZURE_INFERENCE_ENDPOINT"],
    credential=os.environ["AZURE_INFERENCE_CREDENTIAL"],
)
チャット入力候補モデルを使用する
最初にモデルを直接使用しましょう。
ChatModels は LangChain Runnable のインスタンスです。つまり、インスタンスと対話するための標準インターフェイスが公開されます。 モデルを呼び出すだけなら、メッセージの一覧を invoke メソッドに渡すことができます。
from langchain_core.messages import HumanMessage, SystemMessage

messages = [
    SystemMessage(content="Translate the following from English into Italian"),
    HumanMessage(content="hi!"),
]

model.invoke(messages)
必要に応じて、いわゆるチェーンと呼ばれている形式で操作を組み立てることもできます。 それでは、プロンプト テンプレートを使用して文を翻訳してみましょう。
from langchain_core.output_parsers import StrOutputParser

system_template = "Translate the following into {language}:"
prompt_template = ChatPromptTemplate.from_messages(
    [("system", system_template), ("user", "{text}")]
)
プロンプト テンプレートからわかるように、このチェーンには language と text が入力されています。 次に、出力パーサーを作成しましょう。
from langchain_core.prompts import ChatPromptTemplate
parser = StrOutputParser()
これで、パイプ (|) 演算子を使用し、上記のテンプレート、モデル、出力パーサーを組み合わせることができます。
chain = prompt_template | model | parser
チェーンを呼び出すには、必要な入力を特定し、invoke メソッドを使用して値を指定します。
chain.invoke({"language": "italian", "text": "hi"})
'ciao'
複数の LLM を連結する
Azure AI Foundry にデプロイされたモデルは Azure AI モデル推論 API をサポートしますが、その API はすべてのモデルで標準となります。 各モデルの機能に基づいて複数の LLM 操作を連結し、機能に基づいて最適なモデルが活用されるようにします。
次の例では、2 つのモデル クライアントを作成します。1 つはプロデューサーで、もう 1 つは検証ツールです。 区別を明確にするために、Azure AI モデル推論サービスのようなマルチモデル エンドポイントを使用しています。そのため、Mistral-Large と Mistral-Small モデルを使用するためにパラメーター model_name を渡しています。コンテンツの生成はその検証よりも複雑であることがわかります。
from langchain_azure_ai.chat_models import AzureAIChatCompletionsModel

producer = AzureAIChatCompletionsModel(
    endpoint=os.environ["AZURE_INFERENCE_ENDPOINT"],
    credential=os.environ["AZURE_INFERENCE_CREDENTIAL"],
    model_name="mistral-large-2407",
)

verifier = AzureAIChatCompletionsModel(
    endpoint=os.environ["AZURE_INFERENCE_ENDPOINT"],
    credential=os.environ["AZURE_INFERENCE_CREDENTIAL"],
    model_name="mistral-small",
)
ヒント
各モデルのモデル カードを調べ、各モデルに最適なユース ケースを理解します。
次の例では、都会の詩人によって書かれた詩が生成されます。
from langchain_core.prompts import PromptTemplate

producer_template = PromptTemplate(
    template="You are an urban poet, your job is to come up \
             verses based on a given topic.\n\
             Here is the topic you have been asked to generate a verse on:\n\
             {topic}",
    input_variables=["topic"],
)

verifier_template = PromptTemplate(
    template="You are a verifier of poems, you are tasked\
              to inspect the verses of poem. If they consist of violence and abusive language\
              report it. Your response should be only one word either True or False.\n \
              Here is the lyrics submitted to you:\n\
              {input}",
    input_variables=["input"],
)
次に、ピースを連結してみましょう。
chain = producer_template | producer | parser | verifier_template | verifier | parser
前のチェーンは、ステップ verifier の出力のみを返します。
producer によって生成される中間結果にアクセスする必要があるため、LangChain では、RunnablePassthrough オブジェクトを使用してその中間ステップも出力する必要があります。 次のコードは、これを行う方法を示したものです。
from langchain_core.runnables import RunnablePassthrough, RunnableParallel

generate_poem = producer_template | producer | parser
verify_poem = verifier_template | verifier | parser

chain = generate_poem | RunnableParallel(poem=RunnablePassthrough(), verification=RunnablePassthrough() | verify_poem)
チェーンを呼び出すには、必要な入力を特定し、invoke メソッドを使用して値を指定します。
chain.invoke({"topic": "living in a foreign country"})
{
  "peom": "...",
  "verification: "false"
}
埋め込みモデルを使用する
LLM クライアントを作成するのと同じ方法で、埋め込みモデルに接続できます。 次の例では、埋め込みモデルを指すように環境変数を設定しています。
export AZURE_INFERENCE_ENDPOINT="<your-model-endpoint-goes-here>"
export AZURE_INFERENCE_CREDENTIAL="<your-key-goes-here>"
次に、以下のようにクライアントを作成します。
from langchain_azure_ai.embeddings import AzureAIEmbeddingsModel

embed_model = AzureAIEmbeddingsModel(
    endpoint=os.environ["AZURE_INFERENCE_ENDPOINT"],
    credential=os.environ['AZURE_INFERENCE_CREDENTIAL'],
    model_name="text-embedding-3-large",
)
次の例は、メモリ内のベクトル ストアを使用する簡単な例を示しています。
from langchain_core.vectorstores import InMemoryVectorStore

vector_store = InMemoryVectorStore(embed_model)
ドキュメントをいくつか追加してみましょう。
from langchain_core.documents import Document

document_1 = Document(id="1", page_content="foo", metadata={"baz": "bar"})
document_2 = Document(id="2", page_content="thud", metadata={"bar": "baz"})

documents = [document_1, document_2]
vector_store.add_documents(documents=documents)
類似性で検索してみましょう。
results = vector_store.similarity_search(query="thud",k=1)
for doc in results:
    print(f"* {doc.page_content} [{doc.metadata}]")
Azure OpenAI モデルを使用する
Azure OpenAI Service または Azure AI モデル推論サービスを langchain-azure-ai パッケージの OpenAI モデルとともに使用する場合、api_version パラメーターを使用して特定の API バージョンを選択することが必要になる場合があります。 次の例は、Azure OpenAI サービスで Azure OpenAI モデル デプロイに接続する方法を示しています。
from langchain_azure_ai.chat_models import AzureAIChatCompletionsModel

llm = AzureAIChatCompletionsModel(
    endpoint="https://<resource>.openai.azure.com/openai/deployments/<deployment-name>",
    credential=os.environ["AZURE_INFERENCE_CREDENTIAL"],
    api_version="2024-05-01-preview",
)
重要
デプロイで使用している API のバージョンを確認します。 間違った api_version やモデルでサポートされていないものを使用すると、ResourceNotFound 例外が発生します。
デプロイが Azure AI Services でホストされている場合、Azure AI モデル推論サービスを使用できます。
from langchain_azure_ai.chat_models import AzureAIChatCompletionsModel

llm = AzureAIChatCompletionsModel(
    endpoint="https://<resource>.services.ai.azure.com/models",
    credential=os.environ["AZURE_INFERENCE_CREDENTIAL"],
    model_name="<model-name>",
    api_version="2024-05-01-preview",
)
デバッグおよびトラブルシューティング
アプリケーションをデバッグし、Azure AI Foundry のモデルに送信される要求を理解する必要がある場合は、統合のデバッグ機能を次のように使用できます。
まず、ログ記録を関心のあるレベルに構成します。
import sys
import logging

# Acquire the logger for this client library. Use 'azure' to affect both
# 'azure.core` and `azure.ai.inference' libraries.
logger = logging.getLogger("azure")

# Set the desired logging level. logging.INFO or logging.DEBUG are good options.
logger.setLevel(logging.DEBUG)

# Direct logging output to stdout:
handler = logging.StreamHandler(stream=sys.stdout)
# Or direct logging output to a file:
# handler = logging.FileHandler(filename="sample.log")
logger.addHandler(handler)

# Optional: change the default logging format. Here we add a timestamp.
formatter = logging.Formatter("%(asctime)s:%(levelname)s:%(name)s:%(message)s")
handler.setFormatter(formatter)
要求のペイロードを確認するには、クライアントをインスタンス化するときに、引数 logging_enable=True を client_kwargs に渡します。
import os
from langchain_azure_ai.chat_models import AzureAIChatCompletionsModel

model = AzureAIChatCompletionsModel(
    endpoint=os.environ["AZURE_INFERENCE_ENDPOINT"],
    credential=os.environ["AZURE_INFERENCE_CREDENTIAL"],
    model_name="mistral-large-2407",
    client_kwargs={"logging_enable": True},
)
コードでクライアントを通常のとおりに使用します。
トレース
トレーサーを作成することで、Azure AI Foundry のトレース機能を使用できます。 ログは Azure Application Insights に格納され、Azure Monitor または Azure AI Foundry ポータルを使用していつでもクエリすることができます。 各 AI ハブには、関連付けられている Azure Application Insights があります。
インストルメンテーション接続文字列を取得する
Azure Application Insights にテレメトリを送信するようにアプリケーションを構成するには、次のいずれかのようにします。
Azure Application Insights への接続文字列を直接使用する。
Azure AI Foundry ポータルに移動し、[トレース] を選択します。
[データ ソースの管理] を選択します。 この画面で、プロジェクトに関連付けられているインスタンスを確認できます。
[接続文字列] にある値をコピーし、次の変数に設定します。
import os

application_insights_connection_string = "instrumentation...."
Azure AI Foundry SDK とプロジェクト接続文字列を使用する。
使用している環境に
azure-ai-projectsパッケージがインストールされていることを確認します。Azure AI Foundry ポータルに移動します。
プロジェクトの接続文字列をコピーし、次のコードを設定します。
from azure.ai.projects import AIProjectClient
from azure.identity import DefaultAzureCredential

project_client = AIProjectClient.from_connection_string(
    credential=DefaultAzureCredential(),
    conn_str="<your-project-connection-string>",
)

application_insights_connection_string = project_client.telemetry.get_connection_string()
Azure AI Foundry のトレースを構成する
次のコードでは、Azure AI Foundry のプロジェクトの背後にある Azure Application Insights に接続されたトレーサーを作成します。 パラメーター enable_content_recording が True に設定されていることに注意してください。 これにより、アプリケーション全体の入力と出力、および中間ステップのキャプチャが可能になります。 このようにすると、アプリケーションのデバッグとビルド時には便利ですが、運用環境では無効にすることも考えられます。 環境変数 AZURE_TRACING_GEN_AI_CONTENT_RECORDING_ENABLED の既定の値になります。
from langchain_azure_ai.callbacks.tracers import AzureAIInferenceTracer

tracer = AzureAIInferenceTracer(
    connection_string=application_insights_connection_string,
    enable_content_recording=True,
)
チェーンでトレースを構成するには、invoke 操作の値の構成をコールバックとして指定します。
chain.invoke({"topic": "living in a foreign country"}, config={"callbacks": [tracer]})
トレース用にチェーン自体を構成するには、.with_config() メソッドを使用します。
chain = chain.with_config({"callbacks": [tracer]})
続いて、通常どおり invoke() メソッドを使用します。
chain.invoke({"topic": "living in a foreign country"})
トレースを表示する
トレースを確認するには次のようにします。
Azure AI Foundry ポータルに移動します。
[トレース] セクションに移動します。
作成したトレースを特定します。 トレースが表示されるまでに数秒かかる場合があります。

詳細については、「トレースを視覚化して管理するプロジェクトを作成および管理する方法」を参照してください。