Azure Local で Arc VM を管理する
適用対象: Azure Local 2311.2 以降
この記事では、Azure Local バージョン 23H2 で実行されている Azure Arc 仮想マシン (VM) を管理する方法について説明します。 ゲスト管理を有効にし、Azure Arc VM の開始、停止、再起動、一時停止、保存、削除を行う手順について説明します。
前提条件
デプロイおよび登録されている Azure ローカル インスタンスへのアクセス。 Azure ローカル インスタンスのデプロイには、Azure Arc リソース ブリッジとカスタムの場所の作成が含まれます。
Azure のリソース グループに移動します。 表示される情報には、カスタムの場所と、Azure Local 用に作成された Azure Arc リソース ブリッジが含まれます。 サブスクリプション、リソース グループ、およびカスタムの場所をメモしておきます。 このシナリオでは、後で使用します。
Azure ローカル インスタンスで実行されている 1 つ以上の Azure Arc VM。 詳細については、「Azure Localでの Azure Arc 仮想マシンの作成」を参照してください。
ゲスト管理の有効化
ゲスト管理のコンテキストでは、VM ゲスト エージェントと Azure 接続マシン エージェントという 2 つのエージェントを理解することが重要です。 Azure portal または Azure CLI を使用して作成されたすべての Azure Arc VM は、ゲスト エージェント (mocguestagentとも呼ばれます) を使用してプロビジョニングされます。
Azure Arc VM でゲスト管理を有効にすると、ゲスト エージェントによって azure Connected Machine エージェント がインストールされます。 Azure Connected Machine エージェントを使用して、VM 上の Azure Arc VM 拡張機能を管理します。
VM のプロビジョニング後にゲスト管理を有効にするための主な考慮事項を次に示します。
- Azure ローカル インスタンスが 2311.2 以降を実行していることを確認します。
- VM プロビジョニング後のゲスト管理の有効化は、Windows Server 2012 および Windows Server 2012 R2 ではサポートされていません。
- ゲスト管理を有効にする手順は、ゲスト エージェントが Azure Arc VM で実行されているかどうかによって異なります。
ゲスト エージェントが実行されていることを確認する
ゲスト エージェントが Azure Arc VM で実行されていることを確認するには:
マシンに接続します。
次のコマンドを実行します。
az stack-hci-vm show --name "<VM name>" --resource-group "<Resource group name>"ゲスト エージェントが実行されていることを示すサンプル出力のスニペットを次に示します。 出力の
vmAgentの下でstatusesを探します。"instanceView": { "vmAgent": { "statuses": [ { "code": "ProvisioningState/succeeded", "displayStatus": "Connected", "level": "Info", "message": "Successfully established connection with mocguestagent", "time": "2024-01-13T00:57:39Z" }, { "code": "ProvisioningState/succeeded", "displayStatus": "Connected", "level": "Info", "message": "New mocguestagent version detected 'v0.13.0-3-gd13b4794", "time": "2024-01-13T00:57:39Z" } ], "vmConfigAgentVersion": "v0.13.0-3-gd13b4794" } }ゲスト エージェントは、
statusesがcodeをProvisioningState/succeededとして示し、displayStatusをConnectedとして示すときに稼働しています。古いバージョンを実行している場合、
statusesはcodeをOKとして示し、displayStatusをActive.として示します
状態が上記の出力と一致しない場合は、「ゲスト エージェントが実行されていないときにゲスト管理を有効にする」の手順に従います。
ゲスト エージェントの実行中に VM でゲスト管理を有効にする
ゲスト エージェントが実行されている Azure Arc VM でゲスト管理を有効にするには:
次のコマンドを実行して、
enable-agentパラメーターをtrueに設定します。az stack-hci-vm update --name "mylocal-vm" --enable-agent true --resource-group "mylocal-rg"ゲスト管理が有効になるまで数分かかります。
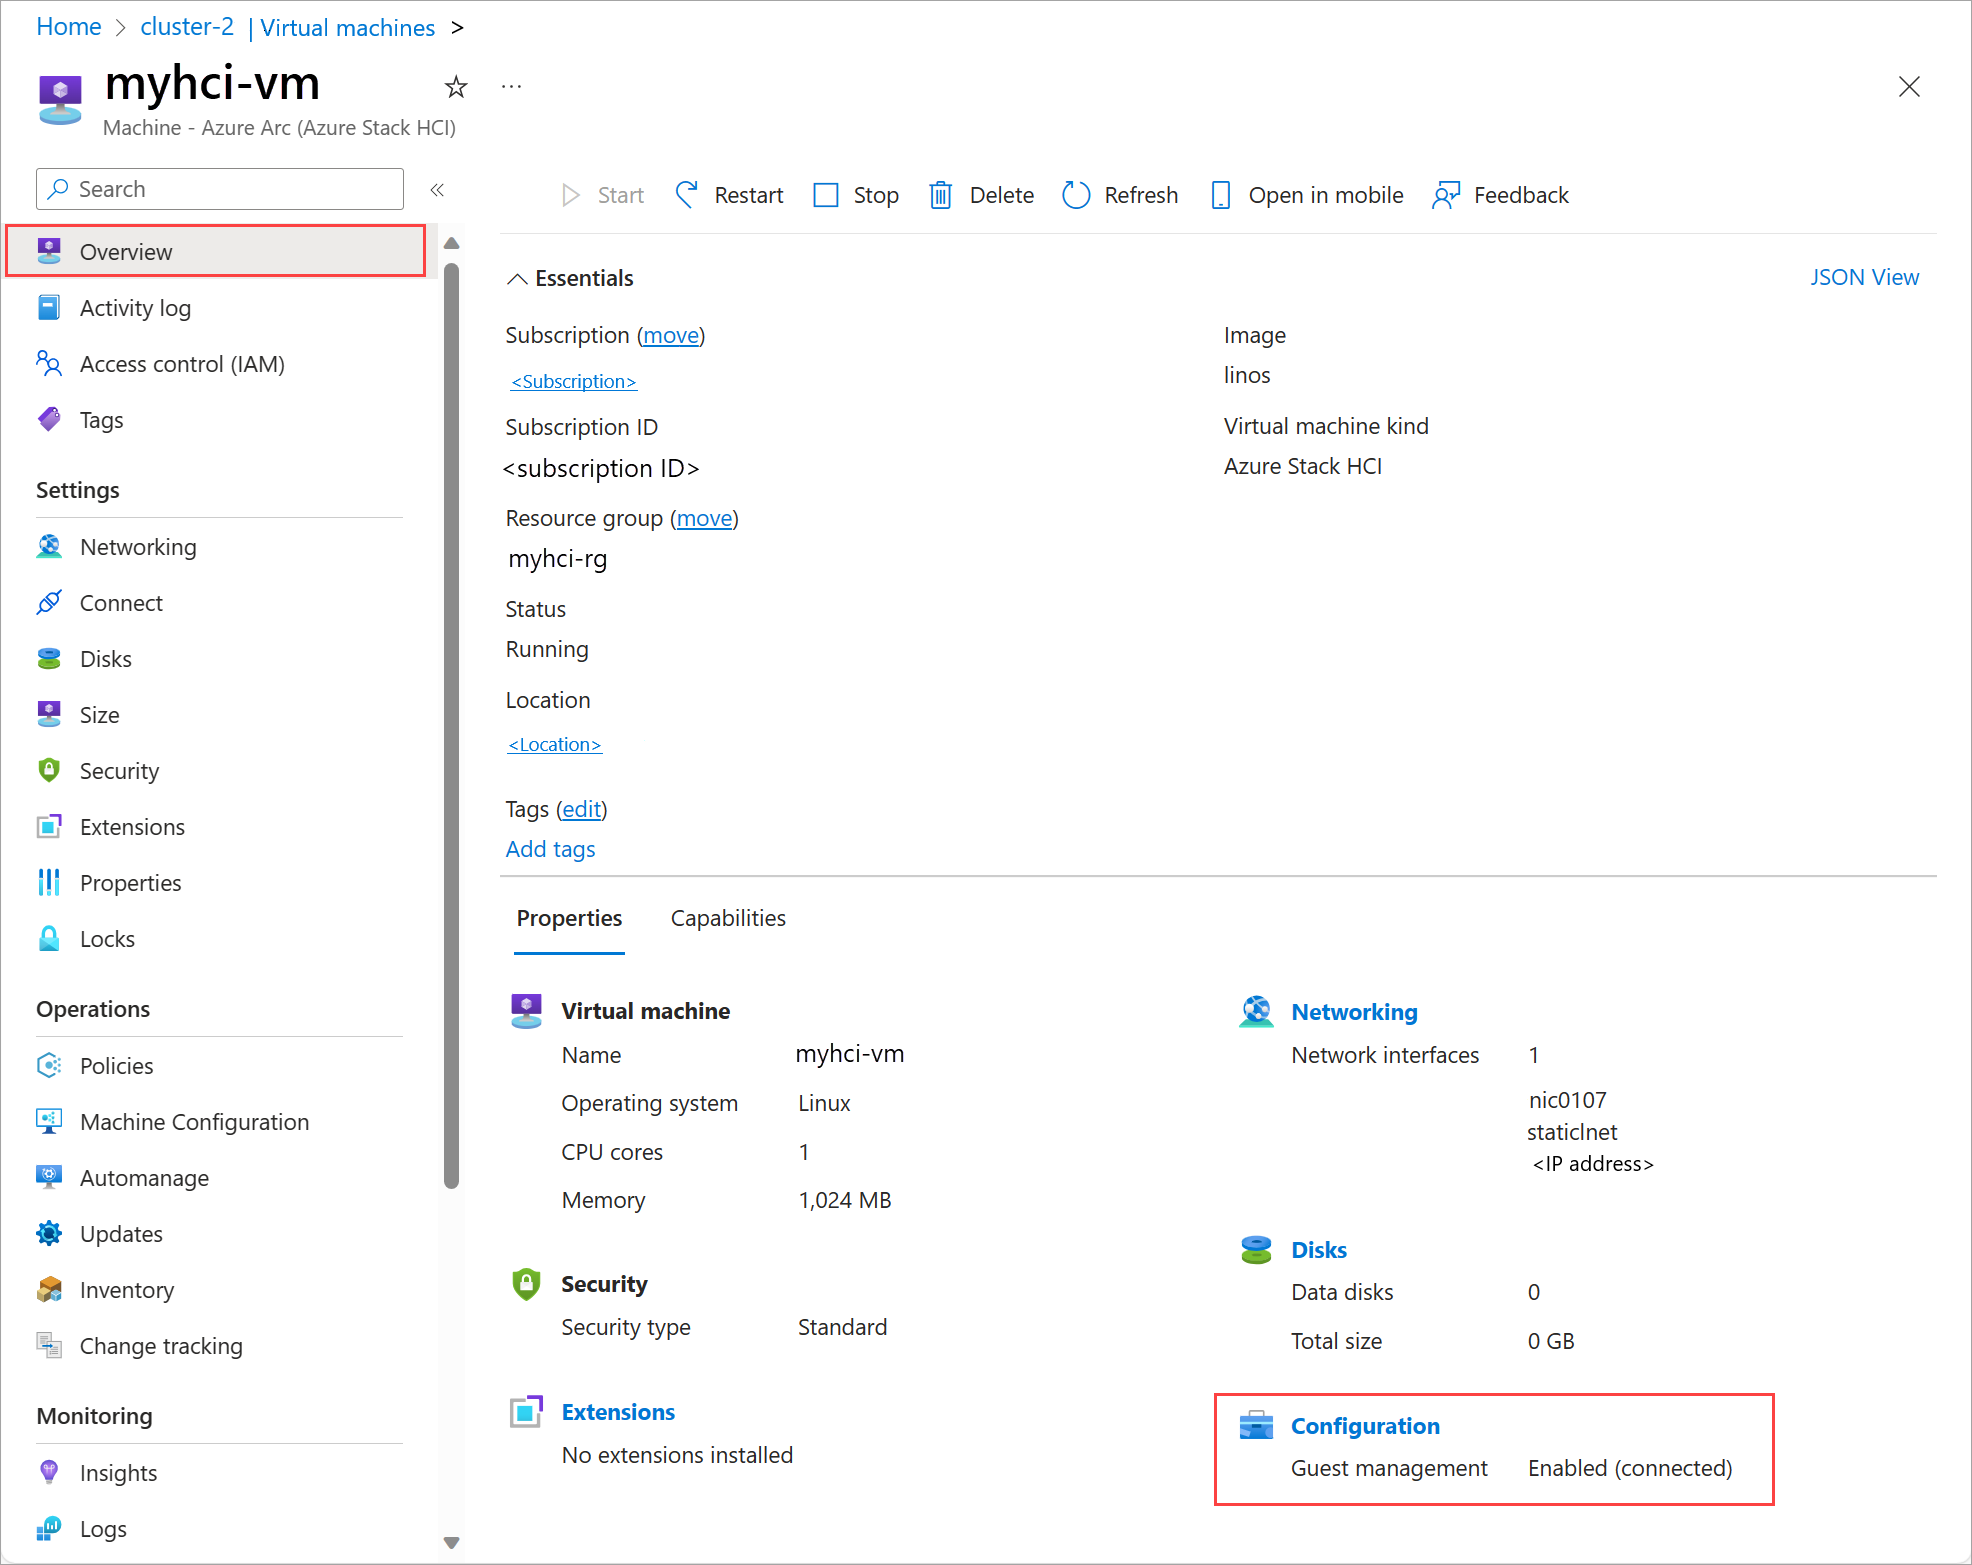
ゲスト管理が有効になっていることを確認します。 「Azure portalでゲスト管理が有効になっていることを確認する」の手順に従います。
ゲスト エージェントが実行されていないときに VM でゲスト管理を有効にする
ゲスト エージェントは、状態が Connecting されたときと状態が null の場合の 2 つのシナリオでは実行されません。 次のセクションでは、これらのシナリオと対応する手順について説明します。
[接続中] として表示される状態
このサンプル出力スニペットは、Connectingの状態を示しています。
"instanceView": {
      "vmAgent": {
        "statuses": [
          {
            "code": "ProvisioningState/InProgress",
            "displayStatus": "Connecting",
            "level": "Info",
            "message": "Waiting for connection with mocguestagent",
            "time": "2024-01-19T01:41:15Z"
          }
        ]
      }
    },
statuses が code を ProvisioningState/InProgress として示し、displayStatus を Connectingとして示しているとき、ゲストエージェントは実行されていません。
古いバージョンを実行している場合、statuses は code を OKとして、displayStatus を Activeとして、message を Successfully started HyperV listenerとして示します。
次のステップを実行します。
OS 固有の手順を使用して VM に接続します。 管理者として Azure PowerShell を実行します。
次のいずれかのコマンドを実行して、OS の種類に基づいて VM でゲスト エージェントを有効にします。
Linux では次のコマンドを使用します。
sudo -- sh -c 'mkdir /mociso && mount -L mocguestagentprov /mociso && bash /mociso/install.sh && umount /mociso && rm -df /mociso && eject LABEL=mocguestagentprov'Windows では次のコマンドを使用します。
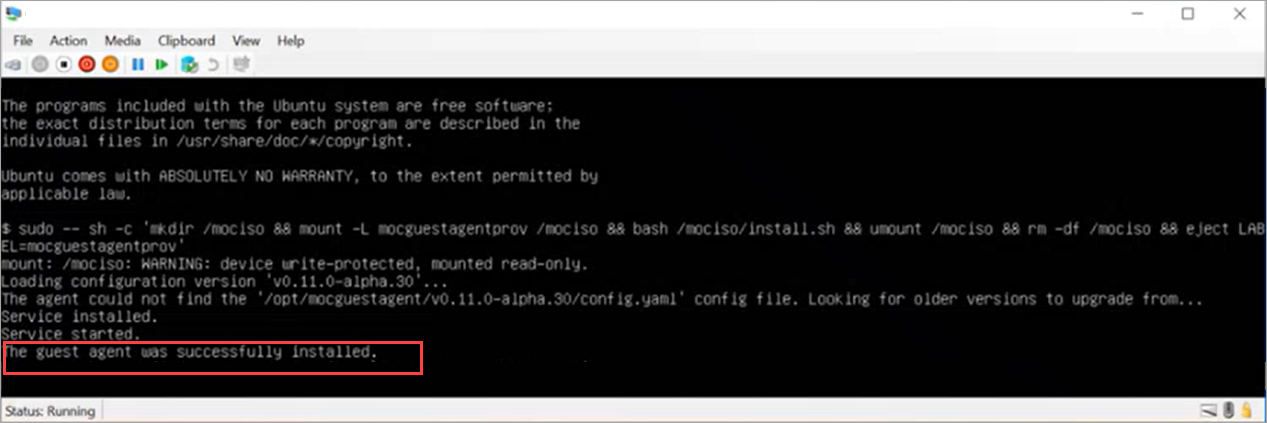
$d=Get-Volume -FileSystemLabel mocguestagentprov;$p=Join-Path ($d.DriveLetter+':\') 'install.ps1';powershell $pゲスト エージェントの正常なインストールを示す Linux VM の出力例を次に示します。
いずれかのマシンに接続します。 次のコマンドを実行して、ゲスト管理を有効にします。
az stack-hci-vm update --name "mylocal-vm" --enable-agent true --resource-group "mylocal-rg"ゲスト管理が有効になっていることを確認します。 「Azure portalでゲスト管理が有効になっていることを確認する」の手順に従います。
null として表示される状態
次の出力スニペットの例は、null 状態を示しています。 この状態は、ゲスト エージェントに必要な iso が見つからないことを示します。
"instanceView": {
      "vmAgent": {
        "statuses": []
      }
    },
次のステップを実行します。
マシンに接続します。
次のコマンドを実行します。
az stack-hci-vm update --name "<VM Name>" --resource-group "<Resource group name>" --enable-vm-config-agent trueenable-vm-config-agentパラメーターは、ゲスト エージェントに必要なisoをマウントします。数分待ってから、
az stack-hci-vm showコマンドを再実行します。 ステータスにConnectingが表示されたら、「接続中として表示されているステータス」の手順に従います。
Azure portal でゲスト管理が有効になっていることを確認する
Azure ポータルにアクセスします。
Azure ローカル>仮想マシンに移動し、ゲスト管理を有効にした VM を選択します。
[の概要] ページの [プロパティ] タブで、[構成] に移動します。 ゲスト管理 には、有効 (接続)が表示されます。
VM のプロパティを表示する
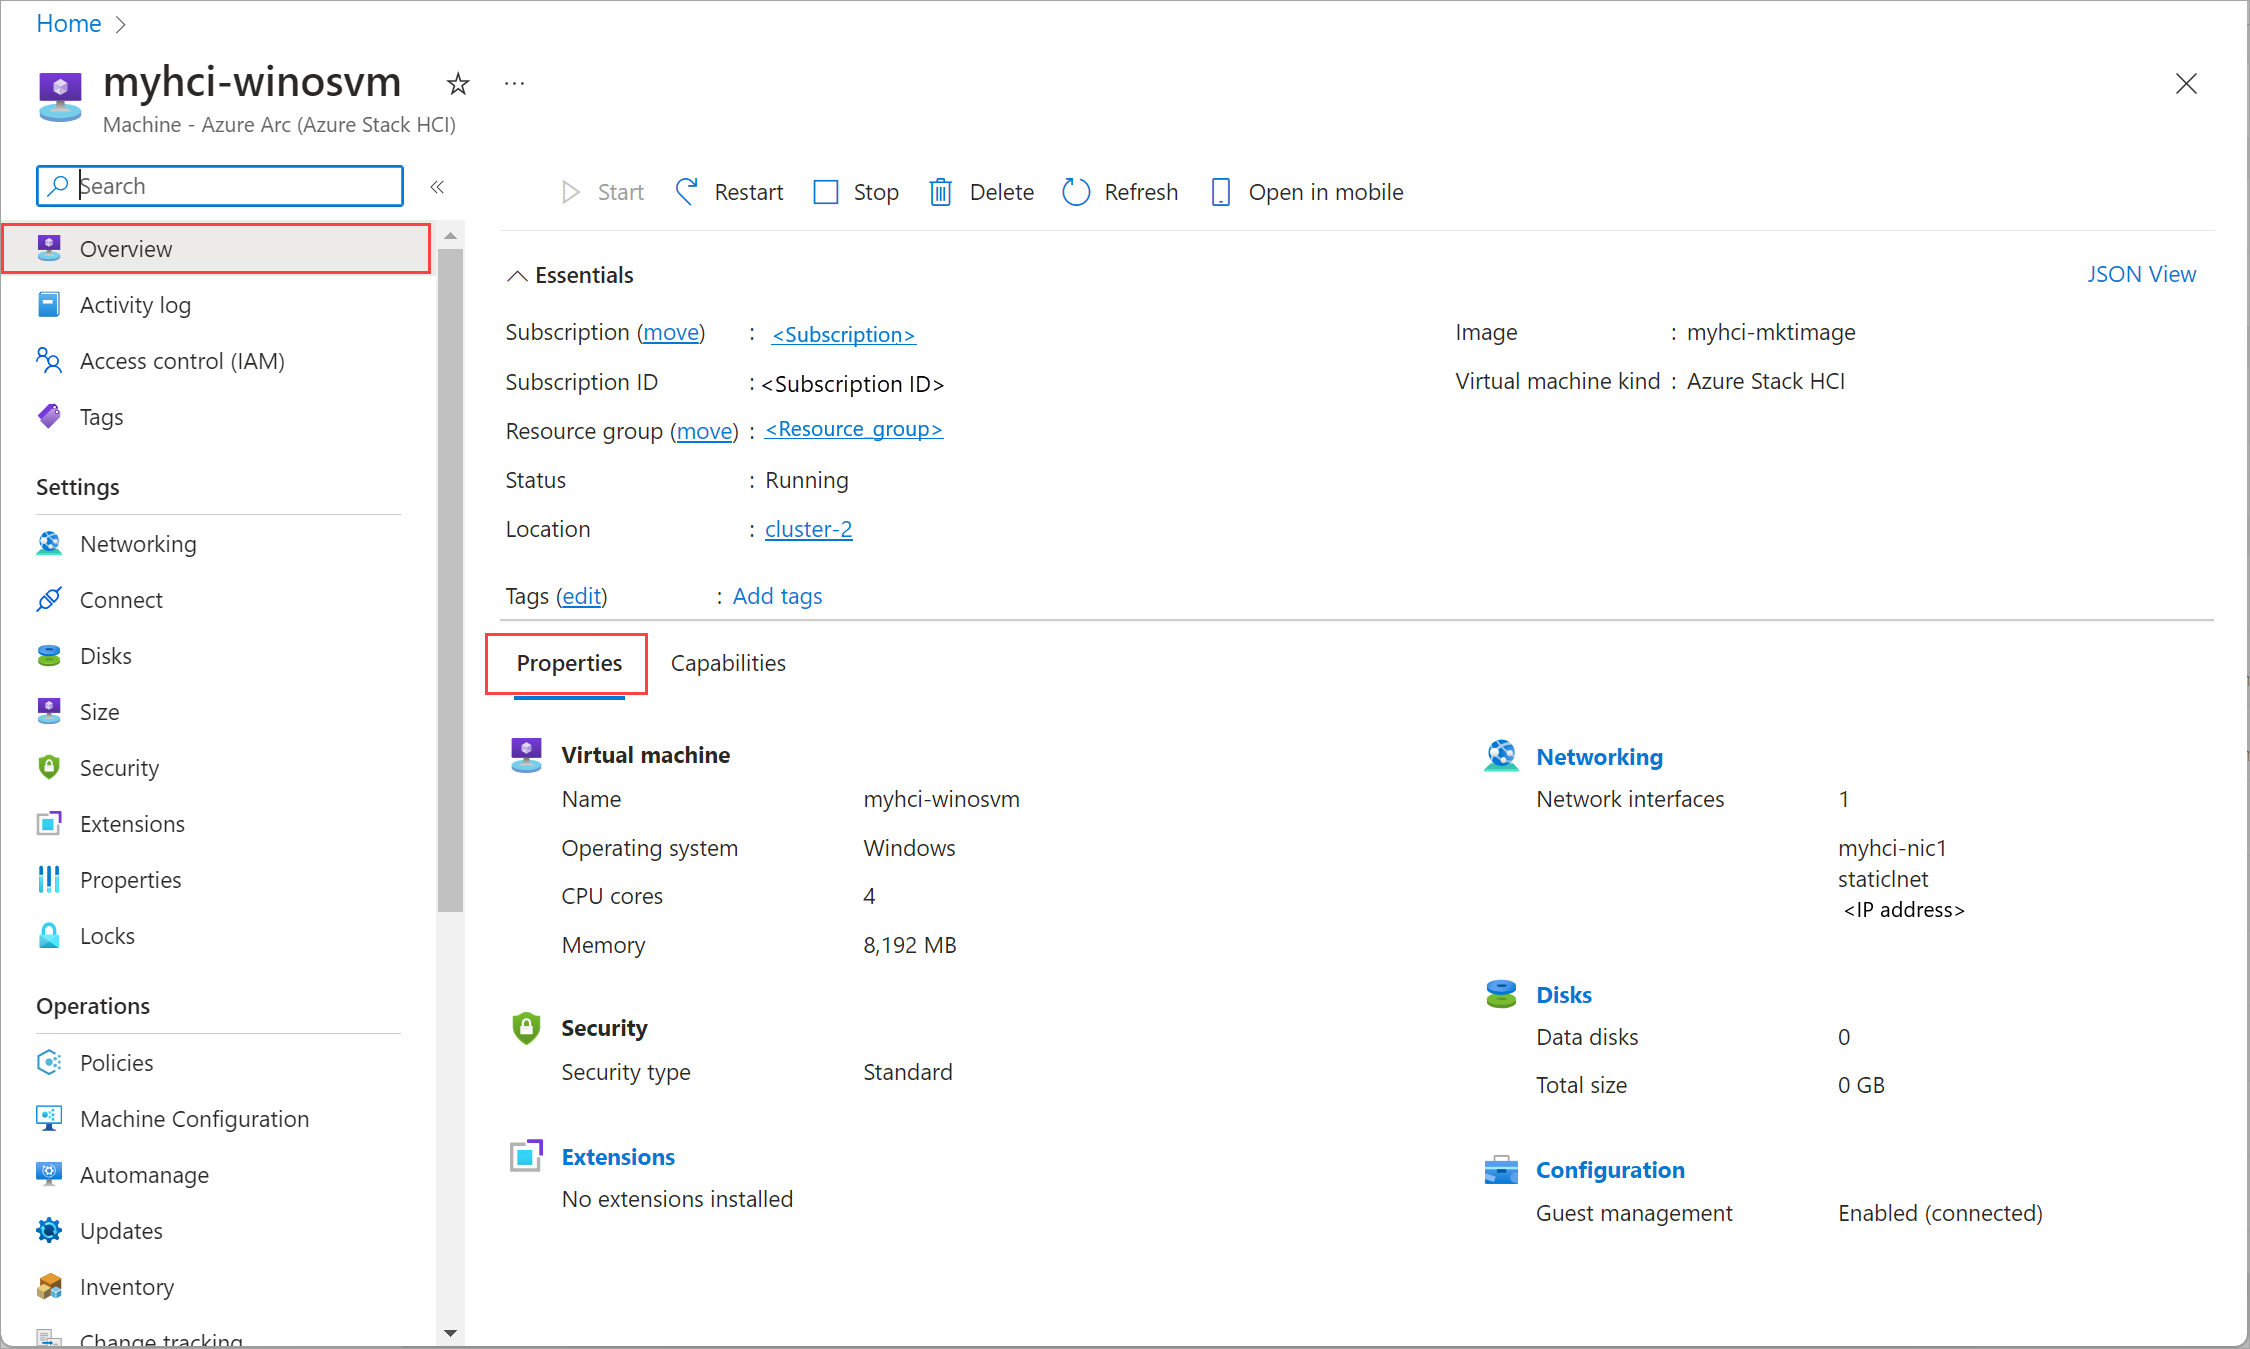
Azure ローカル インスタンスの VM プロパティを表示するには、Azure portal で次の手順を実行します。
Azure ローカル リソースに移動し、仮想マシンに移動します。
仮想マシンの一覧で、プロパティを表示する VM の名前を選択します。
[の概要] ページで、[プロパティ] タブを選択して、VM のプロパティを表示します。
VM の起動
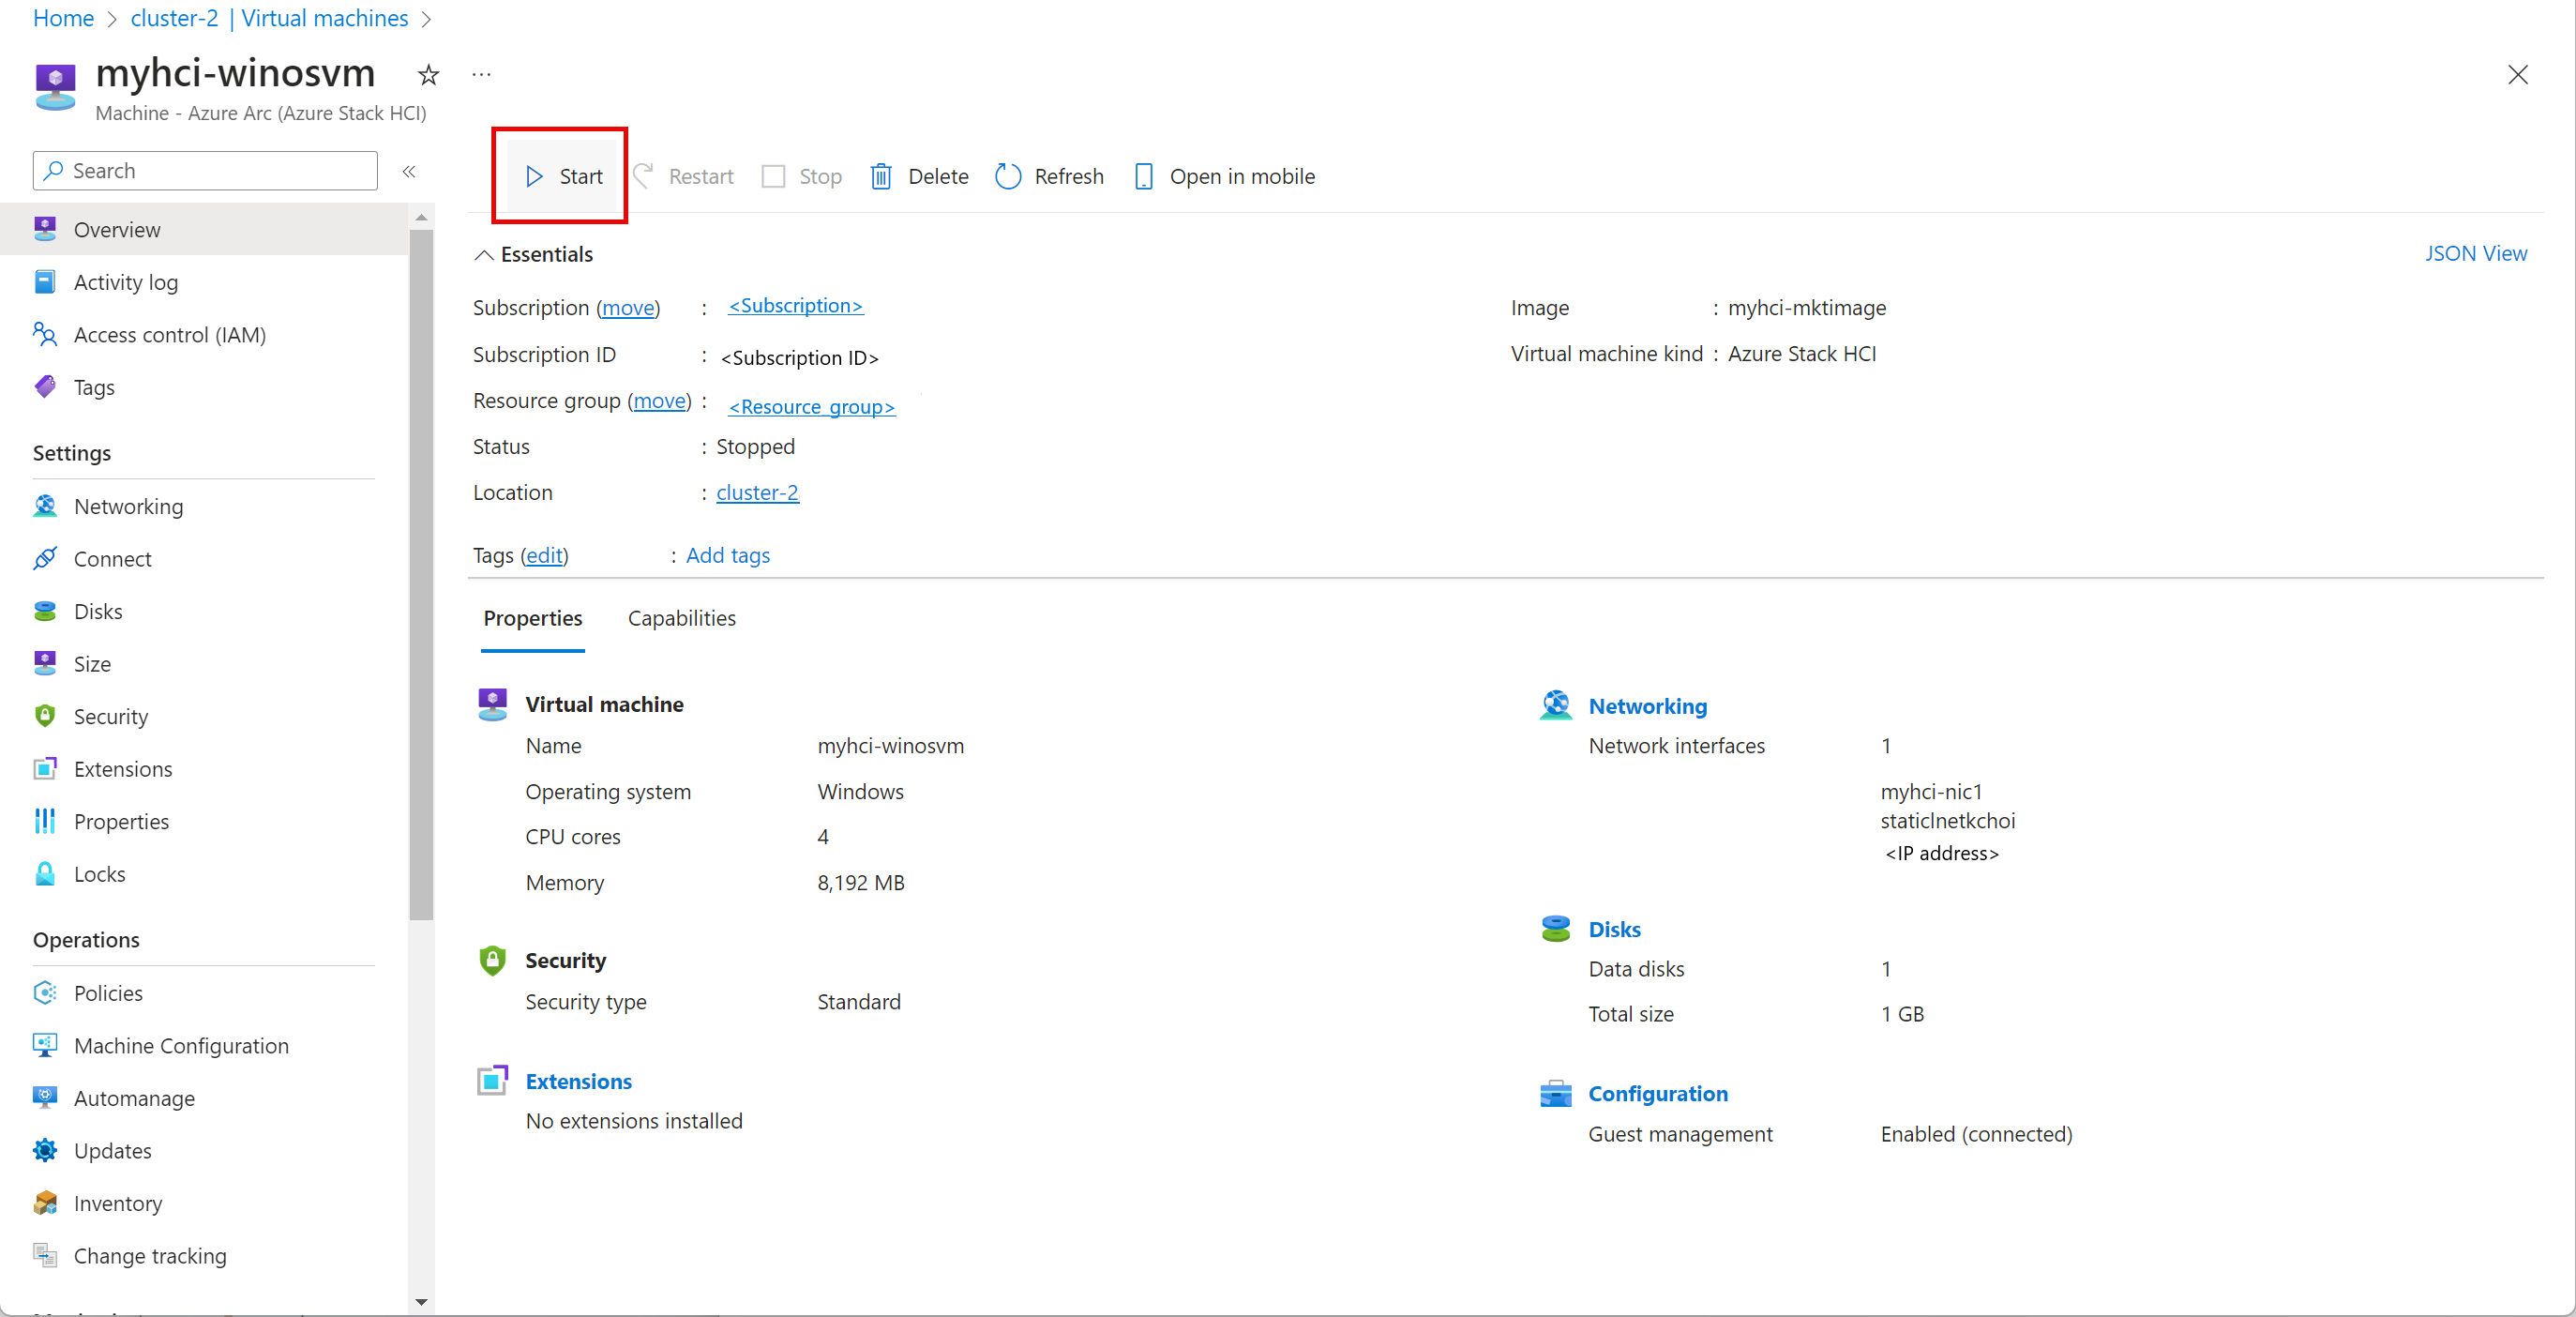
VM を起動するには、Azure Portal で Azure ローカル インスタンスの次の手順に従います。
Azure ローカル リソースに移動し、仮想マシンに移動します。
仮想マシンの一覧から、実行されていない開始したい VM を選択します。
VM の [[概要]] ページのコマンドバーで、[[開始]] を選択します。
[はい] を選択します。
VM が起動したことを確認します。
VM の停止
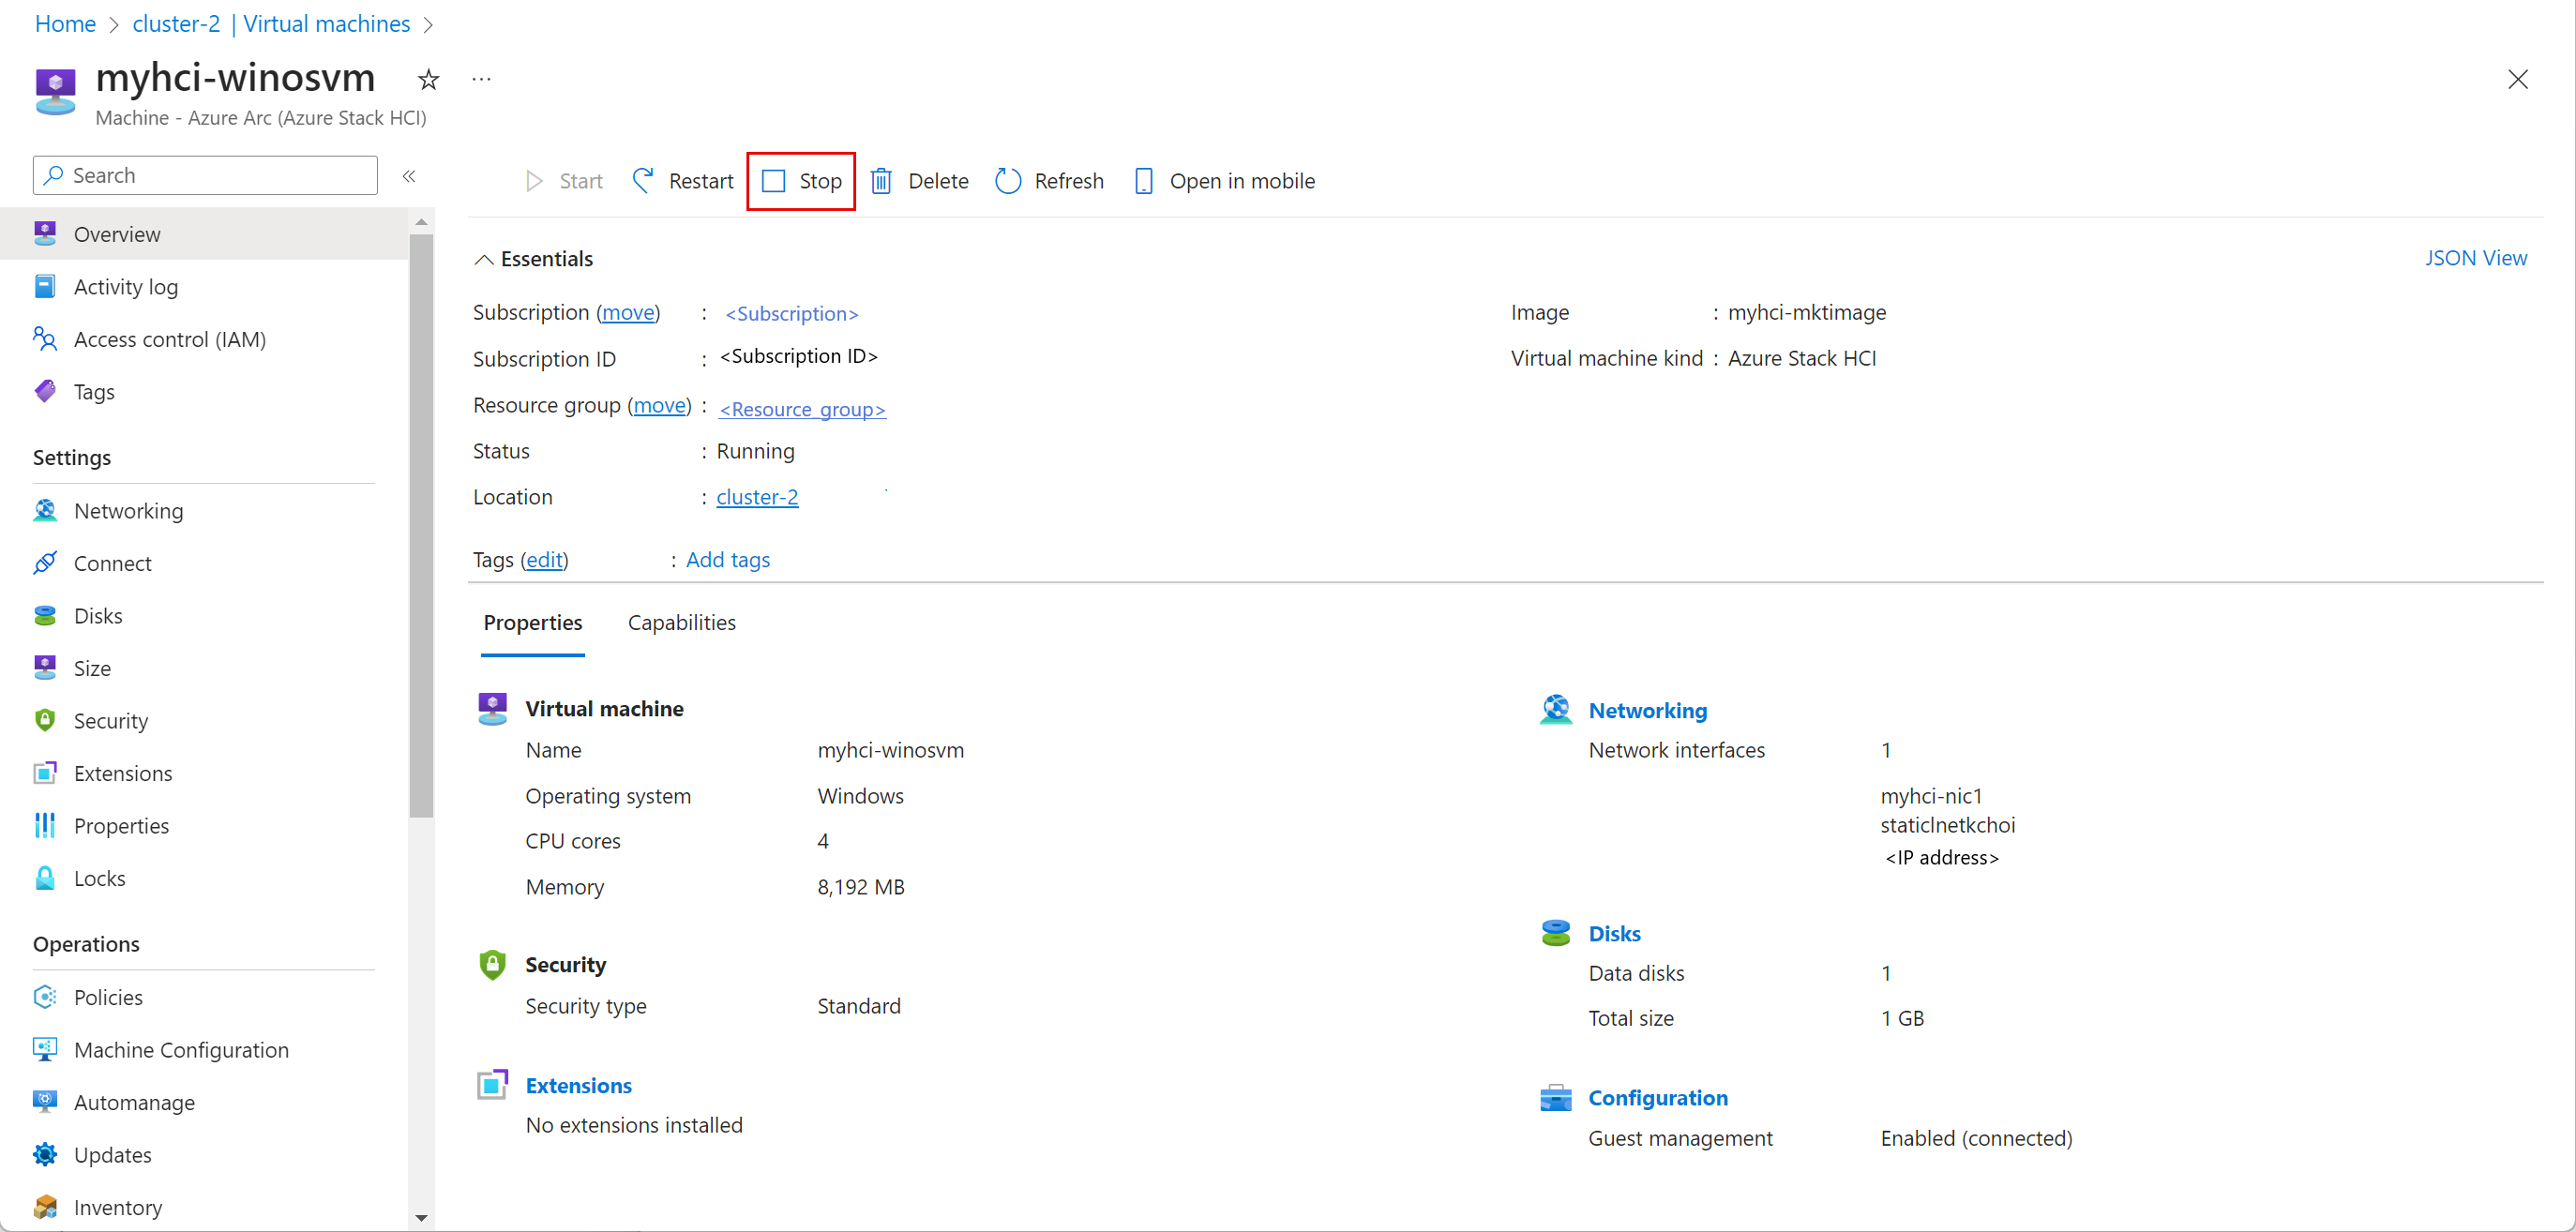
VM を停止するには、Azure ローカル インスタンスの Azure portal で次の手順を実行します。
Azure ローカル リソースに移動し、仮想マシンに移動します。
仮想マシンの一覧で、実行中で停止する VM を選択します。
VM の [の概要] ページで、コマンド バーの [の停止]選択します。
[はい] を選択します。
VM が停止したことを確認します。
VM の再起動
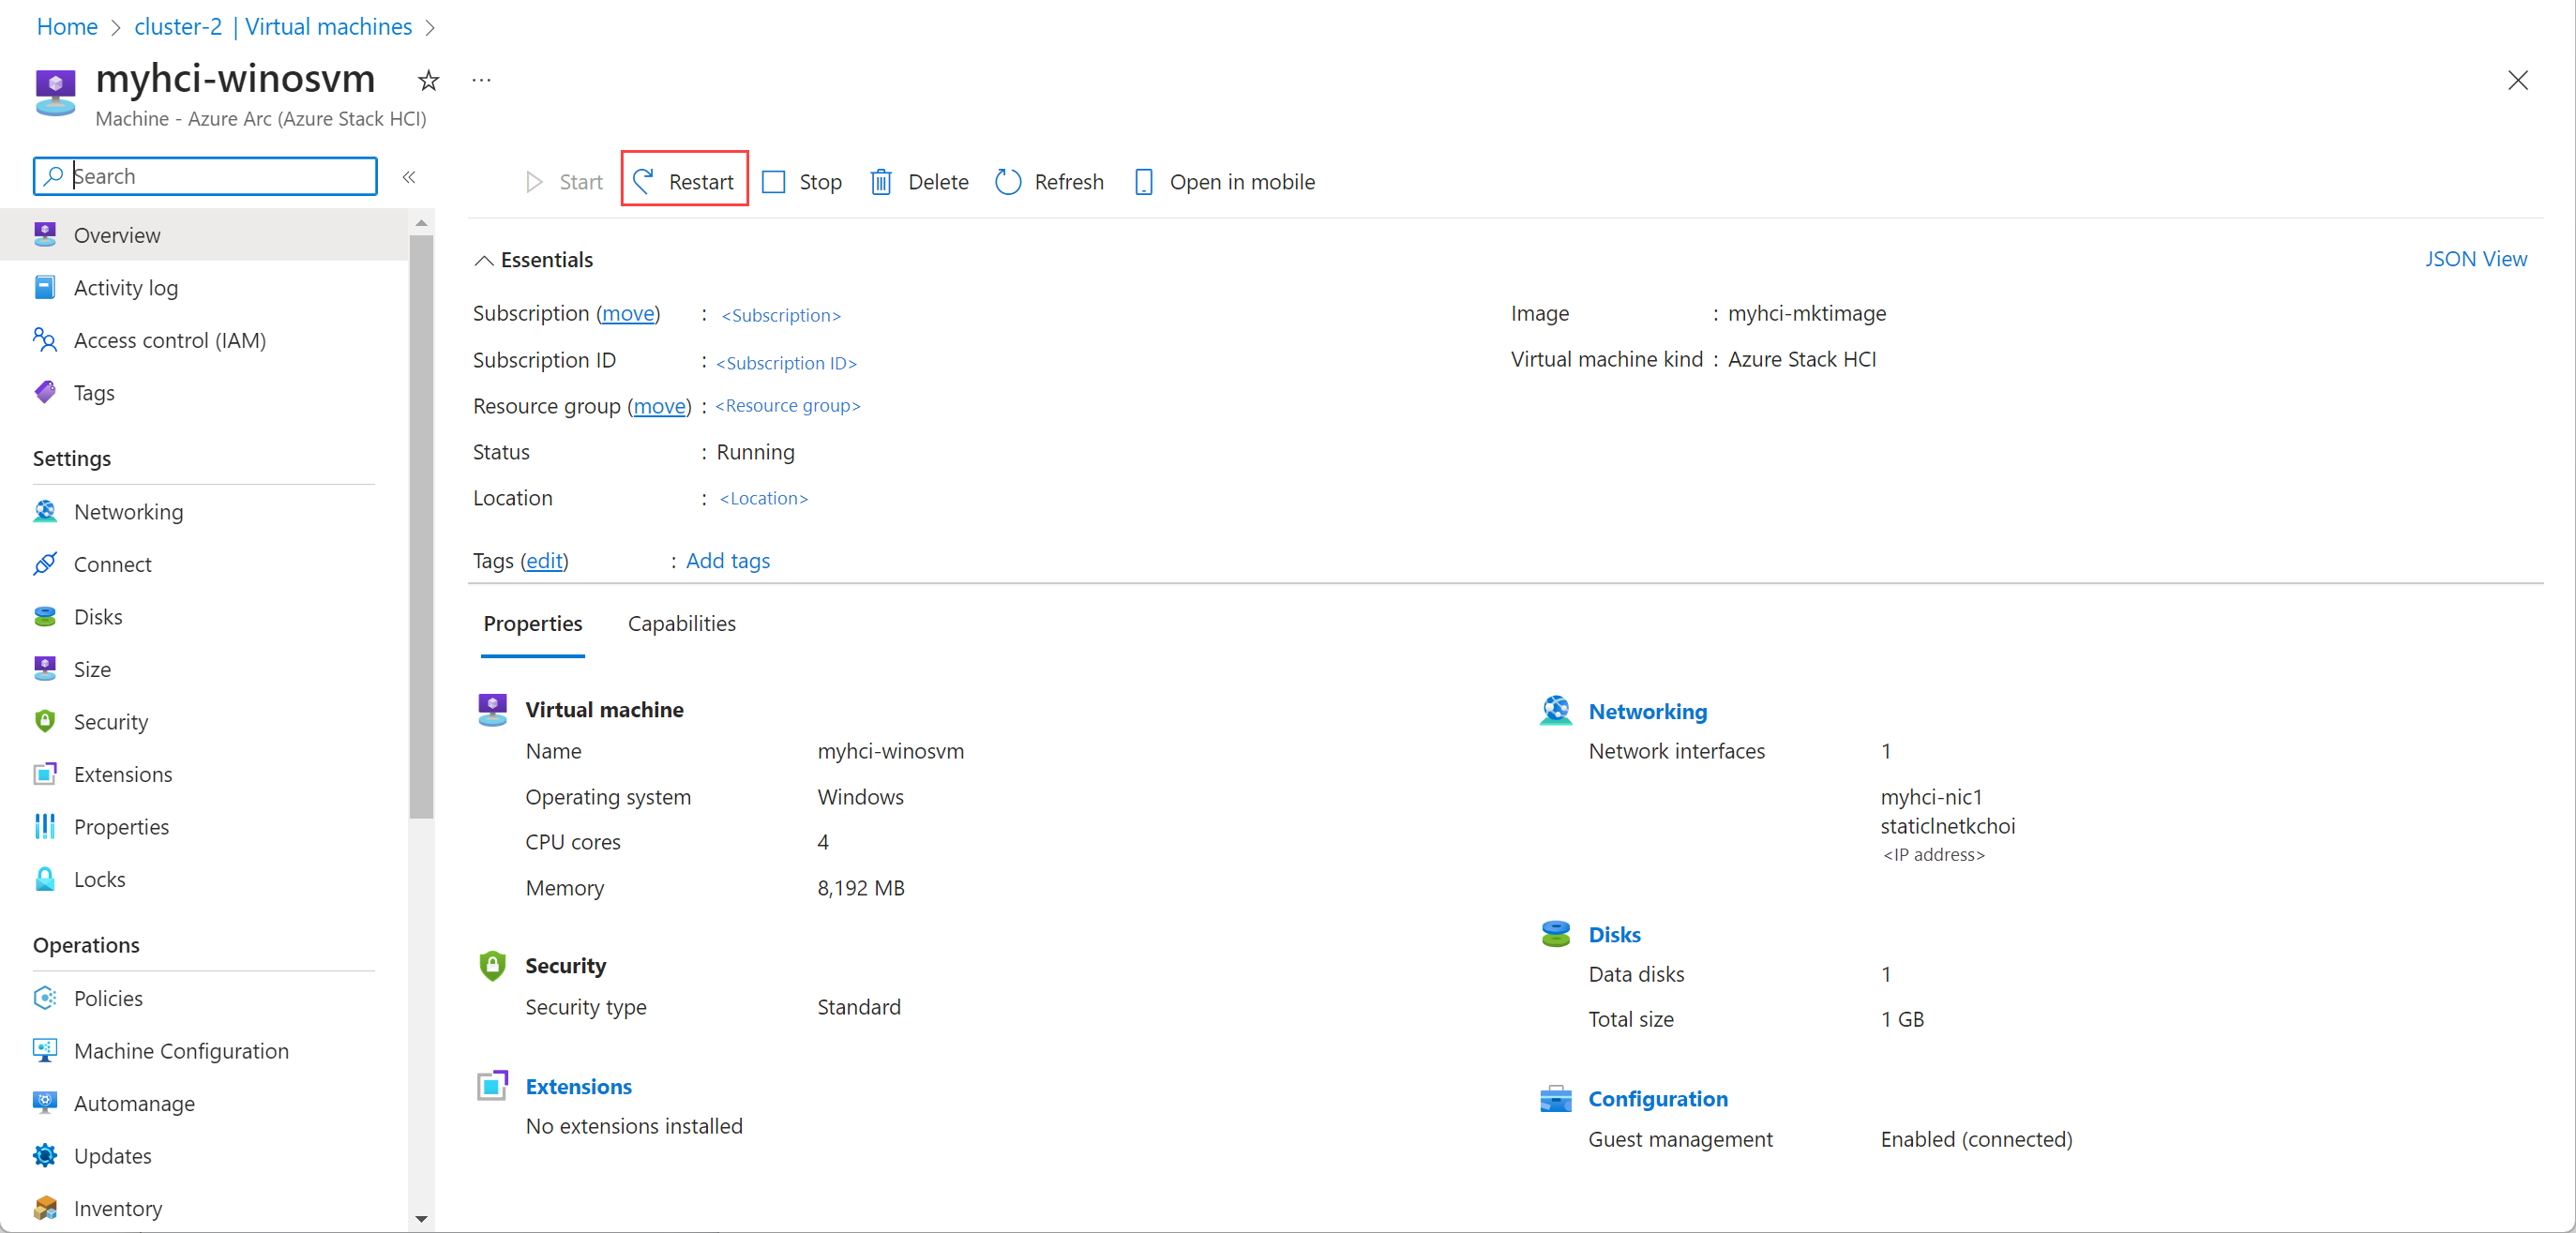
VM を再起動するには、Azure Portal で Azure ローカル インスタンスの次の手順に従います。
Azure ローカル リソースに移動し、仮想マシンに移動します。
仮想マシンの一覧で、停止していて再起動する VM を選択します。
VM の [概要] ページで、コマンド バーの [再起動] を選択します。
[はい] を選択します。
VM が再起動されたことを確認します。
VM を一時停止する
VM を一時停止すると、VM を使用していないときにコンピューティング リソースを節約するのに役立ちます。 VM を一時停止すると、CPU アクティビティが停止します。
実行中の VM のみを一時停止できます。 VM を一時停止した後、後で再開できます。
次の Azure PowerShell コマンドレットを実行します。
#Set input parameters

$rg = "<Resource group name>"
$vmName = "<VM name>"

#Pause the VM

az stack-hci-vm pause --name $vmName --resource-group $rg
このコマンドレットのパラメーターは次のとおりです。
パラメーター 説明 name仮想マシンの名前。 resource-groupリソース グループの名前。 az configure --defaults group=<name>を使用して、既定のグループを構成できます。subscriptionサブスクリプションの名前または ID。 既定のサブスクリプションは、 az account set -s NAME_OR_IDを使用して構成できます。VM の状態を確認して、VM が一時停止されていることを確認します。
#Check the VM status

az stack-hci-vm show --name $vmName --resource-group $rg
VM を起動して、一時停止状態から VM を再開します。
#Start the VM

az stack-hci-vm start --name $vmName --resource-group $rg
VM が実行されていることを確認します。
出力例
このセクションを展開して、出力例を確認します。
#Set parameters

[v-host1]: PS C:\Users\HCIDeploymentUser> $rg = "<Resource group name>"
[v-host1]: PS C:\Users\HCIDeploymentUser> $vmName = "<VM name>"

#Pause the VM

[v-host1]: PS C:\Users\HCIDeploymentUser> az stack-hci-vm pause --name $vmName --resource-group $rg

#Show the current state of the VM
[v-host1]: PS C:\Users\HCIDeploymentUser> az stack-hci-vm show -g $rg --name $vmName
{
  "attestationStatus": null,
  "virtualmachineinstance": {
    "extendedLocation": {
      "name": "/subscriptions/<Subscription ID>/resourcegroups/<Resource group name>/providers/Microsoft.ExtendedLocation/customLocations/s-cluster-customlocation",
      "type": "CustomLocation"
    },
    "id": "/subscriptions/<Subscription ID>/resourceGroups/<Resource group name>/providers/Microsoft.HybridCompute/machines/testvm001/providers/Microsoft.AzureStackHCI/virtualMachineInstances/default",
    "identity": null,
    "name": "default",
    "properties": {
      "guestAgentInstallStatus": null,
      "hardwareProfile": {
        "dynamicMemoryConfig": {
          "maximumMemoryMb": null,
          "minimumMemoryMb": null,
          "targetMemoryBuffer": null
        },
        "memoryMb": 2000,
        "processors": 2,
        "vmSize": "Custom"
      },
      "httpProxyConfig": null,
      "instanceView": {
        "vmAgent": {
          "statuses": [
            {
              "code": "ProvisioningState/succeeded",
              "displayStatus": "Connected",
              "level": "Info",
              "message": "Connection with mocguestagent was successfully reestablished",
              "time": "2024-06-24T16:30:05+00:00"
            },
          ],
          "vmConfigAgentVersion": "v0.18.0-4-gd54376b0"
        }
      },
      "networkProfile": {
        "networkInterfaces": []
      },
      "osProfile": {
        "adminPassword": null,
        "adminUsername": "azureuser",
        "computerName": "testvm001",
        "linuxConfiguration": {
          "disablePasswordAuthentication": false,
          "provisionVmAgent": false,
          "provisionVmConfigAgent": true,
          "ssh": {
            "publicKeys": null
          }
        },
        "windowsConfiguration": {
          "enableAutomaticUpdates": null,
          "provisionVmAgent": false,
          "provisionVmConfigAgent": true,
          "ssh": {
            "publicKeys": null
          },
          "timeZone": null
        }
      },
      "provisioningState": "Succeeded",
      "resourceUid": null,
      "securityProfile": {
        "enableTpm": false,
        "securityType": null,
        "uefiSettings": {
          "secureBootEnabled": true
        }
      },
      "status": {
        "errorCode": "",
        "errorMessage": "",
        "powerState": "Paused",
        "provisioningStatus": null
      },
      "storageProfile": {
        "dataDisks": [],
        "imageReference": {
          "id": "/subscriptions/<Subscription ID>/resourceGroups/<Resource group name>/providers/Microsoft.AzureStackHCI/galleryImages/WinImage-26tdJUIS",
          "resourceGroup": "<Resource group name>"
        },
        "osDisk": {
          "id": null,
          "osType": "Windows"
        },
        "vmConfigStoragePathId": "/subscriptions/<Subscription ID>/resourceGroups/<Resource group name>/providers/Microsoft.AzureStackHCI/storageContainers/UserStorage2-guid"
      },
      "vmId": "<guid>"
    },
    "resourceGroup": "<Resource group name>",
    "systemData": {
      "createdAt": "2024-06-24T01:29:06.594266+00:00",
      "createdBy": "7d6ffe2f-dac5-4e74-9bf2-4830cf7f4668",
      "createdByType": "Application",
      "lastModifiedAt": "2024-06-24T16:41:27.166668+00:00",
      "lastModifiedBy": "319f651f-7ddb-4fc6-9857-7aef9250bd05",
      "lastModifiedByType": "Application"
    },
    "type": "microsoft.azurestackhci/virtualmachineinstances"
  }
}

#Start the VM after it was paused.

[v-host1]: PS C:\Users\HCIDeploymentUser> az stack-hci-vm start --name $vmName --resource-group $rg
Inside _start_initial/subscriptions/<Subscription ID>/resourceGroups/<Resource group name>/providers/Microsoft.HybridCompute/machines/testvm0012024-02-01-preview/https://management.azure.com/subscriptions/<Subscription ID>/resourceGroups/<Resource group name>/providers/Microsoft.HybridCompute/machines/testvm001/providers/Microsoft.AzureStackHCI/virtualMachineInstances/default/start?api-version=2024-02-01-preview

#Show the current state of the VM. The VM should be running.

[v-host1]: PS C:\Users\HCIDeploymentUser> az stack-hci-vm show -g $rg --name $vmName
{
  "attestationStatus": null,
  "virtualmachineinstance": {
    "extendedLocation": {
      "name": "/subscriptions/<Subscription ID>/resourcegroups/<Resource group name>/providers/Microsoft.ExtendedLocation/customLocations/s-cluster-customlocation",
      "type": "CustomLocation"
    },
    "id": "/subscriptions/<Subscription ID>/resourceGroups/<Resource group name>/providers/Microsoft.HybridCompute/machines/testvm001/providers/Microsoft.AzureStackHCI/virtualMachineInstances/default",
    "identity": null,
    "name": "default",
    "properties": {
      "guestAgentInstallStatus": null,
      "hardwareProfile": {
        "dynamicMemoryConfig": {
          "maximumMemoryMb": null,
          "minimumMemoryMb": null,
          "targetMemoryBuffer": null
        },
        "memoryMb": 2000,
        "processors": 2,
        "vmSize": "Custom"
      },
      "httpProxyConfig": null,
      "instanceView": {
        "vmAgent": {
          "statuses": [
            {
              "code": "ProvisioningState/succeeded",
              "displayStatus": "Connected",
              "level": "Info",
              "message": "Connection with mocguestagent was successfully reestablished",
              "time": "2024-06-24T17:25:19+00:00"
            }
          ],
          "vmConfigAgentVersion": "v0.18.0-4-gd54376b0"
        }
      },
      "networkProfile": {
        "networkInterfaces": []
      },
      "osProfile": {
        "adminPassword": null,
        "adminUsername": "azureuser",
        "computerName": "testvm001",
        "linuxConfiguration": {
          "disablePasswordAuthentication": false,
          "provisionVmAgent": false,
          "provisionVmConfigAgent": true,
          "ssh": {
            "publicKeys": null
          }
        },
        "windowsConfiguration": {
          "enableAutomaticUpdates": null,
          "provisionVmAgent": false,
          "provisionVmConfigAgent": true,
          "ssh": {
            "publicKeys": null
          },
          "timeZone": null
        }
      },
      "provisioningState": "Succeeded",
      "resourceUid": null,
      "securityProfile": {
        "enableTpm": false,
        "securityType": null,
        "uefiSettings": {
          "secureBootEnabled": true
        }
      },
      "status": {
        "errorCode": "",
        "errorMessage": "",
        "powerState": "Running",
        "provisioningStatus": null
      },
      "storageProfile": {
        "dataDisks": [],
        "imageReference": {
          "id": "/subscriptions/<Subscription ID>/resourceGroups/<Resource group name>/providers/Microsoft.AzureStackHCI/galleryImages/WinImage-26tdJUIS",
          "resourceGroup": "<Resource group name>"
        },
        "osDisk": {
          "id": null,
          "osType": "Windows"
        },
        "vmConfigStoragePathId": "/subscriptions/<Subscription ID>/resourceGroups/<Resource group name>/providers/Microsoft.AzureStackHCI/storageContainers/UserStorage2-guid"
      },
      "vmId": "<guid>"
    },
    "resourceGroup": "<Resource group name>",
    "systemData": {
      "createdAt": "2024-06-24T01:29:06.594266+00:00",
      "createdBy": "<guid>",
      "createdByType": "Application",
      "lastModifiedAt": "2024-06-24T17:28:13.206935+00:00",
      "lastModifiedBy": "<guid>",
      "lastModifiedByType": "Application"
    },
    "type": "microsoft.azurestackhci/virtualmachineinstances"
  }
}
VM を保存する
VM を保存すると、現在の状態がディスクに格納され、VM が停止されます。 VM を保存すると、メモリと CPU リソースが解放されます。 保存できるのは、実行中の VM のみです。
次の Azure PowerShell コマンドレットを実行します。
#Set input parameters

$rg = "<Resource group name>"
$vmName = "<VM name>"

#Save the VM

az stack-hci-vm save --name $vmName --resource-group $rg
このコマンドレットのパラメーターは次のとおりです。
パラメーター 説明 name仮想マシンの名前。 resource-groupリソース グループの名前。 az configure --defaults group=<name>を使用して、既定のグループを構成できます。subscriptionサブスクリプションの名前または ID。 既定のサブスクリプションは、 az account set -s <Subscription name or Subscription ID>を使用して構成できます。VM の状態を確認して、VM が保存されていることを確認します。
#Check the VM status

az stack-hci-vm show --name $vmName --resource-group $rg
VM を起動して、保存された状態から VM を再開します。
#Start the VM

az stack-hci-vm start --name $vmName --resource-group $rg
VM が実行されていることを確認します。
出力例
このセクションを展開して、出力例を確認します。
#Set parameters

[v-host1]: PS C:\Users\HCIDeploymentUser> $rg = "<Resource group name>"
[v-host1]: PS C:\Users\HCIDeploymentUser> $vmName = "<VM name>"

#Save the VM

[v-host1]: PS C:\Users\HCIDeploymentUser> az stack-hci-vm save --name $vmName --resource-group $rg

#Show the current state of the VM

[v-host1]: PS C:\Users\HCIDeploymentUser> az stack-hci-vm show -g $rg --name $vmName
{
  "attestationStatus": null,
  "virtualmachineinstance": {
    "extendedLocation": {
      "name": "/subscriptions/<Subscription ID>/resourcegroups/<Resource group name>/providers/Microsoft.ExtendedLocation/customLocations/s-cluster-customlocation",
      "type": "CustomLocation"
    },
    "id": "/subscriptions/<Subscription ID>/resourceGroups/<Resource group name>/providers/Microsoft.HybridCompute/machines/testvm001/providers/Microsoft.AzureStackHCI/virtualMachineInstances/default",
    "identity": null,
    "name": "default",
    "properties": {
      "guestAgentInstallStatus": null,
      "hardwareProfile": {
        "dynamicMemoryConfig": {
          "maximumMemoryMb": null,
          "minimumMemoryMb": null,
          "targetMemoryBuffer": null
        },
        "memoryMb": 2000,
        "processors": 2,
        "vmSize": "Custom"
      },
      "httpProxyConfig": null,
      "instanceView": {
        "vmAgent": {
          "statuses": [
            {
              "code": "ProvisioningState/succeeded",
              "displayStatus": "Connected",
              "level": "Info",
              "message": "Connection with mocguestagent was successfully reestablished",
              "time": "2024-06-24T17:25:19+00:00"
            },
          ],
          "vmConfigAgentVersion": "v0.18.0-4-gd54376b0"
        }
      },
      "networkProfile": {
        "networkInterfaces": []
      },
      "osProfile": {
        "adminPassword": null,
        "adminUsername": "azureuser",
        "computerName": "testvm001",
        "linuxConfiguration": {
          "disablePasswordAuthentication": false,
          "provisionVmAgent": false,
          "provisionVmConfigAgent": true,
          "ssh": {
            "publicKeys": null
          }
        },
        "windowsConfiguration": {
          "enableAutomaticUpdates": null,
          "provisionVmAgent": false,
          "provisionVmConfigAgent": true,
          "ssh": {
            "publicKeys": null
          },
          "timeZone": null
        }
      },
      "provisioningState": "Succeeded",
      "resourceUid": null,
      "securityProfile": {
        "enableTpm": false,
        "securityType": null,
        "uefiSettings": {
          "secureBootEnabled": true
        }
      },
      "status": {
        "errorCode": "",
        "errorMessage": "",
        "powerState": "Saved",
        "provisioningStatus": null
      },
      "storageProfile": {
        "dataDisks": [],
        "imageReference": {
          "id": "/subscriptions/<Subscription ID>/resourceGroups/<Resource group name>/providers/Microsoft.AzureStackHCI/galleryImages/WinImage-26tdJUIS",
          "resourceGroup": "<Resource group name>"
        },
        "osDisk": {
          "id": null,
          "osType": "Windows"
        },
        "vmConfigStoragePathId": "/subscriptions/<Subscription ID>/resourceGroups/<Resource group name>/providers/Microsoft.AzureStackHCI/storageContainers/UserStorage2-345d968fa1e74e99a9509ab7f3d259fd"
      },
      "vmId": "<guid>"
    },
    "resourceGroup": "<Resource group name>",
    "systemData": {
      "createdAt": "2024-06-24T01:29:06.594266+00:00",
      "createdBy": "<guid>",
      "createdByType": "Application",
      "lastModifiedAt": "2024-06-24T18:29:02.794305+00:00",
      "lastModifiedBy": "<guid>",
      "lastModifiedByType": "Application"
    },
    "type": "microsoft.azurestackhci/virtualmachineinstances"
  }
}

#Start the VM after it was saved

[v-host1]: PS C:\Users\HCIDeploymentUser> az stack-hci-vm start --name $vmName --resource-group $rg
Inside _start_initial/subscriptions/<Subscription ID>/resourceGroups/<Resource group name>/providers/Microsoft.HybridCompute/machines/testvm0012024-02-01-previewhttps://management.azure.com/subscriptions/<Subscription ID>/resourceGroups/<Resource group name>/providers/Microsoft.HybridCompute/machines/testvm001/providers/Microsoft.AzureStackHCI/virtualMachineInstances/default/start?api-version=2024-02-01-preview

#Show the current state of the VM. The VM should be running.

[v-host1]: PS C:\Users\HCIDeploymentUser> az stack-hci-vm show -g $rg --name $vmName
{
  "attestationStatus": null,
  "virtualmachineinstance": {
    "extendedLocation": {
      "name": "/subscriptions/<Subscription ID>/resourcegroups/<Resource group name>/providers/Microsoft.ExtendedLocation/customLocations/s-cluster-customlocation",
      "type": "CustomLocation"
    },
    "id": "/subscriptions/<Subscription ID>/resourceGroups/<Resource group name>/providers/Microsoft.HybridCompute/machines/testvm001/providers/Microsoft.AzureStackHCI/virtualMachineInstances/default",
    "identity": null,
    "name": "default",
    "properties": {
      "guestAgentInstallStatus": null,
      "hardwareProfile": {
        "dynamicMemoryConfig": {
          "maximumMemoryMb": null,
          "minimumMemoryMb": null,
          "targetMemoryBuffer": null
        },
        "memoryMb": 2000,
        "processors": 2,
        "vmSize": "Custom"
      },
      "httpProxyConfig": null,
      "instanceView": {
        "vmAgent": {
          "statuses": [
            {
              "code": "ProvisioningState/succeeded",
              "displayStatus": "Connected",
              "level": "Info",
              "message": "Connection with mocguestagent was successfully reestablished",
              "time": "2024-06-24T18:32:41+00:00"
            }
          ],
          "vmConfigAgentVersion": "v0.18.0-4-gd54376b0"
        }
      },
      "networkProfile": {
        "networkInterfaces": []
      },
      "osProfile": {
        "adminPassword": null,
        "adminUsername": "azureuser",
        "computerName": "testvm001",
        "linuxConfiguration": {
          "disablePasswordAuthentication": false,
          "provisionVmAgent": false,
          "provisionVmConfigAgent": true,
          "ssh": {
            "publicKeys": null
          }
        },
        "windowsConfiguration": {
          "enableAutomaticUpdates": null,
          "provisionVmAgent": false,
          "provisionVmConfigAgent": true,
          "ssh": {
            "publicKeys": null
          },
          "timeZone": null
        }
      },
      "provisioningState": "Succeeded",
      "resourceUid": null,
      "securityProfile": {
        "enableTpm": false,
        "securityType": null,
        "uefiSettings": {
          "secureBootEnabled": true
        }
      },
      "status": {
        "errorCode": "",
        "errorMessage": "",
        "powerState": "Running",
        "provisioningStatus": null
      },
      "storageProfile": {
        "dataDisks": [],
        "imageReference": {
          "id": "/subscriptions/<Subscription ID>/resourceGroups/<Resource group name>/providers/Microsoft.AzureStackHCI/galleryImages/WinImage-26tdJUIS",
          "resourceGroup": "<Resource group name>"
        },
        "osDisk": {
          "id": null,
          "osType": "Windows"
        },
        "vmConfigStoragePathId": "/subscriptions/<Subscription ID>/resourceGroups/<Resource group name>/providers/Microsoft.AzureStackHCI/storageContainers/UserStorage2-guid"
      },
      "vmId": "<guid>"
    },
    "resourceGroup": "<Resource group name>",
    "systemData": {
      "createdAt": "2024-06-24T01:29:06.594266+00:00",
      "createdBy": "<guid>",
      "createdByType": "Application",
      "lastModifiedAt": "2024-06-24T18:35:18.206280+00:00",
      "lastModifiedBy": "<guid>",
      "lastModifiedByType": "Application"
    },
    "type": "microsoft.azurestackhci/virtualmachineinstances"
  }
}
ローカル アカウントのパスワードを変更する
Azure ローカル インスタンスにデプロイされた Azure Arc VM のローカル アカウント パスワードを変更するには、次の手順に従います。 手順は、Windows VM と Linux VM では異なります。
Azure Arc VM にサインインします。
次の Azure PowerShell コマンドを実行します。
# Define the username
$username = "AccountName"

# Prompt the user to enter the new password
$newPassword = Read-Host -AsSecureString "Enter the new password for $username"

# Prompt the user to re-enter the new password for verification
$verifyPassword = Read-Host -AsSecureString "Re-enter the new password for verification"

# Convert the secure strings to plain text for comparison
$plainPassword = [Runtime.InteropServices.Marshal]::PtrToStringAuto([Runtime.InteropServices.Marshal]::SecureStringToBSTR($newPassword))
$plainVerifyPassword = [Runtime.InteropServices.Marshal]::PtrToStringAuto([Runtime.InteropServices.Marshal]::SecureStringToBSTR($verifyPassword))

# Check if the passwords match, and change the password if they match. Fail if the passwords don't match.
if ($plainPassword -eq $plainVerifyPassword) {
    $account = [ADSI]"WinNT://./$username,user"
    $account.SetPassword($plainPassword)
    $account.SetInfo()

    Write-Host "Password for user $username has been reset successfully." -ForegroundColor Green
} else {
    Write-Host "The passwords do not match. Please try again." -ForegroundColor Red
}
VM を削除する
VM を削除しても、VM に関連付けられているすべてのリソースは削除されません。 たとえば、データ ディスクと VM に関連付けられているネットワーク インターフェイスは削除されません。 これらのリソースを個別に見つけて削除する必要があります。
VM を削除するには、Azure Portal で Azure ローカル インスタンスの次の手順に従います。
Azure ローカル リソースに移動し、仮想マシンに移動します。
仮想マシンの一覧で、システムから削除する VM を選択します。
VM の [の概要] ページのコマンド バーで、[の削除]選択します。
削除を確認するプロンプトが表示されます。 [はい] を選択します。
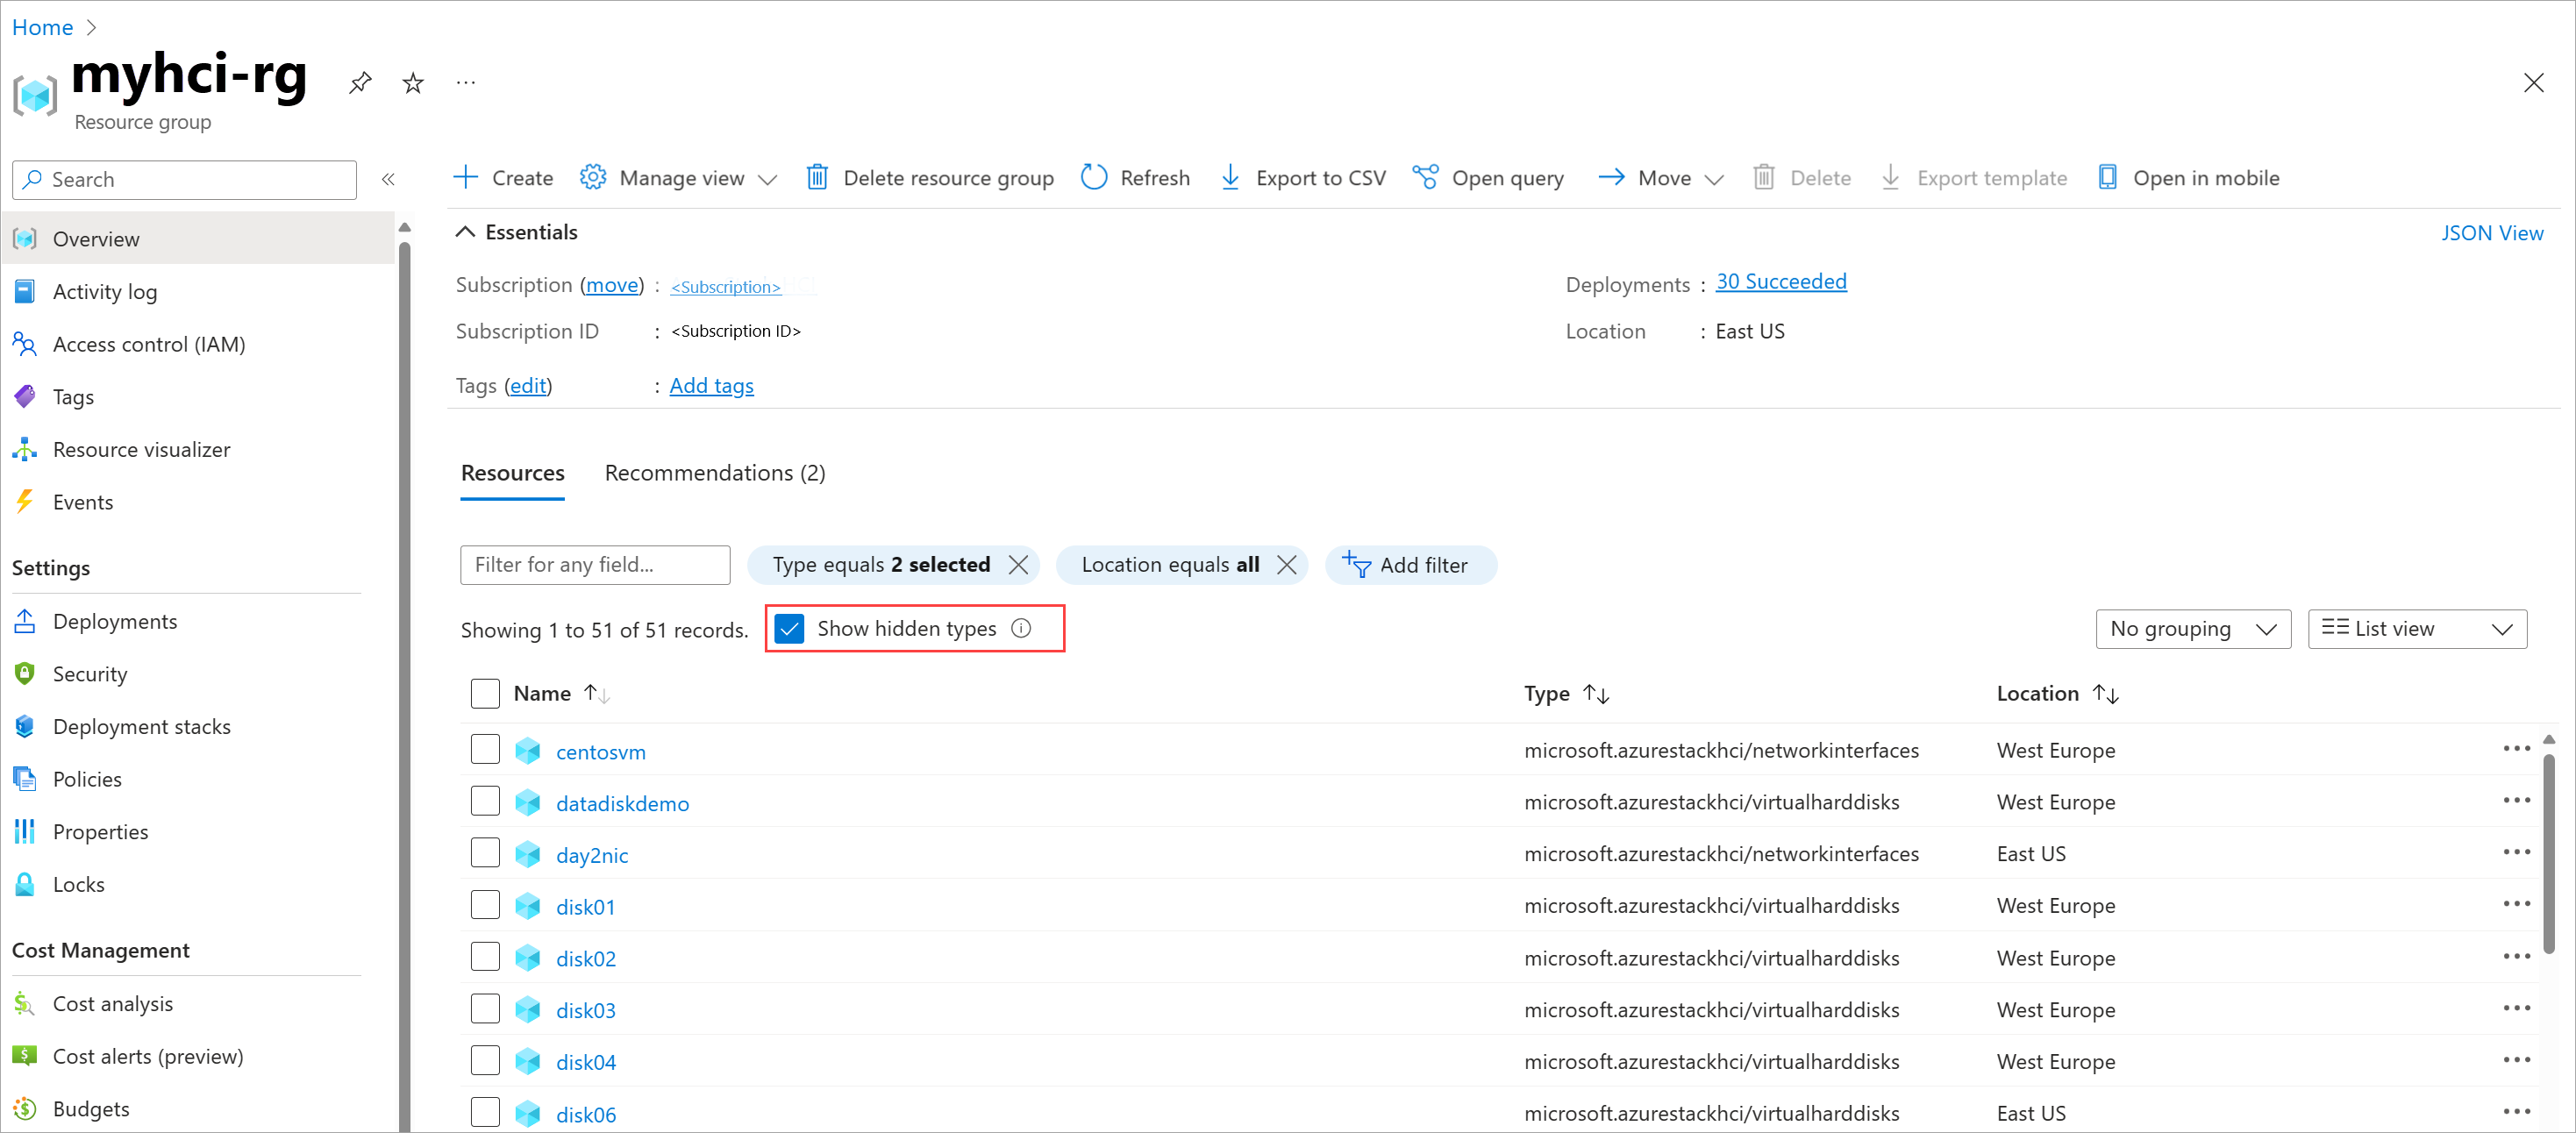
この VM がデプロイされたリソース グループに移動します。 リソース グループ内のリソースの一覧から VM が削除されていることを確認します。
ネットワーク インターフェイスやデータ ディスクなど、関連付けられているリソースを見つけて削除します。 削除されていないこの VM に関連付けられているリソースを表示するには、[非表示の種類を表示する] を選択する必要がある場合があります。
Azure Arc VM のライブ マイグレーションを実施する
Azure ローカル ノード間での Azure Arc VM のライブ マイグレーションは、フェールオーバー クラスター マネージャー や Windows Admin Center などのオンプレミス ツールを使用してサポートされます。 VM ストレージのライブ マイグレーションはサポートされていません。
コアとメモリの変更
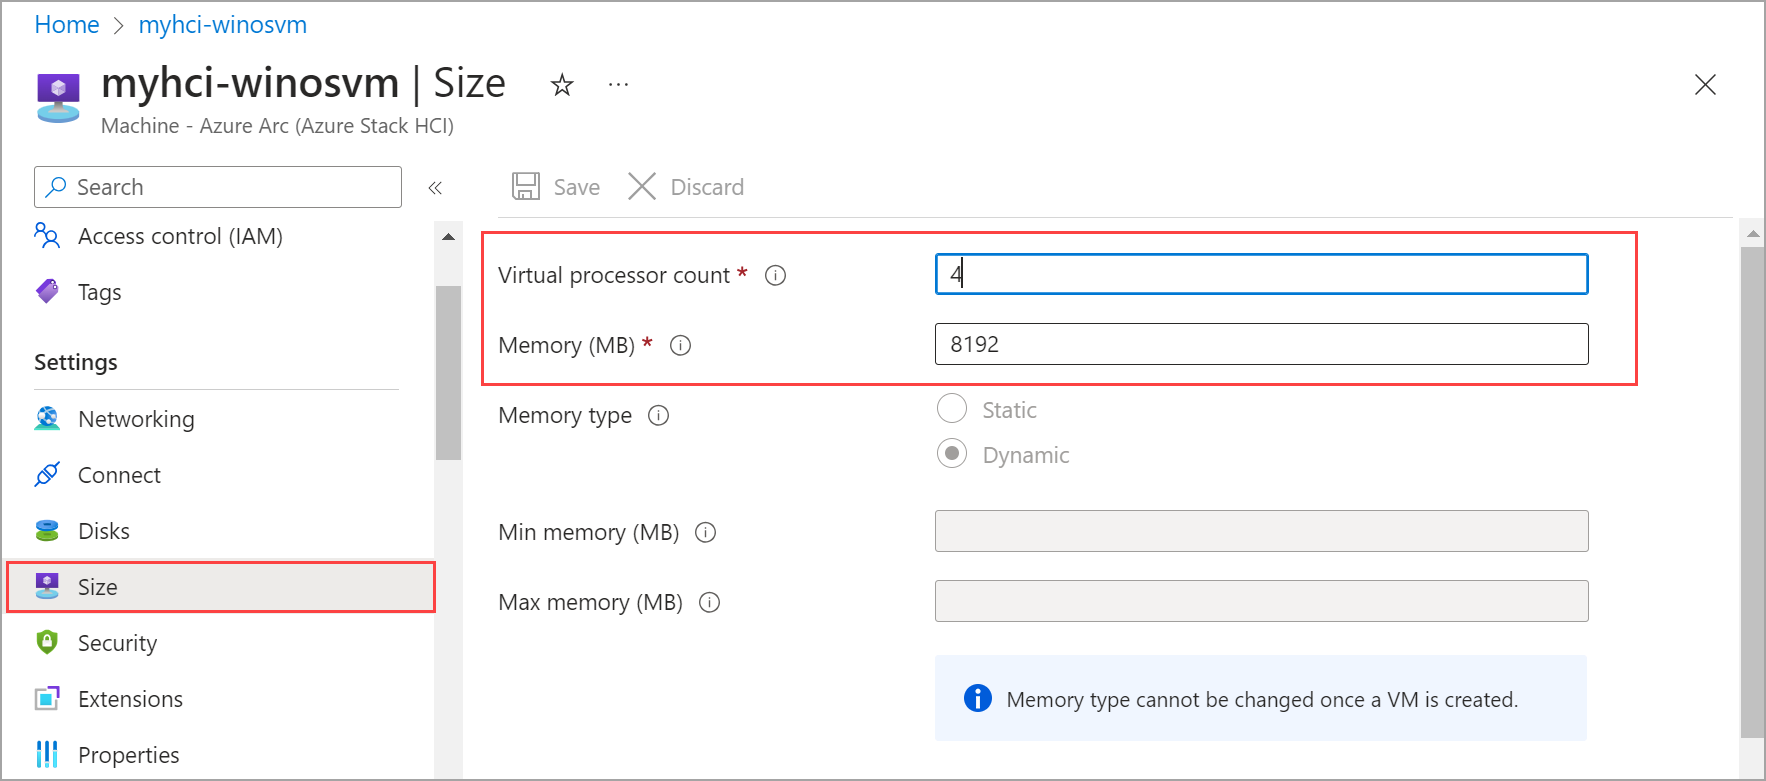
コアとメモリを変更するには、Azure Portal で Azure ローカル インスタンスの次の手順に従います。
Azure ローカル リソースに移動し、仮想マシンに移動します。
VM の一覧で、コアとメモリを変更する VM を選択して移動します。
[設定] で [サイズ] を選択します。 仮想プロセッサ数 または Memory (MB) 値を編集して、VM のコアまたはメモリ サイズを変更します。 メモリの場合、サイズのみを変更できます。 VM の作成後にメモリの種類を変更することはできません。
