Creating and Publishing a Web Application to Windows Azure in 15 Minutes
Windows Azure SDK 1.6 (November 2011 Release) has made it much easier to deploy a web application from Within Visual Studio 2010 than previous SDK releases. You can download the SDK and other Windows Azure developer resources.
This post documents the process of creating a simple asp.net web application, deploying it to your Windows Azure account, and enabling remote desktop access to the virtual instance that hosts your web application in Microsoft data centers.
1. Create an ASP.NET web application. You can select the Cloud template and create a Windows Azure web role application. Or, you can select the Web template and create an ASP.NET web application. Windows Azure Tools for Visual Studio in this SDK allows you to add a Windows Azure deployment project later on. Nice feature!
2. Add your code, debug and test your application. For this post, I add the string “Windows Azure Demo” to the title, to keep the demo simple.
3. When the app is ready to deploy, select the web project, right click and select Add Windows Azure Deployment Project. A Windows Azure deployment project is added to your solution.
4. To publish the application from within Visual Studio, select the Windows Azure project, right click and select Publish. Optionally, you can create a package, and deploy it using Visual Studio or the Windows Azure Management portal.
5. To allow Visual Studio to access your Windows Azure account, you must provide your Windows Azure subscription credentials. With the new SDK, all you have to do is click “Sign in to download credentials”. You only have to do this once. For subsequent deployments, you can re-use the downloaded credentials file.
6. Once you sign in to your Windows Azure account at https://www.windowsazure.com, you are prompted to download the credentials file from the browser. You can manually download the file by clicking the link on the screen.
The credentials publishing settings file is an XML file, containing a management certificate.
<?xml version="1.0" encoding="utf-8"?>
<PublishData>
<PublishProfile
PublishMethod="AzureServiceManagementAPI"
Url="https://management.core.windows.net/"
ManagementCertificate="MIIKFAIBAzCCCdQGCSqGSIb3DQEHAaCCCcUE....">
<Subscription
Id="xxxxxxx"
Name="Field: zxue" />
</PublishProfile>
</PublishData>
7. Import the downloaded publishing settings file, and start the publishing process.
8. Create a new hosting service for the web application or use an existing service. You can choose to deploy the application to staging or production.
9. Optionally, you can enable Remote Desktop for all roles. Specify the user name and password for accessing the virtual instance. This user name is different from your Windows Azure account. Behind the scenes, the new SDK creates and manages the self-issued certificate for you automatically. A huge improvement over previous SDKs.
10. Optionally, you can create storage account from the Advanced Settings.
11. You are now ready to publish the application to Windows Azure. The publication process takes approximately 6-8 minutes, depending on the size of your application.
12. You can now login to your Windows Azure account, and review the published application. If the application is published to staging environment, you can find the url for the application and launch it in the browser.
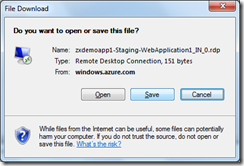
13. If the Remote Desktop feature is enabled for the application, you can select the application instance, and click “Connect” from the top menu to download the connection shortcut (an rdp file).
14. Click the downloaded connection shortcut, and enter the user credentials for the remote desktop access you supplied in a previous step. Note that you will be warned that the certificate is not from a trusted certifying authority. This is because the certificate is self-issued. You will not see the warning if you use a commercial certificate that is issued for the application. You can safely proceed to the next step despite the warning.
15. You are now logged in to a Windows Server 2008 by default. From the Windows Azure Management portal, you can choose a different operating system family, e.g. Windows Server 2008 R2, and a different Windows Azure operating system version.
That’s all. With the new SDK, deploying applications to Windows Azure is very easy. If you are interested to automate the build process and deploy applications to multiple environments, you will find the new SDK has those features that await you. You can find more info on team build and multiple subscription deployment management here.


