How to use to custom SQL attribute store to generate claims and authorize user.
This blog will help you to understand how you can configure ADFS to use SQL to use the value from the table and generate token and authorize the user.
Before moving ahead you require your ADFS setup and running.
You can refer this blogs which helps you to configure ADFS 2.0 with SharePoint 2010
https://blogs.technet.com/b/speschka/archive/2010/07/30/configuring-sharepoint-2010-and-adfs-v2-end-to-end.aspx
Follow the steps below to configure SQL and ADFS and SharePoint server.
- Create a new Database by name : Peoplestore
- Create a new table named :Attribute
- Create columns eg: User ID, Logon, Department\Organization\Firm
- Add values to it:
Note: Make sure we have proper permission on the Database created
Here proper permission means the ADFS account should be able to access this SQL database. We don’t need write access, a read access to the DB will be more than enough.
if you face issues with generating claims, you can check the event viewer on ADFS server for the event related to permission and grant the required permission on the DB.
On ADFS server
Add SQL attribute store
Imp note : Display Name: SQL
- Modify Relying party trust
- Edit claim rule.
- Add a new claim rule
- Claim type :
- Customer rule
- Claim rule language
- Ref: https://technet.microsoft.com/en-us/library/ee913566(WS.10).aspx
- For Conditions under claim rule
- Ref:https://technet.microsoft.com/en-us/library/dd807118(WS.10).aspx
- Eg : claim rule
c:[Type == "https://schemas.microsoft.com/ws/2008/06/identity/claims/windowsaccountname"] => issue(store = "sql", types = ("https://schemas.xmlsoap.org/ws/2005/05/identity/claims/Firm"), query = "SELECT Firm from dbo.attributes where logon = {0}", param = c.Value);
On Sharepoint Server
- Set up claims mapping for "https://schemas.xmlsoap.org/ws/2005/05/identity/claims/firm
- $token = Get-SPTrustedIdentityTokenIssuer
- Add new claim type
- $token.ClaimTypes.Add(https://schemas.xmlsoap.org/ws/2005/05/identity/claims/Firm)
- Add claim type mapping
- $firmclaim = New-SPClaimTypeMapping -IncomingCLaimType "https://schemas.xmlsoap.org/ws/2005/05/identity/claims/Firm" -IncomingClaimTypeDisplayName "Firm" -LocalClaimType https://schemas.xmlsoap.org/ws/2005/05/identity/claims/Firm
- To add claim type to our issuer
- $firmclaim | Add-SPClaimTypeMapping -TrustedIdentityTokenIssuer $token
In case you want to use a new web application and use the same SAML token provider
- Add URI
- $uri = new-object System.Uri(https://sunshine.vinit.com)
- $token.ProviderRealms.Add($uri, "urn:sharepoint:sunshine")
- $token.Update()
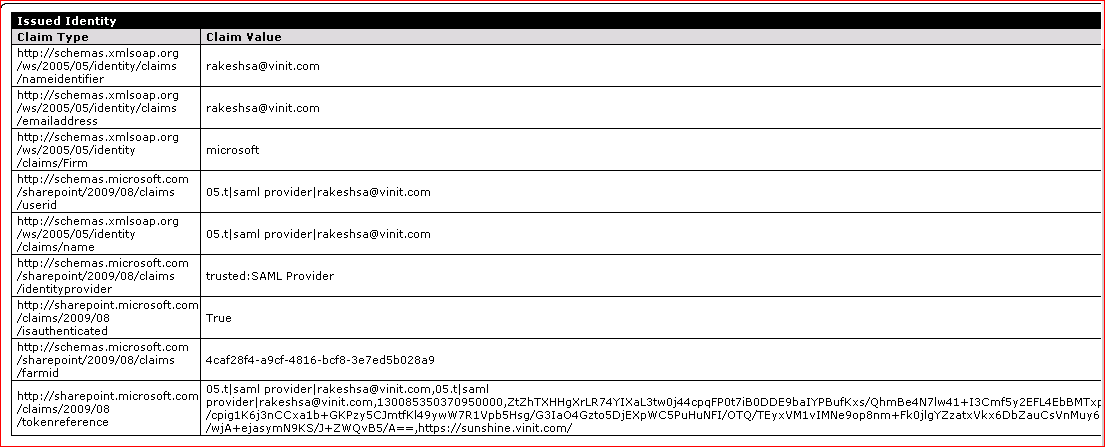
You are done now, how to verify
On Claims enabled site, create a new document library
Break the permission and add Microsoft as the claim.
Login to site with the rakeshsa, we should be able to see document library, login with Adam and the document library will be security trimmed.
To verify if you have got the correct claim, here is the wsp package which can you help you.
Steps remains same on how to deploy the WSP package.
In short, deploy the package, activate it, use the webpart on newly created page( just to avoid messing up with default.aspx)
And then you should be able to see the claims, attached below is the WSP package.
Output should like something like this
Comments
- Anonymous
February 17, 2014
Vineet: Do you know if we can connect to DB2 Database instead of SQL Server ?


