PowerShell Workflow for Mere Mortals: Part 4
Summary: Microsoft Scripting Guy, Ed Wilson, continues his five-part series about Windows PowerShell Workflow.
Hey, Scripting Guy! Yesterday you talked about Windows PowerShell Workflow activities. But you only demonstrated the Parallel activity. Is there something you can share with me about some of the other types of activities? In particular I am interested in checkpoints because I think they can help me.
—AP
Hello AP,
Microsoft Scripting Guy, Ed Wilson, is here. This morning, it is really foggy outside. To be honest, it seems to look more like fall than the end of summer. But then, I am not a real weather person—I don’t even play one on TV. It is fairly humid and fairly cool—a nice morning for a cup of English Breakfast tea. I am not in the mood to experiment today, and so I am going with a standard recipe of mine: Three scoops of English Breakfast tea, a scoop of lemon grass, and a single crushed cinnamon stick. I let it steep for three minutes and 45 seconds, grab my tea pot, my Surface RT, and head outside to check email.
AP, you want to talk about checkpoints in a Windows PowerShell workflow today. No problem…
Note This is the fourth in a five-part series of blog posts about Windows PowerShell Workflow for “mere mortals.” Before you read this post, please read:
- PowerShell Workflow for Mere Mortals: Part 1
- PowerShell Workflow for Mere Mortals: Part 2
- PowerShell Workflow for Mere Mortals: Part 3
For more information about workflow, see these Hey, Scripting Guy! Blog posts: Windows PowerShell Workflow.
Checkpoints Windows PowerShell workflow
If I have a Windows PowerShell Workflow, and I need to save the workflow state or data to a disk while the workflow runs, I can configure a checkpoint. In this way, if something interrupts the workflow, it does not need to restart completely. Instead, the workflow resumes from the point of the last checkpoint. Setting a checkpoint in a Windows PowerShell Workflow is sometimes referred to as “persistence” or “persisting a workflow.” Because Windows PowerShell Workflows run on large distributed networks, or they control the execution of long running tasks, it is vital that the workflow can handle interruptions.
Understanding checkpoints
A checkpoint is a snapshot of the workflow’s current state. This includes the current values of variables and generated output. A checkpoint persists this data to a disk. It is possible to configure multiple checkpoints in a workflow.
Windows PowerShell Workflow provides multiple methods to implement a checkpoint. Whichever method is used to generate the checkpoint, Windows PowerShell will use the data in the latest checkpoint for the workflow to recover and resume the workflow if it is interrupted. If a workflow runs as a job (such as by using the AsJob workflow common parameter), Windows PowerShell retains the workflow checkpoint until the job is deleted (for example, by using the Remove-Job cmdlet).
Placing checkpoints
I can place checkpoints anywhere in a Windows PowerShell Workflow. This includes before and after each command or activity. The counter-balance to this sort of a paranoid approach is that each checkpoint uses resources. Therefore, it interrupts processing the workflow—often with perceptible results. In addition, every time the workflow runs on a target computer, it “checkpoints” the workflow.
So where are the best places to place a checkpoint? I like to place a checkpoint after a portion of the workflow that is significant, such as something that takes a long time to run. Or it might be a section of the workflow that uses a great amount of resources. Or even something that relies on a resource that is not always available.
Adding checkpoints
There are several levels of checkpoints that I can add to a Windows PowerShell Workflow. For example, I can add a checkpoint at the workflow level or at the activity level. If I add a checkpoint at the workflow level, it will set a checkpoint at the beginning and at the end of the workflow.
Workflow checkpoints are free
The absolutely, positively easiest way to add a checkpoint to a Windows PowerShell Workflow is to use the –PSPersist common parameter when calling the workflow.
The following workflow obtains network adapter, disk, and volume information:
workflow Get-CompInfo
{
Get-NetAdapter
Get-Disk
Get-Volume
}
To cause the workflow to set a checkpoint, I call the workflow with the –PSPersist parameter, and I set it to $true as shown here:
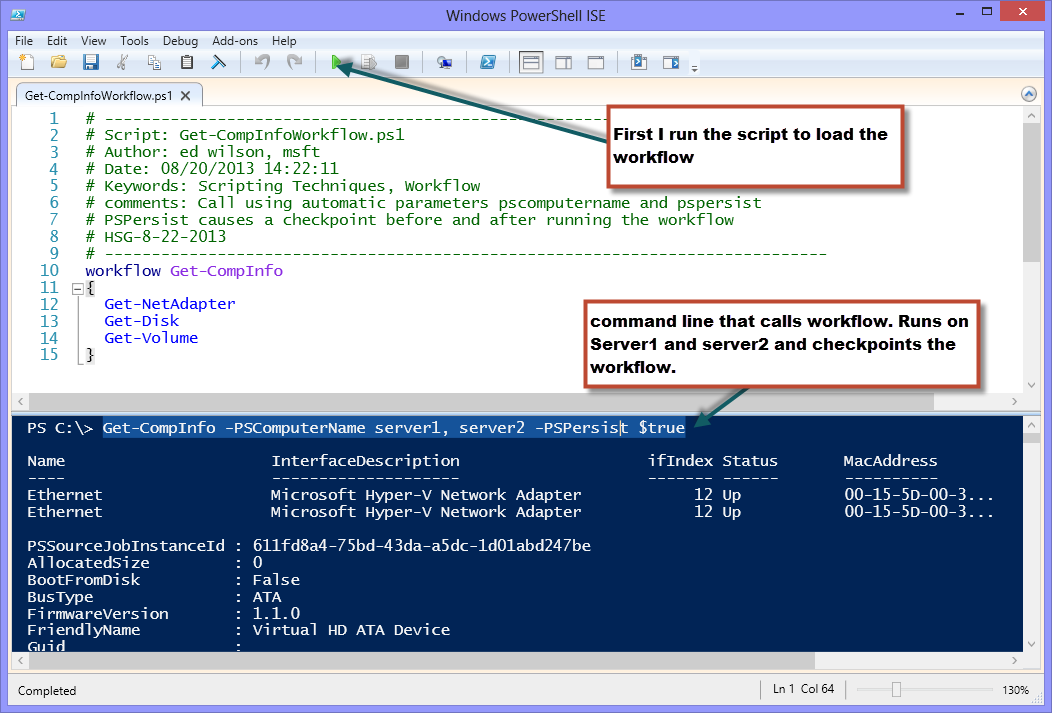
Get-CompInfo -PSComputerName server1, server2 -PSPersist $true
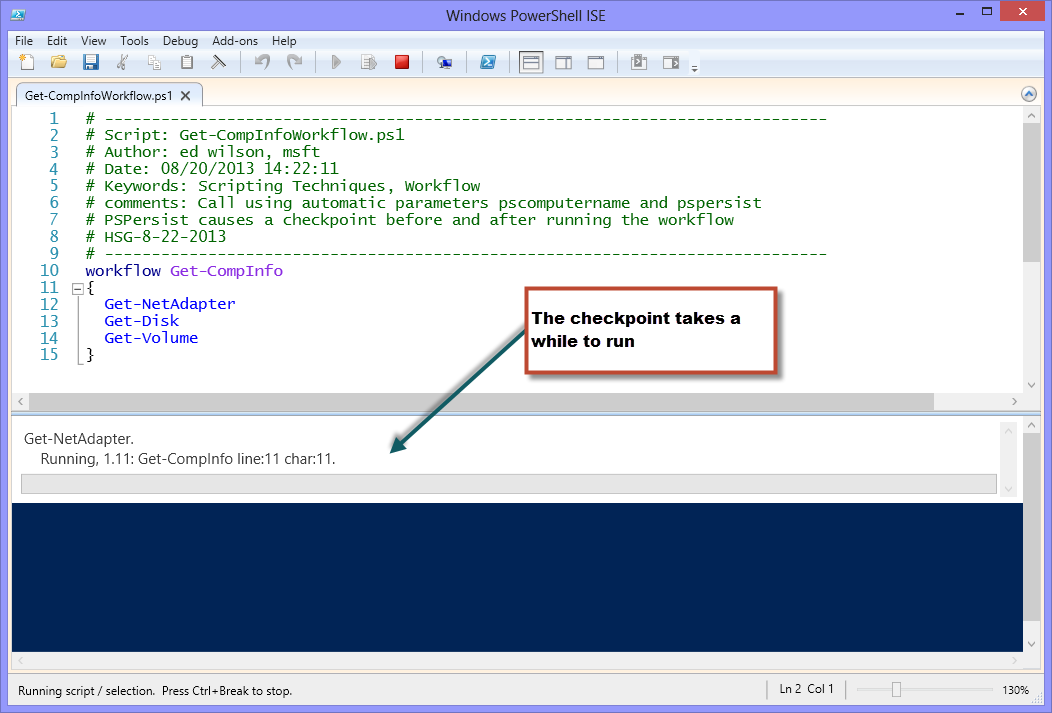
When I run the workflow, a progress bar appears. It takes a few seconds due to the checkpoints. This progress bar is shown in the image that follows.
After the checkpoints, the workflow completes quickly and displays the gathered information. The following image shows the output and the command line that I used to call the workflow.
Checkpoint activity
If I use core Windows PowerShell cmdlets, they pick up an automatic –PSPersist parameter. I can then set a checkpoint for my workflow at the activity level. I use the –PSPersist parameter the same way that I do if I use it at the workflow level. To cause a checkpoint, I set the value to $true. To disable a checkpoint, I set it to $false.
In the workflow that follows, I set a checkpoint to occur after the completion of the first and third activities.
workflow Get-CompInfo
{
Get-process -PSPersist $true
Get-Disk
Get-service -PSPersist $true
}
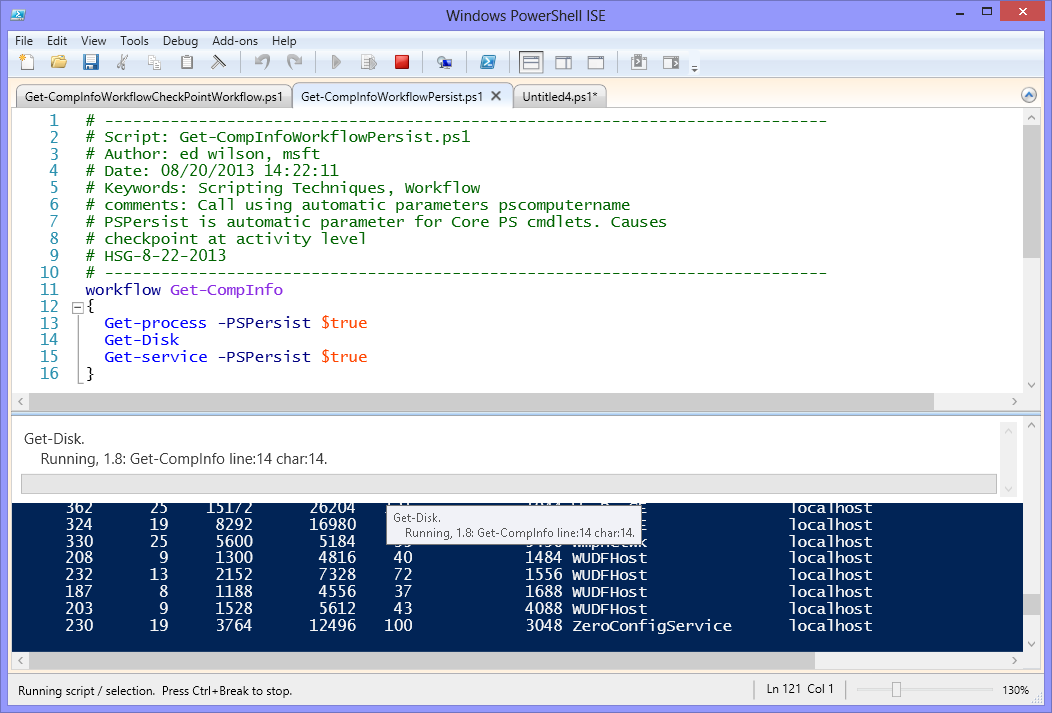
The workflow obtains process information, and then the workflow takes a checkpoint. Next, disk information and service information appear and the final checkpoint occurs. In the image that follows, the progress bar indicates a checkpoint in progress. But in the output pane, process information appears. This indicates that the Get-Process cmdlet ran prior to the checkpoint.
Using the CheckPoint-Workflow activity
The CheckPoint-WorkFlow activity causes a workflow to checkpoint immediately. I can place it in any location in the workflow. The big advantage of the Checkpoint-Workflow activity is that I can use it to checkpoint a workflow that does not use the core Windows PowerShell cmdlets as activities. This means that, for example, I can use a workflow that includes Get-NetAdapter, Get-Disk, and Get-Volume, and still be able to checkpoint the activity.
I need to use Checkpoint-Workflow because no –PSPersist parameter adds automatically to the non-core Windows PowerShell cmdlets. Here is my revised workflow:
workflow Get-CompInfo
{
Get-NetAdapter
Get-Disk
Get-Volume
Checkpoint-Workflow
}
AP, that is all there is to using checkpoints with Windows PowerShell workflow. Windows PowerShell Workflow Week will continue tomorrow when I will talk about more cool workflow stuff.
I invite you to follow me on Twitter and Facebook. If you have any questions, send email to me at scripter@microsoft.com, or post your questions on the Official Scripting Guys Forum. See you tomorrow. Until then, peace.
Ed Wilson, Microsoft Scripting Guy


