Adding mount points to a WSFC SQL Cluster ( FCI ) Instance
In this blog post I will look at how you can add a mount point to a Windows Server Failover Cluster and use that mount point for SQL Server 2005 and later installations. I already have the SQL FCI setup and configured, so at this point all I am going to do is add the mount point.
The first step is to open up diskmgmt.msc and look at the available drive for the mount point. Since this is on my laptop I have a specific VM setup just to share disks. I created an iSCSI disk on that VM and make it available to my cluster. At this point the drive doesn’t have a drive letter or mount point associated with it.
Next, I am going to go out to my M drive and create a folder to use for my mount point. There are a couple of things to make note of here. First – my M drive is a resource on my cluster. When SQL fails over from one node to another, so does my M (data) and L (log) drives. Since I am putting the mount point on a clustered resource, I ultimately have to make the mount point a clustered resource and I must make it dependent upon the SQL Server service itself. I have created a folder in my M drive named MountedDrives which I will use as an entry point for the drive I plan to mount.
Here is what my SQL Server Failover Cluster Instance (FCI) configuration looks like. I have 2 nodes in the cluster (FarmFCIA & FarmFCIB). FarmFCIA is the current owner and my disks 2 & 3 currently belong to that node. Disk 1 (my quorum disk) is currently on node FarmFCIB.
Before I add a pointer to the mount point to FarmFCIA, I must first add the unassigned disk to the WSFC. Right click on Storage and select ‘Add a Disk’. My available disk shows up and I add it to the cluster.
At this point, the resource is available to the cluster but it is not assigned to a cluster resource group. Right click on the disk, select More Actions, and then ‘Move this resource to another service or application.’
Choose my SQL Server resource and select OK.
At this point, a drive letter has been added to the drive. However, we want to mount this drive in a folder on the M drive, so we aren’t quite done yet.
Open up diskmgmt.msc and choose ‘Change Drive Letter and Paths’ on the drive we intend to mount.
Navigate to the folder that we plan to mount the drive in and choose ‘OK’.
Now the cluster disk shows up as a mounted volume in Cluster Manager.
Next, I will add a dependency so that my mount point clustered disk relies on Clustered Disk 2 (the M drive where the mount point lives). In this setup, my SQL Server service relies upon my Clustered Disk 2 (my M drive) and Clustered Disk 3 (my log drive).
The SQL Server resource also must depend on Cluster Disk 4, which I am not showing here.
Failover the active node so that it lives on my secondary node, in this case FarmFCIB. Note that at this point the mounted drive will no longer be visible in My Computer.
I can navigate on node FarmFCIB and see that the drive has failed over.
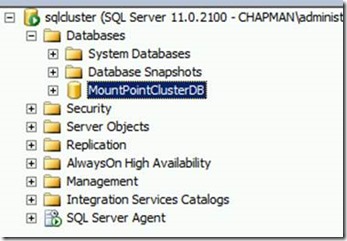
To test the new drive, I’ll connect to my cluster resource name, SQLCluster in SSMS.
Create a new database that lives in the mount point location.
Failover the node again so that active node is currently FarmFCIA.
Refresh the Databases list in SSMS to ensure my database comes back online. Voila! A working mount point!
Thanks!
Tim Chapman, MCM
Comments
Anonymous
August 28, 2013
what about ntfs permissions? You have not addressed that issue in this article. As shown above this will work if your SQL server runs under an account that is a local administrator. If your SQL Server service account is not a local admin (which it should not be) then you will run into permission issues when you attempt to create databases in the new mountpoint location.Anonymous
September 09, 2013
Hi, Thanks for your comment. You're right, I didn't cover permissions in this post - and your comment is correct. I just happened to not have covered security permissions in this post. Thanks again, TimAnonymous
April 16, 2015
From my experience as I recall, you have to apply the NTFS permissions to the root of the new volume while it has a drive letter applied to it. Sub-folders and files you can modify permissions after it has been moved to be a mount point still. Otherwise, attempts to change the permissions of the root, will instead be applied to the folder your volume is mounted in. You should also consider adding some mention of why it is so important to make sure you set up the dependency of this new volume on the disk that you are mounting it to. If it tries to mount before the other disk mounts, it will fail, and will leave the folder you were mounting to open, and any files created, will be written to that folder, causing it to no longer be an empty folder, preventing future attempts to mount your volume to it.


