Authentication with Azure AD for Azure Resource Manager with Python – The single tenant app approach
This is the Azure Single Tenant application approach where one deploys the application in their own subscription to manage and automate workloads.
While the steps to register the application remains same, we need to add the Application as a contributor to the subscription. We have seen that using the REST API in the previous blog post, here we will use Azure CLI command line and certificate based authentication.
The application can retrieve the Auth code using the Application secret as well, however that may not be the preferred method as you will be storing the secret in the application code/config most likely.
More details of the client secret based approach is present in the following link in the previous blog post.
Let’s assume you have the application registered with your AD, next step will be to give access to the subscription.
Step 1: Add the application as Service principal to the subscription
Please note you could add this to multiple subscriptions that you have the rights to manage.
On your Linux VM, run the following commands:
Create a service principal for your
azure ad sp create <<client ID of the application>>
This command will return the ObjectID of the application, please make sure you copy this as you will use it for the next step
Assign Contributor role to the subscriptions
azure role assignment create –objectId <object ID>-o Contributor -c /subscriptions/{subscriptionId}/
Step 2: Update the manifest.json file with the certificate for certificate based authentication:
On your Linux VM:
Create the certificate, public and private key:
openssl req -x509 -days 3650 -newkey rsa:2048 -keyout azkey.pem -out azcert.pem
This creates two files, the azkey.pem file with the private key and azcert.pem file with the certificate and public key.
Please run the following command to export the certificate thumbprint and Base64 it.
echo $(openssl x509 -in cert.pem -fingerprint -noout) | sed 's/SHA1 Fingerprint=//g' | sed 's/://g' | xxd -r -ps | base64
Run the following command to export the public key of the certificate.
tail -n+2 cert.pem | head -n-1
On the portal, under your application configure tab, click on the manage manifest option and select download manifest
It will download a JSON file which has basic details of your application registered with AD. We will modify this JSON file to add the thumbprint and the public key of the certificate we will be using to authenticate the application with Azure AD.
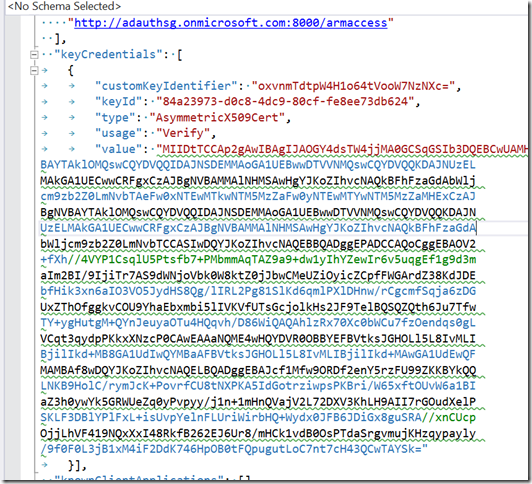
In the manifest, update the keyCredentials file with the certificate details (please note , copy paste the values as is from your VM and do not add/update/delete spaces)
keyCredentials": [
{
"customKeyIdentifier": "Base 64 thumbprint",
"keyId": "GUID generated ", (you can use uuidgen –r to generate a GUID)
"type": "AsymmetricX509Cert",
"usage": "Verify",
"value": (Paste the public key value here”
Your JSON file should look like the one below:
Save the JSON file and upload the file using the Upload manifest option. Please make sure it uploads successfully. If it gives an error without specifying the field name, it’s probably because there is an additional character that has been added. Please make sure you have copied the thumbprint encoded & the public key value as is. If you have, try using another editor.
Make sure you save the private key in a location where you can reference it in your code.
Following code snippet shows how to obtain the Access token from AD based on certificate:
The client_det dictionary hold the tenant_id, client_id of the application.
endpoint = 'https://login.windows.net/' + client_det['tenant_id'] + '/oauth2/token'
jwt_token_body = {}
jwt_token_body['aud']='https://login.windows.net/'+client_det['tenant_id']+'/oauth2/token'
jwt_token_body['iss']=client_det['client_id']
jwt_token_body['sub']=client_det['client_id']
dt_now = int(time.time())
jwt_token_body['nbf']= str(dt_now)
jwt_token_body['exp']=str(dt_now +600)
jwt_token_body['jti']= str(uuid.uuid1())
privateKey = open(CERTIFICATE_KEY_PATH,'r').read()
headers = {'x5t':'oxvnmTdtpW4H1o64tVooW7NzNXc='}
#cert_str = "-----BEGIN CERTIFICATE-----"
#cert_obj = load_pem_x509_certificate(cert_str, default_backend())
#public_key = cert_obj.public_key()
#private_key = cert_obj.private_key()
client_assertion_val = jwt.encode(payload=jwt_token_body,key=privateKey,algorithm='RS256',headers=headers)
payload = {
"grant_type":"client_credentials",
"client_id" : client_det['client_id'],
"client_assertion_type":"urn:ietf:params:oauth:client-assertion-type:jwt-bearer",
"client_assertion":client_assertion_val,
"resource":_resource
}
else:
endpoint = 'https://login.microsoftonline.com/' + _tenant_id + '/oauth2/token'
payload = {
'grant_type': 'client_credentials',
'client_id': _client_id,
'client_secret': _client_secret,
'resource': _resource
}
response = requests.post(endpoint, data=payload)
#print('response content ' + response.content)
json_val = json.loads(response.content)
access_token_det = {}
if (response.status_code == 200):
access_token_det["access_token"] = json_val["access_token"]
access_token_det["status"] = "1"
access_token_det["exp_time"] = json_val["expires_in"]
access_token_det["exp_date"] = json_val["expires_on"]
access_token_det["accessDetails"] = json_val
else:
access_token_det["details"] = str(response.status_code)
access_token_det["status"] = "0"
return access_token_det
The application creates a JWT token, which follows the following structure
jwt_token_body['aud']='https://login.windows.net/'+client_det['tenant_id']+'/oauth2/token'
jwt_token_body['iss']=client_det['client_id']
jwt_token_body['sub']=client_det['client_id']
dt_now = int(time.time())
jwt_token_body['nbf']= str(dt_now)
jwt_token_body['exp']=str(dt_now +600)
jwt_token_body['jti']= str(uuid.uuid1())
Make sure the audience claim (aud) is same as the endpoint, and you add the header with the certificate thumbprint.
Encode the token using the jwt.encode() method and pass the private key as the parameter for key.
jwt.encode(payload=jwt_token_body,key=privateKey,algorithm='RS256',headers=headers)
Then create the payload as the following:
payload = {
"grant_type":"client_credentials",
"client_id" : client_det['client_id'],
"client_assertion_type":"urn:ietf:params:oauth:client-assertion-type:jwt-bearer",
"client_assertion":client_assertion_val,
"resource":_resource
}
You will notice it is different from the client secret based payload which is in the else part:
payload = {
'grant_type': 'client_credentials',
'client_id': _client_id,
'client_secret': _client_secret,
'resource': _resource
}
Once you get the access token, you can proceed to deploy or manage ARM infrastructure on Azure as explained in the next blog part.
We will look at the user-based authentication along with the deployment description in the next post.

