SharePoint 2010 Apps for n00bs – Workflows
Another integral feature in SharePoint is the “workflows” concept that has been baked into the system since ye olde times and they’re basically just data-oriented application processes that can run automatically (or manually) when data changes. Specifically, they normally run important data operations that define how the business operates. Workflows are normally associated with a list, are triggered automatically when data changes in the list and the idea is they are basically automatic processes for the business that run as autonomously as possible.
For our pet store we’re going to try automating a key process – stock control. In plain English we want the following process when there’s been a new sale:
- Subtract store quantity for sale amount in inventory
- Warn people that care if stock reaches a low limit
- Confirm sale is OK (i.e. someone else didn’t take the last item(s) just before you).
All of that we want to just happen when we add a new sale item in our list.
Demo App Prerequisites
For any of this to work we need to add a new column to our “inventory” list – “quantity in store”. Also we want a new column on “Sales” – “Sale confirmed” (yes/no) to be populated by the workflow itself. Create these columns and add some fake quantities to your stock items, otherwise none of this example stuff will work.
What Will the Workflow do?
We want stock to be automatically taken care of so to be precise, we want a workflow to do the following when someone makes a new sale:
1. Check we’re only running the workflow on “new” items only.
o Done by comparing the “created” and “modified” dates on the “current item” (workflow talk for “item that’s changed & the reason I’m even running”).
o We want to do this because it is possible to set workflows to only run on “create” but there is the possibility it can be triggered other times too – like manually for example, so we want to take this into account.
2. Update the stock-levels as appropriate.
3. Email some people when stock gets low.
Creating the Workflow
First up we’re creating a workflow for a list – specifically “sales” and we’re going to do it in SharePoint Designer (SPD) again so open SPD & navigate to the “sales” list we created back in tutorial 1. You can create completely custom-coded workflows in Visual Studio but that’s way too advanced for this tutorial so for now we’re going to use the very simplified SharePoint Designer workflow Designer – it’s so easy even my grandma could manage it.
The first thing to notice is there are no workflows for this list, but that’s where we’re going to see any we make & publish for the list.
To begin making a new workflow, click this button:
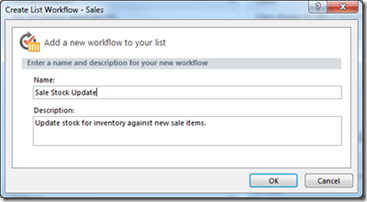
You’ll be asked to give a name for the new workflow; fill it out something like this:
You’ll now be presented with this, a blank editor for our 1st workflow!
Structure the Workflow Tasks
The first thing I want to do is outline our three major actions this workflow will do:
- Load & validate what just happened.
- Update data
- Notify users of low stock
So let’s do that as 3 major “steps” – click the “Step” button in the toolbar. Bear in mind whatever you insert will be inserted wherever the orange cursor is set, so don’t do this…
It is possible to nest steps in steps; for now just put 3 steps in like so:
Note: you can click on the step title to change it. Amazing! Next, to actually put some “code” in.
Load & Validate the Data
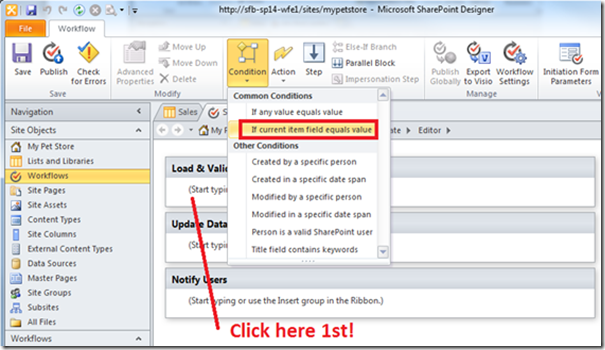
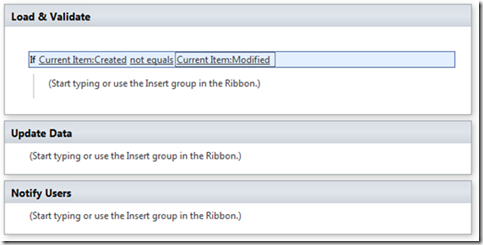
As we said before we want to load & validate the data we’re passed before doing anything; specifically we want to check the “created” and “modified” dates on the “current item” are the same so let’s add a new condition in the 1st step:
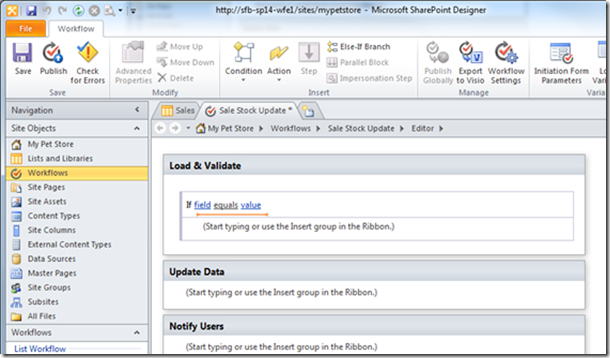
…which should give us this:
Now those two links are clickable, and need to be. Because we inserted an “If current item field…” then SPD knows we’re talking about the current item.
Current item by the way just means “Item this workflow is executing against because a [verb] just happened” – where [verb] could be “insert”, “update”, or even “manually launched”.
So it should be self-explanatory at this point, but select “created”…
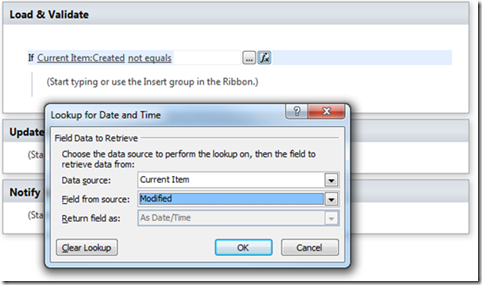
Next we’re only interested in taking a branched action if the dates don’t match, so click on “equals” and change to “not equals”. Now we need to specify is what “created” needs to be compared against so click “value” link and you’ll see this:
Here we can specify either a function or a concrete data lookup to compare against. Seeing as we’re comparing a concrete lookup (same item, different field) click the “fx” button and fill out the next form like this:
Click “OK” and your workflow should look like this:
Congratulations, you’ve made your first “IF” statement. Yay! Next to make something happen when our condition is met.
Set the WF cursor to inside the condition block and type (without quotes) “stop”, like so:
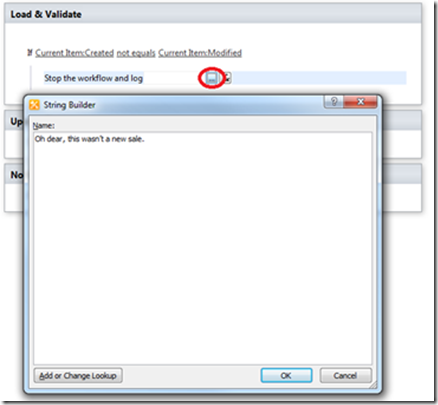
…and press ENTER. SPD will set the command and allow you to pass a “message” parameter – click it and set a message like “Oh dear, this wasn’t a new sale”, like below:
Notice you’re using the string-builder here – you can mix dynamic (data) & static (text) elements here.
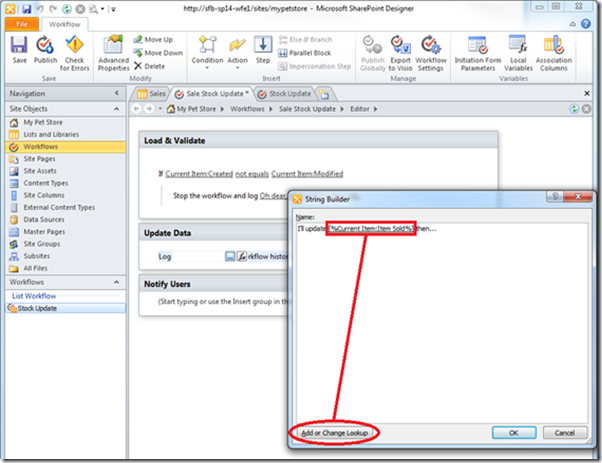
Next for the next step (Update Data) we’re going to just output some text for now & test our not-really-so-awesome-yet workflow so add the following step (Log to History):
Let’s insert the item being sold name into the log too, just because we can:
Now when you click ok, we want to save the workflow.
Save & Publish Your Workflow
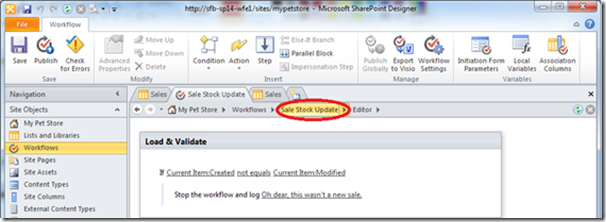
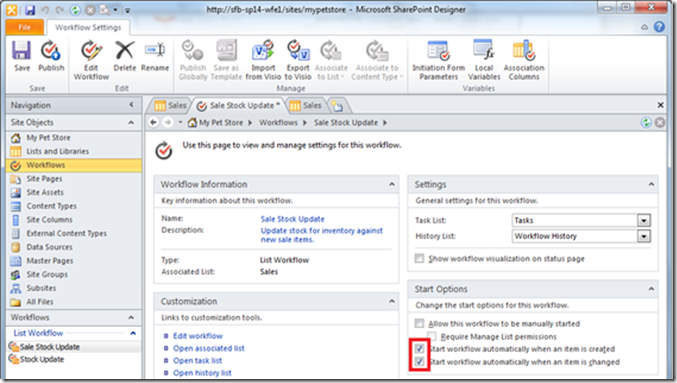
So anyway, let’s test it now so we can see how workflows even look like. But before we do any of that we need to configure when our workflow is run automatically so click on the original workflow to get back to its configuration, as so:
From here let’s set the WF to be triggered on new & update – if only to test our infallible sanity checking coded into the WF itself:
Now we want to publish the workflow now everything’s ready for our test-run. What’s the difference between saving & publishing? Save will stop you losing any work; publish will actually make any changes since the last publication live – if you’re ever wondering why your workflow seemingly ignores you, it’s probably because you’ve only saved it. So click “Publish”!
Let’s do a Test-Run
Now we have a published & primed workflow let’s see the awesomeness in action. In the browser, go to your “sales” list. Add a new item; fill in anything you want – we just want to invoke the workflow which we can see when we do:
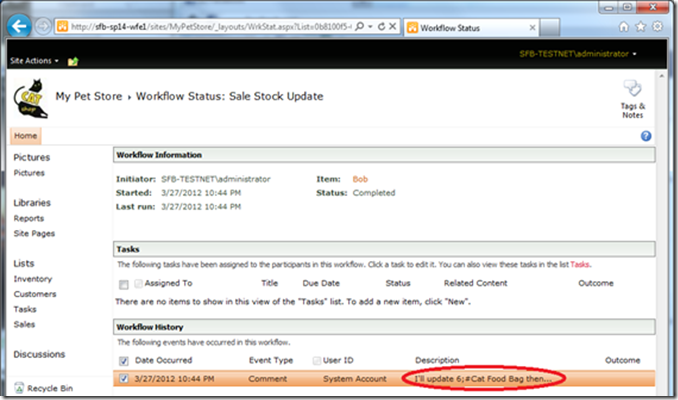
That column shows the status of the workflow (it’s actually a virtual column but more on that another day). Click on it and we can see the result of that workflow. Note that sometimes you have to refresh the list in browser to see “Completed” reported.
Here we can see what route our workflow execution took – the description of the sold item is a bit odd as in this example, to save some time we’re just flattening out the related record to text, which includes all the ID field too hence the weirdness. It’s possible to grab a specific property; we’ll look at that later – the important thing is we see some kind of audit/tracing going on with the data we’re reading.
Anyway to test the sanity checking of our workflow, go back to the sales list but this time edit the sale instead of creating a new one.
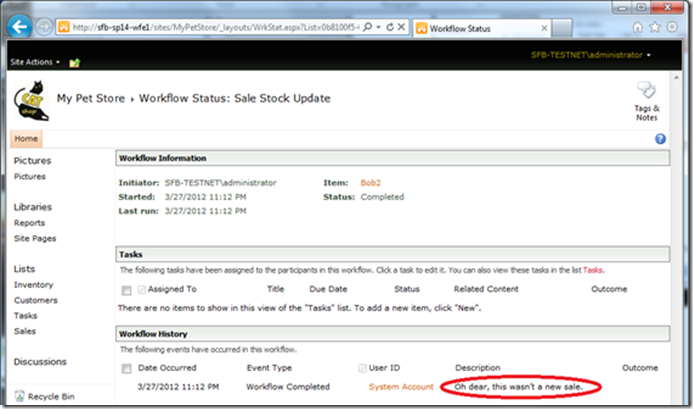
When we edit a sale, the history shows us this:
Tada!
Read in Inventory Stock
So now we know our workflow works and we’ve covered how to debug them, let’s actually get it to do something useful – the first step of which is actually getting the WF to do what it says on the tin – update the stock level, but to do that we need to know what the current stock-level is for our associated inventory item.
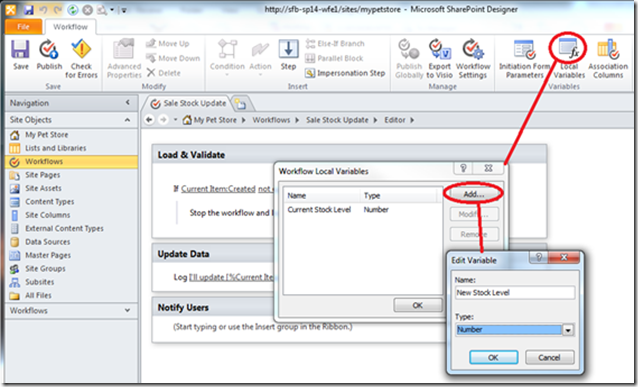
Now first, let’s create 2 variables – one to hold the current stock level, and another to hold a new stock level. The first one isn’t desperately necessary but holding the current level in a variable means we can also log the value to the workflow history for debugging purposes.
Anyway, we create the variables in the “Local Variables” dialogue. Add like so:
Now once you’ve added these two number variables we’re going to set the “current stock level” var. Set the next action in “Update” data as “Set variable” by typing “var” and pressing ENTER like so:
When you press ENTER you’ll be able to select which one; pick the “Current Stock Level”.
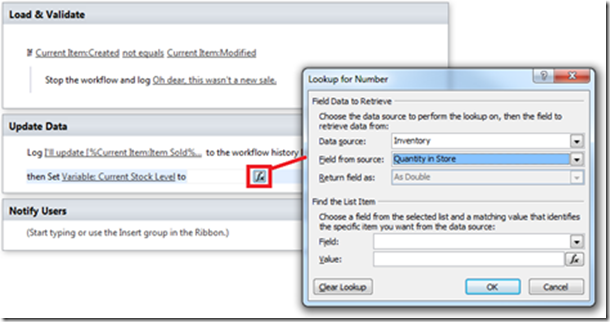
The next step is where it gets interesting, because we’re reading from a record that isn’t the current one or even in the same list – we’re reading from our inventory list. This means we have to tell SharePoint how to find the inventory record we want. Anyway for now, set the “lookup” for our variable setting as so:
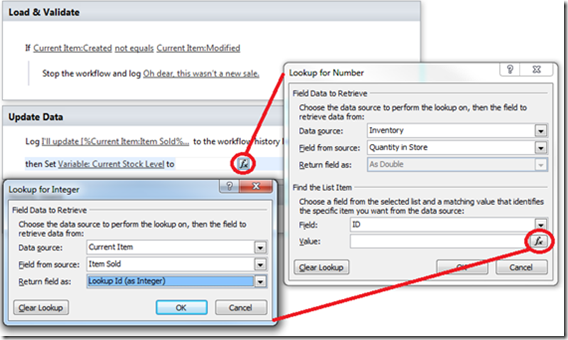
This tells SharePoint Designer which value from the inventory list we’re going to insert into the variable. Next we need to tell SPD how to find the record we’re interested in which we do in the 2nd part of this dialogue “Find the List Item”. In short, we’re going to find the inventory item by ID as it’s a unique value always so where it says “Field” select “ID” – the fields in this list are from the inventory list. Next we need to match inventory ID to a value in the current item and we do this by clicking the “fx” button at the bottom-right (the lookup button). Make your form look like this:
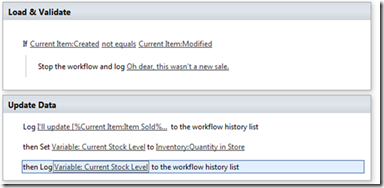
…and say “OK” to all forms. To make sure the variable is being read in ok we can output the value to the workflow history if only temporarily.
...and here’s the result:
This is an important step; it shows we can debug our workflow if necessary (it will be if you get into writing these things).
Set New Stock Level
So let’s delete the last “log to history” task because we know it now works…
…and now let’s add a new command “Calculate Variable” – this is where we’ll do our super-complex maths of “New stock level = old stock level – order quantity”. So click in the right location:
(Starting to type while the cursor is here will enter a new action)
The command is “calculate”, and we take the variable “Current Stock Level”, minus the “current item (sale) quantity” and output to our other variable “New Stock Level”.
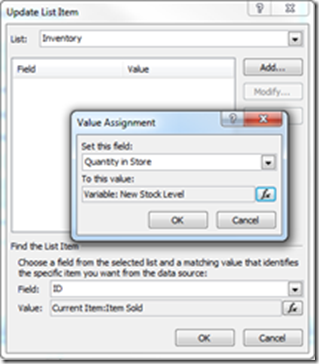
Finally, one more step – “Update List Item” the action is called.
We’re updating not the current item, but another record – the sale item. We need to locate it – just as we did before and also set the new stock level quantity to our variable value.
Your WF should look like this now:
Let’s test it!
Testing Stock Updates
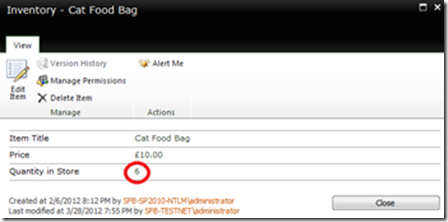
As before let’s make a new sale, but let’s also make sure there is some stock first…
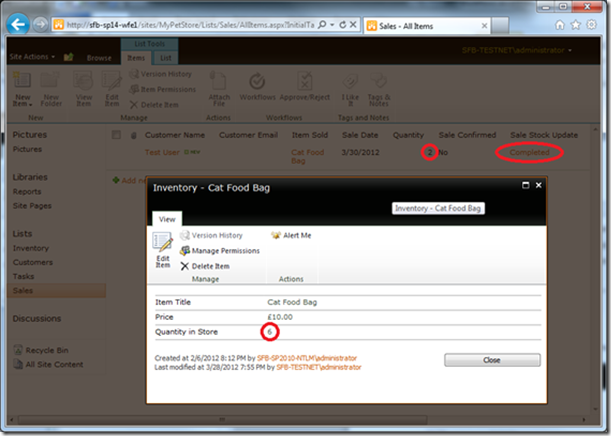
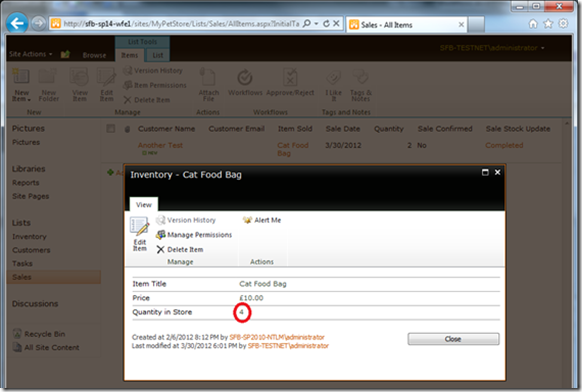
If we buy 4 of these, there should be 2 left, right? Right?! Let’s save our workflow and test it.
Well this is odd; the workflow’s complete but it’s not updating. Why?
Well because we didn’t publish the changes so it’s our last-published workflow running still. A common mistake to make, worry ye not.
So publish it and try again…
Yay!
Send Email Notifications
Last things to do then should be easy.
1st thing in the “notify users” block – an “if” statement that says:
“If there are less than 3 items left in inventory, alert people with an email.”
So insert a new condition, and in the condition block add “email” action (without specifying how/who) like so:
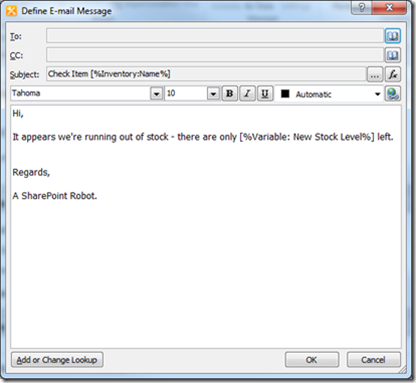
Click the “these users” link to begin defining an email to be sent automatically. Here’s where we’re going to generate a nice automatic email to send to a group of people with auto-generated messages just like we did above. Fill it all out like so, adding lookups where we need dynamically inserted data:
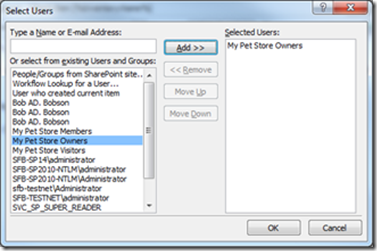
Now in the “to” field, click the address-book. This will show all the contacts relevant to this site; we can email 1 user in the system or out, or a whole group, or several combinations of the two. Let’s email anyone in the Pet Shop “owner” SharePoint group.
That’s it; the SharePoint emailing robot (assuming it’s been setup by your administrator) will now do thy pet-shop bidding.
Set “Sale Confirmed” Flag
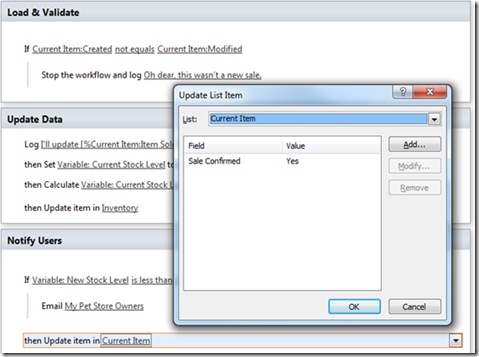
Finally, and as a last step we’re going to set the “Sale Confirmed” flag as “true”. You’ve done this already, but here it is:
This last step means we’re assuming that if we got there, it all went well. It’s something of an assumption but this isn’t a lesson in system design so it’ll do for now. Publish & test…
If the email doesn’t arrive, there’s not much more you can do than speak to your SharePoint administrator – it’s setup at a farm level so way, way outside your control in this instance. You as the programmer though don’t care; someone else can deal with actually making the email arrive where & when it should.
Wrap-Up
That’s it for now. The idea was to give a basic idea of debugging, decision-making & performing actions all automatically for a list. You should have a basic understanding of how workflows work. For serious workflows that SPD can’t/won’t be able to do, there’s always Visual Studio too but that, like many other subjects in SharePoint, is for another day. Congrats on programming your first workflow!
Comments
Anonymous
June 04, 2014
This has been very helpful. If a user mistakenly puts in the wrong amount and then tries to reenter the correct amount, will the workflow automatically adjust the quantity in stock?Anonymous
June 29, 2014
I'm not sure it would in my quick & dirty example here but certainly you could build in that logic if you spent some time designing it well enough :)


