Git- Integration With Visual Studio 2013
In my previous post, I did an intro to Git, what it is, what the basic commands are in the Command Prompt, and the general cycle of adding and committing files. In this post, I want to show how Visual Studio 2013 integrates Git into the IDE. This way, you are not responsible for manually opening up the Command Prompt and making commits. Visual Studio can make this easier and quicker for you. So, let’s go ahead and get started. If you would rather watch this in video form, you can use this YouTube Video.
First off, if you don’t have Visual Studio 2013, you download VS Express 2013 for free here. If you have a Bizpark account, Dreamspark account, or MSDN Subscription, you can also download Visual Studio Ultimate, Professional, etc. here. I won’t walk through the installation process here, but If you are installing Visual Studio for the first time, just know that the process is pretty straight forward.
Now that we have Visual Studio installed, we can start by creating a new project. To do this, open up Visual Studio, and go to File->New->Project. I am going to create a new Universal Project under visual C#, but it doesn’t matter what kind of project you create. The main thing to notice when your new project however, is the checkbox that asks whether or not you want to use source control in the bottom right hand corner.
You could go ahead and check the box, “Add to Source Control”, but for this example I am going to skip this for now. If you did however, this would initialize your project as a Git Repository. This accomplishes the same thing as using the “git init” command in the command prompt. Again, this is helpful because you wouldn’t have to manually open up the Command Prompt and do this yourself. I did say I was going to skip this for now, so I will create my project without selecting this check box.
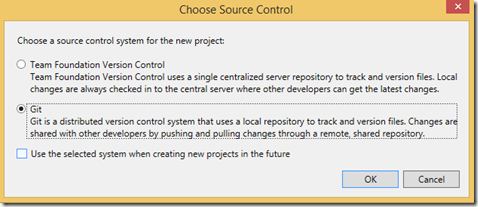
I wanted to skip that check box for now to simply show you that you can add your project to source control at any time. This means you can take any existing project and add to source control. To do this, go to File->Add to Source Control. After doing this, you will see a pop up menu asking which kind of Source Control you want to use, Team Foundation Version Control or Git. Since this article is about using Git, let’s go ahead and choose Git and then click OK.
What we have done is created a Git Repository for our project. Perfect. Now you could make changes and edit files in Visual Studio, but how do you make the actual commits? Remember the cycle we want to follow, Create/Edit Files->Add->Commit. . Let’s see how to make commits.
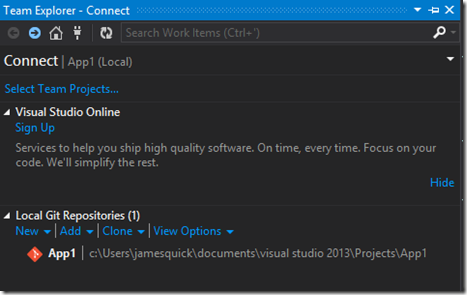
In Visual Studio, you want to find the Team Explorer window. You can find this under the View tab at the top. Once you pull it up, it should look like this.
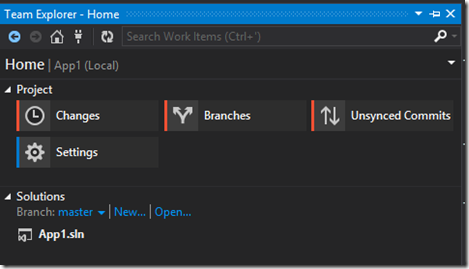
From here go ahead and click on your Git Repository. Mine is shone at the bottom of the above screenshot and is called App1 (a terrible naming convention I know). After opening up that repository, you should see this.
From here, click on “Changes”.
You should see a whole list of files that are ready to be committed. You will also see a folder for Included Changes (this currently includes all of my files) and a folder for Excluded Changes. You can choose which files get included in the commit and which ones don’t if you choose. This would be the equivalent of only adding certain files with “git add” before committing. Selecting which files to include is more or less the “Add” portion of our commit cycle.
In addition, you should see a grayed out “Commit” box right under the Changes heading. This box is grayed out because we need to a description of our commit to be able to commit. This text box is shown above with the temporary text saying “Enter a commit message <require>”. If you go ahead and enter a message, say “initial commit”, the Commit box will become enabled.
Now that the Commit button is enabled, you can click it to commit all of your files. After committing, notice that there is no longer a list of files that have been changed and need to be committed.
So that covers that basics of using Git integration in Visual Studio 2013. This is very useful because it takes away the need from you to have to manually open up the Command Prompt and give Git commands. Especially nice if you don’t like using the Command Prompt in general. Either way, knowing the basic command line commands is not a bad idea.
If you would rather watch this in video form, you can find the YouTube video here.
As always comment below with questions, comments, or concerns, or find me on twitter @jquickwit. Thanks!
Comments
Anonymous
October 05, 2014
Should this blog post have been titled - Using Git with TFS? The Visual Studio Git client has much more functionality and isn't dependent on TFS.Anonymous
October 05, 2014
Hey, i am trying to integrate my visual studio project with git. When i want to perform any action on my repository using VS i get this error: An error occurred. Detailed message: An error was raised by libgit2. Category = Tag (Error). This transport isn't implemented. SorryAnonymous
October 06, 2014
Agree with other comments - this is got via TFS. Would like a got with GitHub walkthrough, and especially dealing with merges, which IME is an unworkable mess.Anonymous
October 28, 2014
Hey Greg and Rich, thanks for the feedback. I might be misunderstanding the comments, but as far as I can tell, I am not touching TFS at all. I am simply making local pushes with GIT, completely independent of TFS.Anonymous
October 28, 2014
Mr. Zator, I'm not sure what that error is. Could you possibly send me a screenshot?Anonymous
December 17, 2014
Hi James, Thank you for the quick intro. It seems pretty simple to get started using VS2013 for local pushes. I assume all the complexity will come setting the server and permissions, right? Any tutorial on that? CheersAnonymous
December 18, 2014
Mr. Zator, I get that error when the remote repository is set up with SSH instead of HTTPS. You might need to change your remote repository formats.Anonymous
December 28, 2014
I have the same issue as Mr.Zator, getting that 'This transport isn't implemented. Sorry' error. And yes, the Repository URL I initially entered was ssh (https). So I changed my repository with just http, but in Visual Studio, now I don't see option to change the repository URL anywhere. When I try to push, I get the same error. Any idea, where I can edit the originally entered https url to the new http url?Anonymous
January 03, 2015
Hi James, thanks for the post I really found it useful. I've a little bit issue that in Update and Extensions of my VS there's another Git Extension "Git Tools by Yiyi Sun" and one is by TFS Team. Which one is better. I'm not finding that extension provided by TFS team, should I install that of Yiyi Sun?Anonymous
January 19, 2015
Great feature for those who are use to TFS and moving to Git. However, now that I've had some time to play & learn GIT on its own I find the VS integration a bit cumbersome. For example, I've found that the "Changes" view differs from what is returned when you run "git status" (so far "git status" has always been the expected changes). On the plus side, the ability to exclude files from a commit is extremely easy without stashing, which is great. Great work & keep at it (lots more Git features available to add to this tool)!Anonymous
February 16, 2015
I wonder why Visual Studio team keep wasting their time on implementing useless features. There are dozens of great GIT clients out there, while Visual Studio UI is itself already overwhelmed. The only unique feature that can be made only by GIT integration is highlighting differences with GIT index directly in text editor and in solution explorer. And this is the only feature that is NOT being done.Anonymous
October 11, 2015
Can we integrate Git Delphi? Thanks you


