Step By Step Guide to Supporting Large Meetings Using Lync Server 2013
One common complaint from my customers who switched from other web/AV conferencing solutions to Lync is the limited number of maximum participants (recommended at 250) allowed in a Lync meeting. It is a valid complaint and Microsoft addressed this by providing a way to support meetings up to 1000 participants. This posting is intended for new Lync administrators who are tasked with implementing support for large meetings.
Based on the Lync Server 2013 User Models and the recommended Server Hardware Platfoms, below are some of the guidelines regarding the Lync conferencing supportability:
- 250 is the maximum supported conference size hosted by a regular Lync Server 2013 Front End pool. (Note: 250 is not a hard limit, but a recommendation based on the scalability tests using the recommended hardware and software specifications. The tests were based on the Lync Server 2013 User Models. Thus, the actual usage may be different from the usage scenarios in the user model. The actual usage determines the actual server performance and conference experience. )
- 5% of users in a pool may be in a conference at any one time (e.g., a pool of 10,000 users could have about 500 users in conferences at one time).
- There shouldn't be any users homed on the large-meeting pool.
- A dedicated large-meeting pool can host only one meeting at the same time. In order to support more than one large meetings at the same time, Microsoft recommends setting up multiple dedicated large-meeting pools.
References:
- Lync Server 2013 User Models: https://technet.microsoft.com/en-us/library/gg398811.aspx
- Capacity Planning Using the User Models: https://technet.microsoft.com/en-us/library/gg615015.aspx
- The Conferencing User Model: https://technet.microsoft.com/en-us/library/jj205199.aspx
- Scalability Testing: https://technet.microsoft.com/en-us/library/jj205226.aspx
- Conferencing Load Distribution:https://technet.microsoft.com/en-us/library/jj204922.aspx
- Supporting Large Meetings Using Lync Server 2013: https://technet.microsoft.com/en-us/library/jj204894.aspx
These are the steps involved in supporting large meetings using Lync Server 2013 Standard Edition:
- Configuring the Topology
- Installing the Lync Server 2013 Standard Edition Server
- Creating and Configuring a New Conferencing Policy
- Enabling a Designated Meeting Account
- Scheduling a Test Meeting
Important: Implementing the large-meeting pool using Lync Server 2013 Standard Edition does NOT support the high availability features included with Enterprise Edition. To provide high availability, Microsoft recommends a two Front End Server pool (2 = minimum, 3 = recommended) with mirrored Back End Servers.
1. Configure the topology
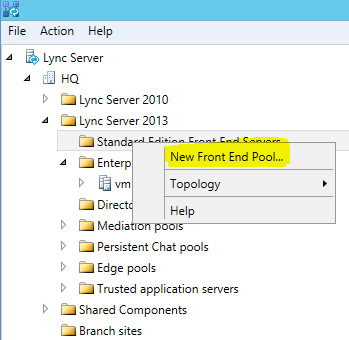
1.1 From the Lync Server Topology Builder, right-click on Standard Edition Front End Servers and then select New Front End Pool
Note: Make sure to update the current topology by selecting "Download Topology from existing deployment."
1.2 Click Next to continue
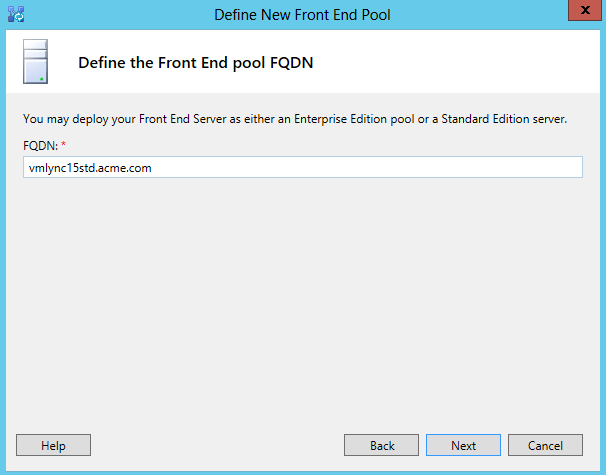
1.3 Type in the FQDN of the large meeting pool and click Next
Note: Create an internal A record that resolves the FQDN of the large meeting pool to the IP address of the Standard Edition server.
1.4 Select the additional features that you want to enable for the large meeting pool
Note: I'm not adding the Dial-in (PSTN) conferencing feature as this requires the voice-enabled infrastructure in place. However, you can add it if you have already deployed either Enterprise Voice or a Mediation Server and a public switched telephone network (PSTN) gateway. You can collocate the Monitoring and Archiving databases on the exiting SQL server.
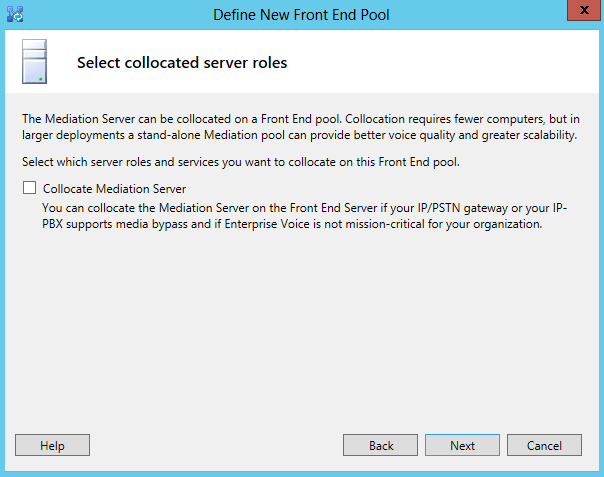
1.5 Leave the box unchecked and click Next to continue
Note: The Mediation Server role is not needed if you are not planning on enabling the Dial-in conferencing feature.
1.6 Check the box if you are going to associate the large meeting pool with the existing Edge pool (if already exist)
Note: The association with Edge pool is required only if you are planning on allowing external contacts to participate in the large meetings.
1.7 Click Next to continue
Note: With the Standard Edition sever, you will not be able to dedicate a backend SQL server.
1.8 Select Define a new file store and click Next to continue
Note: Make sure to create the file share before publishing the topology. You can also use the previously defined file store.
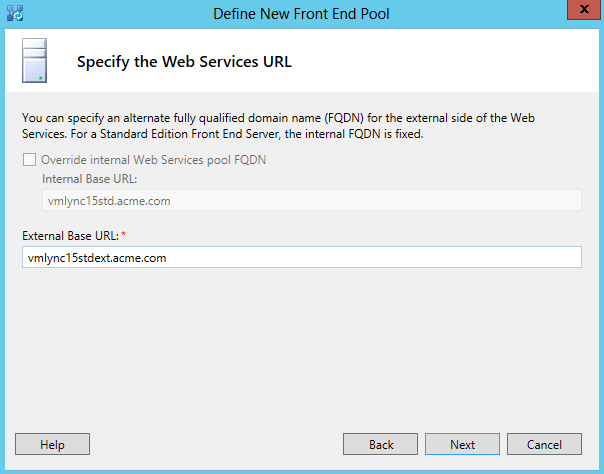
1.9 Type in the External Base URL for the large meeting pool
Note: The External Base URL is used for external meeting participants and the corporate users joining the meeting from outside the corporate network. This URL should be pointing to the IP address of the external reverse proxy.
1.10 Associate the large meeting pool with existing Office Web Apps server (if already exist) and click Next to continue
1.11 Select or define the SQL store that will host the Monitoring databases (LcsCDR and QoEMetrics)
Note: In the example below, I chose to leverage the existing SQL store from the main user pool. This makes it easier for the administrators to review the reports.
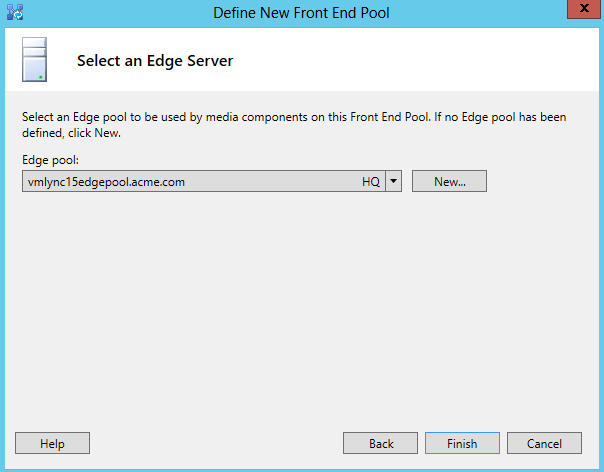
1.12 Select the Edge pool (if already exist) you want to associate with the large meeting pool and click Finish to complete the configuration
Note: The association with Edge pool is required if you want to allow external contacts or remote users to participate in the large meeting.
1.13 Verify that the new Standard Edition Front End server has been successfully added and publish the new topology
2. Install Lync Server 2013 Standard Edition server
2.1 Make sure the software and hardware requirements have been met:
- Server Hardware Platforms: https://technet.microsoft.com/en-us/library/gg398835.aspx
- System Requirements for Servers Running Lync Server 2013: https://technet.microsoft.com/en-us/library/gg398588.aspx
- IIS Requirements for Front End Pools and Standard Edition Servers: https://technet.microsoft.com/en-us/library/gg399038.aspx
2.2 Run Setup.exe and click Yes to install Visual C++ Runtime
2.3 Click Install (if okay with the default installation location)
2.4 Accept the License Agreement and click OK to continue
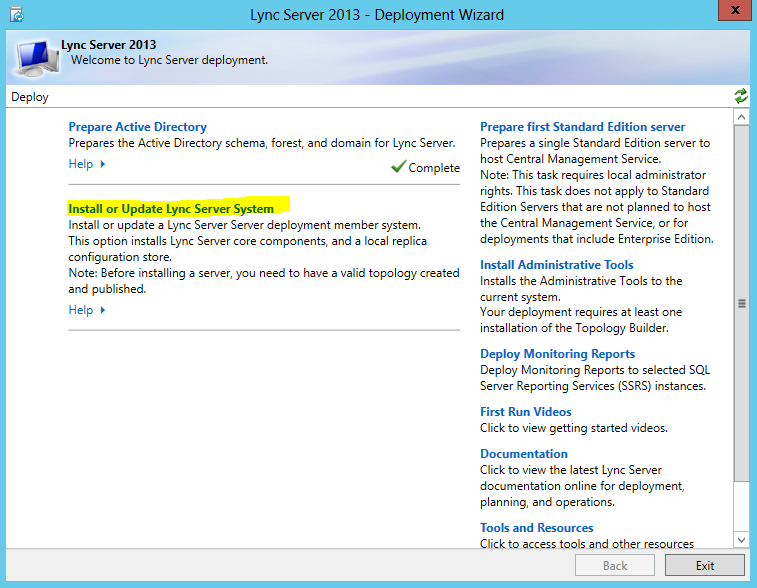
2.5 Start the Lync Server Deployment Wizard and click on Install or Update Lync Server System
2.6 Click Run under Step 1: Install Local Configuration Store
2.7 Select "Retrieve directly from the Central Management store" and click Next to continue
Note: This process copies the Central Management Store configuration to the local server.
2.8 Click Finish to complete Step 1
2.9 Click Run under Step 2: Setup or Remove Lync Server Components
2.10 Click Next to continue
Note: This process installs Lync Server components based on the retrieved Central Management Store configuration on the local server.
2.11 Click Finish to complete Step 2
2.12 Click Run under Step 3: Request, Install or Assign Certificates
2.13 Select the Default certificate and click Assign
Note: This step assumes that you already have the valid certificate installed on the local certificate store.
2.14 Click Next to continue
2.15 Select the certificate for the Standard Edition server and click Next to continue
2.16 Verify that you have the correct certificate and click Next to continue
2.17 Click Finish to complete Step 3
2.18 Verify the certificate assignments by expanding the Default certificate and click Close
2.19 Click Run under Step 4: Start Services
2.20 Click Next to start the services
2.21 Click Finish to complete Step 4
2.22 Make sure Step 1-3 have been completed successfully
3. Create and configure a new conferencing policy to be used for the large meetings
3.1 Create a new conferencing policy from the Lync Management Shell
3.2 Configure the newly created policy with the following settings:
- Set the MaxMeetingSize option to 1000. (The default is 250.)
- Set the AllowLargeMeetings option to True.
- Set the EnableAppDesktopSharing option to None.
- Set the AllowUserToScheduleMeetingsWithAppSharing option to False.
- Set the AllowSharedNotes option to False.
- Set the AllowAnnotations option to False.
- Set the DisablePowerPointAnnotations option to True.
- Set the AllowMultiview option to False.
- Set the EnableMultiviewJoin option to False.
Reference: https://technet.microsoft.com/en-us/library/jj205074.aspx
4. Enable the designated meeting account on the large-meeting pool
4.1 Create a user account (mailbox enabled) to be used as the designated meeting account
Note: This account is used for scheduling large meetings and should be the only account homed on the large-meeting pool.
4.2 Enable the designated meeting account on the large-meeting pool
4.3 Assigned the new conferencing policy to the designated meeting account
4.3 Confirm that the new conferencing policy has been successfully assigned to the designated meeting account
5. Scheduling a test meeting
According to the following TechNet article, the best practice for scheduling large meetings is to use the dedicated meeting account homed on the large-meeting pool:
https://technet.microsoft.com/en-us/library/jj205074.aspx
However, you can also have one of the Lync administrators schedule large meetings by using the Delegate Access feature in Outlook and enabling the Exchange delegate synchronization in Lync.
5.1 Configure the Global client policy to allow Exchange delegate synchronization
Note: You can also create a separate client policy and assign it to a specific group of users.
Set-CsClientPolicy -Identity Global -EnableExchangeDelegateSync $True
5.2 Log on as the designated meeting account and add the Lync administrators (responsible for scheduling large meetings) as delegates from Outlook
Note: This gives the Lync administrators access to the designated meeting account's calendar and allows them to schedule large meetings on his behalf.
5.2 Confirm that the person responsible for scheduling large meetings has the delegate access in Lync as well
5.3 Open the designated meeting account's calendar from Outlook and schedule a meeting
Note: As shown below, the meeting URL reflects the designated meeting account (largemeetingadmin).
5.4 Assign presenters to the scheduled meeting
Note: This option allows you to pre-assign presenters who will be sharing/presenting during the meeting.
The invited users will receive a meeting invite as shown below:
Refer to the following TechNet article for the best practice guidelines in running large meetings:
