Upgrading PerformancePoint Server 2007 to PPS 2010
Most of the customers who have been using PerformancePoint Server 2007 have accumulated several months, if not years, worth of dashboards and data. Their KPIs, grids, charts, scorecards, and custom objects have gone to good use, providing a great deal of corporate discussion about how to handle business decisions and to help plan for the future. And while the 2007 version of PerformancePoint helped to do this very well, the SharePoint BI 2010 version does it even better. Understandably, most companies want to build on top of their old dashboards in 2010. And the idea of starting from scratch is unthinkable. Fortunately, Microsoft has a nice migration path so that you can migrate all of your existing objects to the new version. The migration process is straightforward, but to help ensure that things go smoothly, we’ve created a set of steps to follow.
Microsoft supports two upgrade paths. The first is a version to version, in-place upgrade that involves launching an install of SharePoint 2010 right over the top of SharePoint 2007. The install detects the prior version instance and proceeds through the upgrade process. The second involves a version to version database attach scenario that allows you to attach a 2007 database to a new install of SharePoint 2010. Both methods work equally well. The latter method is ideal if you have new hardware for SharePoint 2010 and don’t need to re-use existing servers hosting 2007 versions of PerformancePoint/SharePoint.
Version 1 to Version 2 Database Attach
The steps involved with this scenario include the basic steps necessary to upgrade/prepare your MOSS environment by first backing up and then attaching your 2007 SharePoint content database to your 2010 environment. Then, for PerformancePoint, rather than attaching an existing database, you will use the 2010 migration tool to copy objects from the 2007 PerformancePoint database to SharePoint lists and document libraries, which house dashboards, KPIs, grids, charts, etc. in 2010. To get started with the database attach scenario, start with the following steps.
- If your scenario involves a new install of MOSS and you need to attach your 2007 MOSS content database before importing your PerformancePoint 2007 content, follow the steps in Backup, Restore, and Attach the MOSS Database.
- Continue with the steps in Importing PerformancePoint 2007 Content Using the Import Wizard.
Since the import utility migrates all PerformancePoint 2007 objects into flat lists, once the import is complete, you should arrange these objects amongst different lists within the SharePoint site collection before adding the lists to Dashboard Designer. This greatly enhances performance in Dashboard Designer and eliminates the need to parse through potentially thousands of objects in the same list. Additionally, you may want to use Dashboard Designer to organize them into manageable sections.
Version-to-Version In-Place Upgrade
The O12 to O14 in-place upgrade entails installing a new 2010 installation over the top of an existing 2007 installation. For the purposes of this guide, a 3m farm will serve as the example. The upgrade steps for a 1m farm are the same in that you only upgrade one machine and not several machines as you would in a multi-machine farm. The steps to perform this type of upgrade are as follows:
- There is an STSADM pre-upgrade command that evaluates the state of the farm to ensure that it can be upgraded. Run this command from the directory containing the STSADM tool (to %COMMONPROGRAMFILES%\Microsoft Shared\web server extensions\12\bin), and address any issues that it finds:
STSADM -o preupgradecheck
- Install the SharePoint 2010 pre-requisites on each of the servers in the farm that you plan to upgrade. From your existing 2007 WFE, open the installation directory for SharePoint 2010, and run the pre-requisite installer, called PreRequisiteInstaller.exe. This file is located in the same directory as setup.exe.
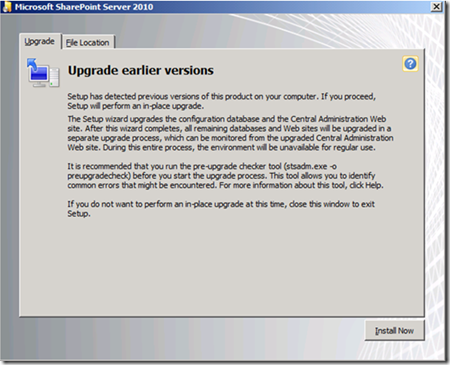
- When the pre-requisites have been installed, launch setup.exe. You should be prompted with a confirmation dialog like the one below. Continue with the install.
-
- On the EULA page, click “continue.”
- In the Server Type tab, select the radio button for the appropriate server type. This dialogue does not pick your server type by default. The server type should match the purpose of this machine in the 2007 farm.
- Select the radio button to perform an automated in-place upgrade, and click the Upgrade button.
- After the progress bar completes, close the dialog box.
Run all of the preceding steps for each SharePoint server in the farm. It is not necessary to run these steps on the database server.
Once the install has completed, run the SharePoint Products and Technologies Configuration Wizard, and proceed through the steps.
- Click OK on the popup dialog box stating that you have to run the configuration wizard on each server in the farm, and wait for the upgrade to finish.
- If you have more than one server in your farm, run the configuration wizard on the remaining servers in the farm. Do not run the configuration on more than one machine at the same time. After the configuration completes, you should see a dialog box, like the one below. This tells you that your databases were configured and that now the farm itself is undergoing the upgrade. You can check the upgrade status through Central Administration to monitor the rest of the upgrade process.
- Verify the upgrade. If the upgrade succeeded, you will not have seen any errors during the upgrade process, and the upgrade log file will not contain errors. The upgrade log file is here:
%Commonpgrogramfiles%\Microsoft Shared\Web server extensions\14\logs\upgrade-*.log
- Browse to a new SharePoint site collection, and either create a PerformancePoint subsite, or create a new PerformancePoint site collection in Central Administration.
- Import your PerformancePoint 2007 objects using the import utility. See Importing PerformancePoint 2007 Content Using the Import Wizard for specific steps.
- Once the import utility has completed, it is recommended that you arrange the migrated content into the meaningful lists and document libraries before using Dashboard Designer to re-deploy your dashboards.
- Touch up your imported dashboards in Dashboard Designer and re-deploy them to your new PerformancePoint site(s).
Importing PerformancePoint 2007 Content Using the Import Wizard
PerformancePoint 2010 comes with a migration tool that allows you to import your 2007 dashboard elements to your 2010 farm. The user running the import/migration wizard must be a SharePoint administrator on the PerformancePoint 2010 target site so that the user context running the wizard has the ability to create SharePoint security groups.
- Browse to the Manage Service Applications in Central Administration.
- Click on the PerformancePoint service application, associated with the web application, to which you want to migrate your 2007 dashboard elements. The default service app is typically called PerformancePoint Service Application.
- Use the Import PerformancePoint Server 2007 Content tool to migrate 2007 content. It will ask you for the location of your 2007 PerformancePoint database.
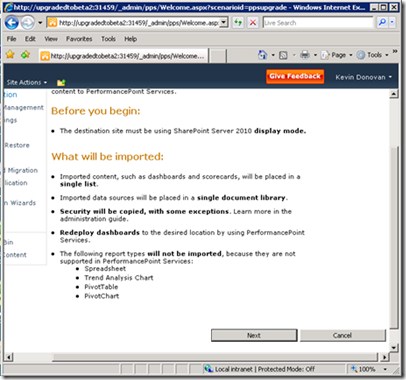
- Follow the instructions presented in the wizard. Note the contents of the initial splash page. Because of the architectural changes made to PerformancePoint in 2010, not all of the objects that existed in PerformancePoint 2007 will migrate seamlessly. There are a few manual steps involved. Most of those steps pertain to re-structuring the layout of objects in Dashboard Designer since the import wizard places all of them into a single list or document library. The other significant change pertains to the change in the security model. PerformancePoint 2007 secured dashboard elements using custom security groups managed in SQL Server. PerformancePoint 2010, on the other hand, uses standard SharePoint groups. To maintain the security experience, the wizard will create new SharePoint security groups based on those in PerformancePoint 2007.
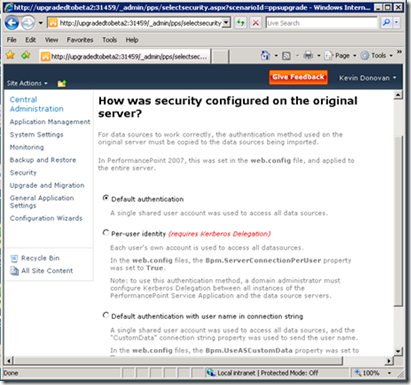
- The next step will ask about PerformancePoint 2007 security. Select the most appropriate authentication type based on your PerformancePoint 2007 installation.
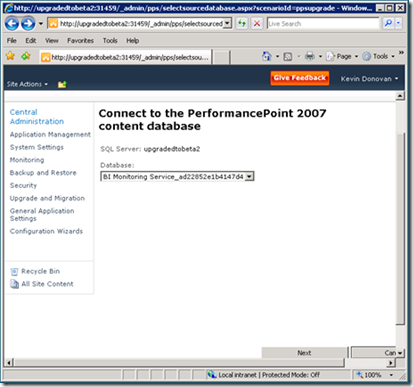
- The next step will ask for a login to the SQL Server name/instance where the PerformancePoint 2007 content was stored. Enter the credentials for a user who can read from the target server. The default PerformancePoint 2007 content database name should be some flavor of “PPSMonitoring.”
- Proceed through the next steps and select from the appropriate site collection, site, and list into which you’d like to migrate PerformancePoint 2007 data.
- Begin the migration. You will be unable to stop it once it has begun. The progress bar shows you how many objects have been migrated.
- Review and clean up security as needed. Security for migrated items will be set at the individual item level. Additionally, two new security roles will be created in the 2010 environment that match what existed in 2007: PerformancePoint Editors and PerformancePoint Readers. Users who were in these roles in 2007 will be placed in them in 2010. You may wish to arrange security to meet the architecture that already exists in 2010.
Backup, Restore, and Attach the MOSS Database
The following steps take you through the process of backing up, restoring, and attaching a MOSS database. It’s used primarily for version to version database attach upgrades.
Back up the SharePoint content database from the 2007 farm.
- Open SQL Server Management Studio, and connect to the SQL Server storing the content database that you plan to back up.
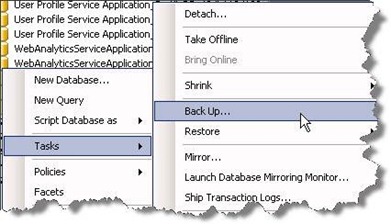
- Expand the databases node, and right-click on the SharePoint 2007 content database. Click on the Tasks submenu, and select Backup.
- Supply a name for the backup file and a .bak extension (e.g. WSSContentBackup.bak).
Restore the content database (from Step 1) to the new 2010 farm.
Copy the content database (that you backed up in Step 1) to the 2010 farm’s SQL Server.
Open SQL Server Management Studio, and connect to the 2010 environment’s SQL server. Under Object Explorer, right-click on the Database node, and select Restore Database.
This will restore the .bak file to the Databases node.

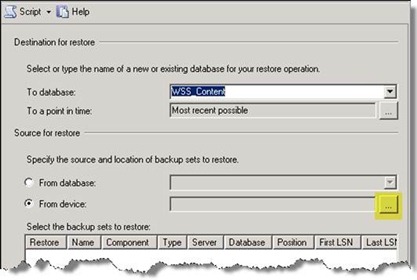
- The To Database box will ask you for a name. Enter a name for your restored database. If you are restoring a database to a location that already contains a SharePoint content database, you can select this name from the dropdown menu to overwrite that database. However, before doing that, be sure you remove that database’s association from the SharePoint web application (if you are unsure how to do this, see Take Offline a WSS Content Database). Otherwise, specify a new name for the database that you will restore. Here you have the option to give the database a name that identifies this content database with a particular web application. For example, you may name the restored database WSS_Content80 if the web application was created on port 80.
- Select From Device, and use the elipsis box to select the location to which you copied the .bak file.
- You will be asked to specify a backup location. From there, choose the location to which you copied the .bak file.
- Begin the restore process.
Create a new web application on the target farm (the 2010 farm) if you haven’t already done so. But DO NOT create a new top level site collection. As a best practice, remove the new content database that was created when you created the web application.
Attach the restored content database to the 2010 environment’s web application. This can be done using the STSADM tool.
By default, STSADM is located in %root%\Program Files\Common Files\Microsoft Shared\Web Server Extensions\14\BIN. To attach the restored database to the web application, run the following command from the directory in which STSADM is located:
STSADM.exe -o addcontentdb -url <URL> -databasename <contentdb>
where <URL> is the base URL to the SharePoint site (e.g. https://sharepoint/). If your web application contains a port number, include that in the URL.
- Verify that there are no errors in the log file. The path to the log file that would contain errors is, %Commonpgrogramfiles%\Microsoft Shared\Web server extensions\14\logs\upgrade*.log.
Take Offline a WSS Content Database
The following process explains how to take offline a WSS content database. This is a necessary step before backing up a database that you plan to attach to an existing farm.
- Take offline the content database from the source environment (or remove the content database from the farm – this is a more permanent action because it suggests that you no longer plan to use it, or instead, plan to archive it).
- Launch SharePoint Central Administration.
- Click on Application Management and then under the Databases heading, click Manage Content Databases. Once on the Manage Content Databases page, use the Web Application drop-down menu, on the upper-right section of the page, to ensure that the proper web application is selected. This will typically be SharePoint – 80.
-
- Click on the database name.
-
When SharePoint creates the database, the default name used is WSS_Content, but the administrator may have renamed it when setting up the environment. If there is more than one content database, choose the one that you want to detach. This opens the settings page for that database. Here, you may change either the database status to “Offline”, or you can scroll to the bottom of the page, and select the checkbox, Remove content database. The former option prevents new site collections from being created in that content database, and the latter option completely removes the database from the farm. In most cases, you will simply take the database offline.
-
- Check this box, confirm the removal, and click the page’s OK button.
Back up both the detached content database as well as the beta 1 PerformancePoint database.
- Open SQL Server Management Studio, and connect to the SQL Server storing the content database that you detached in Step 1.
- Expand the databases node, and right-click on the content database. Click on the Tasks submenu, and select Backup.
Re-Inherit Item-level Permissions
When you import your objects from the PerformancePoint 2007 database, they will be added to a single list, and permission inheritance to the site itself will be broken. Out of the box, SharePoint doesn’t provide a way to re-inherit those items by bulk. You can re-inherit one item at a time, or you can paste the following script into a .PS1 file and run it against your farm using the SharePoint 2010 Management Shell. Instructions, examples, and disclaimers are in the script comments. This is likely something that you will only have to run once, after a 2007 import.
Happy upgrading!
Kevin Donovan, Program Manager
SharePoint BI
----------------------------------------------------------------------------------------------------------------------------
 ##.SYNOPSIS
## Resets list items that have unique permissions assigned to them to re-inherit permissions from the parent list
##.DESCRIPTION
## Resets list items that have unique permissions assigned to them to re-inherit permissions from the parent list
##
##.PARAMETER url
## A URL identifying the target list. This parameter is required.
##
## If the URL contains spaces, it must be enclosed in quotes.
##
##.PARAMETER verbose
## Forces the script to output information about each operation (each processed item) to the Verbose stream.
##
##.PARAMETER whatif
## Forces the script only to produce a report without making any actual changes.
##
##.EXAMPLE
## PS C:\> .\Reset-SPListItemPermissions.ps1 -url "https://sharepoint.contoso.com/sites/testsite/Shared Documents"
##
##
##.NOTES
## For bug reports and any questions or comments regarding the functionality of this script please contact Sergey Zelenov of Microsoft Premier Field Engineering (UK) at szelenov@microsoft.com
##
## This Sample Code is provided for the purpose of illustration only and is not intended to be used in a production environment.  THIS SAMPLE CODE AND ANY RELATED INFORMATION ARE PROVIDED "AS IS" WITHOUT WARRANTY OF ANY KIND, EITHER EXPRESSED OR IMPLIED, INCLUDING BUT NOT LIMITED TO THE IMPLIED WARRANTIES OF MERCHANTABILITY AND/OR FITNESS FOR A PARTICULAR PURPOSE
##
##.LINK
## SharePoint Management PowerShell Scripts Project: https://sharepointpsscripts.codeplex.com
##.LINK
## Microsoft TechNet Script Gallery: https://go.microsoft.com/fwlink/?LinkId=169615
##.LINK
## From The Field Blog: https://sharepoint.microsoft.com/blogs/fromthefield

## See parameter info above or run 'Get-Help .\Get-EffectiveSPPermissions.ps1 -detailed'
param ([uri]$url = $(throw "The required -url parameter was not specified!"), [switch]$whatif, [switch]$verbose)

## Load the required SharePoint assemblies containing the classes used in the script
## The trap statement is used to check for the presence of assemblies on the local computer
## The Out-Null cmdlet instructs the interpreter to not output assembly information to the shell
& {
  trap
   {
      Write-Warning -Message "This computer does not seem to have Windows SharePoint Services installed!
         Please run this script on a server that is a member of a configured SharePoint farm.`n
         This script will now exit.";
       exit;
   }
   [System.Reflection.Assembly]::Load("Microsoft.SharePoint, Version=14.0.0.0, Culture=Neutral, PublicKeyToken=71e9bce111e9429c") | Out-Null
  }

## Set the ErrorActionPreference variable so that any error is treated as terminating
$ErrorActionPreference = "Stop";

if ($whatif -or $verbose)
{
    $VerbosePreference = "Continue";
}

## Bind to the site collection identified by the input URL
$site = New-Object -TypeName Microsoft.SharePoint.SPSite -ArgumentList $url.AbsoluteUri;

## Get the part of the input URL that is relative to the URL of the site collection and store it in a variable
$relUrl = ($url.AbsoluteUri -replace $site.Url).Trim("/");

## Store all segments of the relative URL (including query) in an array
$segments = $relUrl.Split("/?");

## Initialize another string variable with the same value as the current relative URL
$webUrl = $relUrl;

## Process the array of segments backwards, removing segments one by one from the end of the URL, until the URL of the lowest level subsite is identified
-1..-$segments.Count |
 ForEach-Object `
    {
       $webUrl = ($webUrl -replace $segments[$_]).TrimEnd("/?");

        ## Once the correct URL is obtained, initialize a variable containing an instance of SPWeb class for the lowest level subsite
       if ($site.AllWebs.Names -contains $webUrl)
      {
           if ($hostweb -eq $null)
         {
               $hostWeb = $site.AllWebs[$webUrl];
          }
       }
   }
if ($hostWeb -ne $null)
{
   ## Check if the rest of the URL identifies a list or library by trying to bind to the list
  $list = & {trap { continue }; $hostWeb.GetList($($hostWeb.ServerRelativeUrl.TrimEnd("/") + ($url.AbsoluteUri -replace $hostWeb.Url).TrimEnd("/")))};

    if ($list -ne $null)
    {
       $query = New-Object -TypeName Microsoft.SharePoint.SPQuery;
     $query.ViewFields = ""
        $list.GetItems($query) |
           Where-Object {$_.HasUniqueRoleAssignments} |
               ForEach-Object `
                {
                   if ($_.File -eq $null)
                  {
                       $itemurl = $hostweb.Url + "/" + ($_.ParentList.Forms | Where-Object {$_.Type -eq "PAGE_DISPLAYFORM"}).Url + "?ID=" + $_.ID;
                  }
                   else
                    {
                       $itemurl = $hostweb.Url + "/" + $_.Url;
                   }
                   if (-not $whatif)
                   {
                       $_.ResetRoleInheritance()
                   }
                   Write-Verbose ("{0}Re-inherited permissions for item {1} at {2}" -f $(if ($whatif) {"[WHATIF] "}), $_.Name, $itemurl)
               };
  }
   else
    {
       Write-Host ("Could not bind to list at " + $url.AbsoluteUri) -ForegroundColor Red;
        break;
  }
}
Comments
Anonymous
May 28, 2010
This is great! Very helpful. I followed db attach approach and was able to migrate all the dashboards, KPIs, scorecards, indicators and reports except several dashboards where I have used a custom-built filter control (it works very well on PPS 2007 + MOSS 2007). The only message upgrade wizard gave was "unreadable content was found in this item". Would you be able to shed some light to my situation. Thanks in advanceAnonymous
July 01, 2010
any updates on the above message being popped up in upgrade wizard "unreadable content was found in the item" and the session is expiredAnonymous
August 11, 2010
This is no longer an issue. Thanks for checking.Anonymous
August 26, 2010
The conversion is working fine, no errors and everything from one database to another. Yet there is a problem with the conversion of KPI's... I use KPI's on a scorecard for displayconditions. Though the key of a KPI is not converted correctly. It still has the old GUID in the <Key> property instead of the list item ID (e.g. 611_0.00). So every displaycondition in my dashboards are presenting a value, but the click for displaycondition doenst work. If I open the dashboard delete the displaycondition and add it again, it is working, but this means i have to repeat this action for like 200 displayconditions... I cannot find this issue anywhere on the internet. Anybody has any clue or suggestion?Anonymous
August 26, 2010
After a day of searching I found out that it is not the KPI that is not convertred correctly. Its the displaycondition itself that is reffering to the old GUID and not to the listitem id. An example below: This is what it looks like after importing a 2007 environment (in which the displaycondition exist, but not work) <ParameterData diffgr:id="ParameterData1" msdata:rowOrder="0" diffgr:hasChanges="inserted"> <Key>b180a940-1271-029a-174d-17ab59276390</Key <DisplayValue>KPINIEUW</DisplayValue> <KpiId>b180a940-1271-029a-174d-17ab59276390</KpiId> <Name>KPINIEUW</Name> <Description /> <Person_x0020_Responsible>networkme</Person_x0020_Responsible> </ParameterData> This is what it looks like after creating the page from scratch, exactly the same as the pps2007 one: <ParameterData diffgr:id="ParameterData1" msdata:rowOrder="0" diffgr:hasChanges="inserted"> <Key>/sites/mip/Lists/PerformancePoint Content/661_.000</Key> <DisplayValue>KPINIEUW</DisplayValue> <KpiId>fe65a2d6-c1c1-481a-ad89-4625de8cb24e</KpiId> <Name>KPINIEUW</Name> <Description /> <Person_x0020_Responsible>networkme</Person_x0020_Responsible> </ParameterData> In both XML files the real creation of the KPI "KPINIEW" is done correctly, with the id: /sites/mip/Lists/PerformancePoint Content/661_.000 So after conversion, the part that represents the displaycondition is still reffering to a GUID instead of the listitemId. Aaarg, and i have like 200 of em Spread out all over insane large dashboards. Microsoft, please fix this?Anonymous
April 16, 2011
The comment has been removed
