Deploying and Updating Office 2013 or Office 365 Click-to-Run with App-V 5.0 and Configuration Manager 2012
In this blog I will detail how to perform the following with screenshots:
- Benefits of Deploying Office 2013 / 365 with App-V 5.0
- Create an Office 2013 / 365 App-V 5.0 Package
- Import Office Package in Configuration Manager
- Deploy Office Package with Configuration Manager
- Update Office Package with Configuration Manager
NOTE: Everything is running in Hyper-V on Windows Server 2012, Configuration Manager 2012 and Windows 8 clients. This blog is for people who are experienced with Configuration Manager 2012 and Application Virtualization 5.0. All the steps are the same for creating an Office 2013 Volume License App-V Pacakge or an Office 365 Click-To-Run App-V Package. You will choose which package to create when you run the Office Deployment Tool outlined later in this blog.
Benefits of Deploying Office 2013 / 365 with App-V 5.0
Deploying Office 2013 or 365 with App-V 5.0 will provide the best experience for your enterprise. With App-V 5.0, Office deploys more quickly and easily by providing on-demand access, co-existence with previous Office versions, integration with local applications, centralized add-in management and tighter integration with System Center 2012 Configuration Manager SP1 or R2. Best of all... NO Sequencing is Required !!!!
- Administrators can import Office 2013 / 365 Click-To-Run .APPV package right into App-V 5.0, no sequencing is required.
- Administrators can control the Office 365 Click-To-Run updates.
- App-V 5.0 allows IT administrators to customize the components of the Office suite. For example, if you do not want users to see Microsoft Access, Lync, InfoPath or other applications, you may control this using App-V.
- Deliver Office 365 Click-To-Run applications dynamically by publishing Office application shortcuts to users' desktop before Office is cached on the local disk.
- With App-V 5.0, customers can work with the Office package just as they would any other App-V application. For example, App-V lets users run multiple versions of applications side-by-side and Office is no exception.
Step 1: Create Office 2013 / 365 App-V Package with the Office Deployment Tool
Office Deployment Tool for Click-to-Run can be downloaded from - https://www.microsoft.com/en-us/download/details.aspx?id=36778
The Office Deployment Tool allows the administrator to customize and manage Office 2013 Volume License or Office 365 Click-to-Run deployments. This tool will help administrators to manage installations sources, product/language combinations, and deployment configuration options for Office Click-to-Run.
Note: I am using Version 1; Date Published: 11/25/2013
When you download and run the Office Deployment Tool, it will ask you where to extract the files - I picked C:\Temp\Office\DeploymentTool
There will be 2 files in this directory: Configuration.xml and Setup.exe
Office Deployment Tool Setup runs the following tasks:
- Setup /Download - Downloads files to create an Office 15 installation
- Setup /Configure - Adds, removes, or configures an Office 15 installation
- Setup /Packager - Produces an Office 15 App-V package
I made the following changes (highlighted) to default Configuration.xml file:
<Configuration>
<Add SourcePath="C:\Temp\Office\Download" OfficeClientEdition="32" >
<Product ID="O365ProPlusRetail">
<Language ID="en-us" />
</Product>
<Product ID="VisioProRetail">
<Language ID="en-us" />
</Product>
</Add>
<!-- <Updates Enabled="TRUE" UpdatePath="\\Server\Share\Office\" /> -->
<Display Level="None" AcceptEULA="TRUE" />
<Logging Name="OfficeSetup.txt" Path="%temp%" />
<Property Name="AUTOACTIVATE" Value="1" />
</Configuration>
To download and create the Office 365 ProPlus software, used the following Product IDs. They are used for `` Office 365 Retail Activation:
"O365ProPlusRetail""VisioProRetail""ProjectProRetail"
To download and create the Office 2013 Volume License software, use the following Product IDs. They are used for Office 2013 Volume License Activation:
"ProPlusVolume""VisioProVolume""ProjectProVolume"
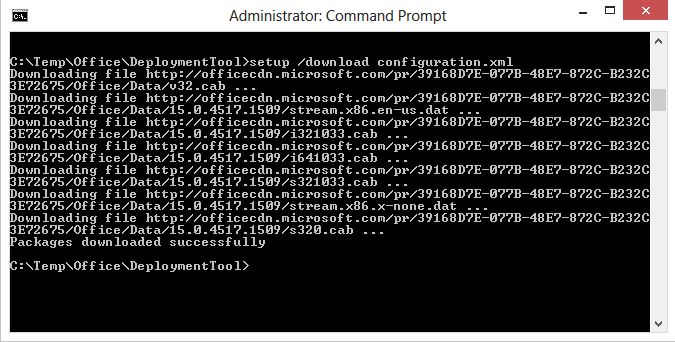
Download: From a Command Prompt (Admin) - run the following command from C:\Temp\Office\DeploymentTool\ folder: Setup /Download Configuration.xml
This will download Click-To-Run source files for Office 365 to C:\Office\Download. Then we will use these files to create an installation.
Configure: We are going to skip the Configure piece and go straight to creating the App-V Package. We will do some Configuration once the App-V Package is imported into Configuration Manager.
Packager: Now we have the Source Files downloaded, we can create the App-V package.
Using a Command Prompt (Admin) - run the following command from C:\Temp\Office\DeploymentTool\ folder: Setup /Packager Configuration.xml C:\Office\App-V
This will create the App-V Package for Office 365 in the target folder C:\Office\App-V
This is a screenshot during the creation:
Now we have an App-V Package to import into Configuration Manager.
For more information on customizing Click-To-Run, please visit the following links:
Office Deployment Tool for Click-to-Run - https://technet.microsoft.com/en-us/library/jj219422(v=office.15)
Reference for Click-to-Run configuration.xml file - https://technet.microsoft.com/en-us/library/jj219426
Step 2: Import App-V Package into Configuration Manager 2012
Copy the App-V Package to the Configuration Manager server. Launch Configuration Manager Console - Select Software Library - Right Click Applications Node and choose Create Application
I select Microsoft Application Virtualization 5 as the Type and use a UNC Path to the Office 365 .appv file
This is a screenshot of the Imported Information
I named the Application: Office 365 ProPlus (April 2013) and filled in most of the other optional information.
You can complete the Wizard by Accepting the Defaults.
Now we have imported the Office 365 ProPlus Package into Configuration Manager Application Model. Now it is time to Configure the Package.
Step 3: Configure Office App-V Application
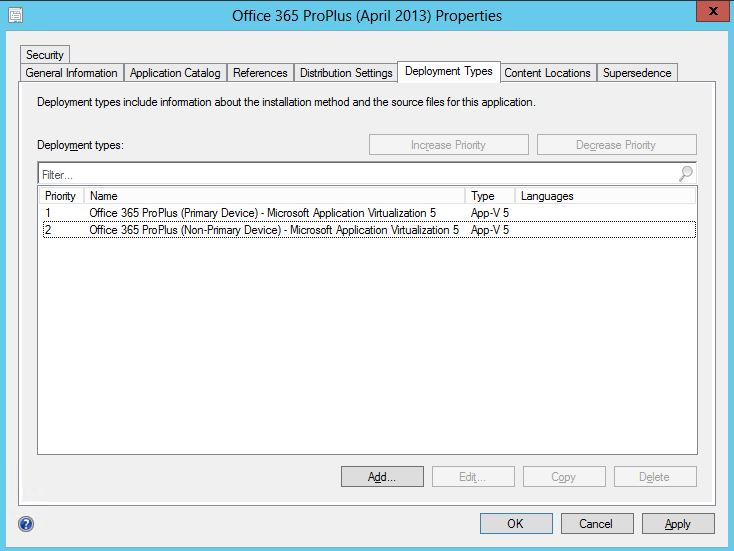
I created two App-V 5 Deployment Types:
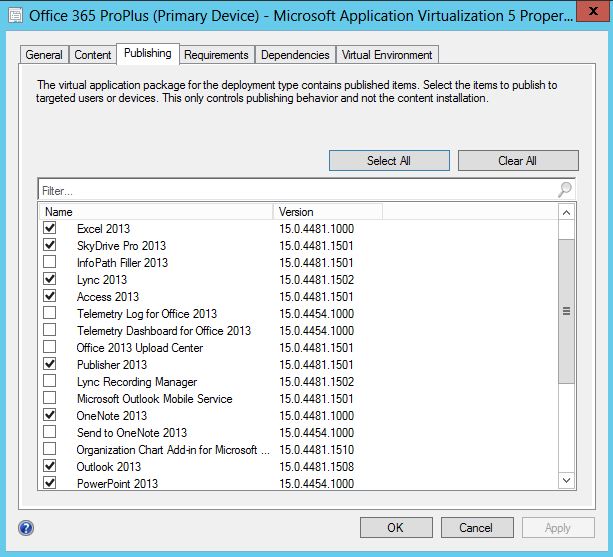
- Primary Device(s) which Publishes all popular items: Excel, PowerPoint, Word, SkyDrive Pro, Lync, Access, Outlook, etc...
- Non-Primary Devices which only Publishes Excel, PowerPoint and Word.
Note that Primary Device is 1st in the Priority List.
I set the Publishing and Requirements for Primary Device using the Tabs shown below:
I did not set Requirements for Non-Primary Device Deployment since I only have 2 Deployment Types and it is last on the list. I did configure the Publishing Tab to only include Excel, Word and PowerPoint. During an installation, Configuration Manager will check 1st Deployment and see if machine is meets the requirements, if not if will continue down the list. Therefore, if the machine is not a Primary Device, then it will fall back to Priority 2 Deployment Type and only Publish the three applications listed.
You can be more elaborate with the Deployment Types / Publishing / Requirements. We could add another Deployment that only applies to Windows 7 or 8 Machines that are Primary Devices, and those can have a separate selection of Application to Publish. We could make those Deployment Types Priority 1 and 2 and Push the Non-Primary Device Deployment to Priority 3.
You can also set Dependencies where the Application Installation will check for the appropriate App-V 5.0 Client and Service Pack level and if desired, install any missing Dependencies.
Now our Application and Deployment Types are set and we are ready to Deploy Office 365 Click-to-Run...
NOTE: App-V ClientPackage Scripting must be enabled to publish Office 2013 packages successfully. This can be done during the App-V Client install, via the Registry or PowerShell Command: Set-AppvClientConfiguration –EnablePackageScripts 1.
Step 4: Deploy Office 2013 / 365 with Configuration Manager
From the Applications Node, Right Click Office 365 Application and Choose Deploy - see screen shot below
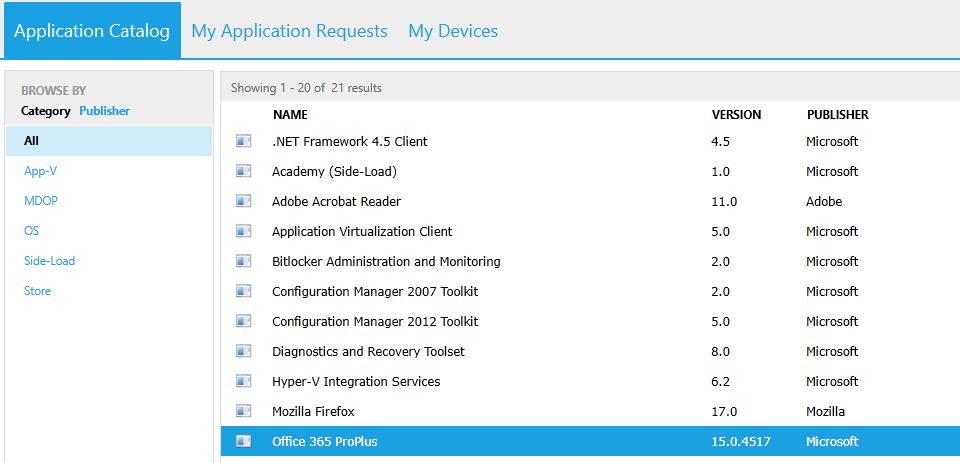
I want this application to show up on the Application Catalog Website, so I chose a User Collection and made the Purpose Available and Checked Require Administrator Approval if Users Request this Application, but this step is not necessary.
Now the Office 365 App-V Application will show up in the Application Catalog Website - it is the last one on the screen shot below:
I installed the Office Application to two separate machines - one is my Windows 8 Primary Device and the other is not. Here is a screenshot from App-V Client on one of my Windows 8 machines.
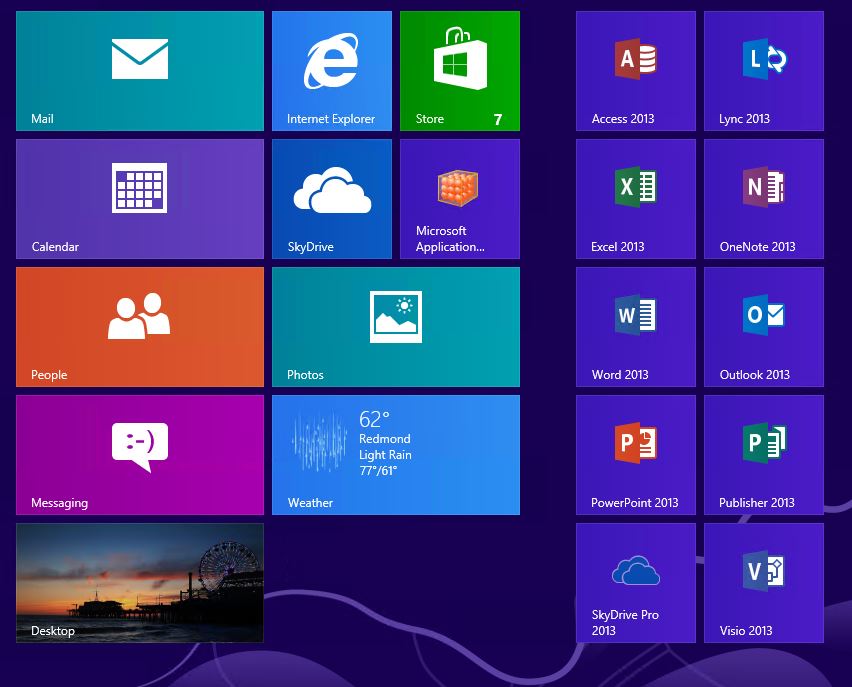
Here is a screenshot of my Start Screen on my Windows 8 Primary Device showing all the Office applications published.
Here are the same screenshot from my Windows 8 Non Primary machine.
And now for the final step - How to Update Office 365 Click-to-Run Package.
Step 5: Updating Office 365 Click-to-Run App-V Package
Here are the "normal" steps for updating an App-V package. However, all these steps do not apply to Office 365 Click-to-Run:
- Copy the existing virtual application package to a clean Sequencer workstation.
- Launch the Sequencer program and open the virtual application package for upgrade.
- Install the desired application updates.
- Save the new version of the package.
- Open the Configuration Manager Admin Console to update the existing package as follows:
- Select Software Library ? Applications.
- Select the copied version that has –copy and select Deployment Types at the bottom.
- Right-click the deployment type and choose Update content.
- Browse and point to the manifest.xml file in the new version of the App-V application and complete the wizard.
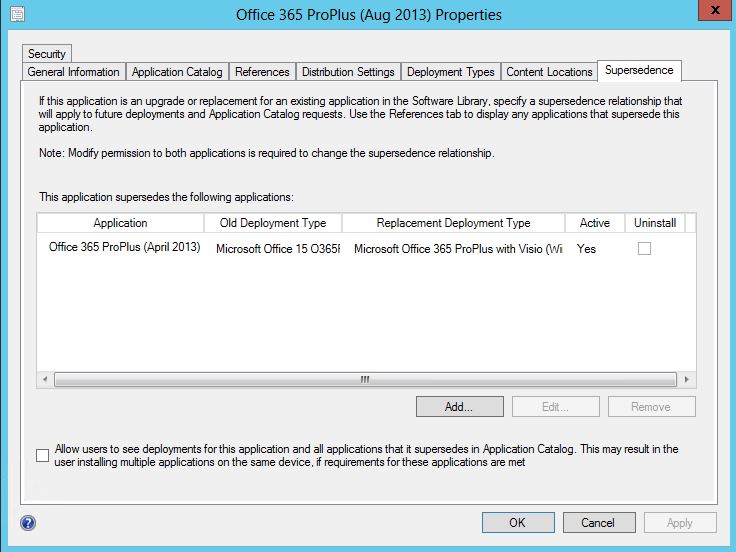
- Go to the properties of the application and from the Supersedence tab, Add a Supersedence relationship for the previous application.
- From the New Deployment Type drop-down, select the previous version of the application. Note: Do not select Uninstall check box.
- Deploy the new version of the application to the appropriate collections.
The steps are little different for updating Office 365 App-V Package. Follow the steps outlined at the beginning of this blog and create a new Office 365 App-V Package. The /download switch from the Office Deployment Tool will download the latest and updated source files. Create a new package, but name it slightly different. I started adding the month and year to my Office 365 Packages in Configuration Manager: Office 365 ProPlus (April 2013) and Office 365 ProPlus (August 2013). Once you have created your new package, then follow the steps for configuring Supersedence above.
If you do not set Supersedence, the installation will remove your old package and all settings before updating. Supersedence will retain each users settings. See screenshot below:
This blog post covered the following steps with screenshots:
- Benefits of Deploying Office 365 with App-V 5.0
- Create a Office 365 Click-to-Run App-V 5.0 Package
- Import App-V Package into Configuration Manager
- Configure App-V Package in Configuration Manager
- Deploy App-V Package with Configuration Manager
- Update App-V Package with Configuration Manager
Supported scenarios for deploying Microsoft Office as a sequenced App-V Package can be found here - https://support.microsoft.com/kb/2772509
Clarification Notes on Office 2013 / 365:
- Office 2013 (Volume License Activation) is the traditional MSI based installation where you buy Office and install it on one machine.
- Office 365 (Retail Activation) is the Cloud Solution that enables Office to be installed on 5 different devices and includes the Click-to-Run installation.
I used the Office 365 solution for creating the App-V Package and Deployment with Configuration Manager that I detailed in this blog post.
More information on the differences can be found at - https://office.microsoft.com/en-us/business/microsoft-office-365-for-business-faq-FX103030232.aspx
