Collecting SNMP Data with Operations Management Suite
SUMMARY: Learn how to use Operations Management Suite (OMS) to collect SNMP data.
Collecting SNMP Data
The Simple Network Management Protocol (SNMP) is a widely-deployed management protocol standard for monitoring and configuring devices. While higher-level management protocols and daemons are typically used for servers, SNMP is often a quite viable option for monitoring of devices and appliances.
SNMP data can be collected in two ways: with “polls” - where a managing system probes an SNMP agent to gather values for specific properties, or with “traps” – where an SNMP agent forwards events or notifications to a managing system. Traps are most often used as event notifications, while polls are more appropriate for stateful health detection or collecting performance metrics.
Whether with Polls or Traps, SNMP properties are identified with an Object Identifier (OID) value. OIDs are defined and described in vendor-provided Management Information Base (MIB) files.
With the highly extensible OMS Agent for Linux, you can collect SNMP data from traps or polls for integration with OMS Log Analytics.
Collecting SNMP Traps with OMS
There are many choices for SNMP trap receiver services available, but a very good SNMP trap receiver is provided with most Linux distributions: snmptrapd from the Net-SNMP agent. It’s important that an SNMP trap receiver can load MIB files for your environment, so that the properties (fields) in the SNMP trap message are described with their name, instead of an OID.
In the next section, I will describe configuration of snmptrapd so that the OMS Agent for Linux can collect SNMP traps into OMS Log Analytics.
Installing snmptrapd
To install and enable snmptrapd on a CentOS 7, Red Hat Enterprise Linux 7, Oracle Linux 7 server use the following commands: #Install the SNMP agentsudo yum install net-snmp#Enable the servicesudo systemctl enable snmptrapd#Allow UDP 162 through the firewall:sudo firewall-cmd --zone=public --add-port=162/udp --permanent
Configuring snmptrapd
There are a few configuration steps required to configure snmptrapd. These will vary a bit by Linux distribution. The examples below apply specifically to Red Hat Enterprise Linux, CentOS, or Oracle Linux.
The first configuration step is to authorize “community” strings (SNMP v1 & v2 authentication strings). For more information on snmptrapd configuration, including guidance on configuring for SNMP v3 authentication, see the Net-SNMP documentation.
Edit snmptrapd.conf: sudo vi /etc/snmp/snmptrapd.conf
To allow all traps for all OIDs, from all sources, with a community string of “public” – ensure that the following line exists in your snmptrapd.conf file: authCommunity log,execute,net public
Importing MIB files
For SNMP trap fields to be logged with their names (instead of OID), MIB files must be imported by snmptrapd. The default directory location for mibs is /usr/share/snmp/mibs. For each device that will be sending SNMP traps, you will want to copy all relevant MIBs to this directory. MIB files are typically provided by the device vendor, but third party websites like www.mibdepot.com and www.oidview.com provide MIBs to download for many vendors. Some vendors, like APC, maintain a single MIB for all devices, while others, like Cisco, have many hundreds of mibs. For snmptrapd to correctly load a MIB, all dependent MIBs must also be loaded. Be sure to check the snmptrapd log file after loading MIBs to ensure that there are no missing dependencies in parsing your MIB files.
Configure snmptrapd output:
To get SNMP traps from snmptrapd to the OMS Agent for collection, we have two options. Snmptrapd can forward incoming traps to syslog, which will be collected by the OMS agent as long as the syslog facility is configured for collection. Alternatively, snmptrapd can write the syslog messages to a file, which can be tailed and parsed by the OMS Agent for Linux for collection. This latter option may be preferable, as we can send the SNMP traps as a new datatype rather than sending as syslog events.
On Red Hat, CentOS, and Oracle Linux, the output behavior of snmptrapd is configured in /etc/sysconfig/snmptrapd (sudo vi /etc/sysconfig/snmptrapd) .
Here’s an example configuration:
# snmptrapd command line options# '-f' is implicitly added by snmptrapd systemd unit file# OPTIONS="-Lsd"OPTIONS="-m ALL -Ls2 -Lf /var/log/snmptrapd -F 'snmptrap \\t %a \\t %B \\t %y/%m/%l %h:%j:%k \\t %N \\t %W \\t %q \\t %T \\t %W \\t %v \\n'"
The options in this example configuration are:
- -m ALL Load all MIB files in the default directories
- -Ls2 Output traps to syslog, to the Local2 facility
- -Lf /var/log/snmptrapd Log traps to the file /var/log/snmptrapd
- -F Define the format for the traps written to the log file
More on output options can be found here. Description of the formatting options can be found here. It should be noted that snmptrapd logs both traps and daemon messages (e.g. service stop/start) to the same log file. In the example, I’ve defined the format to start with the word “snmptrap,” this makes it easy to filter just snmptraps from the log later.
Configuring the OMS Agent for Linux to collect SNMP Traps
If you plan to collect SNMP traps as syslog events, simple ensure that the facility defined in your snmptrapd configuration (i.e. -Ls2 for Local2) is configured for collection in OMS.
To collect SNMP traps by tailing the snmptrapd log file, you can use a configuration like the one below.
To create the configuration file, run the following command:
sudo su omsagent -c "vi /etc/opt/microsoft/omsagent/conf/omsagent.d/snmp.conf"
Example OMS Agent configuration
<source> @type tail path /var/log/snmptrapd pos_file /var/opt/microsoft/omsagent/run/snmptrapd.pos tag my.snmp.traps format tsv keys Type,AgentAddress,Hostname,Date,EntepriseOID,TrapType,TrapSubType,Uptime,Attributes</source>
<filter my.snmp.traps.*> @type grep regexp1 Type snmptrap</filter>
<match my.snmp.*>type out_oms_apilog_level infobuffer_chunk_limit 5mbuffer_type filebuffer_path /var/opt/microsoft/omsagent/state/out_oms_api_snmp*.bufferbuffer_queue_limit 10flush_interval 20sretry_limit 10retry_wait 30s</match>
In this example, a source is defined using the in_tail plugin that will collect any new lines in the snmptrapd log file we defined earlier. Corresponding to the snmptrapd output format we defined, the format is set to tsv and keys are defined as the field names for each column in the log file. A tag is assigned for routing of the data.
I mentioned previously that snmptrapd logs both daemon messages and incoming traps to the same file. So, the grep plugin is used as a filter. Using a regular expression, this configuration selects only those log lines that start with “snmptrap” – corresponding to the format configured for the snmptrapd output.
The output plugin in this configuration uses OMS’s dynamic ingestion capabilities, where incoming data are schematized based on field names sent from the OMS agent. This capability is further described here.
Restarting the daemons
With all configuration complete, we can restart the daemons (snmptrapd and omsagent) and start collecting traps:
sudo systemctl restart omsagentsudo systemctl restart snmptrapd
Be sure to check the log files (/var/log/snmptrapd and /var/opt/microsoft/omsagent/log/omsagent.log) to make sure there are no syntax or MIB loading errors.
Results
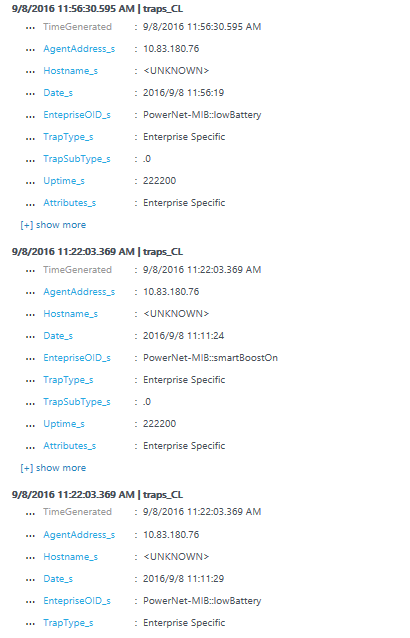
Shortly after SNMP traps start flowing through, they show up in OMS search. Using the dynamic ingestion output plugin, the Type will be traps_cl, where “traps” is the last part of the tag in the data source configuration, and “_cl” indicates that it is a dynamic data type.
Note: for production deployments, it is recommended to have multiple SNMP trap destinations/collectors to avoid missed events in the case of a single-machine outage.
APC UPS Traps in OMS Search

Collecting SNMP poll data with the OMS Agent for Linux
SNMP polls are used for probing stateful data (is the power supply health) and collecting performance metrics. We can also collect data from SNMP polls with the OMS Agent for Linux. The approach described here can be useful to gather some hardware status from the local Linux computer, or probing a set of SNMP properties from network devices or appliances. However, if you have many SNMP properties or devices to poll, it is advisable to use a dedicated network monitoring tool to avoid management of unwieldy configuration files.
A good way to integrate SNMP polling into the OMS Agent for Linux is to use CollectD as an SNMP polling agent. CollectD has a robust SNMP polling implementation, supporting concepts such as indexed SNMP tables.
Using CollectD to poll SNMP properties
Connecting CollectD to the OMS Agent
CollectD’s SNMP plugin is documented here. To install it on Red Hat Enterprise Linux or CentOS, we first need to enable the epel repository, as described here.
Once the epel repository is enabled, we can install CollectD and the SNMP plugin with the following two commands:
sudo yum install collectd collectd-snmpsudo systemctl enable collectd
To send data from CollectD to the OMS agent, you can use the following command:
sudo /opt/microsoft/omsagent/bin/omsadmin.sh -c
NOTE: For more information about the integration with CollectD and the OMS Agent see this blog post.
Configuring CollectD
Please reference the SNMP plugin documentation for a full understanding of the plugin configuration. Here’s an example collectd configuration to enable collection of memory utilization from Cisco networking devices:
<Plugin snmp> <Data "cisco_memory_pool_util"> Type "memory" Table true Instance "1.3.6.1.4.1.9.9.48.1.1.1.2" Values "1.3.6.1.4.1.9.9.48.1.1.1.5" </Data> <Host "cisco.contso.com"> Address "10.185.94.56" Version 2 Community "public" Collect "cisco_memory_pool_util" Interval 180 </Host></Plugin>
After configuring CollectD, restart it with the following command:
sudo systemctl restart collectd
Be sure to monitor CollectD’s log outputs (either a log file or syslog, depending on configuration) to capture any errors in the SNMP polling.
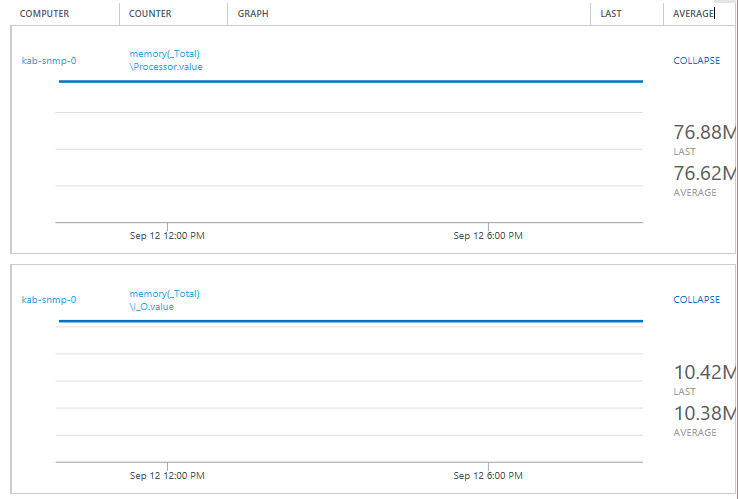
Metrics in OMS from SNMP Polls

Conclusion
The OMS Agent for Linux is highly extensible and can easily add additional data sources for collection with OMS. SNMP traps sent from remote devices to snmptrapd on a Linux computer will have their properties enhanced with names from loaded mibs, and can be forward to the OMS Agent through syslog or a monitored log file. CollectD, when integrated with the OMS Agent, provides a means to poll local or remote SNMP properties and send to OMS as metrics.
That is all I have for you today.
I invite you to follow me on Twitter and the Microsoft OMS Facebook site. If you want to learn more about Windows PowerShell, visit the Hey, Scripting Guy Blog.
If you would like to get a free Microsoft Operations Management Suite (#MSOMS) subscription so that you can test it out, you can do so from here. You can also get a free subscription for Microsoft Azure as well by selecting this link.
Operations Management Team
Comments
- Anonymous
September 21, 2016
Excellent,Please The OMS Agent for Windows support this.I want to do this on our Windows environments. - Anonymous
September 27, 2016
interesting indeed but I see a blocking issue, the Computer name for the collected Perf Counter is the name of the Linux host polling the device, it must be the name/ip of the device, plus the counter name is the Type name from the collectd configuration, again it should be the Data Name (the dsNames in the collectd json payload).