Create a password dialog for Visual Studio deployment project
Introduction
Most of us have worked with Visual Studio deployment projects to create setup projects for components we developed. In many cases we used the custom user interface dialogs that come with Visual Studio to take extra parameters from the user. The problem happens when you require extra parameters than Visual Studio provides or custom user interface dialogs. In my case what I needed is a dialog to take username and password fields from the user and hence I wanted to apply a style to one of the edit box controls to be a password field. In the following I will show you how to create a new custom dialog and how to mark an edit box as a password field.
How to create a custom Visual Studio Setup dialog?
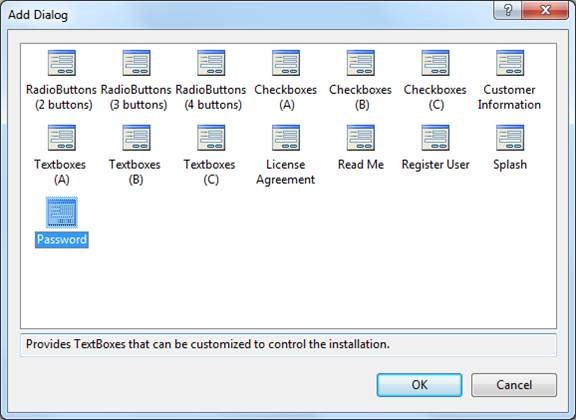
Visual Studio setup project has the functionality to add extra dialogs from a library of custom dialogs as shown in the figure below.

So what I wanted to do is to customize one of the three textboxes dialog and create new one where I change one of the fields to be a password field. To do this you will need ORCA MSI editor from the Windows SDK Components for Windows Installer Developers here. The steps are as follows.
1- Close the Visual Studio.
2- Browse to the folder “C:\Program Files (x86)\Microsoft Visual Studio 10.0\Common7\Tools\Deployment\VsdDialogs\0”and make a copy of the file “VsdCustomText3Dlg.wid” and rename it to “VsdUsernamePasswordDlg.wid”
3- Open the file “VsdUsernamePasswordDlg.wid”in ORCA.

4- Change all occurrences of “CustomTextC”to “CustomTextD” in all tables and all values.
5- In the module signature table make sure you edit the GUID and replace it with a new GUID

6- Open the “ModuleDialog”table and change the display name to any name you would like

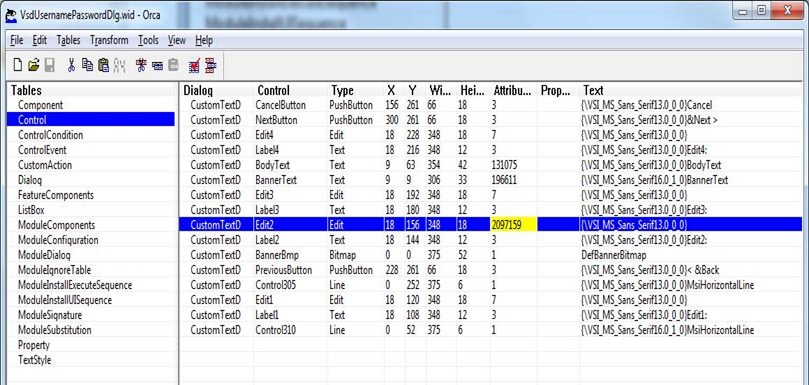
7- Open the “Control” table and then change the attribute of the second edit box control to be a password field by changing the value to “2097159”

8- Save the file.
9- Open the “Module signature”table and change the value of the language to be 1033 (for English)

10- Save the file in the folder“C:\Program Files (x86)\Microsoft Visual Studio 10.0\Common7\Tools\Deployment\VsdDialogs\1033”with the same name.
11- Close ORCA and re –open Visual Studio.
12- Now when you open the add dialog you will find that your custom dialog is added to the list of dialog.

Conclusion
You can edit and create any custom dialog you want to the list of dialogs used by the setup solution but remember that your project will not be built unless this custom dialog exists on the development machine.