From the MVPs: Create a SharePoint Production Farm on Azure
This is the 54th in our series of guest posts by Microsoft Most Valued Professionals (MVPs). You can click the “MVPs” tag in the right column of our blog to see all the articles.
Since the early 1990s, Microsoft has recognized technology champions around the world with the MVP Award . MVPs freely share their knowledge, real-world experience, and impartial and objective feedback to help people enhance the way they use technology. Of the millions of individuals who participate in technology communities, around 4,000 are recognized as Microsoft MVPs. You can read more original MVP-authored content on the Microsoft MVP Award Program Blog .
This post is by SharePoint MVP Inderjeet Singh Jaggi . Thanks, Inderjeet!
After the release of my first MVP blog post “Creating a Lab on Windows Azure” I wanted to write another article continuing on this topic. I will try to dig more into the day to day requirements of SharePoint server and its implementation. I saw lot of companies that didn’t move to Azure because of the network security control which they have on premise. This may have been the case sometime back as Network Security Group (NSG) was not yet released on Azure.
In a normal SharePoint farm scenario Demilitarize Zone (DMZ) is used to prevent Web Front End (WFE) servers. Now we will understand how we can use NSG to manage our network and create a network similar to DMZ. Now that we can manage network traffic on Azure we can create our SharePoint farm on Azure server. Let’s see how we can accomplish this.
To proceed further you need to understand topic I discussed in my previous blog post “Creating a Lab on Windows Azure”. Please make sure you review that post before we begin.
Topics covered in my older post:
- Connect to your Azure Subscription using PowerShell.
- Create a Virtual Network in Azure
- Create a server on Azure in the Virtual Network
- Create a new domain
- Update Domain setting on Virtual Network and bind it to Private IP on DC
- When creating a new server it should be part of this domain
Topics we will discuss in this post:
- Create SharePoint and SQL VM, add them to existing domain.
- Configure SharePoint farm
- Access SharePoint site from Internet and connect server from any machine
- Create NSG rules to restrict access to access to SharePoint\Database servers
- Confirm SharePoint\Database server are secure while internet site is working fine
- Create SharePoint and SQL VM, add them to existing domain.
Once we have Domain Controller and Azure Network setup, we will create Virtual machines on Azure servers. To do so we will follow the steps below.
1. Login to your Azure Subscription Portal site https://manage.windowsazure.com
2. Select “Virtual Machines” from left menu and select “Create a Virtual Machine”
3. Under “Virtual Machine” select “From Gallery”
4. On the Choose an Image screen select SharePoint server 2013 Trial. This trial works for 180 days.
5. Type the Machines necessary details like Hardware configuration, Machine name, username and password
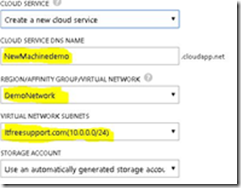
6. Now we have an important step in the process. Select the DEMONETWORK you created in Region/Affinity Group/Virtual Network. Make sure our Virtual network name is selected in Virtual Network Subnet. Click on Next
7.a Once the machine is created, connect to server and add it to domain from server manager. Open server manager > type credentials > Once machine is restarted, you can login with domain credentials
Or
7.b You could follow step “When creating a new server it should be part of this domain” from my previous blog.
Configure SharePoint farm
Once we have all the servers (SharePoint application server, SharePoint Front server and SQL database) ready and part of domain, we need to configure a SharePoint farm. We will start from Application server
1. Let’s first create a SharePoint farm account on Domain controller. Open Active Directory users and computers > expand domain > users > Right click on users container and create a new user(e.g. spfarm) > Now follow the wizard.
2. Create SharePoint Virtual Machines by following below steps:
a. Login to your Azure Subscription Portal site https://manage.windowsazure.com
b. Select “Virtual Machines” from left menu and select “Create a Virtual Machine”
c. Under “Virtual Machine” select “From Gallery”
d. On the Choose an Image screen select SharePoint server 2013 Trial. This trial works for 180 days.
e. Type the Machine’s necessary details such as Hardware configuration, Machine name, username and password
f. Now we have an important step in the process. Select the DEMONETWORK you created in Region/Affinity Group/Virtual Network. Make sure our Virtual network name is selected in Virtual Network Subnet. Click on Next
g. Now comes the most important step, we need to select Custom Script on this page and select the Join.ps1 script we just created. Click Finish
h. Now you can see that even SharePoint server is ready within few minutes
i. Advantage here is that you have a single credential stored on Active directory using which you manage all the Virtual Machine and work on your lab.
j. Below you can see that I have created SQL server, SharePoint server and started using them in just couple of minutes.
3. Logon to SharePoint Application server\Web server using domain admin credentials. Add newly created account itfree\spfarm to local admin group.
4. Assign DB Creator and Security Admin privileges to newly created account on SQL server
5. Now logon to SharePoint Application Server using SPFarm account, install SharePoint if not installed and create a new farm.
6. Add WFE server to this new farm. Once farm is configured you will see something like below when you go to Central Admin > Servers in Farm
Access SharePoint site from Internet and connect server from any machine
1. Now you need to create a Site collection with host header record e.g. (sharepoint. itfreesupport.com) on SharePoint WFE server.
2. Once site collection is created, logon to Azure Portal and go to dashboard of SharePoint WFE server.
3. Go to Endpoint tab and you would see couple of entries. (These are ports and protocol you can use to access your server)
4. Select Add at bottom > Add a Stand-alone Endpoint and select next.
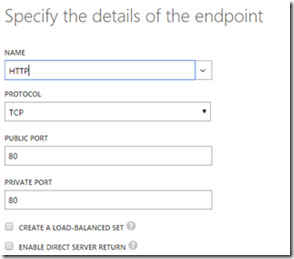
5. Now the Protocol should be http with source and destination port to be 80 as shown below
6. Update your DNS entry(CName) for domain which should route all request for SharePoint.itfreesupport.com to sharepointwfe.cloudapp.net
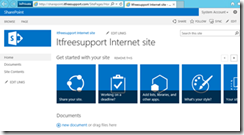
7. Once DNS records are updated by Domain service providers, you should be able to browse your SharePoint site from internet.
Create NSG rules to restrict access to access to SharePoint\Database servers
Now that we know our sites and servers are accessible from Internet, it can be security thread for me. I would need my SharePoint site accessible but my SharePoint server should have restricted access. This is core of this article where we will understand how we can use NSG to protect our SharePoint servers. NSG is a separate DMZ provided by Microsoft in Azure environment. To do so we will first create a table with set of rules so that we can smooth the whole process. Below is an example of the table.
Once above table is created and finalized, create your NSG firewall using below command.
Get-AzureLocation (To check the location of your VM’s e.g. mine is Southeast Asia)
New-AzureNetworkSecurityGroup -Name "NSG4itfreesupport" -Location 'Southeast Asia' -Label 'NSG for itfreesupport' (Create a new NSG in the area)
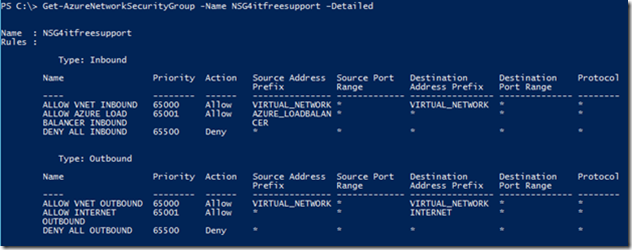
Get-AzureNetworkSecurityGroup -Name NSG4itfreesupport –Detailed (Check default configuration of NSG)
Get-AzureNetworkSecurityGroup -Name "NSG4itfreesupport" | Set-AzureNetworkSecurityRule -Name "DMZ-App" -Type Inbound -Priority 100 -Action Allow -SourceAddressPrefix "10.0.2.0/25" -SourcePortRange '*' -DestinationAddressPrefix '*' -DestinationPortRange '*' -Protocol TCP (Create a new rule in NSG)
Note: You will have to repeat above command multiple times for all the rules you created in above table.
Finally once all the rules are created, we will apply the NSG on SharePoint server using below command:
$service = "SharePoint Application Server service name, use get-azurevm command"
$VM = "SharePoint Application Server VM name, use get-azurevm command"
Get-AzureVM -ServiceName $service -Name $VM | Set-AzureNetworkSecurityGroupConfig -NetworkSecurityGroupName "NSG4itfreesupport"
Follow the same for Database server.
You can apply the NSG on whole subnet as well using below command:
Get-AzureNetworkSecurityGroup -Name "NSG4itfreesupport" | Set-AzureNetworkSecurityGroupToSubnet -VirtualNetworkName 'VNetTest' -SubnetName 'FrontEndSubnet'
Confirm SharePoint\Database server are secure while internet site is working fine
Try to browse your SharePoint server from internet and check if you are able to RDP SharePoint\Database servers from specified networks only.
Hope this will help you setup a very secure and healthy production environment. In my next edition I will show details on how you can disaster recover your local SharePoint environment to your Azure subscription.
Comments
- Anonymous
March 13, 2016
Thanks to you for spreading information to all your fans about valuable tips! - Anonymous
March 16, 2016
Do you approve if I quote a handful of of your articles but I provide credit and sources back to your website? My blog is in the very identical region of curiosity as yours and my guests would certainly advantage from some of the data you present right here. Please let me know if this okay with you. Cheers!- Anonymous
March 17, 2016
Hi Betty Edmison -We have reviewed your website and it does not appear to be an appropriate location to include our information. Due to this reason, we can't grant you permission to quote our materials at this time.Thank you.
- Anonymous
- Anonymous
April 27, 2016
Hi there:I think I am bit confused here, before the NSG bit. I must admit I am new to this.You have got steps 1 to 7a/7b to create a VM based on SP2013 trial image. Again you have got steps 1 to 6 under Configure SharePoint farm to create VMs again. Any explanation will be much appreciated.Thanks. - Anonymous
August 18, 2016
Very useful article.


