Reserved Multiple VIPs per Cloud Service
Scenario: Let's assume you want three Reserved Public Virtual IPs (VIPs) for a single cloud service. By default you can have up to 5 VIPs per cloud service. However, if you need more you can have that increased through Microsoft Support. Good example you may need multiple VIPs for a single cloud service is to host multiple different SSL websites from a single Azure IaaS VM. I'll show you how you can achieve that using Azure PowerShell. If you don’t have Azure PowerShell installed then you can follow the document Azure PowerShell to install it in your local machine and connect to the Azure Subscription.
Note: This post applies only for Classic Model deployments created using Azure Service Manager (ASM).
Steps to follow:
- Create your Virtual Machine using the standard process from the Azure Portal/Azure PowerShell. For this demo, I created a VM and cloud service with the name MNWin10 in South Central US.
- Then using Azure PowerShell, run the below commands to reserve 3 public IP’s. You can change the names & locations to whatever suits your environment.
New-AzureReservedIP –ReservedIPName “ReservedVIP1” –Location “South Central US”
New-AzureReservedIP –ReservedIPName “ReservedVIP2” –Location “South Central US”
New-AzureReservedIP –ReservedIPName “ReservedVIP3” –Location “South Central US”
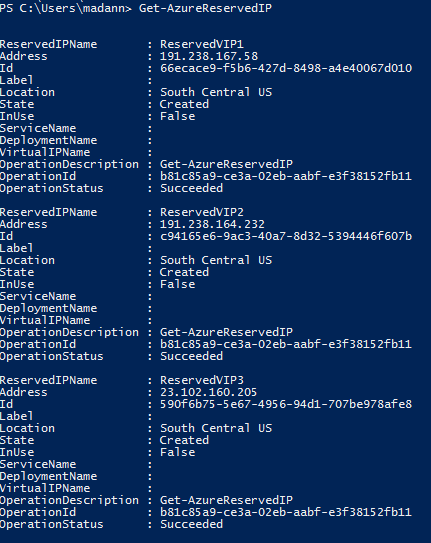
- Now run the below command and make sure that you have three different reserved IP’s and that they are not in use.
Get-AzureReservedIP
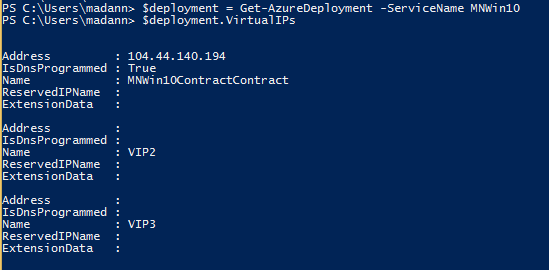
- Run the below commands and you will see only one VIP associated to the cloud service MNWin10. Which is the primary VIP and is not reserved yet. We will replace this VIP with the reserved IP in further steps.
$deployment = Get-AzureDeployment -ServiceName MNWin10
$deployment.VirtualIPs
- Next, run the following set of commands to add two additional VIP to the cloud service. We are only adding two additional VIP’s because by default when you create the VM you will be given a primary VIP.
Add-AzureVirtualIP -VirtualIPName VIP2 -ServiceName MNWin10
Add-AzureVirtualIP -VirtualIPName VIP3 -ServiceName MNWin10
- Now when you run the below commands you will see 3 VIP names but only one VIP address. Vip1 is the default VIP, you know that because the value for IsDnsProgrammedName is set to true. Vip2 and Vip3 are not used as they don’t have any IP addresses. They will only be used if you associate an endpoint to the VIP.
$deployment = Get-AzureDeployment -ServiceName MNWin10
$deployment.VirtualIPs
- Then run the following commands to associate the VIP2 & VIP3 to an http & https endpoints. Also we need to create endpoints for the default primary VIP.
Primary VIP:
Get-AzureVM -ServiceName MNWin10 -Name MNWin10 | Add-AzureEndPoint -Name "Http" -Protocol "tcp" -PublicPort 80 -LocalPort 8080 | Update-AzureVM
Get-AzureVM -ServiceName MNWin10 -Name MNWin10 | Add-AzureEndPoint -Name "Https" -Protocol "tcp" -PublicPort 443 -LocalPort 8081 | Update-AzureVM
VIP 2:
Get-AzureVM -ServiceName MNWin10 | Add-AzureEndpoint -Name http2 -Protocol tcp -PublicPort 80 -LocalPort 8082 -VirtualIPName VIP2 | Update-AzureVM
Get-AzureVM -ServiceName MNWin10 | Add-AzureEndpoint -Name https2 -Protocol tcp -PublicPort 443 -LocalPort 8083 -VirtualIPName VIP2 | Update-AzureVM
VIP 3:
Get-AzureVM -ServiceName MNWin10 | Add-AzureEndpoint -Name http3 -Protocol tcp -PublicPort 80 -LocalPort 8084 -VirtualIPName VIP3 | Update-AzureVM
Get-AzureVM -ServiceName MNWin10 | Add-AzureEndpoint -Name https3 -Protocol tcp -PublicPort 443 -LocalPort 8085 -VirtualIPName VIP3 | Update-AzureVM
- Now run the same commands in step 4 and you should see three different VIP’s associated to the cloud service MNWin10. However, these VIP’s are not the same VIP’s you have reserved in step 2. We will replace these VIP with the reserved VIP's in the next step.
- Run the below commands to associate the reserved IP to the multi VIP cloud service. Before you run the first command below you need to make note of the first default VIP Name. You will find that info in the output of step 4. It may be something like *ContractContract.
Note: You will have a brief disruption in your network (about a minute) when the first command below is run for the primary VIP.
Set-AzureReservedIPAssociation -ReservedIPName ReservedVIP1 -ServiceName MNWin10 -VirtualIPName MNWin10ContractContract
Set-AzureReservedIPAssociation -ReservedIPName ReservedVIP2 -ServiceName MNWin10 -VirtualIPName VIP2
Set-AzureReservedIPAssociation -ReservedIPName ReservedVIP3 -ServiceName MNWin10 -VirtualIPName VIP3
- Now re-run the commands in step 5 and you should see 3 Reserved VIPs associated to your cloud service.
- Also, if you run Get-AzureReservedIP command you will see that all the three IP Addresses are 'In Use' and assigned to the same cloud service.
- And if you go to the portal and look at the endpoints for the VM, you should see something similar to this.
- The VIPS won't be reachable from externally yet. You will need to install and configure IIS and bind the port numbers. So, connect to your VM and install IIS. Once you have IIS installed and then bind the port numbers accordingly to your configurations. In my case I added only the http ports for this demo in bindings in IIS.
- Once you added those port number, you should be all set. You can use any of those VIPs in the cloud service and it will resolve and display the default IIS page.
15. Hope you find this documentation helpful if you are looking to setup same or similar in your Azure environment.
Resource: Multiple VIPs per cloud service
Comments
Anonymous
February 19, 2016
These are great instructions, especially combined with the "Multiple VIPs per cloud service" article which doesn't go into detail about how to use reserved IPs. Just wondering, would it be possible to skip the part where VIPs briefly come into play, and directly associate the reserved IPs in step 7? (In my scenario the primary IP is already reserved, but I'd like to add more, for TLS.)Anonymous
February 22, 2016
Mike, thanks for your feedback. If you already have your primary IP reserved, you should be able to add more VIP's and reserve them or associate a previously reserved IP. I would suggest you try it on a test VM first before doing it on any production ones.


