Implementing Rotate with Single Contact Point in WPF4 & Windows 7
By default there is no rotation (or zoom for that matter) behavior for a single touch point. However, working on my laptop I am limited to a single touch point. So, I wanted to see what I could do. Borrowing from a friend and co-worker’s example I created a simple WPF multi-touch app with an <Image /> control contained within a <ScrollViewer /> – nothing special there. Copying from Jared’s example I attached a behavior to the image control:
public static readonly DependencyProperty IsTouchScrollEnabledProperty =
DependencyProperty.RegisterAttached(
"IsTouchScrollEnabled",
typeof(bool),
typeof(ImageTouchBehavior),
new UIPropertyMetadata(false, OnIsTouchScrollEnabledChanged));
When the OnIsTouchScrollEnabledChanged method executes in addition to some other work I register for all of the manipulation events for the Image control:
// Subscribe to events
image.ManipulationStarted += image_ManipulationStarted;
image.ManipulationDelta += image_ManipulationDelta;
image.ManipulationInertiaStarting += image_ManipulationInertiaStarting;
image.ManipulationCompleted += image_ManipulationCompleted;
So, far the same as Jared’s, but it is in the ManipulationStarted and in the ManiuplationDelta events that I change the execution a bit. First, some background/realization. Since it is not multi-touch I decided to set aside (for a simple example) part of the area of the image in the top let corner. Thus, if the touch happens in that area I do not pan, but rather rotate. That hit test is in ManipulationStarted and looks something like this:
IInputElement inputElement = image.InputHitTest(ImageTouchBehavior.GetTouchStartOrigin(image));
Point TouchPoint = e.GetCurrentOrigin(inputElement);
//determine if touch is in one of the corners
if (TouchPoint.X < 120 && TouchPoint.Y < 120)
{
//need to rotate or set rotation flag
Rotate = true;
…..
The InputHitTest let’s me determine if indeed my Image control was touched then I grab the actual TouchPoint via the GetCurrentOrigin(<element>) method of the ManipulationStartedEventArgs. Once I have that point I do a hardcoded test to see if the touch point is within the square represented by the points 0,0 : 120,0 : 0, 120 : 120,120 by simply checking to ensure that the X and Y lengths are within the 120 pixels that I’m arbitrarily choosing as my rotate hotspot. If I’m in the range I set the Rotate flag to true which I define elsewhere as a static bool.
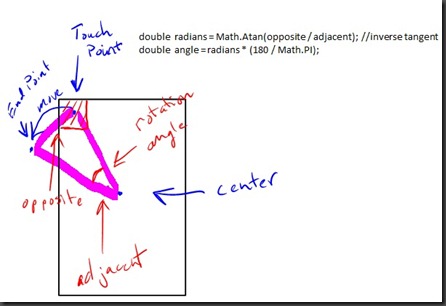
The next real piece of work is in the ManipulationDelta event. When that is raised I ensure that I have the control and then I check to see if I am in Rotate mode. If I am I now need to do some math. I grab the center and then figure out the adjacent and opposite sides of the triangle that is represented by the center of the image, the start point of the manipulation, and the delta point of the manipulation. To limit work, I set a threshold to only rotate the image if I have moved at least ten degrees.
if (Rotate)
{
var m = e.GetCumulativeManipulation(image);
var element = e.OriginalSource as Image;
// Get a holder matrix – here for other reasons
Matrix matrix = lastMatrix;
// Get a center point of the rectangle
var orgCenter = new Point(element.Actua
//rotation math, get the lengths of the opposite and adjacent sides
double opposite = Math.Sqrt(Math.Pow(m.Translation.X - StartPoint.X, 2) + Math.Pow(m.Translation.Y - StartPoint.Y, 2));
double adjacent = Math.Sqrt(Math.Pow(m.Translation.X - orgCenter.X, 2) + Math.Pow(m.Translation.Y - orgCenter.Y, 2));
//get the radians by getting the inverse tangent of the opposite side divided by the
//adjacent side and then convert to degrees
double radians = Math.Atan(opposite / adjacent);
double angle = radians * (180 / Math.PI);
//write to the output window to see what is going on
Debug.WriteLine("Opposite == " + opposite.ToString());
Debug.WriteLine("Adjacent == " + adjacent.ToString());
Debug.WriteLine("Radians == " + radians.ToString());
Debug.WriteLine("Angle == " + angle.ToString());
//only act upon the rotate if the user moved more than ten degrees
if (angle > 10)
{
//create a new RotateTransform with the derived degrees and the center of the origin element
RotateTransform rotateXform = new RotateTransform();
rotateXform.Angle = angle;
rotateXform.CenterX = orgCenter.X;
rotateXform.CenterY = orgCenter.Y;
//set the transform of the image to the newly created RotateTransform object
element.LayoutTransform = rotateXform;
….
To give a visual of what is going on here is a rough drawing (I leave the equation for distance of a line to you):
Once the rotateXform is assigned to the element.LayoutTransform I am basically done. In this sample there are a couple of lingering problems that I have to address with the primary one being that the rotation is always positive due to the equation of a line. I need to keep track of the direction of the manipulation and adjust the sign accordingly and I suspect that will solve that problem.
Of note, this isn’t sophisticated like the ScatterView of the Surface, but it just serves to express the concept of being able to rotate when only single finger manipulation is available. A similar thing could be done to accomplish zoom. All of the pan code still runs the same as it is in the else of the condition that looks for the rotate flag (which is reset to false in the ManipulatinCompleted event.
If you need this sample feel free to reach out to me. I’m not posting it currently as it is incomplete and has some quirks, but it could serve as a start point.
Technorati Tags: WPF 4,multi-touch,single touch point,single finger,rotation,windows 7,manipulation,C#
Comments
- Anonymous
August 30, 2012
Like this? www.google.com/.../US8130211
