Upgrading System Center Configuration Manager (SCCM) LINUX Clients
OVERVIEW
Microsoft periodically releases updated Microsoft System Center Configuration Manager - Clients for Additional Operating Systems. The update releases often do not align with the Configuration Manager server or Windows client releases. You should periodically check the download site for the most current release.
Microsoft System Center Configuration Manager - Clients for Additional Operating Systems https://www.microsoft.com/en-us/download/details.aspx?id=47719
Now would be a great time to upgrade your older deployed System Center Configuration Manager (SCCM) Clients for Linux.
Disclaimer: The information provided below is an EXAMPLE using a single method for a single operating system with the expectation that you have a healthy SCCM environment in a supported configuration. It is highly recommended that you test your configurations in a non-production environment, tailoring the configuration to your environment. A good overview of this process can be found at https://technet.microsoft.com/en-us/library/jj573939.aspx#BKMK_UpgradeLinuxClient
The TechNet example is great in that it reminds administrators of the importance of keeping things simple. While the simple solution may be fine for a small deployment, it may be too simple for an enterprise. Today we will expand on the upgrade process by demonstrating a real-world example for an enterprise. Remember, there are a number of ways to approach this. This EXAMPLE is just one way.
The SCCM Linux client upgrade process leverages “AT” which is a Linux job execution scheduling tool. If the SCCM client executes the upgrade directly, it would fail. During the upgrade process, the SCCM Linux client process (ccmexecd) will be terminated, the binaries removed and then replaced by the newer version. To get around the process termination, AT functions as an out-of-band execution mechanism.
The overall upgrade process is:
- CREATE DEPLOYMENT COLLECTION(S)
- CREATE A DEPLOYMENT PACKAGE (WITH LOGIC)
- MONITOR DEPLOYMENT
During a first time SCCM Linux client install, a few values are required. At a minimum, the install requires that you specify a site code, its associated management point and an OS specific tar file containing the installation binaries. To perform the upgrade, those same values are required.
CREATE DEPLOYMENT COLLECTIONS
We start with creating deployment collections for a few reasons. First, there isn’t a consistent way to query from the client side to get the previously used, required install values. To ensure success in our example we will create query based collections that identifies systems that:
- Are UNIX and Linux agented systems
- Are running an agent less than the version we are deploying
- Are of a specific distribution
- Belong to a specified Site Code
- Connect to a specific Management Point.
The results will tell you everything required to perform the upgrade. Another critical reason to create collections is that it will determine the number of upgrade packages you require. Based on this example, you will need a package for every site code.
For production environments, it is recommended that you build a hierarchy of limiting collections. A site code hierarchy may look like:
 _Global LINUX Clients
|_Global LINUX Clients Centos 6
| |_ Global LINUX Clients CentOS 6 SC1
|    |_ Global LINUX Clients CentOS 6 SC1 Not Current
| |_ Global LINUX Clients CentOS 6 SC2
|    |_ Global LINUX Clients CentOS 6 SC2 Not Current
|_ Global LINUX Clients Centos 7
| |_ Global LINUX Clients Centos 7 SC1
|    |_ Global LINUX Clients Centos 7 SC1 Not Current
| |_ Global LINUX Clients Centos 7 SC2
|    |_ Global LINUX Clients Centos 7 SC2 Not Current
|_ Global LINUX Clients RedHat 6
| |_ Global LINUX Clients RedHat 6 SC1
|    |_ Global LINUX Clients RedHat 6 SC1 Not Current
| |_ Global LINUX Clients RedHat 6 SC2
|    |_ Global LINUX Clients RedHat 6 SC2 Not Current
|_ Global LINUX Clients RedHat….
|_ ….and so on
The above hierarchy example is for illustration purposes. Your will need to build a hierarchy that suits your organization’s needs.
WQL query statements for those collections may look like:
UNIX AND LINUX AGENT
select SMS_R_SYSTEM.ResourceID,SMS_R_SYSTEM.ResourceType,SMS_R_SYSTEM.Name,SMS_R_SYSTEM.SMSUniqueIdentifier,SMS_R_SYSTEM.ResourceDomainORWorkgroup,SMS_R_SYSTEM.Client from SMS_R_System where SMS_R_System.ClientEdition = 13
CENTOS LINUX 7
select SMS_R_SYSTEM.ResourceID,SMS_R_SYSTEM.ResourceType,SMS_R_SYSTEM.Name,SMS_R_SYSTEM.SMSUniqueIdentifier,SMS_R_SYSTEM.ResourceDomainORWorkgroup,SMS_R_SYSTEM.Client from SMS_R_System where SMS_R_System.OperatingSystemNameandVersion like "CentOS Linux 7%"
CLIENT ASSOCIATED TO SITECODE SC1
select SMS_R_SYSTEM.ResourceID,SMS_R_SYSTEM.ResourceType,SMS_R_SYSTEM.Name,SMS_R_SYSTEM.SMSUniqueIdentifier,SMS_R_SYSTEM.ResourceDomainORWorkgroup,SMS_R_SYSTEM.Client from SMS_R_System where SMS_R_System.SMSInstalledSites = "SC1"
CLIENT NOT CURRENT
select SMS_R_SYSTEM.ResourceID,SMS_R_SYSTEM.ResourceType,SMS_R_SYSTEM.Name,SMS_R_SYSTEM.SMSUniqueIdentifier,SMS_R_SYSTEM.ResourceDomainORWorkgroup,SMS_R_SYSTEM.Client from SMS_R_System where LOWER(SMS_R_System.ClientVersion) < "5.00.7958.2437"
In the above “CLIENTS NOT CURRENT” query, you would edit the query every time you import a new client package and set the “less than client version” number to be the version number of the client you are going to install.
The following example is a PowerShell method for building out a similar hierarchy. The script requires that you pass the parameters selected from your environment for the following:
- Site Code
- The Client OS
- The Client Version (as seen from the SCCM client)
- The Limiting Collection (normally the all systems collection)
 Param(
    $SiteCode = 'SC1',
    $ClientOS = 'CentOS Linux 7',
    $ClientVersion = '5.00.7958.2437',
    $LimitingCollectionID = 'SMS00001'
)
#Date Time
$TodaysDate = Get-Date -Format "yyyy-MM-dd"
#Collection  Comment
$CollectionComment = "Created by: Collection Creation Script; " +
                     "Created on: $($TodaysDate);" +
                     "Executed by: $($env:USERNAME)"
$CMRefreshSchedule = @{DurationInterval = 'Days'
                       DurationCount = 7
                       DayOfWeek = 'Saturday'
}
$LinuxClientMaintenanceCollections = @(
    @{
        Name = '_Global LINUX Clients'
        LimitingCollectionID = $LimitingCollectionID
        RefreshSchedule = (New-CMSchedule @CMRefreshSchedule -Start (Get-Date -Hour 01 -Minute 00 -Second 00))
        RefreshType = 'Periodic'
        MembershipRules = @(
            @{  RuleType = 'Query'
                Params = @{ RuleName = '_Global LINUX Clients'
                            QueryExpression = 'select SMS_R_SYSTEM.ResourceID,SMS_R_SYSTEM.ResourceType,SMS_R_SYSTEM.Name,SMS_R_SYSTEM.SMSUniqueIdentifier,SMS_R_SYSTEM.ResourceDomainORWorkgroup,SMS_R_SYSTEM.Client from SMS_R_System where SMS_R_System.ClientEdition = 13'
                }
            }
        )
    }
    @{
        Name = "_Global LINUX Clients $($ClientOS)"
        LimitingCollectionName = '_Global LINUX Clients'
        RefreshSchedule = (New-CMSchedule @CMRefreshSchedule -Start (Get-Date -Hour 01 -Minute 10 -Second 00))
        RefreshType = 'Periodic'
        MembershipRules = @(
            @{  RuleType = 'Query'
                Params = @{ RuleName = '_Global LINUX Clients'
                            QueryExpression = "select SMS_R_SYSTEM.ResourceID,SMS_R_SYSTEM.ResourceType,SMS_R_SYSTEM.Name,SMS_R_SYSTEM.SMSUniqueIdentifier,SMS_R_SYSTEM.ResourceDomainORWorkgroup,SMS_R_SYSTEM.Client from SMS_R_System where SMS_R_System.OperatingSystemNameandVersion like `"$($ClientOS)%`""
                }
            }
        )
    }
    @{
        Name = "_Global LINUX Clients $($ClientOS) $($SiteCode)"
        LimitingCollectionName = "_Global LINUX Clients $($ClientOS)"
        RefreshSchedule = (New-CMSchedule @CMRefreshSchedule -Start (Get-Date -Hour 01 -Minute 20 -Second 00))
        RefreshType = 'Periodic'
        MembershipRules = @(
            @{  RuleType = 'Query'
                Params = @{ RuleName = '_Global LINUX Clients'
                            QueryExpression = "select SMS_R_SYSTEM.ResourceID,SMS_R_SYSTEM.ResourceType,SMS_R_SYSTEM.Name,SMS_R_SYSTEM.SMSUniqueIdentifier,SMS_R_SYSTEM.ResourceDomainORWorkgroup,SMS_R_SYSTEM.Client from SMS_R_System where SMS_R_System.SMSInstalledSites = `"$($SiteCode)`""
                }
            }
        )
    }
    @{
        Name = "_Global LINUX Clients $($ClientOS) $($SiteCode) Not Current"
        LimitingCollectionName = "_Global LINUX Clients $($ClientOS) $($SiteCode)"
        RefreshSchedule = (New-CMSchedule @CMRefreshSchedule -Start (Get-Date -Hour 01 -Minute 30 -Second 00))
        RefreshType = 'Periodic'
        MembershipRules = @(
            @{  RuleType = 'Query'
                Params = @{ RuleName = '_Global LINUX Clients'
                            QueryExpression = "select SMS_R_SYSTEM.ResourceID,SMS_R_SYSTEM.ResourceType,SMS_R_SYSTEM.Name,SMS_R_SYSTEM.SMSUniqueIdentifier,SMS_R_SYSTEM.ResourceDomainORWorkgroup,SMS_R_SYSTEM.Client from SMS_R_System where LOWER(SMS_R_System.ClientVersion) < `"$($ClientVersion)`""
                }
            }
        )
    }
)
#Check for the folder
If (Get-Item ('DeviceCollection\_Global LINUX Clients')) {$true}
else {
    mkdir ('DeviceCollection\_Global LINUX Clients')
    Start-Sleep -Seconds 5
}
Foreach ($Collection in $LinuxClientMaintenanceCollections){
    $ColParams = $Collection.Clone()
    $ColParams.Remove('MembershipRules')
    $ColParams.Add('Comment',$CollectionComment)
    New-CMDeviceCollection @ColParams
    Foreach ($rule in $Collection.MembershipRules){
        $RuleParams = $Rule.Params
         switch($rule.RuleType) {
            'None' {}
            'Query' {Add-CMDeviceCollectionQueryMembershipRule -CollectionName $Collection.Name  @RuleParams }
            'Include' {Add-CMDeviceCollectionIncludeMembershipRule -CollectionName $Collection.Name @RuleParams }
            'Exclude' {Add-CMDeviceCollectionExcludeMembershipRule -CollectionName $Collection.Name @RuleParams}
        }
    }
    #Move Collection to Folder
    Get-CMDeviceCollection -Name $Collection.Name | Move-CMObject -FolderPath ('DeviceCollection\_Global LINUX Clients')
}
Now that you have a picture of the landscape that requires upgrading, you can create pilot groups. Create collections that have direct membership of clients chosen from your “Not Current” collections that match the criteria that you have chosen to pilot. For example, you may choose to pilot:
- An array of OS release versions
- System that have different security hardening configurations
- Systems with different application loads
- Development machines versus production machines
Whatever your criteria, you can now choose a smaller sampling of systems to verify the success of the SCCM Client Upgrade package.
CREATE A DEPLOYMENT PACKAGE (WITH LOGIC)
To begin, you need to create a deployment package for the new client. For a larger deployment, the logic would ideally include:
- Simple dynamic setup
- Logging to a syslog server
- Performing post deployment cleanup
Preparing the Installation Files
- On a Windows system, download the installation bits from https://www.microsoft.com/en-us/download/details.aspx?id=47719
- Execute the downloaded Config Mgr Clients for Linux.EXE file to unpack the installation media. Store the extracted files in a folder. Example: Client-5.00.7958.2437
- Create a script file called schedule_upgrade.sh It is highly recommended that you created this script on a LINUX system to avoid file encoding issues and Unicode characters. This script will be executed by the older SCCM client. It will perform an in-place upgrade of the client. Utilize the following script as an example for your pilot. Customize it as need. The logic in the script is:
* Accept the paramaters of a site code and management point.
* Create a log function that will be used for troubleshooting and execution history.
* Define the installation source path.
* Update the install script with the correct execution path.
* Schedule the upgrade (in the example for 64-bit systems).
* Schedule the post upgrade cleanup.
 #!/bin/sh
SITECODE=$1
MPSERVER=$2
TARGETVERSION=5.00.7958.2437
###############################################################################
# EDIT ONLY THE VALUES ABOVE. THE TARGET VERSION VALUE MUST EXACTLY MATCH
# THE VERSION NUMBER OF THE CLIENT UPGRADE
###############################################################################
LOGDIR=/opt/microsoft/cm/packagelog/
LOGFILE=$LOGDIR/sccm_client_upgrade_$TARGETVERSION.log
INSTALLPATH=/tmp/upgrade
TARGETPATH=/opt/microsoft/cm/bin
SOURCEPATH=$(printf `pwd`)
###############################################################################
# LOG FUNCTION TO WRITE LOCAL LOG FILE AND TO /VAR/LOG/MESSAGES
###############################################################################
writelog() {
    echo ${*} 2>&1 >> $LOGFILE
    if [ -f /bin/logger ]
    then
        logger ${*}
    fi
}
###############################################################################
# Create an upgrade log file to track activity
###############################################################################
if [ ! -d $LOGDIR ]
then
    mkdir -p $LOGDIR
fi
if [ -f $LOGFILE ]
then
    rm -f $LOGFILE
fi
touch $LOGFILE
writelog $(date)
writelog "CCMEXECD - Log file created for the SCCM client upgrade to $TARGETVERSION from path $INSTALLPATH"
###############################################################################
writelog "CCMEXECD - Defining the install path directory. Removing installation bits from any previous upgrade."
###############################################################################
if [ ! -d $INSTALLPATH ]
then
    mkdir -p $INSTALLPATH
else
    rm -Rf $INSTALLPATH
    mkdir -p $INSTALLPATH
fi
###############################################################################
writelog "CCMEXECD - Copy the installation media from the package download cache folder to the installation directory"
###############################################################################
cp $SOURCEPATH/* $INSTALLPATH
writelog "CCMEXECD - Editing the $INSTALLPATH/execute_upgrade.sh file with the correct variables for installation."
sed -i s@INSTALLPATH@$INSTALLPATH@g $INSTALLPATH/execute_upgrade.sh
sed -i s@MPSERVER@$MPSERVER@g $INSTALLPATH/execute_upgrade.sh
sed -i s@SITECODE@$SITECODE@g $INSTALLPATH/execute_upgrade.sh
writelog "CCMEXECD - Editing the $INSTALLPATH/post_install_check.sh file with the correct variables for installation."
sed -i s@TARGETPATH@$TARGETPATH@g $INSTALLPATH/post_install_check.sh
sed -i s@TARGETVERSION@$TARGETVERSION@g $INSTALLPATH/post_install_check.sh
sed -i s@LOGFILE@$LOGFILE@g $INSTALLPATH/post_install_check.sh
###############################################################################
# Create a one time AT job to execute the upgrade. If the upgrade were
# executed by SCCM it would fail because the runtime would be killed
# during client uninstall. To resolve this, it is executed out of band
# using AT.
# Note: Execution cannot be run from within the /opt/microsoft/configmgr/.cache/ directory.
# The upgrade to the modern clients changes the directory structure and performs clean-up
# during client upgrade. The modern client installation is moved to /opt/microsoft/cm/
###############################################################################
writelog "CCMEXECD - Initiating SCCM Client Upgrade AT job."
###############################################################################
# Change Directory to the upgrade directory before initiating the AT job
# otherwise AT job PWD becomes the SCCM .cache/package directory (which will
# not exist at the time of the execution.
###############################################################################
cd $INSTALLPATH
###############################################################################
# Checking the version of the SCCM client in the event you are redeploying the
# package and the collections have not re-evaluated (collection membership).
###############################################################################
if [ -f $TARGETPATH/ccmexec ]
then
    INSTALLEDVERSION=$(echo $(/opt/microsoft/cm/bin/ccmexec -v) | cut -d " " -f 3)
    writelog "CCMEXECD - Checking the current installed version."
    writelog "CCMEXECD - Installed SCCM version is $INSTALLEDVERSION"
    if [ $INSTALLEDVERSION = "TARGETVERSION" ]
    then
        writelog "CCMEXECD - Client is already at the version for this package."
        writelog "CCMEXECD - Removing installation directory."
        rm -Rf INSTALLPATH
    else
        at -f $INSTALLPATH/post_install_check.sh -m now + 15 min
        at -f $INSTALLPATH/execute_upgrade.sh -m now
    fi
else
    at -f $INSTALLPATH/post_install_check.sh -m now + 15 min
    at -f $INSTALLPATH/execute_upgrade.sh -m now
fi
**WARNING** It is recommended that you create, edit and save this script on a LINUX machine. If you do use a Windows based editor, ensure that you utilize one that saves the file in UNIX format with an encoding of UTF-8 without Byte Order Marks. By default, most Windows file editors add carriage returns AND line feeds to scripts (CRLF) as well as encodes the files in Unicode. If you choose to edit the files in Windows, see another post ( Editing / Converting LINUX scripts from a Windows System ) to ensure they are formatted correctly for LINUX.
Create a script file called execute_upgrade.sh This script will be executed by an AT job. Because the script sources another script (the Linux SCCM client install script).
 #!/bin/sh
# DO NOT ALLOW ANY TRAILING SPACES OR RETURN CARRAIGES BEYOND THE TAR FILE
INSTALLPATH/install -sitecode SITECODE -mp MPSERVER -keepdb INSTALLPATH/ccm-Universalx64.tar
Create a script file called post_install_check.sh This script will also be executed by an AT job at a later time to check the status of the install and perform clean up.
 #!/bin/sh
###############################################################################
# LOG FUNCTION TO WRITE LOCAL LOG FILE AND TO /VAR/LOG/MESSAGES
###############################################################################
writelog() {
    echo ${*} >> LOGFILE
    if [ -f /bin/logger ]
    then
        logger -s ${*}
    fi
}
###############################################################################
writelog "CCMEXECD - Performing clean-up tasks. If there are any issues, check /var/spool/mail/root"
###############################################################################
if [ -f TARGETPATH/ccmexec ]
then
    INSTALLEDVERSION=$(echo $(/opt/microsoft/cm/bin/ccmexec -v) | cut -d " " -f 3)
    writelog "CCMEXECD - Installed SCCM version is $INSTALLEDVERSION"
    if [ $INSTALLEDVERSION = "TARGETVERSION" ]
    then
        writelog "CCMEXECD - Removing installation directory."
        rm -Rf INSTALLPATH
    fi
else
    if [ -f /opt/microsoft/configmgr/bin/ccmexec ]
    then
       INSTALLEDVERSION=$(echo $(/opt/microsoft/configmgr/bin/ccmexec -v) | cut -d " " -f 3)
       writelog "CCMEXECD - Installed SCCM version is $INSTALLEDVERSION"
    fi
    writelog "CCMEXECD - ## The expected version of TARGETVERSION was not found. Leaving the installation directory.  ##"
fi
Manually test your scripts. Copy / SCP the scripts and installation files to a Linux test machine and verify they execute as desired. If there are issues, review the created log file as well as your local mail spool file to check the status of the executed upgrade job.
DEPLOYMENT PACKAGE
Once your scripts are tested, create a SCCM package (see https://technet.microsoft.com/en-us/library/gg682112.aspx ). SCCM supports only package deployment to UNIX / LINUX systems. Applications are a Windows specific concept and are not support on non-windows platforms. (see Deploying Software to Linux and UNIX Servers in Configuration Manager https://technet.microsoft.com/en-us/library/jj573943.aspx ) Next, you will create a deployment package. You will follow his process to create and deploy a separate package for each site code in your SCCM hierarchy. In the hierarchy example above, you would create packages for SC1 and SC2
Create the Deployment Package
Place your scripts in your SCCM package source share folder. (\\servername\sharename\path) Example \\fileserver\packagesource$\Microsoft\SystemCenter\ConfigManager\Linux\Client-5.0.7958.2437
Start the Create Package Wizard. Fill out the fields with the appropriate values and select the package source folder where you stored your shell scripts.
[caption id="attachment_425" align="alignnone" width="812"]
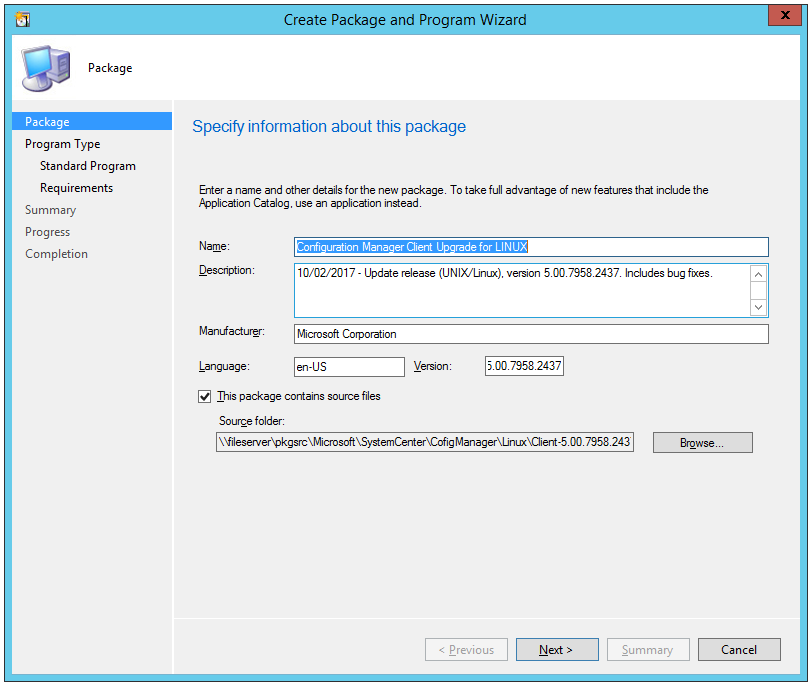 Specify information about this package[/caption]
On the Program Type page, select “Standard program”.
In the program command line, define the shell you intend to use, the script specified in your package followed by the two parameters of the site code and the management point. Example:
/bin/sh ./execute_upgrade.sh SC1 sccmmp1.contoso.corpSet the program to run “normal”. The “Program can run” value must be set to “Whether or not a user is logged on”. SCCM client execution does not support the user context on non-Windows platforms.
[caption id="attachment_535" align="alignnone" width="719"]
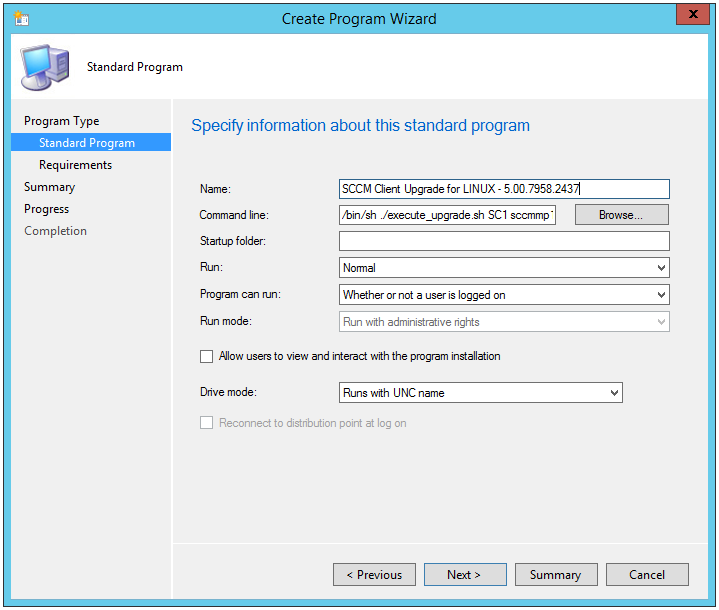 Specify information about this standard program[/caption]
On the Requirements page, select the appropriate values for your environment. The Platform requirements can be set to either “This program can be run on any platform” or a platform specific setting. It is recommended that you either filter at the collection level and or by the package requirements. In this example, the program is set to run on any platform and will be filtered at the collection level.
Set the Estimated disk space to be 300MB. This will account for:
* the package content size
* the copy of the package it makes during deployment in the .cache/<packageID>/tmp directory
* the copy of the installation bits copied to /tmp/upgrade NOTE: After package deployment, the .cache/<PackageID> folder and subdirectories are deleted unless you checked the box to “Persist content in the client cache”Complete the wizard screens (next… next… close).
Distribute the Package
Ensure that you distribute the package to all the required DPs. (https://technet.microsoft.com/en-us/library/gg682083.aspx)
Deploy the Package
Utilize the existing collection created previously that contains the target LINUX machines that are now Not Current. ENSURE that you are targeting the collection with a package that is SPECIFIC to the site code and management point specified in the script.
[caption id="attachment_525" align="alignnone" width="796"]
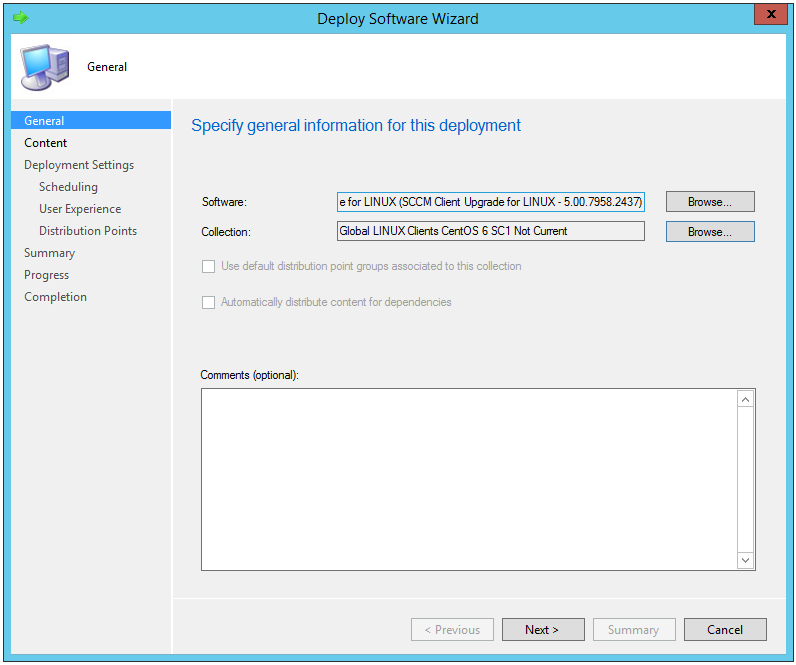 Specify general information for this deployment[/caption]
Select Next, on the “Specify the content destination” page.
On the “Specify settings to control how this software is deployed”, ensure that the “Purpose:” is set to “Required”.
[caption id="attachment_435" align="alignnone" width="790"]
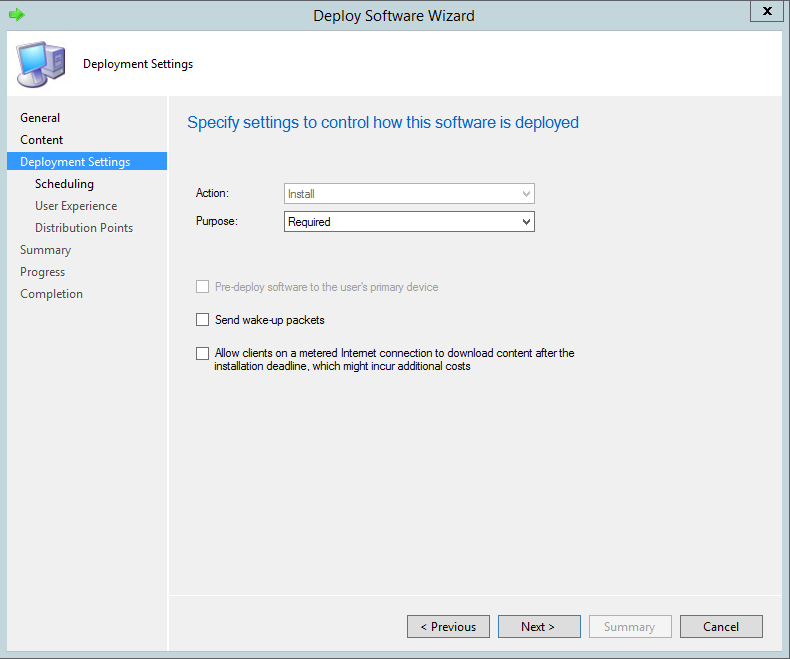 Deployment Settings[/caption]
On the Scheduling page, select “Schedule when this deployment will become available:” and choose the default date. For the “Assignment schedule”, select “New…”, utilizing the default date or choose “Assign immediately after this event” --> “Assign to the following Schedule” and click OK (which chooses the current date / time as the default). The values “log on and “log off” are not supported in LINUX deployments.
[caption id="attachment_465" align="alignnone" width="791"]
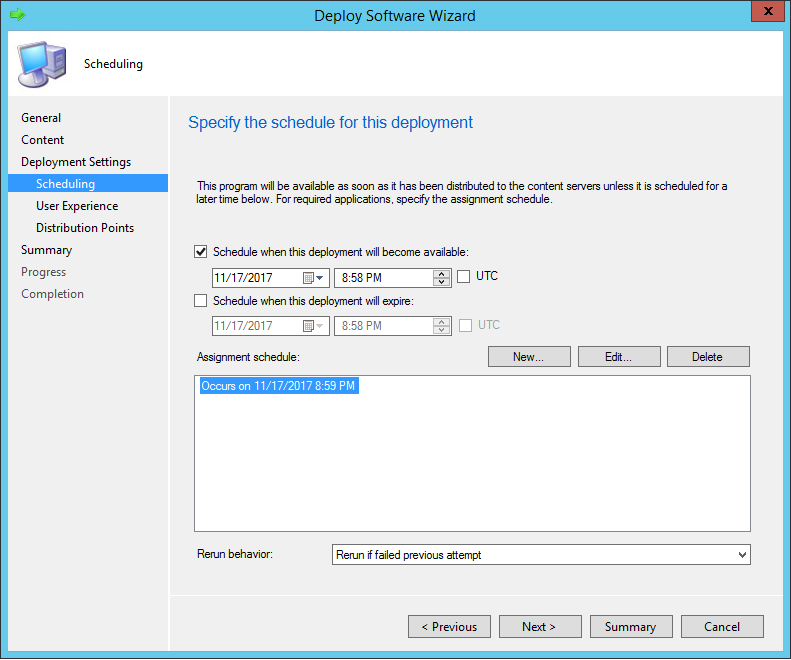 Specify the schedule for this deployment[/caption]
Click “Next >” on the User Experience page.
On the “Distribution Points” page, ensure the “Deployment options” are set to “Download content from distribution point and run locally”. Deselect the option to “Allow clients to share content”. Linux clients do not support branch cache. Click Next >
[caption id="attachment_455" align="alignnone" width="791"]
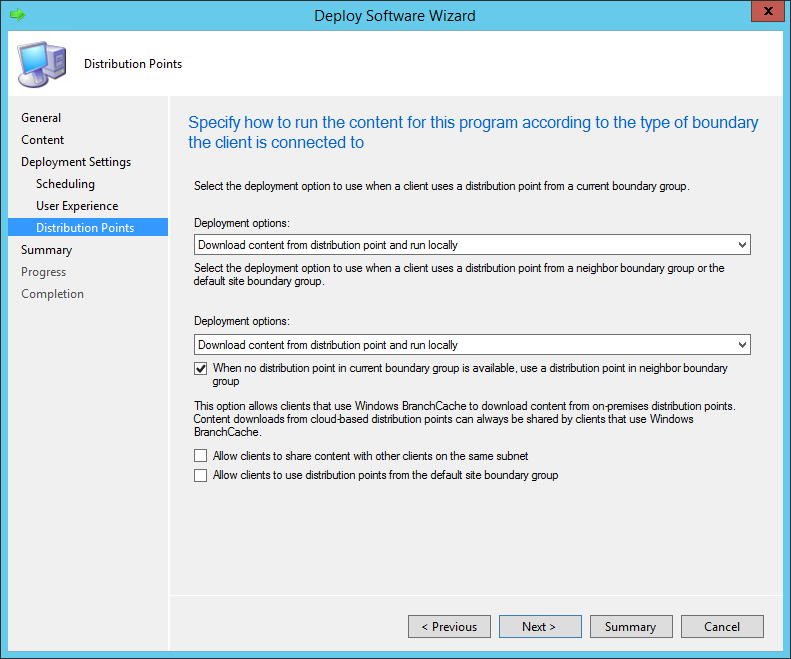 Distribution Points[/caption]
On the Summary page, click Next>
Click Close.
Open the properties page of the package that was just deployed.
MONITOR DEPLOYMENT
There are multiple ways to monitor the deployment. There are some challenges in monitoring the upgrade. Monitoring the deployment does not tell you whether the upgrade is going well. Monitoring the deployment indicates how well the package has been delivered to the client and the AT job has been setup. Once those actions are completed, depending upon your enterprise configurations, you may loose a little visibility into what is occurring at a large scale. Here are a few ways to approach monitoring your successful deployment.
Monitor the Collections
Within the Configuration Manager Console, navigate to the device collections created above. For example select your Global LINUX Clients collection. Within the console, add the columns for:
- Agent Edition
- Client Version
- Management Point
- Operating System
- Site Code
Periodically you can refresh your collections to view the progress of the deployment across your sites
Monitor Deployment Reports
The deployment reports will provide good view of how successful the older Linux clients have downloaded the package and have executed the shell script setting up the AT job.
Monitor Syslog
Many enterprises have centralized logging for Linux. A common method used is syslog. In this example, centralized syslog is configured using rsyslog. The syslog server that aggregates all logs can be either monitored with tail or queried using grep. In the example below, the query is based on the log entry created by the installation script using the logger command. CCMEXECD was part of the text in the log entry.
 [logadmin@sylogserver ~]$ cat /var/log/messages | grep -e CCMEXECD
Mar 18 22:56:41 centos7test logger: CCMEXECD - Log file created for the SCCM client upgrade to 5.00.7958.2437 from path /tmp/upgrade
Mar 18 22:56:41 centos7test logger: CCMEXECD - Defining the install path directory. Removing installation bits from any previous upgrade.
Mar 18 22:56:41 centos7test logger: CCMEXECD - Copy the installation media from the package download cache folder to the installation directory
Mar 18 22:56:42 centos7test logger: CCMEXECD - Editing the /tmp/upgrade/execute_upgrade.sh file with the correct variables for installation.
Mar 18 22:56:42 centos7test logger: CCMEXECD - Editing the /tmp/upgrade/post_install_check.sh file with the correct variables for installation.
Mar 18 22:56:42 centos7test logger: CCMEXECD - Initiating SCCM Client Upgrade AT job.
Mar 18 23:01:00 centos7test root: CCMEXECD - Performing clean-up tasks. If there are any issues, check /var/spool/mail/root
Mar 18 23:01:00 centos7test root: CCMEXECD - Installed SCCM version is 5.00.7958.2437
Mar 18 23:01:00 centos7test root: CCMEXECD - Removing installation directory.
Mar 19 00:53:09 centos6dev logger: CCMEXECD - Log file created for the SCCM client upgrade to 5.00.7958.2437 from path /tmp/upgrade
Mar 19 00:53:09 centos6dev logger: CCMEXECD - Defining the install path directory. Removing installation bits from any previous upgrade.
Mar 19 00:53:09 centos6dev logger: CCMEXECD - Copy the installation media from the package download cache folder to the installation directory
Mar 19 00:53:09 centos6dev logger: CCMEXECD - Editing the /tmp/upgrade/execute_upgrade.sh file with the correct variables for installation.
Mar 19 00:53:09 centos6dev logger: CCMEXECD - Editing the /tmp/upgrade/post_install_check.sh file with the correct variables for installation.
Mar 19 00:53:09 centos6dev logger: CCMEXECD - Initiating SCCM Client Upgrade AT job.
Mar 19 00:53:09 centos6dev logger: CCMEXECD - Checking the current installed version.
Mar 19 00:53:09 centos6dev logger: CCMEXECD - Installed SCCM version is 5.00.7958.2437
Mar 19 01:08:00 centos6dev root: CCMEXECD - Performing clean-up tasks. If there are any issues, check /var/spool/mail/root
Mar 19 01:08:00 centos6dev root: CCMEXECD - Installed SCCM version is 5.00.7958.2437
Mar 19 01:08:00 centos6dev root: CCMEXECD - Removing installation directory.
Monitor an Individual Client
For your pilot group, you will want to analyze a few clients closely to ensure that the upgrade goes exactly as you would like it. It is recommended that you edit the existing client configuration and enable TRACE mode.
The configuration file in the older clients for the logs is /opt/microsoft/configmgr/etc/scxcm.conf it supports the log settings of: ERROR,WARNING INFO and TRACE.
To change the log level, edit the scxcm.conf and change each instance of the tag MODULE to the desired log level.
Ensure that you ONLY use TRACE during troubleshooting. The trace log is very verbose and can fill up a small disk quickly if you are not paying attention.
To speed up testing, you can execute a policy pull:
/opt/microsoft/configmgr/bin/ccmexec -rs policy
In real time you can watch the logs:
tail -f /var/opt/microsoft/scxcm.log
To get the most detail for testing configure the existing SCCM client for LINUX in trace mode. Once you have restarted the client, initiate a policy pull and GREP on the package ID. A simple one-line command example would be:
/opt/microsoft/configmgr/bin/ccmexec -rs policy ; tail -f /var/opt/microsoft/scxcm.log | grep --color -e SC100091
TROUBLESHOOTING DEPLOYMENTS
For deployment troubleshooting deployment infrastructure issues, see the Troubleshooting Deployment section of https://blogs.technet.microsoft.com/jeffbutte/2016/02/01/deploying-a-script-or-package-to-a-linux-host-with-system-center-configuration-manager-2012-r2/
Analyze the Package Log
As long as the deployment infrastructure is functional the next step would be to evaluate the log file generated by the execute_install.sh script. Based on the example script, the log file will be found in /opt/microsoft/cm/packagelog
 [root@centos6dev ~]# cat /opt/microsoft/cm/packagelog/sccm_client_upgrade_5.00.7958.2437.log
Mon Mar 19 00:53:08 EDT 2018
CCMEXECD - Log file created for the SCCM client upgrade to 5.00.7958.2437 from path /tmp/upgrade
CCMEXECD - Defining the install path directory. Removing installation bits from any previous upgrade.
CCMEXECD - Copy the installation media from the package download cache folder to the installation directory
CCMEXECD - Editing the /tmp/upgrade/execute_upgrade.sh file with the correct variables for installation.
CCMEXECD - Editing the /tmp/upgrade/post_install_check.sh file with the correct variables for installation.
CCMEXECD - Initiating SCCM Client Upgrade AT job.
CCMEXECD - Checking the current installed version.
CCMEXECD - Installed SCCM version is 5.00.7958.2437
CCMEXECD - Performing clean-up tasks. If there are any issues, check /var/spool/mail/root
CCMEXECD - Installed SCCM version is 5.00.7958.2437
CCMEXECD - Removing installation directory.
Analyze the Mail Log
In the above example, the -m switch is used with the AT job. This will send mail to the user when the job has completed even if there was no output. CentOS uses POSTFIX so mail messages can be found in /var/spool/mail/ Since the SCCM client executes jobs as root, the mail file will be /var/spool/mail/root
 [root@centos6dev ~]# cat /var/spool/mail/root
From root@centos6dev.contoso.corp Mon Mar 19 00:53:28 2018
Return-Path: <root@centos6dev.contoso.corp>
X-Original-To: root
Delivered-To: root@centos6dev.contoso.corp
Received: by centos6dev.contoso.corp (Postfix, from userid 0)
id B662940BDBD6; Mon, 19 Mar 2018 00:53:28 -0400 (EDT)
Subject: Output from your job 13
To: root@centos6dev.contoso.corp
Message-Id: <20180319045328.B662940BDBD6@centos6dev.contoso.corp>
Date: Mon, 19 Mar 2018 00:53:28 -0400 (EDT)
From: root@centos6dev.contoso.corp (root)
Beginning installation of Configuration Manager
Checking Prerequisites...
Removed symlink /etc/systemd/system/multi-user.target.wants/ccmexecd.service.
Generating a 2048 bit RSA private key
*************************+++++
***************************+++++
unable to write 'random state'
writing new private key to '/etc/opt/microsoft/cm/omi/ssl/omikey.pem'
-----
Start to kill old ccmexec process
Done
Datastore found in /var/opt/microsoft/cm.
Configuring CCMExec service(ccmexecd.service) ...
Created symlink from /etc/systemd/system/multi-user.target.wants/ccmexecd.service to /usr/lib/systemd/system/ccmexecd.service.
Starting Configuration Manager...
From root@centos6dev.contoso.corp Mon Mar 19 00:58:01 2018
Return-Path: <root@centos6dev.contoso.corp>
X-Original-To: root
Delivered-To: root@centos6dev.contoso.corp
Received: by centos6dev.contoso.corp (Postfix, from userid 0)
id 5639540BDBD6; Mon, 19 Mar 2018 01:08:01 -0400 (EDT)
Subject: Output from your job 12
To: root@centos6dev.contoso.corp
Message-Id: <20180319045801.5639540BDBD6@centos6dev.contoso.corp>
Date: Mon, 19 Mar 2018 01:08:01 -0400 (EDT)
From: root@centos6dev.contoso.corp (root)
root: CCMEXECD - Performing clean-up tasks. If there are any issues, check /var/spool/mail/root
root: CCMEXECD - Installed SCCM version is 5.00.7958.2437
root: CCMEXECD - Removing installation directory.
COMMON ISSUES
Issue: The upgrade runs as an AT job but only generates an error:
Archive file not found or no read permissions
Cause 1 : The install shell script in the execute_upgrade.sh has either space, a return carriage or additional data following the specified TAR file. The install script must be the last line in the execute_upgrade.sh script and must not have trailing data after the TAR file.
Cause 2: The install shell script parameters in the execute_upgrade.sh are in incorrect. All specified parameters must be specified before the platform specific TAR file. The TAR file must be the last parameter.
Cause 3: The execute_upgrade.sh script is not in the proper format. To check the scripts, run the Linux “file” command against the scripts
 [root@centos70]# file *.sh
 execute_upgrade.sh:    POSIX shell script, ASCII text executable
 post_install_check.sh: POSIX shell script, ASCII text executable
 schedule_upgrade.sh:   POSIX shell script, ASCII text executable, with CRLF line terminators
If you end up with file properties of: POSIX shell script, ASCII text executable, with CRLF line terminators then your file has been likely created with a Windows based editor that inserted Byte Order Marks (BOM). Update the file to the correct format.
Issue: The upgrade runs as an AT job but only generates an error:
 install: missing file operand
 Try 'install --help' for more information.
Cause: The schedule_upgrade.sh script is missing the change directory (cd) to the correct directory that the upgrade files are copied to. When the AT job is scheduled, it inherits the present working directory (pwd) during the execution of the script.
Hopefully this use case example has been helpful towards planning your upgrade!
Special thanks to Kevin Kasalonis for his contributions to this post.
