Scenario
Within your organization mobile workers are frequently working outside of the office and to accommodate this mobile workforce, you have setup Azure AD and joined the Windows 10 machines of the mobile workforce to Azure AD. The number of mobile workers keeps growing and the task to setup these Azure AD joined Windows 10 machines is taking more and more of your time. You want to enable your mobile workers to easily configure their own machines for Azure AD and Microsoft Intune (Mobile Device Management). Within parts of the organization the mobile workforce regularly changes and their machines are transferred between employees, for this process you reset and re-enroll the devices into Azure AD which takes up some of your time as well.
Solution
For this solution you want to implement Windows AutoPilot for easy enrollment of out of the box devices into Azure AD and Microsoft Intune. This will enable the end-user to get productive very quickly and without Administrator intervention. Device information, necessary for Windows AutoPilot, will be loaded into the Windows Store for Business automatically by your reseller. Settings and Applications will be delivered by Microsoft Intune.
To give your mobile workers the possibility to swap devices and reset them back to its original state, the devices must be configured for Windows Automatic Redeployment. This will enable your mobile workers to initiate a Windows redeployment while keeping the device in scope of your management tools.
Technical Information
Windows AutoPilot
Windows AutoPilot is a collection of technologies used to set up and pre-configure new devices, getting them ready for productive use.
This solution enables an IT department to achieve the above with little to no infrastructure to manage, with a process that's easy and simple.
Windows AutoPilot allows you to:
- Automatically join devices to Azure Active Directory (Azure AD)
- Auto-enroll devices into MDM services, such as Microsoft Intune (Requires an Azure AD Premium subscription)
- Restrict the Administrator account creation
- Create and auto-assign devices to configuration groups based on a device's profile
- Customize OOBE content specific to the organization
For more detailed information about Windows AutoPilot, click here and here
Windows Automatic Redeployment
IT departments can use Windows Automatic Redeployment to quickly remove personal files, apps, and settings, and reset Windows 10 devices from the lock screen any time and apply original settings and keep management enrollment (Azure Active Directory and Mobile Device Management) so the devices are ready to use. With Windows Automatic Redeployment, devices are returned to a fully configured or known IT-approved state.
For more detailed information about Windows Automatic Redeployment, click here
Configuration
This part will describe how you can configure your Azure AD and Microsoft Intune to enable Windows AutoPilot and Windows Automatic Redeployment.
Configure Windows AutoPilot
Get Device registration information
In order to register devices with the Microsoft Store for Business, you will need to acquire their hardware ID. Microsoft is actively working with various hardware vendors to enable them to provide the required information to you, or upload it on your behalf.
If you would like to capture that information by yourself, you can use the Get-WindowsAutoPilotInfo PowerShell script, which will generate a .csv file with the required information.
NOTE: This PowerShell script requires Windows 10 Creators Update or later.
How to add devices to the Windows Store for Business
In order to use Windows AutoPilot you need to register your devices within the Microsoft Store for Business. Previously you have obtained a .csv file from either your hardware vendor or created a .csv file by running the PowerShell script.
First, you need to create a Windows AutoPilot profile
- Sign in to Microsoft Store for Business
- Click Manage, and then click Devices.
- Click AutoPilot deployment, and then click Create new profile.
- Name your profile, choose the settings to include, and then click Create.
The new profile is added to the AutoPilot deployment list
You can manage multiple settings on the Windows AutoPilot Profile:
These settings are ON by default and can't be changed:
- Skip Cortana, OneDrive, and OEM registration setup pages
- Automatically setup for work or school
- Sign in experience with company or school brand
For your organization you can manage the following settings in the Windows AutoPilot Profile. They are OFF by default.
- Skip privacy settings
- Disable local admin account creation on the device
After you have created the Windows AutoPilot profile, you can import your devices and assign the Windows AutoPilot Profile to the devices:
Second, you need to add devices to the Microsoft Store for Business
-
- Sign in to Microsoft Store for Business
- Click Manage, and then click Devices.
- Click Add devices, navigate to the *.csv file and select it.
- Type a name for a new AutoPilot deployment group, or choose one from the list, and then click Add.
If you don't add devices to a group, you can select the individual devices to apply a profile to.
- Click the devices or AutoPilot deployment group that you want to manage. You need to select devices before you can apply an AutoPilot deployment profile. You can switch between seeing groups or devices by clicking View groups or View devices.
And last but not least, apply an AutoPilot deployment profile to your devices
- When you have devices selected, click AutoPilot deployment.
- Choose the AutoPilot deployment profile to apply to the selected devices.
- Microsoft Store for Business applies the profile to your selected devices, and shows the profile name on Devices.
Now you are ready to use Windows AutoPilot to enhance the experience of your end users while they enroll their devices into your organization. Windows AutoPilot requires
Configure Windows Automatic Redeployment via Mobile Device Management
Enable the Windows Automatic Redeployment authentication provider via Mobile Device Management with Microsoft Intune
- Sign in to Microsoft Azure Portal with your tenant administrator
- Click Intune and select Device Configuration
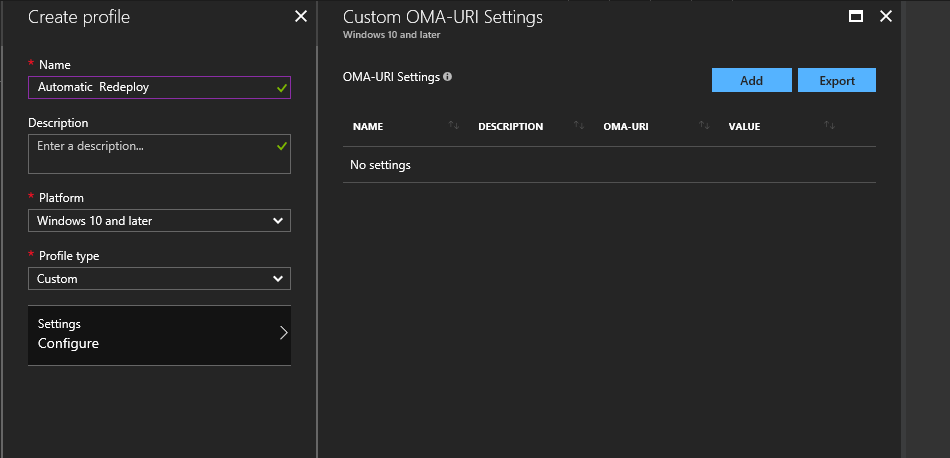
- Click on Profiles and click on Create Profile
- Create a profile with the following settings:
Use the following information to create the new Configuration Policy
- OMA-URI: ./Vendor/MSFT/Policy/Config/CredentialProviders/DisableAutomaticReDeploymentCredentials
- Data type: Integer
- Value: 0
NOTE: Windows Automatic Redeployment requires Windows 10 Fall Creators Update or later.
And so, how does this look like in real life....
New machine experience
When you start a new Windows 10 Fall Creators update, after specifying Region & Keyboard settings and connecting to a network (either physical or wireless) in the Out Of the Box Experience (OOBE) you end up in the following personalized screen.
The user will be able to logon with his Azure AD credentials and will automatically join his machine to Azure AD and enroll his device into Microsoft Intune.
Redeploying Windows within your organization
When your mobile workers wants to transfer his device to another user, they can initiate a Windows Automatic Redeployment from the lock screen.
- On the Windows lock screen, enter the keystroke: CTRL +
 + R. This keystroke will trigger the logon windows as shown below.
 - Sign in with an Azure AD account, which is allowed to join devices to Azure AD.
The logon will verify if the user has sufficient rights to redeploy the device. Additional verification will be done if the device has sufficient battery or is powered via AC before redeployment.
On a Surface Pro 3, the reset took less then 15 minutes before it end ups on the logon screen as shown below. Windows is set up and ready to go for a new user.
Comments
- Anonymous
December 08, 2017
The comment has been removed


