Delay that mail!
Just last week, I was clicking the Send button on an e-mail in Outlook when I thought to myself, (read this line in slo motion) "No, don't send yet- I need to remove that person from the thread!” I had forgotten to remove some people from the thread, but it was too late - the mail was gone! Yikes. It wasn’t too embarrassing, but it could have been.
If you're like me and sometimes click Send and then immediately regret it because you wanted to change something, there's a nifty Outlook trick that most people don't know about called "delayed send." I learned about it on the Microsoft Outlook blog, and a few co-workers sing the praises of this rule too.
With it, you can buy yourself some extra time before your mail goes out. If you remember something you want to fix, you can fish it out of the Outbox and make further edits.
Here’s how to turn on delayed send in Outlook 2007:
1. Go to Tools> Rules and Alerts andclick New Rule.
2. Select Check messages after sending and then click Next and thenclick Next again. When Outlook confirms that you want this rule to apply to every message you send, click Yes.
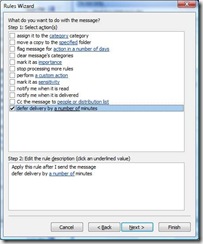
3. Check the checkbox next to defer delivery by a number of minutes:
4. Click on a number of and choose how many minutes you want mail to be delayed. One minute is a good place to start.
5. Click Finish.
6. If your mail server is Microsoft Exchange, Outlook will tell you that this is a client-side rule, which is fine (it does mean any mails you send via Web or mobile client won't be delayed - just ones you write in Outlook); just click OK. Then click OK to close the Rules and Alerts window.
If you want urgent e-mails to still be sent immediately, you can easily create a rule that permits messages marked with a particular category to bypass delayed send. Here's how:
1. Go back to Tools> Rules and Alerts and select the delayed-send rule that you just created and click Change Rule > Edit Rule Settings.
2. 2. Click Next, and click Yes for the “apply to every message” prompt. Click Next again.
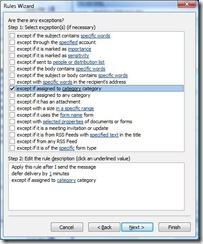
3. Under “Are there any exceptions?” check the checkbox next to except if assigned to category.
4. Click on the category link. You’ll be taken to the Color Categories window.
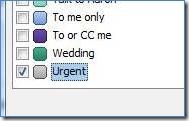
5. Click New to create a new category. Name it “Urgent” (or whatever you prefer) and click OK. (Note that some people who receive your messages marked in this manner may see the category attached to your message; it’s best to choose a category name that you don’t mind other people reading.)
6. You should now see the “Urgent” category checked:

7. Click OK. You should now see that the rule will only apply to messages that don’t have the “Urgent” category: Click Finish.
When writing a mail, here's how to mark it as “Urgent” so it skips the delayed send rule:
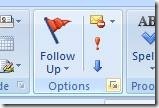
1. Under the Home tab, click the dialog launcher ( ) for the Options chunk:

2. Click on the Categories button and choose Urgent and then click Close.
That's it. When you click Send, the message will send immediately.
Thanks to the Microsoft Outlook Team blog for the background and steps for this tip.
Suzanne

