SharePoint 2013 Customizing Suite Bar
Before we start customizing the top bar lets get familiar with controls.
The top bar shows:
1. The Branding Title or Logo
2. Suite Bar with Links i.e Newsfeed, SkyDrive, Site
3. Welcome Control
Suite bar is designed as an out-of-the-box delegate control.
Now I will explain adding my own link called Search to the Suite Bar.
1. Create a new SharePoint 2013 empty project named ProjectSuteBarCustomisation. Provide the site url.
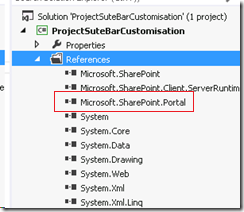
2. Add reference to Microsoft.SharePoint.Portal dll
3. Add Feature with scope Farm
4. Add User Control named CustomSuiteBarLinks.ascx.
In the code behind add reference to Microsoft.SharePoint.Portal.WebControls dll.
Change the partial class to inherit from MySuiteLinksUserControl instead of UserControl.
Add the below code in the cs file which override the Render method to add the custom link.
 public partial class CustomSuiteBarLinks : MySuiteLinksUserControl
    {
        readonly string linkText = "Search";
        readonly string linkNavigation = "https://bing.com";
        readonly string linkId = "lnkSearchLink";

        protected void Page_Load(object sender, EventArgs e)
        {
        }

        protected override void Render(HtmlTextWriter writer)
        {
            writer.RenderBeginTag(HtmlTextWriterTag.Style);
            writer.Write(".ms-core-suiteLinkList {display: inline-block;}");
            writer.RenderEndTag();
            writer.AddAttribute(HtmlTextWriterAttribute.Class, "ms-core-suiteLinkList");
            writer.RenderBeginTag(HtmlTextWriterTag.Ul);
            RenderSuiteLink(writer, linkNavigation, linkText, linkId, false);
            writer.RenderEndTag();
            base.Render(writer);
        }
    }
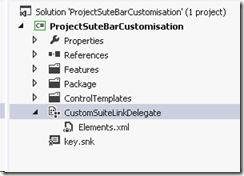
5. Add an Empty Element File and name it CustomSuiteLinkDelegate
6. Add the below code to the CustomSuiteLinkDelegate xml file
 <?xml version="1.0" encoding="utf-8"?>
<Elements xmlns="https://schemas.microsoft.com/sharepoint/">
  <Control Id="CustomSuiteLinkDelegate"
  Sequence="90"  ControlSrc="~/_ControlTemplates/15/ProjectSuteBarCustomisation/CustomSuiteBarLinks.ascx" />
</Elements>
7. Deploy the solution.
Comments
Anonymous
March 12, 2013
Hi, how I can change how the "home" button works?Anonymous
April 02, 2013
@Salvatore removing base.Render(writer); from the Render method, you have full control to manage your own buttons and links. Otherwise you have to write JQuery commands to control links, titles, ecc... without changing the OOBAnonymous
July 30, 2013
Great Article! Microsoft did a great job with the branding tools but in my opinion they are still a bit limited. Take a look at http://bindtuning.com and check how easily you can brand you site with a lot of features that are not included in the sharepoint by default.Anonymous
November 24, 2013
Thanks for the uploaded article but I have query about after deployment what are the step we have to do.Anonymous
January 28, 2014
Good article. One small correction. In step 6, the control ID should be set to the delegate ID in the master page so for example, <Control Id="SuiteLinksDelegate"... I anticipated the custom control would be need to be registered as safe, but it appears there is already a wild card inclusion for anything in the ControlTemplates folderAnonymous
June 30, 2014
The name 'RenderSuiteLink' does not exist in the current contextAnonymous
July 16, 2014
how can we do this using javascript


