Data Synchronization using SQL Azure Data Sync (Part II)
To begin, you have to access the Windows Azure portal. Go to www.windowsazure.com using your account. You have to own a subscription in order to access to the portal.
Select subscription’s name in the Azure Console, select database and click on the Create button.
You will have to select the region where you want to host the new server:
Choose your region and click Next.
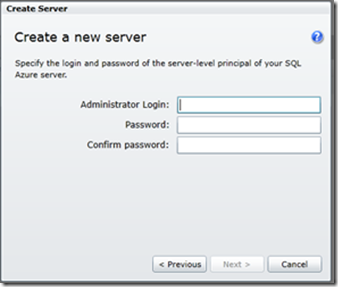
In the next screen, you will have to create a login in order to administer the server. You must use a strong password.
Remember that SQL Azure does not support Windows Authentication. Next, you will have to create a firewall rule to enable access to this server.
In the Create Server window click on Add button
In the Add Firewall Rule window, add a name for this rule and enter an IP range authorized to access the server.
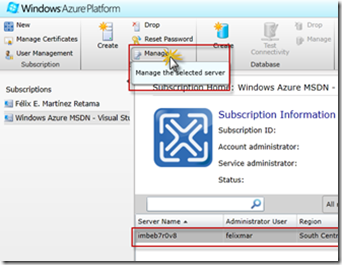
Finally, click on OK button. Now, you will be able to access the portal, to do this, select the server in the administration console and click on Manage.
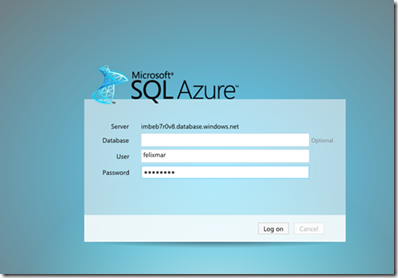
The SQL Azure Access Window is displayed. Enter the login information (user and password). Since we have not created a database yet, you can omit this field.
Click on Log On to access the portal. Now you are inside the administration portal. Click the Create Database button as shown in the following illustration.
Enter the database name in the Name field and select the database size. The available sizes depend on your subscription type. You can type a different collation for the database if you want at the bottom of the page. Click Submit to create the database.
After the database is created, you will see its properties including the fully qualified name on the upper left corner.
Although you can administer the database from here, it’s easier to use SQL Server Management Studio. All you have to do is click on Connect button and enter the fully qualified name in the server box and the login information:
Once connected, you will see your SQL Azure database in the object explorer:
An interesting point is that you can implement data synchronization using any Edition of SQL Server, including Express Edition. In fact I used this version in my own tests.
Configuring SQL Azure Data Sync
To configure SQL Azure Data Sync you have to access the Windows Azure Portal and select Data Sync option and click on Provision button.
Configuring Data Sync requires working on the Azure portal as well as in the local service user interface. You will need an Agent Key to configure the local service; the Agent Key is obtained from the SQL Azure Portal.
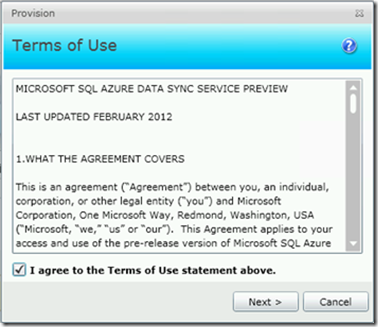
Accept the Terms of Use.
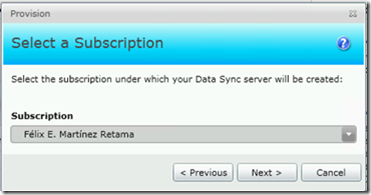
Select your subscription:
Click on Next and select the region where you want to provision the Data Sync Service:
Click on Finish and start configuring the service.
To start configuring the service, you have to follow the next steps:
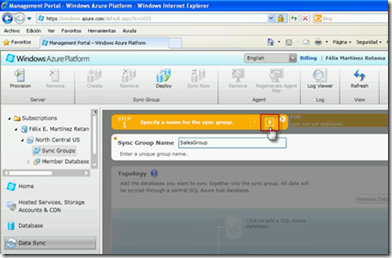
1. - Enter a name for the Sync Group and click on the next arrow ( > )
2. – In the Step 2 you will have to add a local database:
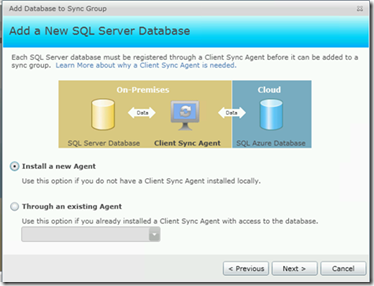
The window “Add Database to Sync Group” will appear:
3. – Choose Add new SQL Server database to the sync group and select the synchronization direction. Sync to the Hub lets you synchronize information from the On-Premise database to the SQL Azure database while Sync from the Hub is the opposite. If you want to sync from either side select Bi-Directional.
Click Next. Now you will have to configure the data sync Agent:
4. -Since this is the first time we are configuring the Agent, it is necessary to click on Install a new Agent. In case you have already installed and configured the Agent, you can select the option Through an existing Agent. Click Next to continue. You will be able to download the agent from the Internet in the next page:
5. – Click on Download and proceed to install the agent. The setup program is quiet straightforward and requires Microsoft.NET Framework 4.0; the setup programs will give you a link to download .NET Framework 4 in case you do not have it. The minimum OS version required is Windows Vista; if you have Windows XP you won’t be able to install it.
Once installed, you will need to specify a name for the Agent. Enter the name you wish to assign in the Agent Name textbox:
6. – Now you will need to an Agent Key which is required in order to configure the Agent. Click on Generate Agent Key to generate a new Key. The button will be enabled once you have installed the Agent.
7.- Click the Copy Button to copy the Key to the clipboard
In order to finish the SQL Azure Data Sync configuration, it is necessary to configure the Sync Agent first. I´ll switch to SQL Azure Sync Agent configuration.
Configuring SQL Azure Data SYnc Agent
The First time you start the Agent, the only available option is Submit Agent Key Configuration.
a) - Click on Submit Agent Key Configuration button to enter the agent Key.
If you still have the Key in the clipboard, you can paste it in the Agent Key textbox.
a) Click OK. If the key is correct, all the buttons in the toolbar will be enabled.
Now you will need to register your local server as well as the database you want to synchronize.
b) Click the Register button.
The SQL Azure Data Sync Agent will connect to your local SQL Server in order to register your database, this connection can use SQL Authentication or Windows Authentication, and you can choose whatever you want.
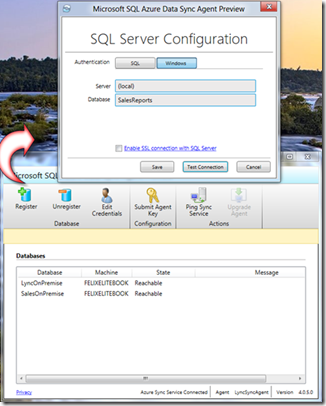
a) Enter the server name as well as the database name and click the Test Connection button.
If everything is fine you will see a confirmation message:
The registration information will be saved in the Data Sync Agent window:
This concludes the SQL Data Sync Agent configuration process. Now let´s switch to SQL Azure portal to continue with SQL Azure Data Sync process.
Database Sync Group (Continued…)
Now switch to the Add Database to Sync Group window and click Next.
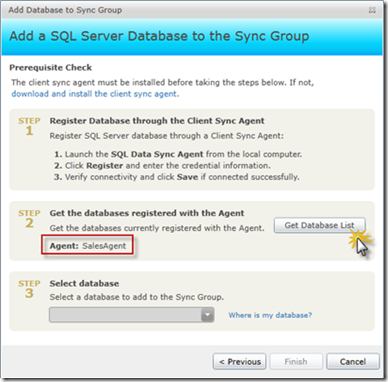
8. – In Step 2 click the Get Database List button to display the database you just registered.
9. - Finally, select the database, in this case SalesOnPremise which is the local database:
10. - Click Finish.
Add the SQL Azure Database
Now you we have to add the SQL Azure database that will be synchronized with the On-Premise database. This is done in the CLOUD section in the SQL Azure Portal.
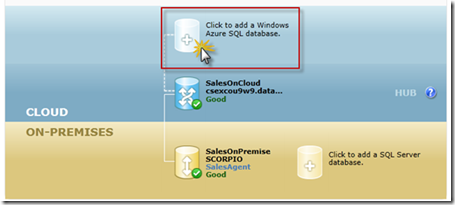
1.- Click on the icon with the leyend “Click to add a Windows Azure SQL database as the Sync Hub”
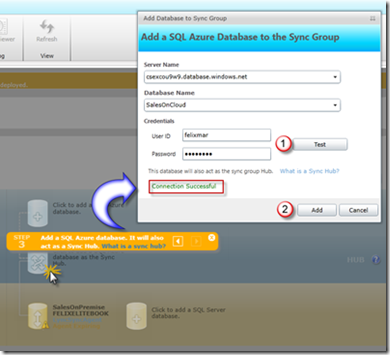
The window titled “Add Database to Sync Group” will display, enter the SQL Azure server name, the SQL Azure Database name and the authentication information.
2.- Click Test to verify the connection:
Click Add to save the information.
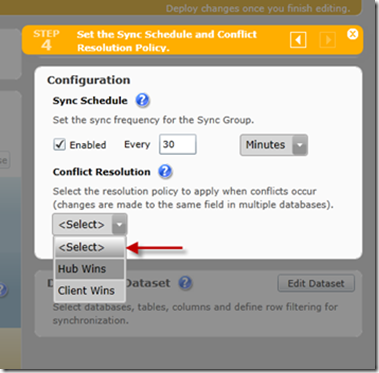
3. – Go to Step and configure the Synch Schedule, you can select any value between 5 minutes and 1 month. You can also specify conflict rules in case you have to overwrite data.
4.- Go to Step 5 and click the Edit Dataset button in order to define which tables and columns you want to synchronize.
5.- Apply a filter if you want to specify which rows will be synchronized, click on the Filter check box and write an expression.
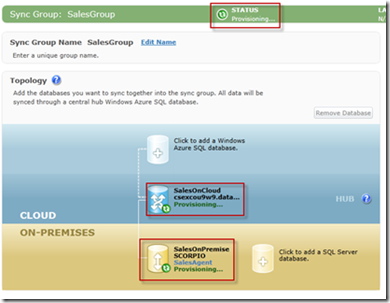
6.- Finally, deploy the changes by clicking Deploy button on the toolbar:
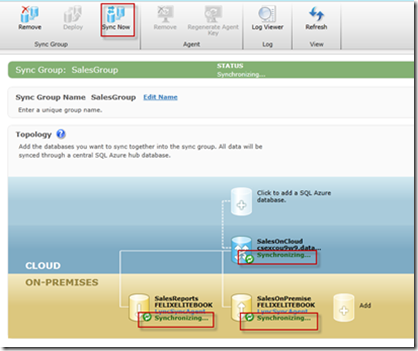
7.- To star synchronizing. Click on Sync Now button on the toolbar:
After the synchronization occurs, you will see a new Schema called DataSync inside your databases as well as several tables used to maintain synchronization:
And several stored procedures too:
Verifying synchronization
To test the process, I insert some rows into Products:
Click on Sync now:
And query the SalesOnCloud database to see the records:
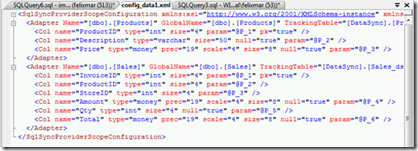
Sync data is stored inside an XML schema inside the data sync tables:
Adding more databases
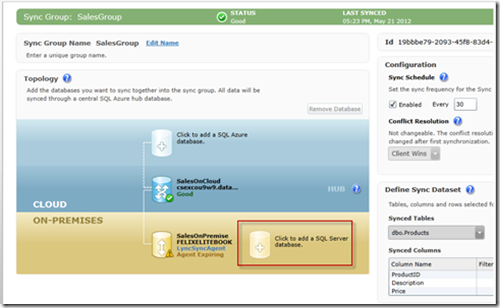
Once you have configured the initial database is easy to add more On-Premise databases, just go to the ON-PREMISES region in the portal and click the Add a SQL Server database icon
Just repeat the previous steps to register the database in the Sync Agent:
And add the database to the Sync Group
And you will see the database in the ON-PREMISES section in the portal:
You can also add another SQL Azure database to your topology just clicking the corresponding icon:
The process is similar to the previous shown before.
Conclusions
The SQL Azure DataSync is an excellent tool for manage scenarios similar to replication but using a SQL Azure Database. The process Works fine and quick and once it is released to production will be a good alternative for consolidate and replicate information.
![image_thumb[2] image_thumb[2]](https://msdntnarchive.z22.web.core.windows.net/media/MSDNBlogsFS/prod.evol.blogs.msdn.com/CommunityServer.Blogs.Components.WeblogFiles/00/00/01/41/60/metablogapi/6545.image_thumb2_thumb_2994320B.png)














![clip_image002[5] clip_image002[5]](https://msdntnarchive.z22.web.core.windows.net/media/MSDNBlogsFS/prod.evol.blogs.msdn.com/CommunityServer.Blogs.Components.WeblogFiles/00/00/01/41/60/metablogapi/5141.clip_image0025_thumb_6F42CC1C.jpg)


