Alumni Address Book Policy in Office 365 Education
We recently took a look at one of the ways you can address the question of supporting alumni users in Office 365 Education, and I mentioned that you would need to look to the new Office 365 Education in order to provide custom address book policies in order to restrict access to your institution GAL by your alumni users.
There are a few reasons why implementing this is a good idea:
- You probably don’t want your alumni users being able to view the details of your current students and faculty.
- You will also likely want to maintain the privacy and separation by stopping your students and faculty from seeing all your alumni details, too!
- Even more importantly, you’ll almost certainly want to stop alumni from seeing each other – as this list grows over time there'll be a lot of names in that list. Who knows, one day some of them might be famous!
What You’ll Need
In order to configure this you’ll need to ensure a few things:
- You’re running the new Office 365 (sometimes known as “Wave 15” or the 2013-style).
- You’ve enabled address book policy routing.
- To use any cmdlets that require the Address List role, you need to add the role to a role group. For details, see the “Add a role to a role assignment policy” section of Manage Role Assignment Policies.
- To decide on, and set, a marker to identify your alumni users; for example, using one of the custom attributes to store a value such as “alumni”.
Step One: Create the Address Lists
Address book policies contain address lists, so to begin we need to create an alumni address list for our users, and a blank resource address list for our resources (assuming we don’t want alumni users to see any rooms or resources in the their GAL).
Resource List:
We’ll connect to our tenant using Windows PowerShell and run the following command:
New-AddressList -name "AL_Alumni_Resources" -RecipientFilter {(((RecipientDisplayType -eq 'ConferenceRoomMailbox') -or (RecipientDisplayType -eq 'SyncedConferenceRoomMailbox')) -and (CustomAttribute3 -eq "nullresource"))} -DisplayName "Alumni Room List"
This creates an address list called AL_Alumni_Resources that contains rooms where custom attribute 3 is equal to “nullresource”. This is a bit of a trick since there are no resources with that value, so we get a blank address list as a result. There are probably more elegant ways to do this, but this one works.
Alumni Address List
Again, in PowerShell, we’ll run:
New-AddressList -name "AL_Alumni" -RecipientFilter {(RecipientType -eq 'UserMailbox') -and (CustomAttribute2 -eq "alumni")} –DisplayName “Alumni Address List”
This creates an address list called AL_Alumni that contains users where custom attribute 2 is equal to “alumni”.
Global Address List
To create a new GAL we’ll run:
New-GlobalAddressList -name "GAL_Alumni" -RecipientFilter {(CustomAttribute2 -eq "alumni")}
This creates a global address list called GAL_Alumni that contains objects where custom attribute 2 is equal to “alumni”.
Offline Address Book
To set up the OAB we’ll run:
New-OfflineAddressBook -name "OAB_Alumni" -AddressLists "GAL_Alumni"
This creates a offline address book called OAB_Alumni that contains the alumni GAL.
Step Two: Create Alumni Address Book Policy
Now that we’ve got our address lists in place we can create the policy that ties it all together, so in PowerShell we run:
New-AddressBookPolicy -name "ABP_Alumni" -AddressLists "AL_Alumni" -OfflineAddressBook "\OAB_Alumni" -GlobalAddressList "\GAL_Alumni" -RoomList "\AL_Alumni_Resources"
Step Three: Assign the Address Book Policy to users
Now for the moment of truth: applying our newly created policy to our alumni users:
Get-Mailbox -resultsize unlimited | where {$_.CustomAttribute2 -eq "alumni"} | Set-Mailbox -AddressBookPolicy "ABP_Alumni"
Step Four: Test
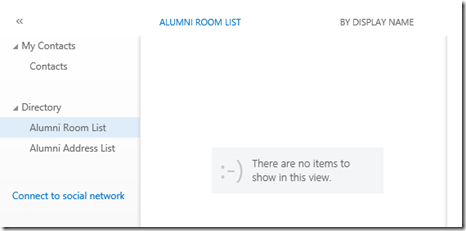
If we log into OWA with a test alumni user we'll see that if we browse to the people tab, we get the following view:
Notice that on the left column, under directory we see the two address lists we created – they’re both empty!
Step Five: Hide alumni from address lists
The last step, now that we’re satisfied we’ve hidden the rest of our users and lists from our alumni, is to hide our alumni from any other address lists. This is much simpler you’ll be please to know!
Get-Mailbox -resultsize unlimited | where {$_.CustomAttribute2 -eq "alumni"} | Set-Mailbox -HiddenFromAddressListsEnabled $true
Things to note
- I’m not a PowerShell expert (sadly!) so there may well be better and more efficient ways to do this.
- If you have large numbers of users to apply this to you may hit PowerShell throttling policies, so be aware that you may need to do this in chunks of users over a period of time, rather than every user in one go.
- Test thoroughly – this is just one way and probably won’t fit every scenario. Make sure you test before rolling out!
Find out more
For a more in depth guide on address book policy procedures check out TechNet which contains all the information I needed to structure this article.


