Crank Up Your Visual Studio Build Output to 11
Sometimes when you build or deploy your project in Visual Studio, the output will say that there are errors, but there doesn’t appear to be any apparent errors in the output it gives you. It’s times like this that you need to do what I refer to as “turning the build output up to 11”. Here’s how you do it:
Tools >> Options
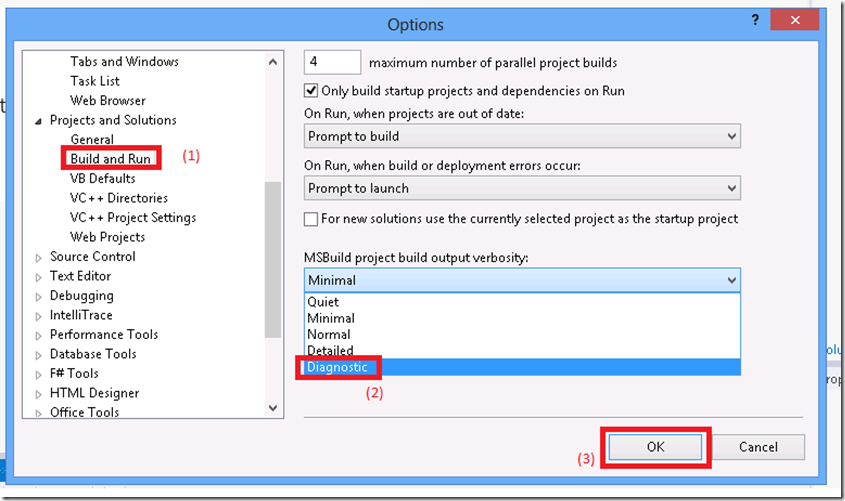
In the Options window, find Projects and Solutions >> Build and Run. Find Diagnostic in the drop-down for MSBuild project build output verbosity
That’s it, next time you build or deploy, you’re going to see a lot more stuff in the old Output window (opened from the View menu if you’ve already closed it)
So what does “Diagnostic” mean exactly? Here is the description:
…displays all errors, warnings, messages, status events, and a build summary.
To give you an idea of the difference in the output produced, I published a LightSwitch HTML application to IIS with the default output value of “Minimal” and it produced 138 lines of output. I then set the dial to 11 (Diagnostic) and it produced 51746 lines. Obviously that’s more output than you are going to want to go through, but if you start looking for “Error” or “Fail” or some other clue found in the error message that occurred when you had “Minimal” output set, you’ll hopefully be able to find something useful.
So there you have it. Next time you can’t find a good enough error message when you build or deploy, put your ear plugs in and crank the output to 11. As I was looking up the definition of “Diagnostic” for verbosity, I found an MSBuild blog nugget from 2005 that showed how to do this. So you can consider this post a reboot of that (mine’s got pictures and a clever pop culture reference though)


