ConfigMgr 2007 Distribution Points Load Testing (Part III)
The last variable in the load testing scenario is the actual creation of your stress tests using a Web tester. DP downloads from clients can be initiated via Server Message Block (SMB) or HTTP but the default is to use HTTP in ConfigMgr 2007. The next variable to understand is the use of HTTP versus HTTP/S which is certificate-based authentication. The latter is used when ConfigMgr 2007 sites are running in Native Mode. Thus, today’s post will focus on creating your test load against the DP using Visual Studio Team System for Testers (VSTS) but I will then add the step to create a secure-based load test using CertPicker.
Build your Web Test
The first step is to build your Web test in VSTS. This is a rather straight-forward process as you can use the wizard to create a simple set of Web tests – the fun begins after you start customizing it for the ConfigMgr DPs.
The steps are rather simple:
- Open Visual Studio Team System
- Depending on your language selection when installing VSTS, you will see under it a option that says ‘Test’ and the only selection is ‘Test Project’
- Select the properties such as where to store the solution\project files and click New
- The default after this creation is to show a Text file saved in your project that reads:
- You should now click Test in the context menu, and select New Test
- In the New Test, Add New Test, select Web Test and give the test a name (e.g. StressUSADP.StressDP)
- This should open a new Internet Explorer browser that launches the recorder
- For simplicity, I would always hit our DP’s home page using https://{servername}/ and close the recorder (you will figure out why later)
- After you have hit the page, go back to Visual Studio and you should see a option to ‘Stop Recording’
- Click Stop Recording
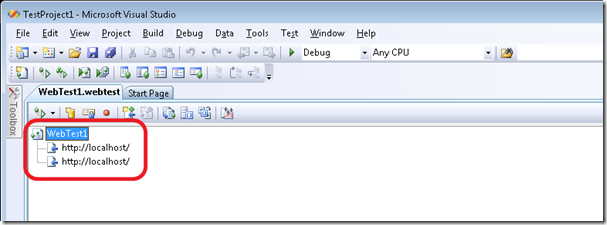
You should have a Generic Web test showing a single URL request listed as the only Web request.
Generate Code for Web Test
The interesting thing is that if you are running your Configuration Manager 2007 hierarchy in Mixed-Mode then you don’t need to do this step. This is only for native mode implementations where you need to utilize the CertPicker I shared in Part I of this series. This step is only for Native Mode environments where DPs are protected by Mutual Authentication using client & server certificates.
To take advantage of CertPicker, the following are the steps needed to effectively connect to to the DP:
- Load a certificate to use for the request
- Load the URL for this request and append the Cert Auth to use to connect to the DP
- Increase the WebTest response payload (more on this later)
- Make a HTTP/S request to the DP using a valid URL to content and the certificate loaded in Step 1
- Remove the certificate upon successful utilization of the certificate
I wrote the scenarios & specs around this procedure and am happy to share with anyone who is interested in more detail ;-)
In short, we need to generate the Web test code and we need to alter it to support our CertPicker code.
To generate the code, do the following:
- In Visual Studio, load the Web test generated in Section 1 of this post by double-clicking in the Solution Explorer
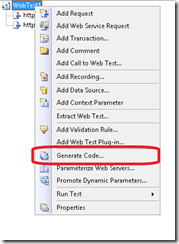
- Right-click on the Web test root, and select Generate Code…give your Web test a unique name for coded (e.g. StressDPCoded)
File Sizes are the key – Pick various Web Test(s) of various file sizes
This might seem like a lot of work but it is well worth it in the end when you can verify how many downloads your DPs can support. This is useful data to have when planning your scale-out plans.
The next step is to build a master list of URLs that cross various package sizes. This is important because you should focus on checking the performance of a lot of small packages, medium-size packages, and large and part of the Load test will allow you to control this which is really helpful. For our example, we used 3 packages – 100 Mb (small), 500 Mb (medium), and 1 Gb (large) and built the appropriate file list in a single file.
We had a file that we would name for the ConfigMgr Package Id such as MD000032 and it was a simple text file and had the following type data in it:
 https://dp01.contoso.com:443/SMS_DP_SMSPKGS$/md10005c/Core.exe
https://dp01.contoso.com:443/SMS_DP_SMSPKGS$/md10005c/mif.xml
https://dp01.contoso.com:443/SMS_DP_SMSPKGS$/md10005c/mif.xsd
https://dp01.contoso.com:443/SMS_DP_SMSPKGS$/md10005c/MS_ForefrontClientSecurity_1.5.1941.9.xml
https://dp01.contoso.com:443/SMS_DP_SMSPKGS$/md10005c/SoftwareInstall.exe
https://dp01.contoso.com:443/SMS_DP_SMSPKGS$/md10005c/swischema.xsd
https://dp01.contoso.com:443/SMS_DP_SMSPKGS$/md10005c/bits/Scripts/Detect_forefront.vbs
https://dp01.contoso.com:443/SMS_DP_SMSPKGS$/md10005c/bits/Scripts/RegKeyValue.vbs
https://dp01.contoso.com:443/SMS_DP_SMSPKGS$/md10005c/bits/Scripts/SetRunOnce.vbs
https://dp01.contoso.com:443/SMS_DP_SMSPKGS$/md10005c/bits/Scripts/UninstallLU.vbs
https://dp01.contoso.com:443/SMS_DP_SMSPKGS$/md10005c/bits/Scripts/Uninstall_Anti-Spyware_Products.vbs
https://dp01.contoso.com:443/SMS_DP_SMSPKGS$/md10005c/bits/Scripts/Uninstall_eTrust_AV.vbs
https://dp01.contoso.com:443/SMS_DP_SMSPKGS$/md10005c/bits/Scripts/Uninstall_forefront.vbs
https://dp01.contoso.com:443/SMS_DP_SMSPKGS$/md10005c/bits/Scripts/Uninstall_McAfee_AV.vbs
https://dp01.contoso.com:443/SMS_DP_SMSPKGS$/md10005c/bits/Scripts/Uninstall_Sophos_AV.vbs
https://dp01.contoso.com:443/SMS_DP_SMSPKGS$/md10005c/bits/Scripts/Uninstall_Symantec_AV.vbs
https://dp01.contoso.com:443/SMS_DP_SMSPKGS$/md10005c/bits/Scripts/Uninstall_Trend_AV.vbs
https://dp01.contoso.com:443/SMS_DP_SMSPKGS$/md10005c/bits/Source/Install Bits/DMSDefault.reg
https://dp01.contoso.com:443/SMS_DP_SMSPKGS$/md10005c/bits/Source/Install Bits/eula.rtf
https://dp01.contoso.com:443/SMS_DP_SMSPKGS$/md10005c/bits/Source/Install Bits/FCSInstall.exe
https://dp01.contoso.com:443/SMS_DP_SMSPKGS$/md10005c/bits/Source/Install Bits/FCSInstall.ini
https://dp01.contoso.com:443/SMS_DP_SMSPKGS$/md10005c/bits/Source/Install Bits/mp_ambits.msi
https://dp01.contoso.com:443/SMS_DP_SMSPKGS$/md10005c/bits/Source/Install Bits/mp_ambits.Mst
https://dp01.contoso.com:443/SMS_DP_SMSPKGS$/md10005c/bits/Source/Install Bits/WindowsXP-KB914882-x86-ENU.exe
https://dp01.contoso.com:443/SMS_DP_SMSPKGS$/md10005c/lib/CommonSwift.dll
https://dp01.contoso.com:443/SMS_DP_SMSPKGS$/md10005c/lib/DetectionLogic.dll
https://dp01.contoso.com:443/SMS_DP_SMSPKGS$/md10005c/lib/DialogPrep.vbs
https://dp01.contoso.com:443/SMS_DP_SMSPKGS$/md10005c/lib/ISMIF32.dll
https://dp01.contoso.com:443/SMS_DP_SMSPKGS$/md10005c/lib/ISMIFCOM.dll
https://dp01.contoso.com:443/SMS_DP_SMSPKGS$/md10005c/lib/msscript.ocx
https://dp01.contoso.com:443/SMS_DP_SMSPKGS$/md10005c/lib/msxml3.dll
https://dp01.contoso.com:443/SMS_DP_SMSPKGS$/md10005c/lib/msxml3a.dll
https://dp01.contoso.com:443/SMS_DP_SMSPKGS$/md10005c/lib/msxml3r.dll
https://dp01.contoso.com:443/SMS_DP_SMSPKGS$/md10005c/lib/RICHTX32.OCX
https://dp01.contoso.com:443/SMS_DP_SMSPKGS$/md10005c/lib/standards.vbs
The next step is to add this file (and any others) to the project using the following steps:
- Right-click on the project name (e.g. StressUSDP)
- Click Add, Existing Item
- Locate the text file with the URLs in it and select it
Add CertPicker Code to your Coded Web Test
The last step before you are ready to create your Load Test is to add your CertPicker reference and then add the code to support it so that prior to making the HTTP/S request to the DP you generate a trusted certificate to the Local Machine store. This is how to accomplish this:
Add Reference to CertPicker:
- Open your Generated Web Test file name (e.g. StressDPUS_Coded)
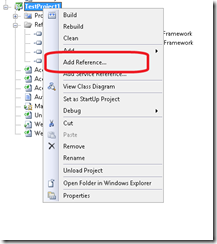
- Right-click on your Web Test Project name, Click Add Reference

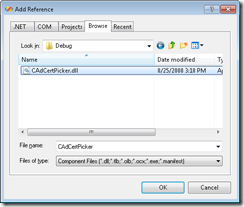
- Click the Browse button
- Locate the compiled Assembly from Part I and select it

Add Code to use CertPicker in WebTest:
- Open your Web Test coded filed from Solution Explorer
- Add a reference for CertPicker using CAdCertPicker & System.Security.Cryptography.x509Certificates
The major piece of code added to the WebTestRequest interface that we add does the following:
- Opens the text file with the URLs listed for the package
- Creates loop that installs random certificate from path using CertPicker
- Adds CCM-specific headers for CCMClientGUID, Timestamp, and Signature
- Removes certificate(s)
For reference, I’m including a full look into the complete Webtest file used for a single package so that you can use it as a reference. Here is sp,e sample code from one of our tests:
Code Snippet
namespace AccessDPBits1
{
using System;
using System.Collections.Generic;
using System.Text;
using Microsoft.VisualStudio.TestTools.WebTesting;
using Microsoft.VisualStudio.TestTools.WebTesting.Rules;
using System.Security.Cryptography.X509Certificates;
using CAdCertPicker;
using System.IO;
public class AccessDP : WebTest
{
public AccessDP()
{
this.PreAuthenticate = false;
}
public override IEnumerator<WebTestRequest> GetRequestEnumerator()
{
// Initialize validation rules that apply to all requests in the WebTest
if ((this.Context.ValidationLevel >= Microsoft.VisualStudio.TestTools.WebTesting.ValidationLevel.Low))
{
ValidateResponseUrl validationRule1 = new ValidateResponseUrl();
this.ValidateResponse += new EventHandler<ValidationEventArgs>(validationRule1.Validate);
}
// Setup URL for accessing the Package as if made from BITS
string[] URLs = File.ReadAllLines(@"D:\StressHavana\VSTS\StressDP\StressDP\MD10005C.txt");
foreach (string URL in URLs)
{
X509Certificate2 cert = CertPicker.InstallRandomCertificate(@"d:\Certs", "ObjGen", StoreLocation.LocalMachine);
WebTestRequest httpRequest3 = new WebTestRequest(URL);
httpRequest3.ClientCertificates.Add(cert);
httpRequest3.FollowRedirects = true;
httpRequest3.Headers.Add(new WebTestRequestHeader("CCMClientID", "{GUID FOR CCM CLIENT}"));
httpRequest3.Headers.Add(new WebTestRequestHeader("CCMClientIDSignature", "{CCM CLIENT ID SIGNATURE}"));
httpRequest3.Headers.Add(new WebTestRequestHeader("CCMClientTimestampSignature", "{CCM CLIENT ID TIMESTAMP}"));
// Remove certificate after Request is completed
CertPicker.RemoveCertificate(cert);
yield return httpRequest3;
}
// Change the ResponseBodyCaptureLimit
this.ResponseBodyCaptureLimit = 150000000;
}
}
\
The only piece of information that you will need to obtain (from logs) is the CCMClientId, CCMClientIDSignature, and the CCMClientTimestampSignature.
The DP does not check that the ClientId matches the signature nor the certificate (the MP does since it is signing policy) and these three headers need to be added to each request to make BITS happy.
You can test any or all of your Web tests using Visual Studio’s Run functionality to test that you have everything configured correctly for the test. To run the test, click the following in the toolbar:
Let’s knock some DPs over … Putting it all together with Load Test
The last step is the most interesting as you finally get to see everything in action. This is a Load test that is made up of a series of Web Tests. In our case, we would make multiple Web Tests that would equal various packages and we would rinse & repeat these steps in a single Load test and modify parameters accordingly. This is an easy way to get some load against your DPs and see how they do.
For those old NT administrators, it is like permissions – create your Global Group (Load Test), Create your Local Group (Web Test), Add your users to the Local Group (Create the package URLs mini-file), Add your Local Group to the Global Group (Add the Web Tests to the Load Test). Sorry… couldn’t resist!
I will close the loop tomorrow with a post that shows you how to use the Load test to run against your DPs. Stay tuned…


