CRM Dev Lab Series - Dev VM and Connectivity(Hyper-V)
I have been thinking to write this post for a while now. Think, 2 or more years. Somehow I could never just start it and was holding back to start a new journey with this blog.
Anyway, I would not like to delay this blog anymore. Let's begin with one of the basic challenges that most of the developers encounter when they start working with
Microsoft Dynamics CRM (From now on let's call it CRM) and that is: How to access the VM from your host and how to provide Internet/external network access to Guest (CRM VM).
For this post, I am making following assumptions and will also expect certain level of familiarity with Hyper-V Configuration options.
Additionally, you are using this for a Development only scenario and you are using Microsoft Windows 8 or Microsoft Windows 8.1 and Hyper-V.
I will also assume you already have created a vanilla CRM VM and it is up and running.
- Create & Configure Virtual Switches
Screen - 1 Open Hyper-V Manager on the Host O/S. In my case it is Windows 8.1.
In this post, I am going to use the VM named CRM 2013. Please notice that it is in Off state. We are going to make few Hardware related changes to this VM hence it needs to be in Off state. From the
screenshot below you can see in Actions pane on right side we have Virtual Switch Manager. Click on it.
-
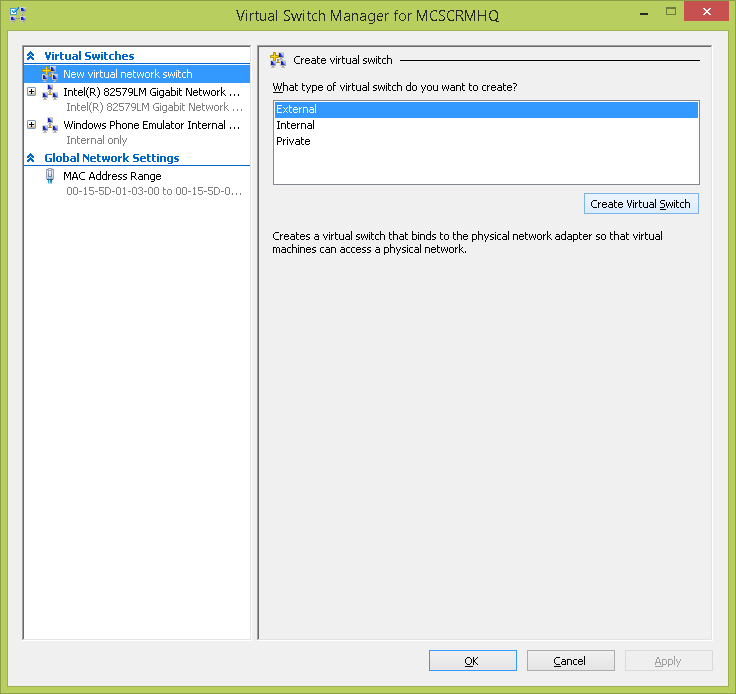
- Screen - 2 Virtual Switch Manager appears. Select External and Click on Create Virtual Switch.
-
- Screen - 3 A dialog window will appear, select a Network card which is connected to Internet/Intranet and Click Apply. Please note that if your Network is not DHCP enabled or if your
Network restricts allocation of IPs then you will have to get an IP address which you can use later on.
- Screen - 3 A dialog window will appear, select a Network card which is connected to Internet/Intranet and Click Apply. Please note that if your Network is not DHCP enabled or if your
-
- Screen - 4 & 5 You will get a warning regarding disruption of network. Click on Apply when you are ready and are able to afford being disconnected from the network for a
while.
- Screen - 4 & 5 You will get a warning regarding disruption of network. Click on Apply when you are ready and are able to afford being disconnected from the network for a
-
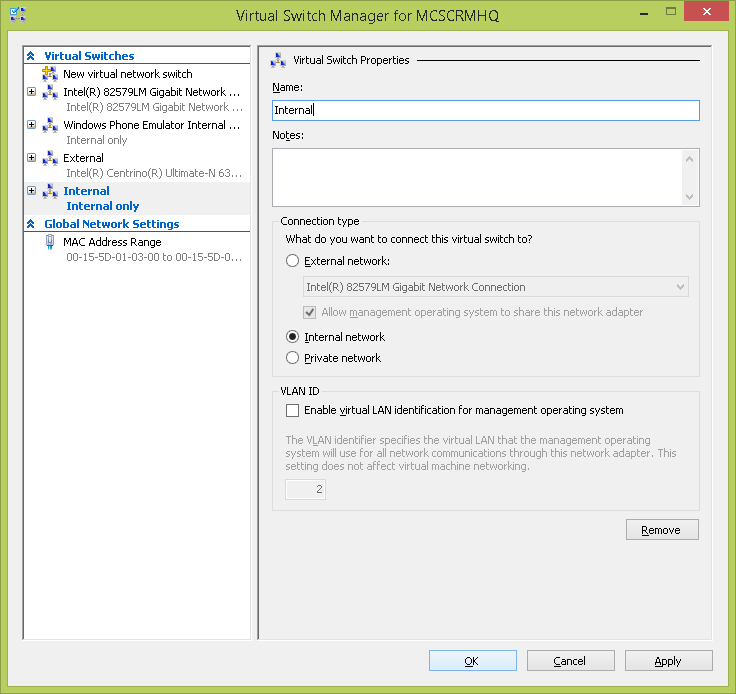
- Screen - 6 & 7 Now repeat step 4 and 5, but instead of External this time select Internal. And click on Apply. This time there will not be any network disruptions.
-
What we just did will create two Hyper-V Virtual Ethernet Adapters behind the scenes. To verify, you can Navigate to Control Panel\Network and Internet\Network Connections
Or
You can right click on Network Icon (Wireless or Ethernet) > Open Network and Sharing Center > Change Adapter Settings
Remember we will be visiting these Network adapters a lot throughout this post.
The Adapters name you will see, based on Input you have provided in Step 4 to 7.
are: vEthernet (Internal) and vEthernet (External).Screen - 8 Select vEthernet (Internal) Connection and Right Click on it. Click on Properties. From the Properties Window,
Double click on Internet Protocol Version 4(TCP/IPV4) then fill in the details as shown below.
We don’t have to configure anything for vEthernet(External) if it is connecting to a network which will automatically assign an IP. If it doesn’t happen you can acquire an appropriate IP and change it as we changed it for vEthernet(Internal)
- Configure Network Adapters for the VM
- Screen - 9 In Hyper-V Manager, Select the VM you want to connect with and Right click > Settings.
-
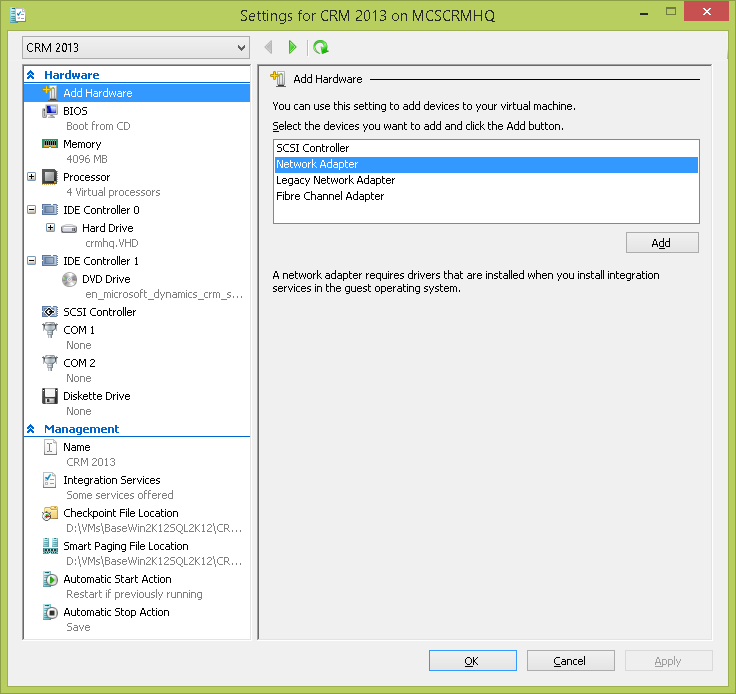
- Screen - 10 Settings Dialog will appear, Select Add Hardware if it is not selected by default.
-
- Screen - 11 Select Network Adapter and Click on Add.
-
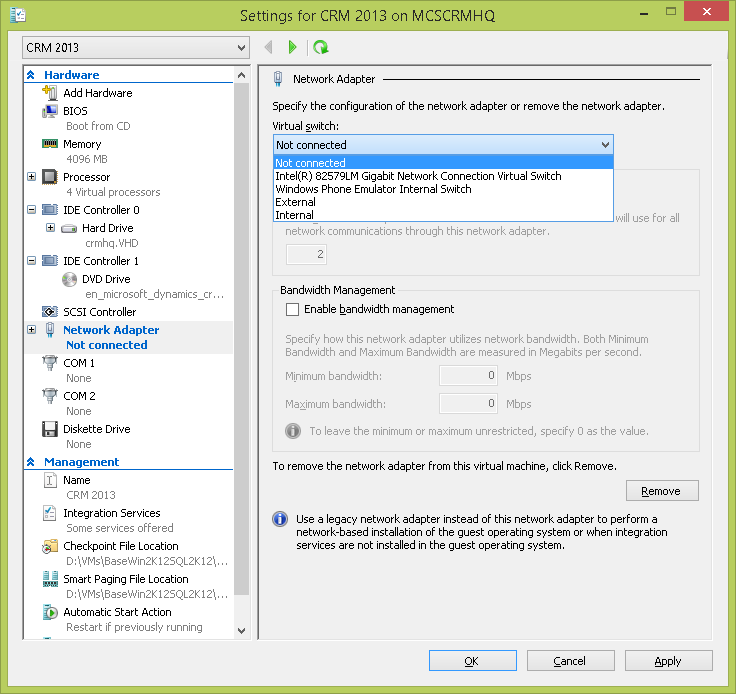
- Screen - 12 & 13 A Network Adapter will be added to the Hardware. Here you can see a list of available Virtual Switches. Select External and Click on Apply.
-
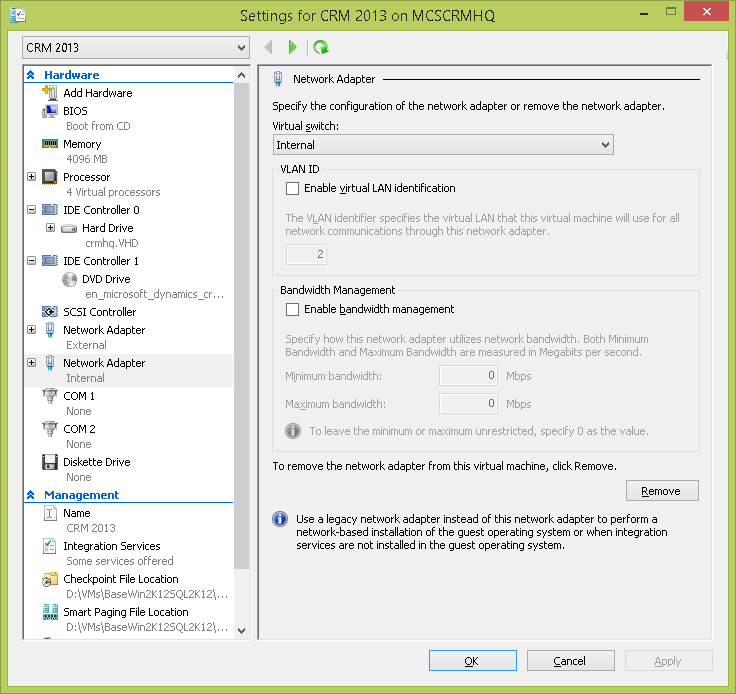
- Screen - 14 Similarly, Add one more Network Adapter to the VM. This time Select Internal from Available Virtual Switches and Click on Apply.
-
- Screen - 15 Right Click on the VM and Click on Start.
-
- Screen - 16 Once the VM starts, wait for few minutes.
-
- Screen - 17 Observe Networking Tab. It will show some random IPs initially.
-
- Screen - 18 Right Click on the VM and Select Connect. Log in to your Guest VM and Navigate to Control Panel\Network and Internet\Network Connections. Here you will see two connections named: Ethernet and Ethernet 2. Rename Ethernet to Internet and Ethernet 2 to Domain.
-
- Screen - 19 Select Domain Connection and Right Click on it. Click on Properties. From the Properties Window,
Double click on Internet Protocol Version 4(TCP/IPV4) then fill in the details as shown below.
- Screen - 19 Select Domain Connection and Right Click on it. Click on Properties. From the Properties Window,
-
Restart Host OS. Remember this step is necessary as without this step I have never seen Internet/External connection working properly inside VM.
Screen - 20 Start Hyper-V Manager. Select the VM and Observe Networking tab. You will see both the IPs are changed now.
- Verifying connections and few tricks
Now you have all the necessary configurations done. Here are few things you might want to do additionally. First let's check few things to be sure we have completed all the configurations correctly.
From your Host machine, open a command prompt and type in ping 192.168.200.50. Check if you are getting responses.
From your Guest VM, open a command prompt and type in ping 192.168.200.1. Check if you are getting responses.
If you have installed CRM on port 5555, open up Internet Explorer and type in https://192.168.200.50:5555 . You will be presented with a credential prompt, use the credentials you were using in the Guest VM and you should be able to access CRM. If you are facing challenges, please make sure in Guest VM Firewall settings allow traffic on port 5555.
To make thing easier you might want to add a host entry. Navigate to System32\Drivers\ETC. Open hosts file and the following at the last line: 192.168.200.50 crmhq. Once this entry is added to the host file, you can access CRM server by using this URL: https://crmhq:5555 .
Phew... I think this is a longest blog post I have ever wrote. Anyways, I am hoping that this will come handy to someone, someday and yes standard disclaimer is applied: If you end up with a bricked VM then please by all means try from scratch.
Update: 22nd April 2014
Added Reference Links
Comments
- Anonymous
April 21, 2014
Good Post!

