HDI Video: Generate from Usage in Visual Studio 2010 with Karen Liu
Karen Liu, the Lead Program Manager for the Visual C# and Visual Basic IDEs, has created a new video on Generate from Usage (GFU), a feature found in Visual Studio 2010, Beta 2. This post recaps what is included in the video, including the sections that show how GFU can be used to enhance test first development. The video is shot in both VB and C#. Since this is a C# blog, I’ll show only C# code, and will translate the VB code that Karen shows into C#.
- Download the source code from the LINQ Farm
Generate from Usage (GFU) is a new feature in 2010 that allows you to write code that consumes a library or API before that API even exists. Using Visual Studio menus or shortcuts, you can automatically generate classes, constructors, methods, fields and properties from the code you typed in the editor.
As the video begins, Karen first types in the code to initialize a class called Automobile that does not yet exist:
Code Snippet
- var myCar = new Automobile(Make: "Honda", Model: "Accord");
Notice that the class name Automobile is not colored in teal, which is Visual Studio’s way of telling you that it does not yet it exist. When seen inside Visual Studio, the word Automobile will also have red squiggly (or wavy) underline, and a small blue smart tag under the letter A, as shown in Figure 1.
Figure 1: The red squiggle is Visual Studio’s way of telling you that the type Automobile will not compile. The blue smart tag under the letter A let’s the user know that an expansion tip is available by simultaneously pressing the Control key and a period (Ctrl + .).
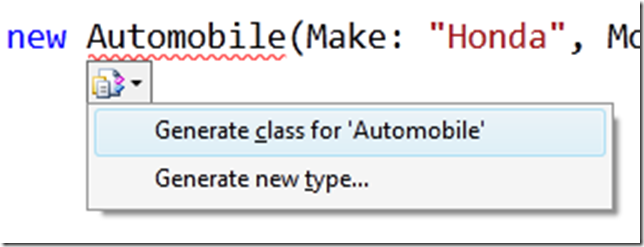
The smart tag under the letter A is Visual Studio’s way of telling you to press the control and period keys to bring up a special expansion tip, as shown in Figure 2. Here we see two options, one for directly creating a class called Automobile, and the other for bringing up a dialog which allows us to define or tweak the details of the type of we create.
Figure 2: Viewing an expansion tip in Visual Studio.
You can also bring up the options to create a new class or type by right clicking on the word Automobile and selecting Generate from the popup menu, as shown in Figure 3.
Figure 3: A second way to generate a class is to right click the word Automobile and choose Generate from the popup menu.
If you select the option to create a new class, then Visual Studio will automatically generate a new file called Automobile.cs and place inside it a new class called Automobile. The entire generated file is shown in Listing 1.
Listing 1: The code generate when you choose to create a new class based on an undefined identifier in Visual Studio 2010.
Code Snippet
- using System;
- using System.Collections.Generic;
- using System.Linq;
- using System.Text;
- namespace DeleteMe
- {
- class Automobile
- {
- }
- }
You can now go back to your original source file where you will see that there is still a red squiggly and blue tool tip, as shown in Figure 4. These hints are shown because we have not yet created a constructor for the Automobile class. If we again press control plus period, then the option to generate these code elements is made available to us, as shown in Figure 4.
Figure 4: Selecting the smart tag a second time brings up an option to automatically generate the constructor and associated fields for your class.
The code that is generated by selecting the expansion tip is shown in Listing 2. Notice that on lines 10 and 11 fields were created for your class and on lines 16 and 17 code was generated inside the constructor for initializing them. A comment in the form of a TODO item is also added to your class. These TODO items are visible in the Visual Studio Task List. You can access the Task List by choosing View | Task List from the menu, or by pressing Ctrl+W, T. Be sure to choose the Comments option from the drop down at the top of the Task List.
Listing 2: The code for the Automobile’s constructor is automatically generated by the IDE.
Code Snippet
- using System;
- using System.Collections.Generic;
- using System.Linq;
- using System.Text;
- namespace GenerateFromUsageSample
- {
- class Automobile
- {
- private string Make;
- private string Model;
- public Automobile(string Make, string Model)
- {
- // TODO: Complete member initialization
- this.Make = Make;
- this.Model = Model;
- }
- }
- }
Karen next types in code for a TurnLeft method, and for a property called IsFacingNorth. As she types each item, a smart tag appears, and again she has the option to press Ctrl+. to automatically generate code for the Automobile class. The code typed in the program’s entry point is shown in Listing 3, and the code generated by the IDE is shown mostly in Listing 4. Notice, however, that code for a private object called distance was automatically generated in the Main method. The IDE actually gives you the option to create either a private field, as shown here, or a public property.
Listing 3: The complete code for Karen’s first sample includes a constructor, a method called TurnLeft, and a property called IsFacingNorth.
Code Snippet
- namespace GenerateFromUsage
- {
- class Program
- {
- private static object distance;
- static void Main(string[] args)
- {
- var myCar = new Automobile(Make: "Honda", Model: "Accord");
- myCar.TurnLeft(distance);
- myCar.IsFacingNorth = true
- }
- }
- }
Listing 4: The code generated by the IDE for the TurnLeft method and the IsFacingNorth property.
Code Snippet
- using System;
- namespace GenerateFromUsage
- {
- class Automobile
- {
- private string Make;
- private string Model;
- public Automobile(string Make, string Model)
- {
- // TODO: Complete member initialization
- this.Make = Make;
- this.Model = Model;
- }
- internal void TurnLeft(object distance)
- {
- throw new NotImplementedException();
- }
- public bool IsFacingNorth { get; set; }
- }
- }
When looking at Listing 4, notice that code for generating a NotImplementedException is automatically generated in the TurnLeft method. The IDE was also smart enough to discern that the IsFacingNorth property returns a bool. All the lines of code shown in Listing 4 were generated by typing just three lines of code in the main method found in Listing 3.
The C# Side
In the second part of the video Karen shows how you can use generate from usage (GFU) to enhance your experience when creating unit tests. Many theorists advocate using a test first methodology in which you first create a test, and then write the code that you want to test. You will see that GFU can be used to make this style of development quite natural and simple to use inside of Visual Studio.
NOTE: This section of the post requires high end versions of Visual Studio that contain the test wizards. Even if you don’t have those tools, you can still follow along to see how Generate from Usage can be used in all versions of Visual Studio to make it easier to create unit tests.
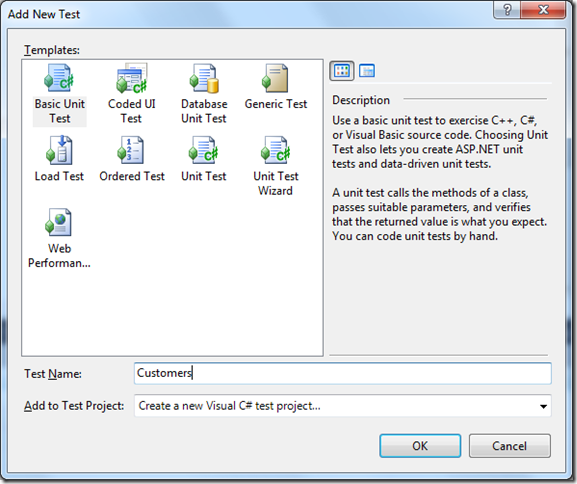
Begin by starting a new console application called Customer. Choose Tests | New Test from the Visual Studio menu. Select Basic Unit Test from the dialog, and name it Customers, as shown in Figure 5. When you press OK in the Add New Test dialog you will be prompted for the name of your unit test project. Type in CustomerTests. When you are done, the Solution Explorer for your project should look as it does in Figure 6.
Figure 5: Create a new unit test project that will house a file called Customers.
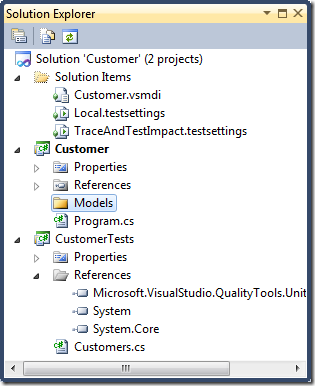
Right click on the Customer node in the solution explorer and choose Add | New Folder to create a new directory called Models. When you are done you should see a new node in the solution explorer, as shown in Figure 6.
Figure 6: This solution contains two projects, one a simple console application called Customer that contains a folder called Models. The other project is called CustomerTests and it is designed to hold unit tests.
I want to check if my Customer list is create correctly. In the Customers file from your test project, create a method called IsCustomerListValid. Inside the method create code to initialize a CustomerList object, as shown in Listing X.
Listing 5: A simple unit test with the code to initialize a class called CustomerList. Note that the CustomerList is not colored in Teal, since its declaration has not been created yet.
Code Snippet
- using System;
- using System.Text;
- using System.Collections.Generic;
- using System.Linq;
- using Microsoft.VisualStudio.TestTools.UnitTesting;
- namespace CustomerTests
- {
- [TestClass]
- public class Customers
- {
- [TestMethod]
- public void IsCustomerListValid()
- {
- CustomerList cust = new CustomerList();
- }
- }
- }
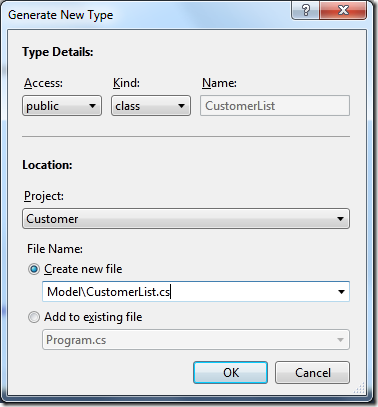
At this stage, there is no CustomerList, so in Visual Studio you will again see the red squiggles and the blue smart tag, just as I showed in Figure 2. Without needing to take your hands off the keyboard, you can press control plus dot to bring up the expansion tips as in Figure 2. This time select New Type. A dialog comes up like the one shown in Figure 7. In the dialog we can change the accessibility, the kind of code to generate and the project file and directory where we want to place it. Set the Access to public and the Kind to class. Use the Project drop down to select the Customer project and the the Create new file drop down to select the Model directory. Type in CustomerList.cs as the name of the file to create.
Figure 7. Selecting the kind of type that you want to create, as well as the project, folder and file in which you want to place it.
When you press OK in the Generate New Type dialog, the new type will be created, and the IDE will add the using directive and the correct references. You can now fill out your test and your generated class as shown in Listing 6 and 7. Note that we have used generate from usage to enhance the CustomerList class with a method called Add. I then manually wrote code to create a list into which the text we pass can be inserted.
Listing 6: A simple unit test.
Code Snippet
- using Customer.Models;
- using Microsoft.VisualStudio.TestTools.UnitTesting;
- namespace CustomerTests
- {
- [TestClass]
- public class Customers
- {
- [TestMethod]
- public void IsCustomerListValid()
- {
- CustomerList cust = new CustomerList();
- cust.Add("Karen");
- Assert.IsNotNull(cust);
- }
- }
- }
Listing 7: The using directive, namespace, CustomerList class and header for the Add method were auto-generated. I manually created the list and inserted the call to Add an item into it.
Code Snippet
- using System.Collections.Generic;
- namespace Customer.Models
- {
- public class CustomerList
- {
- List<string> list = new List<string>();
- public void Add(string p)
- {
- list.Add(p);
- }
- }
- }
You can now use the Test | View menu to bring up the Test List Editor and Test View to select and run your test.
Summary
In this post you got a second look at the code used in Karen Liu’s generate from usage video. You saw that GFU can be used to create classes, constructors, parameters, properties and fields. You also explored the powerful Generate New Type dialog which gives you the flexibility to choose the kind of type you want to create, as well as the project, directory and file in which you want to insert it. Finally, you saw that generate from usage can be powerful aid when you are engaged in test first development.
Resources
- Download the source code from the LINQ Farm
- The How Do I Generate from Usage Video
- Generate from Usage in the MSDN Library
- Walkthrough: TDD Support with the Generate From Usage Feature in VS 2010 (Lisa Feigenbaum)
- Magnus Martensson on Generate from Usage
- Task Lists and TODO comments in the MSDN Library
Comments
- Anonymous
November 12, 2009
The comment has been removed


