Dual Boot Vista with Windows Server 2008
Some time ago I built my laptop with dual boot and had a few issues along the way. I thought it might be worth sharing, but have only just got round to sharing this information. This information works equally as well with Windows 7 and Windows Server 2008 R2.
ISSUE 1 (Bitlocker PIN enabling for Dual boot partitions that may not be on a domain)
I wanted to dual boot with Vista x64 and Windows 2008 (actually triple boot, but this information is useful all ways). And I wanted all partitions (with the exception of the boot partition) to be protected with Bitlocker. I couldn’t seem to get Bitlocker to use a PIN for all boot partitions (the other 2 partitions were not going to live on any domain; well not immediately anyway).
Unfortunately, I had blindly enabled Bitlocker before ensuring the Advanced Settings were enabled (this can be set to be enabled by default on a domain), which allows the setting of a PIN or USB key. Further it was looking increasingly like I had to decrypt the partition, enable the advanced settings and then re-encrypt (while at the same time setting a PIN). I did a little bit of searching around and came up with the following (in essence you can enable Advanced Bitlocker settings post encryption (the easy bit) and then create a PIN afterwards (even easier, but not well known)).
Enable Advanced Bitlocker Settings As per points 1 -6 in Section “To turn on BitLocker Drive Encryption with a TPM plus a PIN or with a TPM plus a startup key on a USB flash drive” in this article https://technet.microsoft.com/en-us/library/cc766295.aspx (extract below)
1. Click Start, type gpedit.msc in the Start Search box, and then press ENTER .
2. If the User Account Control dialog box appears, verify that the proposed action is what you requested, and then click Continue. For more information, see Additional Resources later in this document.
3. In the Group Policy Object Editor console tree, click Local Computer Policy, click Administrative Templates, click Windows Components, and then double-click BitLocker Drive Encryption.
4. Double-click the setting Control Panel Setup: Enable Advanced Startup Options. The Control Panel Setup: Enable Advanced Startup Options dialog box appears.
5. Select the Enabled option. For TPM plus a PIN or startup key configurations, you do not need to change any further settings, but you can choose to require or disallow users to create a startup key or PIN. Click OK.
6. Click Start, type gpupdate.exe /force in the Search box, and then press ENTER. Wait for the process to finish.
This doesn’t give you the Option\Dialog to set\create a PIN when the volume is already encrypted, which is a bit of a pain.
Create a PIN for the partition
1. Open a Command prompt as Administrator
2. Use the following command “cscript %systemroot%\system32\manage-bde.wsf –protectors –add %systemdrive% -tpmandpin <4-20 digit numeric PIN> ” (without the quotes)
3. Now to be really sure the PIN is was you want it to be and you don’t trust what you typed in replacement for <4-20 digit numeric PIN> above, Open Control Panel | Security | Bitlocker Drive Protection and choose Manage Bitlocker Keys for the current Volume, and there should now be a Reset PIN option.
4. Job done. Told you is was even easier (easier being less clicks of the mouse).
ISSUE 2 (well not really an issue, but something that might help in sorting out the list of OS’s of the bootloader)
So, I installed Vista x64 then Windows 2008 and another Vista (x86 this time); don’t ask me why I just did, and it suits my needs. The bootloader initial screen showed the really Useful choices of
Microsoft Windows Vista
Microsoft Windows Server 2008
Microsoft Windows Vista
Which was which Vista, well in time I got used to it and the domain connected one was the default, but due to my installation order it was the third in the list; not very intuitive methinks.
What I really wanted was
Microsoft Windows Vista x64
Microsoft Windows Server 2008
Microsoft Windows Vista x86
Firstly the following can be used to reorder the display list
Open a Command prompt as Administrator
Before you do anything backup your BCD by using bcdedit /export “c:\bcdbackup1” (where C: is the volume your working on). If you make any mistakes in the next bits you can restore it by using bcdedit /import “c:\bcdbackup1”
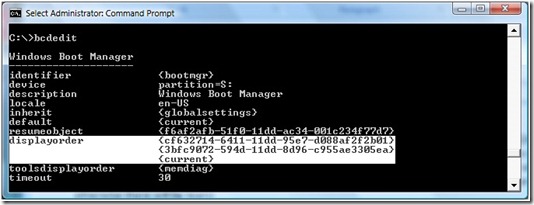
This simply changes the order in which bootloader displays the OS’s bcdedit /displayorder {ID1} ID2} {ID3} where {ID1}, {ID2} and {ID3} can be determined by typing just bcdedit at the command prompt and noting the entries adjacent to displayorder. Just put them in the order that you want them when creating the command line above e.g. my display order under Windows BootMgr looked like this (where {current} is the primary x64 install of Vista. It will show as {default} if bcdedit is run in any of the other OS’s and {current } will obviously be the current OS you are working in. Be aware of this and use the exact GUID or words that are listed opposite displayorder, otherwise there will be tears)
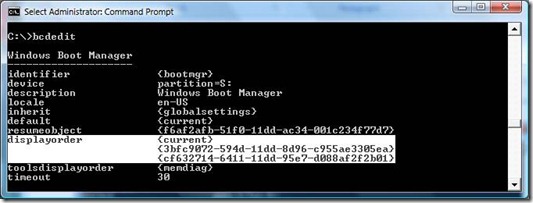
But I wanted it to look like this
And this is the command line I used bcdedit /displayorder {current} {3bfc9072-594d-11dd-8d96-c955ae3305ea} {cf632714-6411-11dd-95e7-d088af2f2b01}
Secondly lets rename the entries in the list (it would be useful if the x64 installation displayed as “Microsoft Windows Vista x64” and the x86 version likewise)
Open a Command prompt as Administrator
Before you do anything backup your BCD by using bcdedit /export “c:\bcdbackup2” (where C: is the volume your working on). If you make any mistakes in the next bits you can restore it by using bcdedit /import “c:\bcdbackup2”
To change the display name in the bootloader list type the following at the command prompt bcdedit –set {current} DESCRIPTION “Microsoft Windows Vista x64” (the quotes are needed and {current } is the entry I wanted to change. If the Identifier is a GUID or {default} use that). And this is what you see when you run bcdedit again.
Comments
- Anonymous
January 01, 2003
The comment has been removed - Anonymous
July 23, 2009
The comment has been removed - Anonymous
February 24, 2010
The comment has been removed - Anonymous
February 24, 2010
As a follow on question, in a dual/triple boot, the system drive seems to always be C: no matter wihch OS one is booting into. Are you saying just using the edit you propose will add the PIN to TPM for all OS'? Just reflecting on your tutorial, as it is not obviously clear to an IT gal just out of college. Tamara.


