Supporting Billions of entities/rows for Mobile – Android Series - Part 4–Building a Cloud-based RESTful service for our Android, iOS, and Windows Phone 7 Clients
Previous Posts to this post |
|
What this post will cover |
There are two parts:
|
Part 1 - Needed Software and Hardware |
|
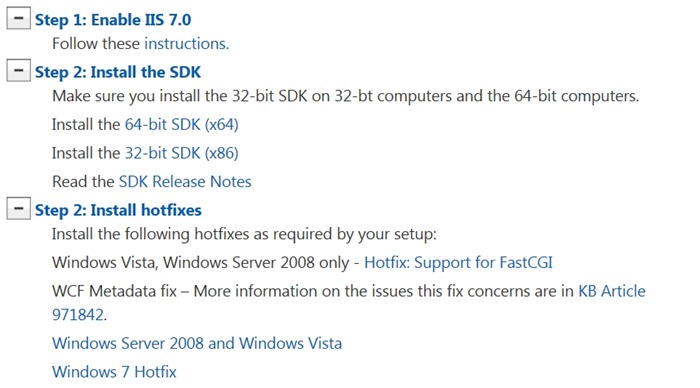
Part 1 - Setup instructions for the Azure SDK |
Details for this instructions can be found here:
 |
Part 1 – Verifying your setup |
|
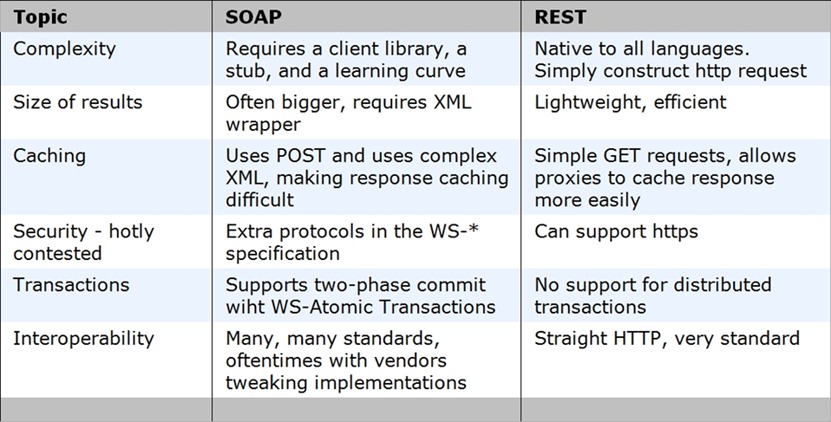
Part 2 – Why REST? |
Part 2 – New Cloud Project |
 At this point, you should be selecting the Cloud template and Windows Azure Project Visual C# . For any of this to work, you need to have installed the Azure SDK as stated above. Notice I have also provided a Name, Location, and Solution Name. At this point, you should be selecting the Cloud template and Windows Azure Project Visual C# . For any of this to work, you need to have installed the Azure SDK as stated above. Notice I have also provided a Name, Location, and Solution Name.  We are about to add a Web Role to our project. Think of the Web Role as the container for our REST-based service. We will add an .svc file to our Web Role. The .svc file will be what our Android application communicates with to retrieve data from our service. We are about to add a Web Role to our project. Think of the Web Role as the container for our REST-based service. We will add an .svc file to our Web Role. The .svc file will be what our Android application communicates with to retrieve data from our service.  Visual Studio makes adding a Web Role easy. There are several types of Web Roles. For this demo we will select ASP.NET Web Role. Go ahead and select ASP.NET Web Role so that your screen looks like this: Visual Studio makes adding a Web Role easy. There are several types of Web Roles. For this demo we will select ASP.NET Web Role. Go ahead and select ASP.NET Web Role so that your screen looks like this: 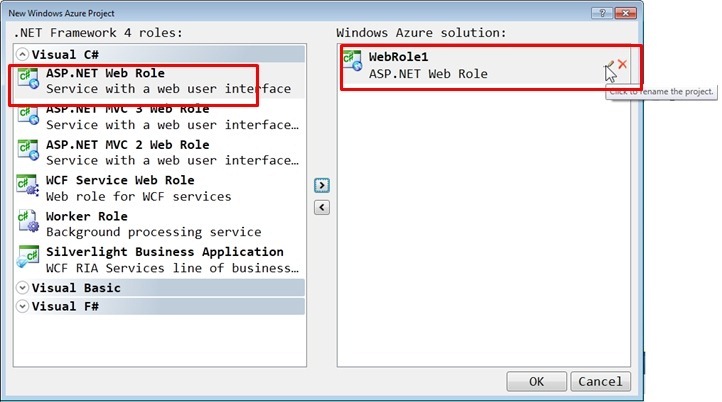 Rename your WebRole to something more appropriate. I renamed it to FastMotorcycleList_WebRole. Rename your WebRole to something more appropriate. I renamed it to FastMotorcycleList_WebRole. 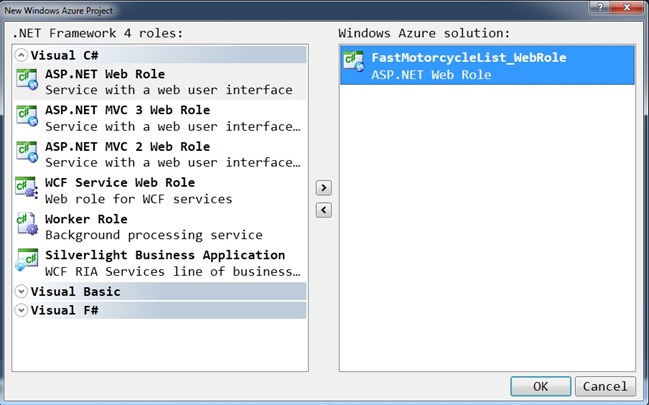 Here is what Solution Explorer should look like: Here is what Solution Explorer should look like: 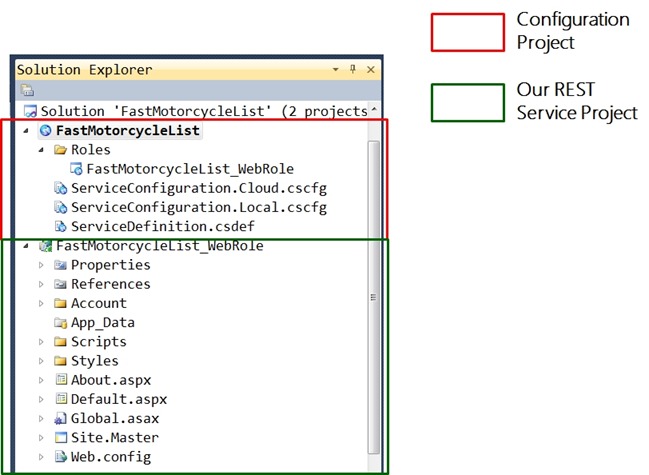
When you create a new Windows Azure Project, it is actually composed of two separate projects. There are a couple of things to notice above about the Configuration Project and the RESTful Service Project:
|
Part 2 – Eliminating Files We Don’t Need and Testing our Configuration of Visual Studio |
It turns out this will be an extremely simple Web Role. We will eliminate many of the files that aren’t needed. To keep this demo as simple as possible, we are not authenticating or authorizing users. Remove the Account folder and the About.aspx file. We’ll keep Default.aspx around simply to be able to run our blank project to make sure everything is setup correctly.
 Assuming you do not get compiler errors (which you shouldn’t), you are ready to run. Go to the Debug menu and select Start Debugging. Assuming you do not get compiler errors (which you shouldn’t), you are ready to run. Go to the Debug menu and select Start Debugging.  You should be able to see the storage and compute emulators. Before you see default.aspx pop up, the emulation environment needs to start. The emulation environment is very useful, because it allows you to run your Azure project locally, without having to deploy the application to the Azure Data centers. Typically, you can do all your testing and debugging without the hassles of deployment. There are exceptions to testing everything locally. You should be able to see the storage and compute emulators. Before you see default.aspx pop up, the emulation environment needs to start. The emulation environment is very useful, because it allows you to run your Azure project locally, without having to deploy the application to the Azure Data centers. Typically, you can do all your testing and debugging without the hassles of deployment. There are exceptions to testing everything locally.

 |
Step 2 – Adding startup code |
We will need to write some startup code that kicks off once our RESTful service starts. This startup code needs to prepare our Azure Table store. We talked about Azure Tables in a previous post. This startup code typically goes in global.asax.cs. 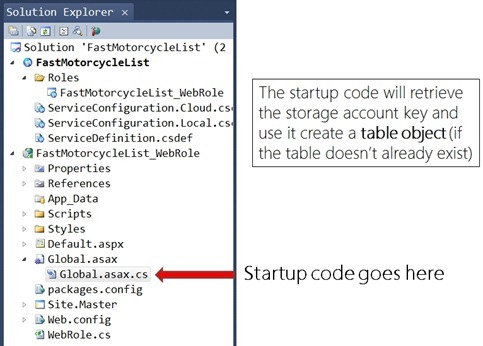 |
global.asax.cs |
| This is your startup code. |
|
Comment |
| The code above is needed to setup the table objects that will be used to store data. CloudTableClient is part of the Azure SDK. It provides a client for accessing the Windows Azure Table service. It allows you to create tables, delete tables, list tables, etc. |
Step 2 – Adding a DataConnectionString |
The point here is to setup a DataConnectionString, which will be used to either direct our application to run in a Microsoft Data Center or run in our local development fabric.
 Click in a step-by-step fashion as seen below. The end result is that we want a setting called DataConnectionString that has a value of UseDevelpmentStorage=true. Click in a step-by-step fashion as seen below. The end result is that we want a setting called DataConnectionString that has a value of UseDevelpmentStorage=true. ![eymqzlu1_thumb[1] eymqzlu1_thumb[1]](https://msdntnarchive.z22.web.core.windows.net/media/MSDNBlogsFS/prod.evol.blogs.msdn.com/CommunityServer.Blogs.Components.WeblogFiles/00/00/01/13/13/metablogapi/1134.eymqzlu1_thumb%5B1%5D_thumb.jpg) |
Step 2 – Adding diagnostic code |
We need to add code to WebRole.cs.  DiagnosticMonitorConfiguration is part of the Azure SDK that allows you to track diagnostic information as the application runs. It represents set of data buffers for logging. You can find more here. DiagnosticMonitorConfiguration is part of the Azure SDK that allows you to track diagnostic information as the application runs. It represents set of data buffers for logging. You can find more here.
|
WebRole.cs |
| Add the following code to WebRole.cs |
|
Comments |
| The main task left is to add AzureLocalStorageTraceListener, which is a custom class that defines aspects of the trace file, such as: 1. The name of the trace file 2. The size of the trace file 3. The name of the container of the trace file 4. The path of the trace file |
AzureLocalStorageTraceListener |
This is a custom class that we are adding. It provides details about the tracing information that we are tracking.  Call the file AzureLocalStorageTraceListener.cs. Call the file AzureLocalStorageTraceListener.cs. |
|
Step 2 – Specifying local storage for FastMotorcycleList.Web.svclog |
You will need to setup Project Properties to finish this task.  You will need to click on Local Storage, followed by Add Local Storage. Next you will enter: You will need to click on Local Storage, followed by Add Local Storage. Next you will enter:
 |
Comments |
| 1. Used by code in WebRole.cs 2. Sets up our trace file to help us with diagnostics 3. The name of the trace file is FastMotorcycleList.Web.svclog 4. Inherits from XMLWriteTraceListener to format the trace entires in XML |
Step 2 - Review |
This is just a quick recap.  Now we are ready to start the main RESTful service aspect of our project. This next section is very important. Now we are ready to start the main RESTful service aspect of our project. This next section is very important. |
Step 2 – Adding our RESTful service |
We will now add the code that allows Android clients (or any client for that matter) to connect and perform CRUD operations (create, read, update, delete) against our table objects. To start things off, let’s add a data provider, which is a class that abstracts away the details CRUD operations and details of the data store. The following 3 classes will be contained inside of FastMotorcycleListDataProvider.cs file. In Solution Explorer, add a new class by right mouse clicking on FastMotorcycleList_WebRole and call it FastMotorcycleListDataProvider.cs.  Call the file FastMotorcycleListDataProvider.cs. Your Solution Explorer should look like this: Call the file FastMotorcycleListDataProvider.cs. Your Solution Explorer should look like this:  |
FastMotorcycleListDataProvider.cs |
| You will now paste in the code for this file (FastMotorcycleListDataProvider.cs). There are 3 main classes here, although the class FastMotorcycleListDataProvider is the only one that is used by the RESTful service. |
|
Comments |
| 1. There are 3 classes but only FastMotorcycleListDataProvider is used outside this class. 2. Together these 3 classes allow us to communicate with the Azure Table Service. 3. Row key and partition key is very important and determines how your data gets scaled across multiple storage nodes. Read the note below. |
Partition Key and Row Key |
This is a very important concept. This is an important read for those wanting more details:  The important points relate to partitionkey and rowkey. The important points relate to partitionkey and rowkey.  Notice that there are 2 partitions. Each partition is defined by the partitionkey and rowkey. Partition 1 and Partition 2 are 2 separate storage nodes, on separate physical machines. Notice that there are 2 partitions. Each partition is defined by the partitionkey and rowkey. Partition 1 and Partition 2 are 2 separate storage nodes, on separate physical machines.
The storage system achieves good scalability by distributing the partitions across many storage nodes. The system monitors the usage patterns of the partitions, and automatically balances these partitions across all the storage nodes. |
Step 2 – Explanation of the 3 classes |
| Here are the 3 main classes inside of FastMotorcycleListDataProvider. |
Methods for FastMotorcycleListDataProvider
|
Step 2 – Adding references |
Adding a reference to System.Data.Services.Client.  Selecting the reference. Selecting the reference.  |
Step 2 – Adding RESTful Code |
At this point we are ready to start the main piece of the RESTful service. ![fb2okl0q_thumb[1] fb2okl0q_thumb[1]](https://msdntnarchive.z22.web.core.windows.net/media/MSDNBlogsFS/prod.evol.blogs.msdn.com/CommunityServer.Blogs.Components.WeblogFiles/00/00/01/13/13/metablogapi/7215.fb2okl0q_thumb%5B1%5D_thumb.jpg) The Android Application will make a all into FastMotorcycleListService.svc. From there calls will be made into the classes inside of FastMotorcycleListDataProvider. The actual interaction with the underlying table is abstracted away in FastMotorcycleListDataProvider, which makes use of two helper classes: The Android Application will make a all into FastMotorcycleListService.svc. From there calls will be made into the classes inside of FastMotorcycleListDataProvider. The actual interaction with the underlying table is abstracted away in FastMotorcycleListDataProvider, which makes use of two helper classes:
![lbzr3nas_thumb[1] lbzr3nas_thumb[1]](https://msdntnarchive.z22.web.core.windows.net/media/MSDNBlogsFS/prod.evol.blogs.msdn.com/CommunityServer.Blogs.Components.WeblogFiles/00/00/01/13/13/metablogapi/6622.lbzr3nas_thumb%5B1%5D_thumb.jpg) The next step here is to finish the RESTful Service. There are two files to edit here. The .svc file is edited by writing XML while the second file ( .cs) is edited using the built-in C# code editor. The next step here is to finish the RESTful Service. There are two files to edit here. The .svc file is edited by writing XML while the second file ( .cs) is edited using the built-in C# code editor. ![tdh5ijyf_thumb[1] tdh5ijyf_thumb[1]](https://msdntnarchive.z22.web.core.windows.net/media/MSDNBlogsFS/prod.evol.blogs.msdn.com/CommunityServer.Blogs.Components.WeblogFiles/00/00/01/13/13/metablogapi/2818.tdh5ijyf_thumb%5B1%5D_thumb.jpg)
FastMotorcycleListService.svc will be edited to use a Web Service Host Factory. Using this approach a host instance is created dynamically in response to incoming messages. The managed hosting environments that support dynamic activation are Internet Information Services (IIS) and Windows Process Activation Service (WAS), which is supported in Windows Azure. |
FastMotorcycleListService.svc |
| The following markup will automatically instantiate an object of type FastMotorcycleListService. It is this code that will begin to service requests from mobile devices. |
|
Step 2 – Writing the code-behind |
Let’s turn our attention to FastMotorcycleListService.svc.cs. ![t1pexdtn_thumb[1] t1pexdtn_thumb[1]](https://msdntnarchive.z22.web.core.windows.net/media/MSDNBlogsFS/prod.evol.blogs.msdn.com/CommunityServer.Blogs.Components.WeblogFiles/00/00/01/13/13/metablogapi/3005.t1pexdtn_thumb%5B1%5D_thumb.jpg) |
FastMotorcycleListService.svc.cs |
The following markup will automatically instantiate an object of type FastMotorcycleListService. It is this code that will begin to service requests from mobile devices. One important thing to notice here is that the data coming back is in JSON format. You could also use XML format. Read more here: 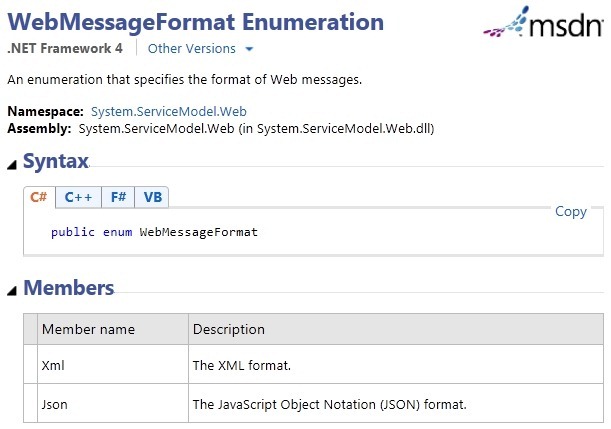 |
|
Step 2 – Redefining Web.Config |
| we need to change the Web.config that was generated when we first created our cloud-based project. We will simplify this file. We will erase the existing web.config file and replace it with new configuration code. This is essentially a configure-less configuration file. Instead, we are using Web Serivce Host Factory, as explained earlier. Start by replace web.config with this code: |
|
Step 2 – Completed |
We should now be able to compile the project successfully. The output window should be error free. ![21a1mq5y_thumb[1] 21a1mq5y_thumb[1]](https://msdntnarchive.z22.web.core.windows.net/media/MSDNBlogsFS/prod.evol.blogs.msdn.com/CommunityServer.Blogs.Components.WeblogFiles/00/00/01/13/13/metablogapi/8863.21a1mq5y_thumb%5B1%5D_thumb.jpg) |
Next Step |
| Before constructing our RESTful client (either Android, iOS, Windows Phone 7), we will test with a browser. The whole point of REST is that it is built upon http. The next blog post will explore using Fiddler to test our RESTful service. |





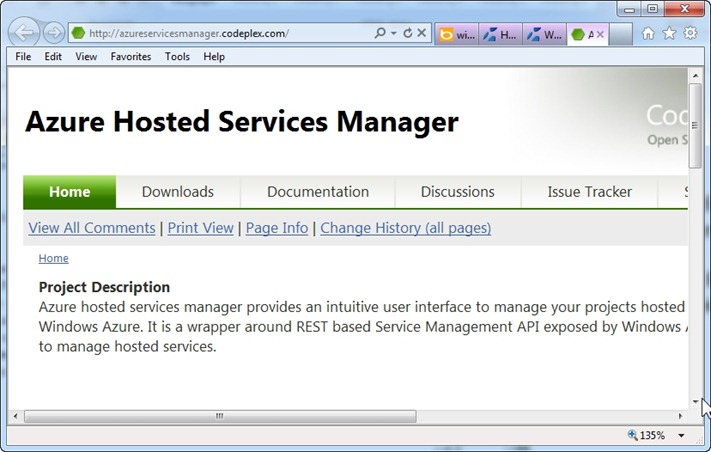


![hdfvishd_thumb[1] hdfvishd_thumb[1]](https://msdntnarchive.z22.web.core.windows.net/media/MSDNBlogsFS/prod.evol.blogs.msdn.com/CommunityServer.Blogs.Components.WeblogFiles/00/00/01/13/13/metablogapi/4774.hdfvishd_thumb%5B1%5D_thumb.jpg)

![fgbpx21o_thumb[1] fgbpx21o_thumb[1]](https://msdntnarchive.z22.web.core.windows.net/media/MSDNBlogsFS/prod.evol.blogs.msdn.com/CommunityServer.Blogs.Components.WeblogFiles/00/00/01/13/13/metablogapi/2821.fgbpx21o_thumb%5B1%5D_thumb.jpg)