How To Take Photographs From Windows 8 Applications And Automatically Upload Them To The Cloud–Part 3 of 6
- We are ready to turn our attention to the web service that will allow us to upload the photo to the cloud
- We will need to return to the Windows 8 project later, once we have completed the cloud project which will provide the Shared Access Signature.
- As you recall, the Shared Access Signature is needed so that the Windows 8 application can upload the photo directly to the cloud.
- This bypasses the need to go through a web site (web role).
- We can save money and gain scale.
- We will start with the server-side/web services project.
- We will leverage the ASP.NET Web API, built into Visual Studio 2012.
- The Web API is a framework for building and consuming HTTP services that can reach a broad range of clients including browsers, phones and tablets.
- You can typically choose either of these two project types: (1) Windows Communication Foundation (WCF) ; or (2) ASP.NET Web API, which is included with MVC version 4.
- We will take the newer, more modern concepts that ASP.NET Web API brings to the table, truly embracing HTTP concepts (URIs and verbs).
- Also, the ASP.NET Web API can be used to create services that use more advanced HTTP features with greater ease - such as request/response headers, hypermedia constructs.
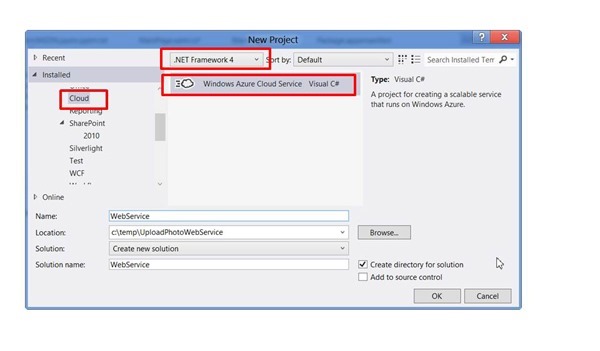
- Let's begin by starting Visual Studio 2012 as Administrator. Here are the steps to create the server-side web service, using the ASP.NET MVC 4 Web API:
- Click on the File menu and choose New/Project.
- Make sure the framework selected is .NET Framework 4
- Choose Cloud from installed templates
- Choose Windows Azure Cloud Service
- Enter a Name of WebService and Location of your choice.
- Click OK.
- Select ASP.NET MVC 4 Web Role
- Click the > button to move the ASP.NET MVC 4 Web Role to the right pane
- Click OK
- Select Web API for a project template
- Click OK
A variety of files will be generated by Visual Studio. This can be overwhelming but we only need to worry about a couple of files.
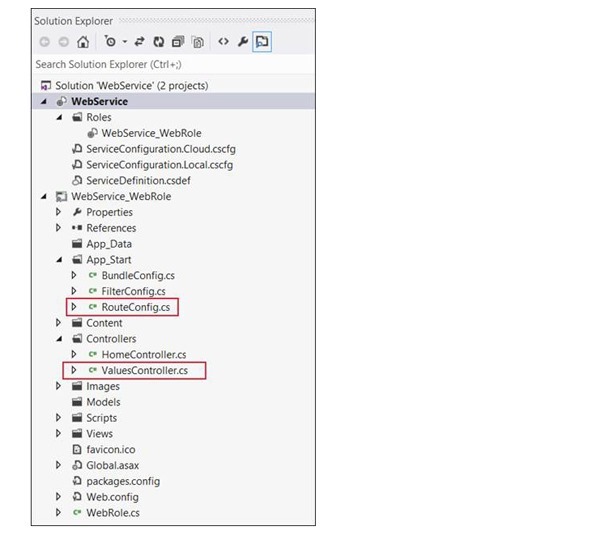
- RouteConfig.cs is used to map the URLs.
- The url portion of the route is simply a matching mechanism for the request.
- If the url matches a particular route, the framework binds the request to a specific controller and action method to handle the request.
- In short, the routing mechanism maps incoming URLs to the application, so that the right Controller and Action method executes to process them.
- ValuesController.cs is where we define the action methods that will handle the request, as expressed by the URL and verb used in the web request.
- VisualController.cs is an important file, because it contains the code that will execute when the Windows 8 client submits an HTTP request against the web service.
- This is where we will add some of our code to return the JSON data required by the Windows 8 application.
- The ValuesController class is generated by Visual Studio, and it inherits from ApiController, which returns data that is serialized and sent to the client.
- Your RouteConfig.cs file should look like this.
- Note that the following route is being added:
- api/{controller}/{container}/{blobname}
- Note that the following route is being added:
| MainWindow.xaml.cs | |
| 1 2 3 4 5 6 7 8 9 10 11 12 13 14 15 16 17 18 19 20 21 22 23 24 25 26 27 28 | public class RouteConfig { public static void RegisterRoutes(RouteCollection routes) { routes.IgnoreRoute("{resource}.axd/{*pathInfo}"); routes.MapHttpRoute( name: "DefaultApi", routeTemplate: "api/{controller}/{id}", defaults: new { id = RouteParameter.Optional } ); // Add a route to support the passing of a container name // and the blob name, which is the picture uploaded from the // Windows 8 application. The URL below (issued by a Windows 8 Application) // resolves to call an action method in ValuesController.cs routes.MapHttpRoute( name: "DefaultApi2", routeTemplate: "api/{controller}/{container}/{blobname}" ); routes.MapRoute( name: "Default", url: "{controller}/{action}/{id}", defaults: new { controller = "Home", action = "Index", id = UrlParameter.Optional } ); } } |
Modifiying the ValuesController.cs
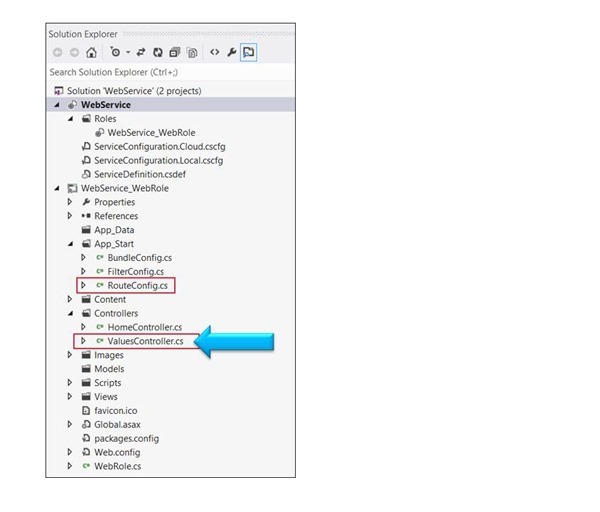
- Once again, VisualController.cs is an important file, because it contains the code that will execute when the Windows 8 client submits an HTTP request against the web service.
- This is where we will add some of our code to return the Shared Access Signature required by the Windows 8 application.
- The ValuesController class is generated by Visual Studio, and it inherits from ApiController, which returns data that is serialized and sent to the client, automatically in JSON format.
- We will return a Shared Access Signature in JSON format.
- Note that the methods above - Get(), Post(), Put(), Delete() - map to specific CRUD operations and HTTP verbs executed by the Windows 8 application.
- This is the beauty of the ASP.NET Web API framework: it automatically routes the HTTP verbs used by the client directly to the methods defined in the VisualController class, minimizing potential programming mistakes.
- As you recall from the previous section, we modified the routing structures to support the passing of parameters.
- This means we need to add a third Get() method to ValuesController.cs.
| ValuesController.cs | |
| 1 2 3 4 5 6 7 8 9 10 11 12 13 14 15 16 17 18 19 20 21 22 23 24 25 26 27 28 29 30 | public class ValuesController : ApiController { // GET api/values public IEnumerable<string> Get() { return new string[] { "value1", "value2" }; } // GET api/values/5 public string Get(int id) { return "value"; } // POST api/values public void Post(string value) { } // PUT api/values/5 public void Put(int id, string value) { } // DELETE api/values/5 public void Delete(int id) { } } |
- Note that in the figure above we will add an additional method to support the passing of 2 parameters from the Windows 8 Application.
- This method will be called when the client issues the following web request:
- You can see that the parameters embedded directly into the URL.
- The Web API framework will parse the parameters and map them to the parameters seen above (container, blobname)
- At the top of the ValuesController.cs file, you will need to add 2 using statements, as seen below:
- The using statements are needed because the code we are about to add leverages the assemblies in the Azure SDK.
| using statements | |
| 1 2 3 | using Microsoft.WindowsAzure; using Microsoft.WindowsAzure.StorageClient; |
The final class is presented below.
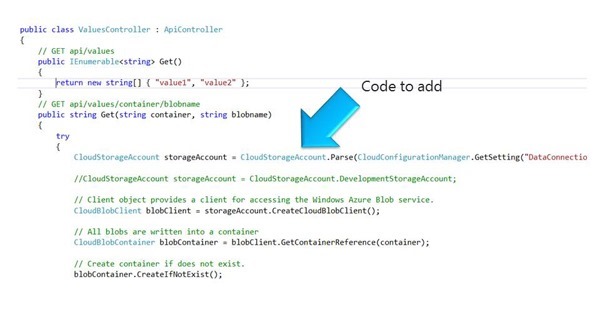
- Some noteworthy points include:
- A storage account is needed. We get this by signing up to a free 90-day account with Azure. See end of this post.
- We can leverage the built in storage emulator which allows us to emulate cloud storage on our local system.
- But I want to show you how to deploy to a real data center
- In a future post we will make some trivial changes and deploy the Web Service to a Microsoft Data Center.
- Blobs are stored in containers.
- They are not stand alone.
- The Windows 8 Application passes in the container name, in addition to the photo name.
- The container is designated to be public, allowing any application with the photograph URL to download it.
- The main point of our Get() method is to return a Shared Access Signature.
- Creating a Shared Access Signature requires you to specify the permission level and the expiration time.
- You can think of a Shared Access Signature as a hall pass in a high school, allowing you to walk the hallways for a specified period of time.
- Once your hall pass expires you lose the right to walk the hallway.
- When the SAS expires you can no longer add/modify blobs (photos)
- Ultimately, the Get() method returns the Shared Access Signature to the Windows 8 application.
- The Shared Access Signature gives the Windows 8 application has 4 hours to write photos to the specified container.
| ValuesController.cs | |
| 1 2 3 4 5 6 7 8 9 10 11 12 13 14 15 16 17 18 19 20 21 22 23 24 25 26 27 28 29 30 31 32 33 34 35 36 37 38 39 40 41 42 43 44 45 46 47 48 49 50 51 52 53 54 55 56 57 58 59 60 61 62 63 64 65 66 67 68 69 70 71 72 73 74 75 76 77 78 | public class ValuesController : ApiController { // GET api/values public IEnumerable<string> Get() { return new string[] { "value1", "value2" }; } // GET api/values/container/blobname public string Get(string container, string blobname) { try { CloudStorageAccount storageAccount = CloudStorageAccount.Parse(CloudConfigurationManager.GetSetting("DataConnectionString")); //CloudStorageAccount storageAccount = CloudStorageAccount.DevelopmentStorageAccount; // Client object provides a client for accessing the Windows Azure Blob service. CloudBlobClient blobClient = storageAccount.CreateCloudBlobClient(); // All blobs are written into a container CloudBlobContainer blobContainer = blobClient.GetContainerReference(container); // Create container if does not exist. blobContainer.CreateIfNotExist(); // Mark the container of the image as public so that can be read by anyone. BlobContainerPermissions containerPermissions = new BlobContainerPermissions(); containerPermissions.PublicAccess = BlobContainerPublicAccessType.Blob; // Define a 4 hour window that the Windows 8 client can write to Azure Blob Storage. containerPermissions.SharedAccessPolicies.Add("mypolicy", new SharedAccessPolicy() { Permissions = SharedAccessPermissions.Write, // | SharedAccessPermissions.Read , //To be available immediately don't set SharedAccessStartTime = SharedAccessExpiryTime = DateTime.Now.Add(TimeSpan.FromHours(4)) }); // Set the permissions so that Windows 8 client can write to the container // for the 4 hours specified above. blobContainer.SetPermissions(containerPermissions); // Create the shared access signature that will be added to the URL. string sas = blobContainer.GetSharedAccessSignature(new SharedAccessPolicy(), "mypolicy"); // Creat the URI to be return to the Windows 8 client that will be used to write // to blob storage. return string.Format("{0}/{1}{2}", blobContainer.Uri, blobname, sas); } catch (Exception ex) { // Return error message to client. string error = ex.Message; return error; } } // GET api/values/5 public string Get(int id) { return "value"; } // POST api/values public void Post(string value) { } // PUT api/values/5 public void Put(int id, string value) { } // DELETE api/values/5 public void Delete(int id) { } } |
- Some interesting posts still remain
- We still need to add the data connection string that will let the web service grant SASs to Windows 8 clients
- The current web service is not fully functional yet.
- That is the next post
- Next post:
- Add connection strings
- Deploying and
- Testing the Web Service
- Adjusting the Windows 8 Client app to talk to our hosted service
- We still need to add the data connection string that will let the web service grant SASs to Windows 8 clients
- Now is the time to download the free trial
- You will need a trial account for Windows Azure to do there exercises.
- Please sign up for it here:
- You will need a trial account for Windows Azure to do there exercises.
Thanks..
I appreciate that you took the time to read this post. I look forward to your comments.

