Configuring a custom domain name for a Microsoft Azure Web Sites
Overview
I need to remember this for later. Therefore, I'll do a quick post about. I finally moved my web site to Azure WebSites. But now I want to register my custome domain of www.brunoterkaly.com. Some steps are missing for some docs I'm reading so I'll just document my jouney.
Prerequisites
An Microsoft Azure account. You will have a domain registrar. My domain (brunoterkaly.com) is registered with Network Solutions.
You also need a shared web site mode in place.
Shared mode for a web site
The bummer is that each domain registrar is slightly different. But this post will certainly lead you in the right direction.
Providing a custom domain
Starting at the Azure Management Portal
This post starts at your Azure Web Site where you've deployed your web app.
Login into your portal account and navigate to Azure Web Sites. Select DASHBOARD from the top menu bar.
Azure Management Portal - Azure Web Sites
Select MANAGE DOMAIN.
Selecting Manage Domains
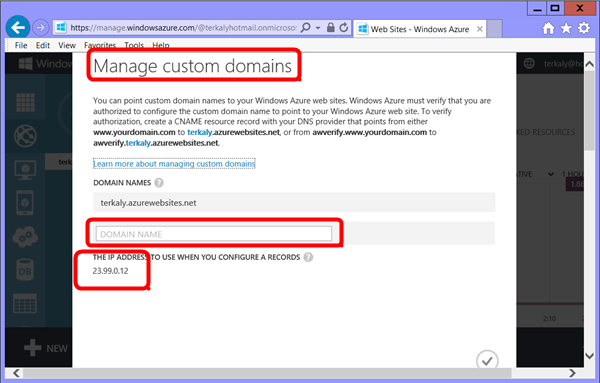
We need the IP address. In our case, it is 23.99.0.12. Yours will be different. Copy it to the clipboard.
Getting the IP Address
The Domain Registrar Portal
This could be one of many possible types. I am using the original Network Solutions but you may have GoDaddy or even someone else.
Login into your domain registrar. Mine is Network Solutions. Perhaps yours is GoDaddy. So the user interface may not be identical. But the concept is the same.
Managing your account
Select EDIT DNS.
Editing the DNS Settings
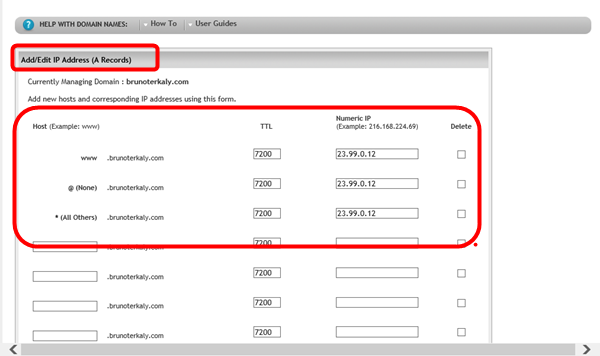
It is time to edit the A Record. Now enter the IP address you obtained from the Azure portal for your Azure web site. Recall ours was 23.99.0.12.
Note: the A record is used to translate from a domain name to an IPv4 address.
Editing the A Record
It is time to edit the CNAME record.
Editing the CNAME
Note: A CNAME record maps a specific domain, such as contoso.com or www.contoso.com , to a canonical domain name. In this case, the canonical domain name is the either the .azurewebsites.net domain name of your Windows Azure web site of your Traffic Manager profile. Once created, the CNAME creates an alias for the .azurewebsites.net domain name. The CNAME entry will resolve to the IP address of your .azurewebsites.net domain name automatically, so if the IP address of the web site changes, you do not have to take any action.
This is what the finished CNAME record looks like.
Verifying the CNAME records
Returning back to the Azure portal
You may need to wait a couple of hours before this works.
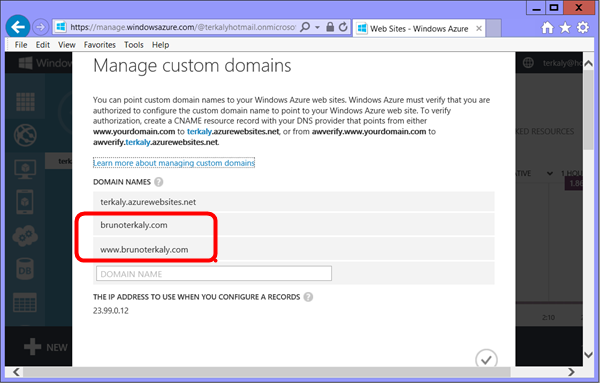
You many need to wait a couple of yours before returning back to the Azure portal and finish adding the domain names.
Entering in the domain name into the Azure Portal
Notice the correct mapping of my domain name working.
Verifying your domain name
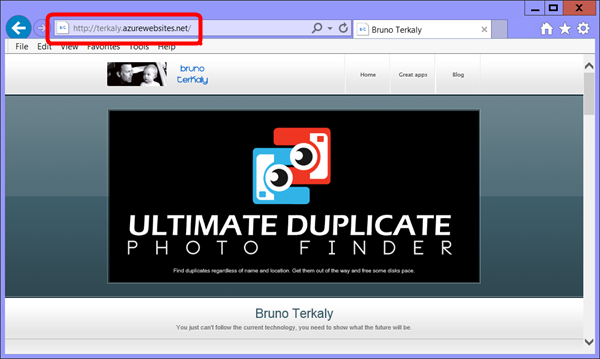
Of course, my unmapped, original Azure Web site name still works.
Viewing the original Azure-assigned domain name
Conclusion
I hope this helps you. I spent way, way too much time figuring this out. That's why it is a post now.
Comments
Anonymous
March 24, 2014
Thanks I did this with GoDaddyAnonymous
March 25, 2014
Hi, I have an azure website which has the custom domain pointing to GoDaddy, now I have another domain in Network Solutions and did the everything I can from webforwarding to the above method you mentioned, azure is not verifying my network solutions domain. Any thoughts?Anonymous
March 26, 2014
Thanks Bruno for your Article this worked for meAnonymous
July 10, 2014
Thank you somuch Bruno for sharing such a great information.I got to learn a lot from yours blog.And it helped me a lot.Anonymous
July 16, 2014
Thank you for your post! I couldn't really figure it out from azure help documents.Anonymous
August 27, 2014
It’s very useful blog your site thanks provide blog commentshttp://www.myindiatourism.com All visitor use to check domainAnonymous
March 05, 2015
Thanks so much for taking the time to write this up. It is extremely helpful.


