Running Powershell Web Jobs on Azure websites
Just last week we announced a series of new features for the Windows Azure platform. One of those features is Web Jobs support for Windows Azure Web Sites. Web Jobs enable you to run custom jobs on your web site, either on-demand, scheduled or continuously. However, some people have already wondered why there is no support for Powershell scripts (.ps1). In this post I’m going to show how you can use Powershell scripts to run as a Web Job on Windows Azure Web Sites.
Setting up an Azure Web Site
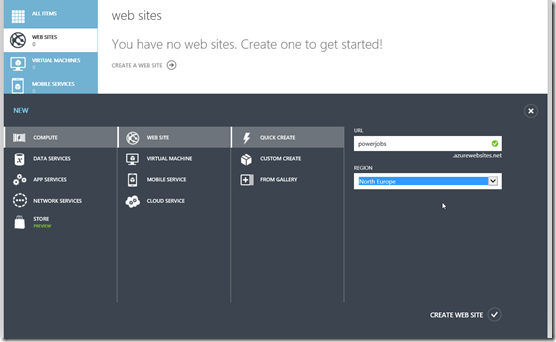
The first step is to quick create an empty Azure Web Site – for the purpose of this post, we don’t need actual web content. So, just create an Azure Web Site through the Azure Management Portal.
Once the site is created (amazing it takes less than 10 seconds!), you should now see the ‘Web Jobs' (preview) section.
In this post, we’re going to be using a very basic PowerShell script to be executed on the Web Site – the script will just retrieve the list of actively running processes on the server by invoking the Get-Process cmdlet.
Verifying it doesn’t work
Of course we want to push our luck and upload a .ps1 file to create a Web Job. When you do this, the operation will fail and you’ll be presented with the following error message in the portal:
Running a PowerShell Web Job
We now have validated that we cannot use a PowerShell script to create a Web Job, but how can we achieve this? As you may know, Powershell can be invoked from the commandline, by means of PowerShell.exe. This is exactly what we’re going to do to use PowerShell as a Web Job.
First step is to create a Windows command file (.cmd or .bat) which will invoke PowerShell.exe and providing it our PowerShell commands. This is the contents of our ListProcessesPS.cmd file:
PowerShell.exe -Command "& {Get-Process}"
After zipping up this file we can now create a Web Job through the Azure Management portal:
The Job is created successfully and we are ready to launch it. Once the Last Run Result shows ‘Success’ we can view the outcome of the Job by navigating to the logs.
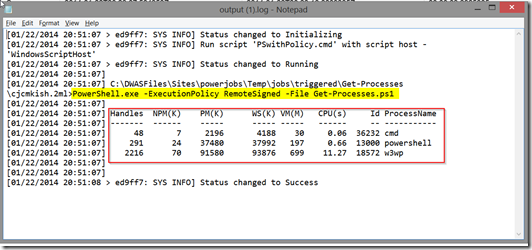
Below screenshot shows the outcome of running the PowerShell command on our Azure Web Site!
Using a separate PowerShell script – Take 1
Of course, this solution is not optimal if you have multi-line, complex PowerShell scripts. Ideally we want to be able to create a PowerShell script file that is separate from the command script. Looking at the PowerShell.exe command-line reference, there is a parameter that allows us to invoke a PowerShell script, namely the –File parameter. So we adapt the command script accordingly:
PowerShell.exe -File Get-Processes.ps1
We then create a zip file containing both the ps1 and cmd files and upload it to create a new Web Job. However, when you run the Web Job, we don’t get the outcome we expected. We receive an error file, which indicates that the PowerShell script we’re trying to execute is not digitally signed and therefore cannot be executed.
Using a separate PowerShell script – Take 2
Reverting back to the PowerShell.exe command-line reference, another command-line parameter comes to the rescue to get around this digital signature issue: –ExecutionPolicy. We update the Windows command file as follows:
PowerShell.exe -ExecutionPolicy RemoteSigned -File Get-Processes.ps1
What’s happening here is that we tell PowerShell to run all local scripts and only require a digital signature for scripts that are being downloaded from the Internet.
We update the zip file with the updated Windows command file and the PowerShell script and create a new Web Job. When running the Job, we finally get the expected results!
Conclusion
As you’ve seen, there is actually a way to run PowerShell scripts as Web Jobs on Windows Azure Web Sites. You currently need to invoke it through an intermediate Windows command file instead of natively supporting .ps1 files, but in the end we got a workable solution.
Did you know that you can try Windows Azure for free?


