チュートリアル: チャット アプリでインライン イメージのサポートを有効にする
Chat SDK は、Microsoft Teams とシームレスに連携するように設計されています。 具体的には、Chat SDK は、Microsoft Teams からインライン イメージを受信し、ユーザーにインライン イメージを送信するソリューションが用意されています。
このチュートリアルでは、JavaScript 用 Azure Communication Services Chat SDK を使用してインライン イメージのサポートを有効にする方法について説明します。
インライン イメージは、Teams クライアントの送信ボックスに直接コピーして貼り付ける画像です。 [このデバイスからアップロード] メニューまたはドラッグ アンド ドロップでアップロードされた画イメージ (Teams の送信ボックスに直接ドラッグされたイメージなど) については、ファイル共有機能の一部としてこのチュートリアルを参照する必要があります。 (「画像添付ファイルを処理する」セクションを参照してください。)
イメージをコピーするには、Teams ユーザーには次の 2 つのオプションがあります。
- オペレーティング システムのコンテキスト メニューを使用してイメージ ファイルをコピーし、Teams クライアントの送信ボックスに貼り付けます。
- キーボード ショートカットを使用する。
このチュートリアルでは、次の場合に実行する必要がある操作について説明します。
Note
現在、インライン イメージを送信する機能は、パブリック プレビューで利用できます。 JavaScript でのみ使用できます。 インライン イメージを受信する場合、現在一般提供で利用できます。 Teams 相互運用性チャットでは、JavaScript と C# の両方で使用できます。
前提条件
- クイックスタート「チャット アプリを Teams の会議に参加させる」を参照してください。
- Azure Communication Services リソースを作成します。 詳細については、Azure Communication Services リソースの作成に関するページを参照してください。 このチュートリアルで使用する接続文字列を記録する必要があります。
- ビジネス アカウントを使用して Teams 会議を設定し、会議 URL を準備します。
- JavaScript 用 Chat SDK (@azure/communication-chat) 1.4.0 または最新版を使用します。 詳細については、JavaScript 用 Azure Communication Chat クライアント ライブラリに関する記事を参照してください。
サンプル コード
このチュートリアルの最終的なコードは GitHub にあります。
新しいメッセージ イベントで受信したインライン イメージを処理する
このセクションでは、新しいメッセージ受信イベントのメッセージ コンテンツに埋め込まれたインライン イメージをレンダリングする方法について説明します。
クイック スタートでは、teams ユーザーから新しいメッセージを受信したときにトリガーされる chatMessageReceived イベントのイベント ハンドラーを作成しました。 また、次のように chatClient から chatMessageReceived イベントを受信したときに、受信メッセージの内容を messageContainer に直接追加します。
chatClient.on("chatMessageReceived", (e) => {
   console.log("Notification chatMessageReceived!");

   // Check whether the notification is intended for the current thread
   if (threadIdInput.value != e.threadId) {
      return;
   }

   if (e.sender.communicationUserId != userId) {
      renderReceivedMessage(e.message);
   }
   else {
      renderSentMessage(e.message);
   }
});

async function renderReceivedMessage(message) {
   messages += '<div class="container lighter">' + message + '</div>';
   messagesContainer.innerHTML = messages;
}
ChatMessageReceivedEvent 型の受信イベントから、attachments という名前のプロパティにインライン イメージに関する情報が含まれます。 UI でインライン イメージをレンダリングする必要があるのは、これですべてです。
export interface ChatMessageReceivedEvent extends BaseChatMessageEvent {
  /**
   * Content of the message.
   */
  message: string;

  /**
   * Metadata of the message.
   */
  metadata: Record<string, string>;

  /**
   * Chat message attachment.
   */
  attachments?: ChatAttachment[];
}

export interface ChatAttachment {
  /** Id of the attachment */
  id: string;
  /** The type of attachment. */
  attachmentType: ChatAttachmentType;
  /** The name of the attachment content. */
  name?: string;
  /** The URL where the attachment can be downloaded */
  url?: string;
  /** The URL where the preview of attachment can be downloaded */
  previewUrl?: string;
}

export type ChatAttachmentType = "image" | "unknown";
次に、前のコードに戻って、次のコード スニペットのような追加ロジックを追加します。
chatClient.on("chatMessageReceived", (e) => {
  console.log("Notification chatMessageReceived!");
  // Check whether the notification is intended for the current thread
  if (threadIdInput.value != e.threadId) {
     return;
  }

  const isMyMessage = e.sender.communicationUserId === userId;
  renderReceivedMessage(e, isMyMessage);
});

function renderReceivedMessage(e, isMyMessage) {
  const messageContent = e.message;

  const card = document.createElement('div');
  card.className = isMyMessage ? "container darker" : "container lighter";
  card.innerHTML = messageContent;

  messagesContainer.appendChild(card);

  // Filter out inline images from attachments
  const imageAttachments = e.attachments.filter((e) =>
    e.attachmentType.toLowerCase() === 'image');

  // Fetch and render preview images
  fetchPreviewImages(imageAttachments);

  // Set up onclick event handler to fetch full-scale image
  setImgHandler(card, imageAttachments);
}

function setImgHandler(element, imageAttachments) {
  // Do nothing if there are no image attachments
  if (!imageAttachments.length > 0) {
    return;
  }
  const imgs = element.getElementsByTagName('img');
  for (const img of imgs) {
    img.addEventListener('click', (e) => {
      // Fetch full-scale image upon click
      fetchFullScaleImage(e, imageAttachments);
    });
  }
}

async function fetchPreviewImages(attachments) {
  if (!attachments.length > 0) {
    return;
  }
  // Since each message could contain more than one inline image
  // we need to fetch them individually
  const result = await Promise.all(
      attachments.map(async (attachment) => {
        // Fetch preview image from its 'previewURL'
        const response = await fetch(attachment.previewUrl, {
          method: 'GET',
          headers: {
            // The token here should be the same one from chat initialization
            'Authorization': 'Bearer ' + tokenString,
          },
        });
        // The response would be in an image blob, so we can render it directly
        return {
          id: attachment.id,
          content: await response.blob(),
        };
      }),
  );
  result.forEach((imageResult) => {
    const urlCreator = window.URL || window.webkitURL;
    const url = urlCreator.createObjectURL(imageResult.content);
    // Look up the image ID and replace its 'src' with object URL
    document.getElementById(imageResult.id).src = url;
  });
}
この例では、fetchPreviewImages と setImgHandler の 2 つのヘルパー関数を作成しました。 最初の 1 つは、認証ヘッダーを持つ各 ChatAttachment オブジェクトで提供される previewURL からプレビュー イメージを直接フェッチします。 同様に、関数 setImgHandler 内の各イメージに対して、onclick イベントを設定します。 イベント ハンドラーでは、認証ヘッダーを持つ ChatAttachment オブジェクトからのプロパティ url からフル スケール イメージをフェッチします。
認証ヘッダーを作成する必要があるため、トークンをグローバル レベルで公開する必要があります。 次のコードを変更する必要があります。
// New variable for token string
var tokenString = '';

async function init() {

   ....

   let tokenResponse = await identityClient.getToken(identityResponse, [
      "voip",
      "chat"
	]);
	const { token, expiresOn } = tokenResponse;

   // Save to token string
   tokenString = token;

   ...
}
オーバーレイでフル スケールのイメージを表示するには、新しいコンポーネントを追加する必要もあります。
<div class="overlay" id="overlay-container">
   <div class="content">
      <img id="full-scale-image" src="" alt="" />
   </div>
</div>
一部の CSS を使用する場合:
/* let's make chat popup scrollable */
.chat-popup {

   ...

   max-height: 650px;
   overflow-y: scroll;
}

 .overlay {
    position: fixed;
    width: 100%;
    height: 100%;
    background: rgba(0, 0, 0, .7);
    top: 0;
    left: 0;
    z-index: 100;
 }

.overlay .content {
   position: fixed;
   width: 100%;
   height: 100%;
   text-align: center;
   overflow: hidden;
   z-index: 100;
   margin: auto;
   background-color: rgba(0, 0, 0, .7);
}

.overlay img {
   position: absolute;
   display: block;
   max-height: 90%;
   max-width: 90%;
   top: 50%;
   left: 50%;
   transform: translate(-50%, -50%);
}

#overlay-container {
   display: none
}
オーバーレイを設定したので、次は、ロジックに取り組み、フル スケールのイメージをレンダリングします。 fetchFullScaleImage 関数を呼び出す onClick イベント ハンドラーを作成したことを思い出してください。
const overlayContainer = document.getElementById('overlay-container');
const loadingImageOverlay = document.getElementById('full-scale-image');

function fetchFullScaleImage(e, imageAttachments) {
  // Get the image ID from the clicked image element
  const link = imageAttachments.filter((attachment) =>
    attachment.id === e.target.id)[0].url;
  loadingImageOverlay.src = '';

  // Fetch the image
  fetch(link, {
    method: 'GET',
    headers: {'Authorization': 'Bearer ' + tokenString},
  }).then(async (result) => {

    // Now we set image blob to our overlay element
    const content = await result.blob();
    const urlCreator = window.URL || window.webkitURL;
    const url = urlCreator.createObjectURL(content);
    loadingImageOverlay.src = url;
  });
  // Show overlay
  overlayContainer.style.display = 'block';
}
最後に追加したいのは、イメージがクリックされたときにオーバーレイを閉じる機能です。
loadingImageOverlay.addEventListener('click', () => {
  overlayContainer.style.display = 'none';
});
これで、リアルタイム通知から送信されるメッセージのインライン画像をレンダリングするために必要なすべての変更を行いました。
コードの実行
Webpack ユーザーは、webpack-dev-server を使用してアプリをビルドし、実行することができます。 ローカルの Web サーバーにアプリケーション ホストをバンドルするには、次のコマンドを実行します。
npx webpack-dev-server --entry ./client.js --output bundle.js --debug --devtool inline-source-map
デモ
自分のブラウザーを開き、http://localhost:8080/ にアクセスします。 会議 URL とスレッド ID を入力します。 Teams クライアントからインライン イメージを送信します。
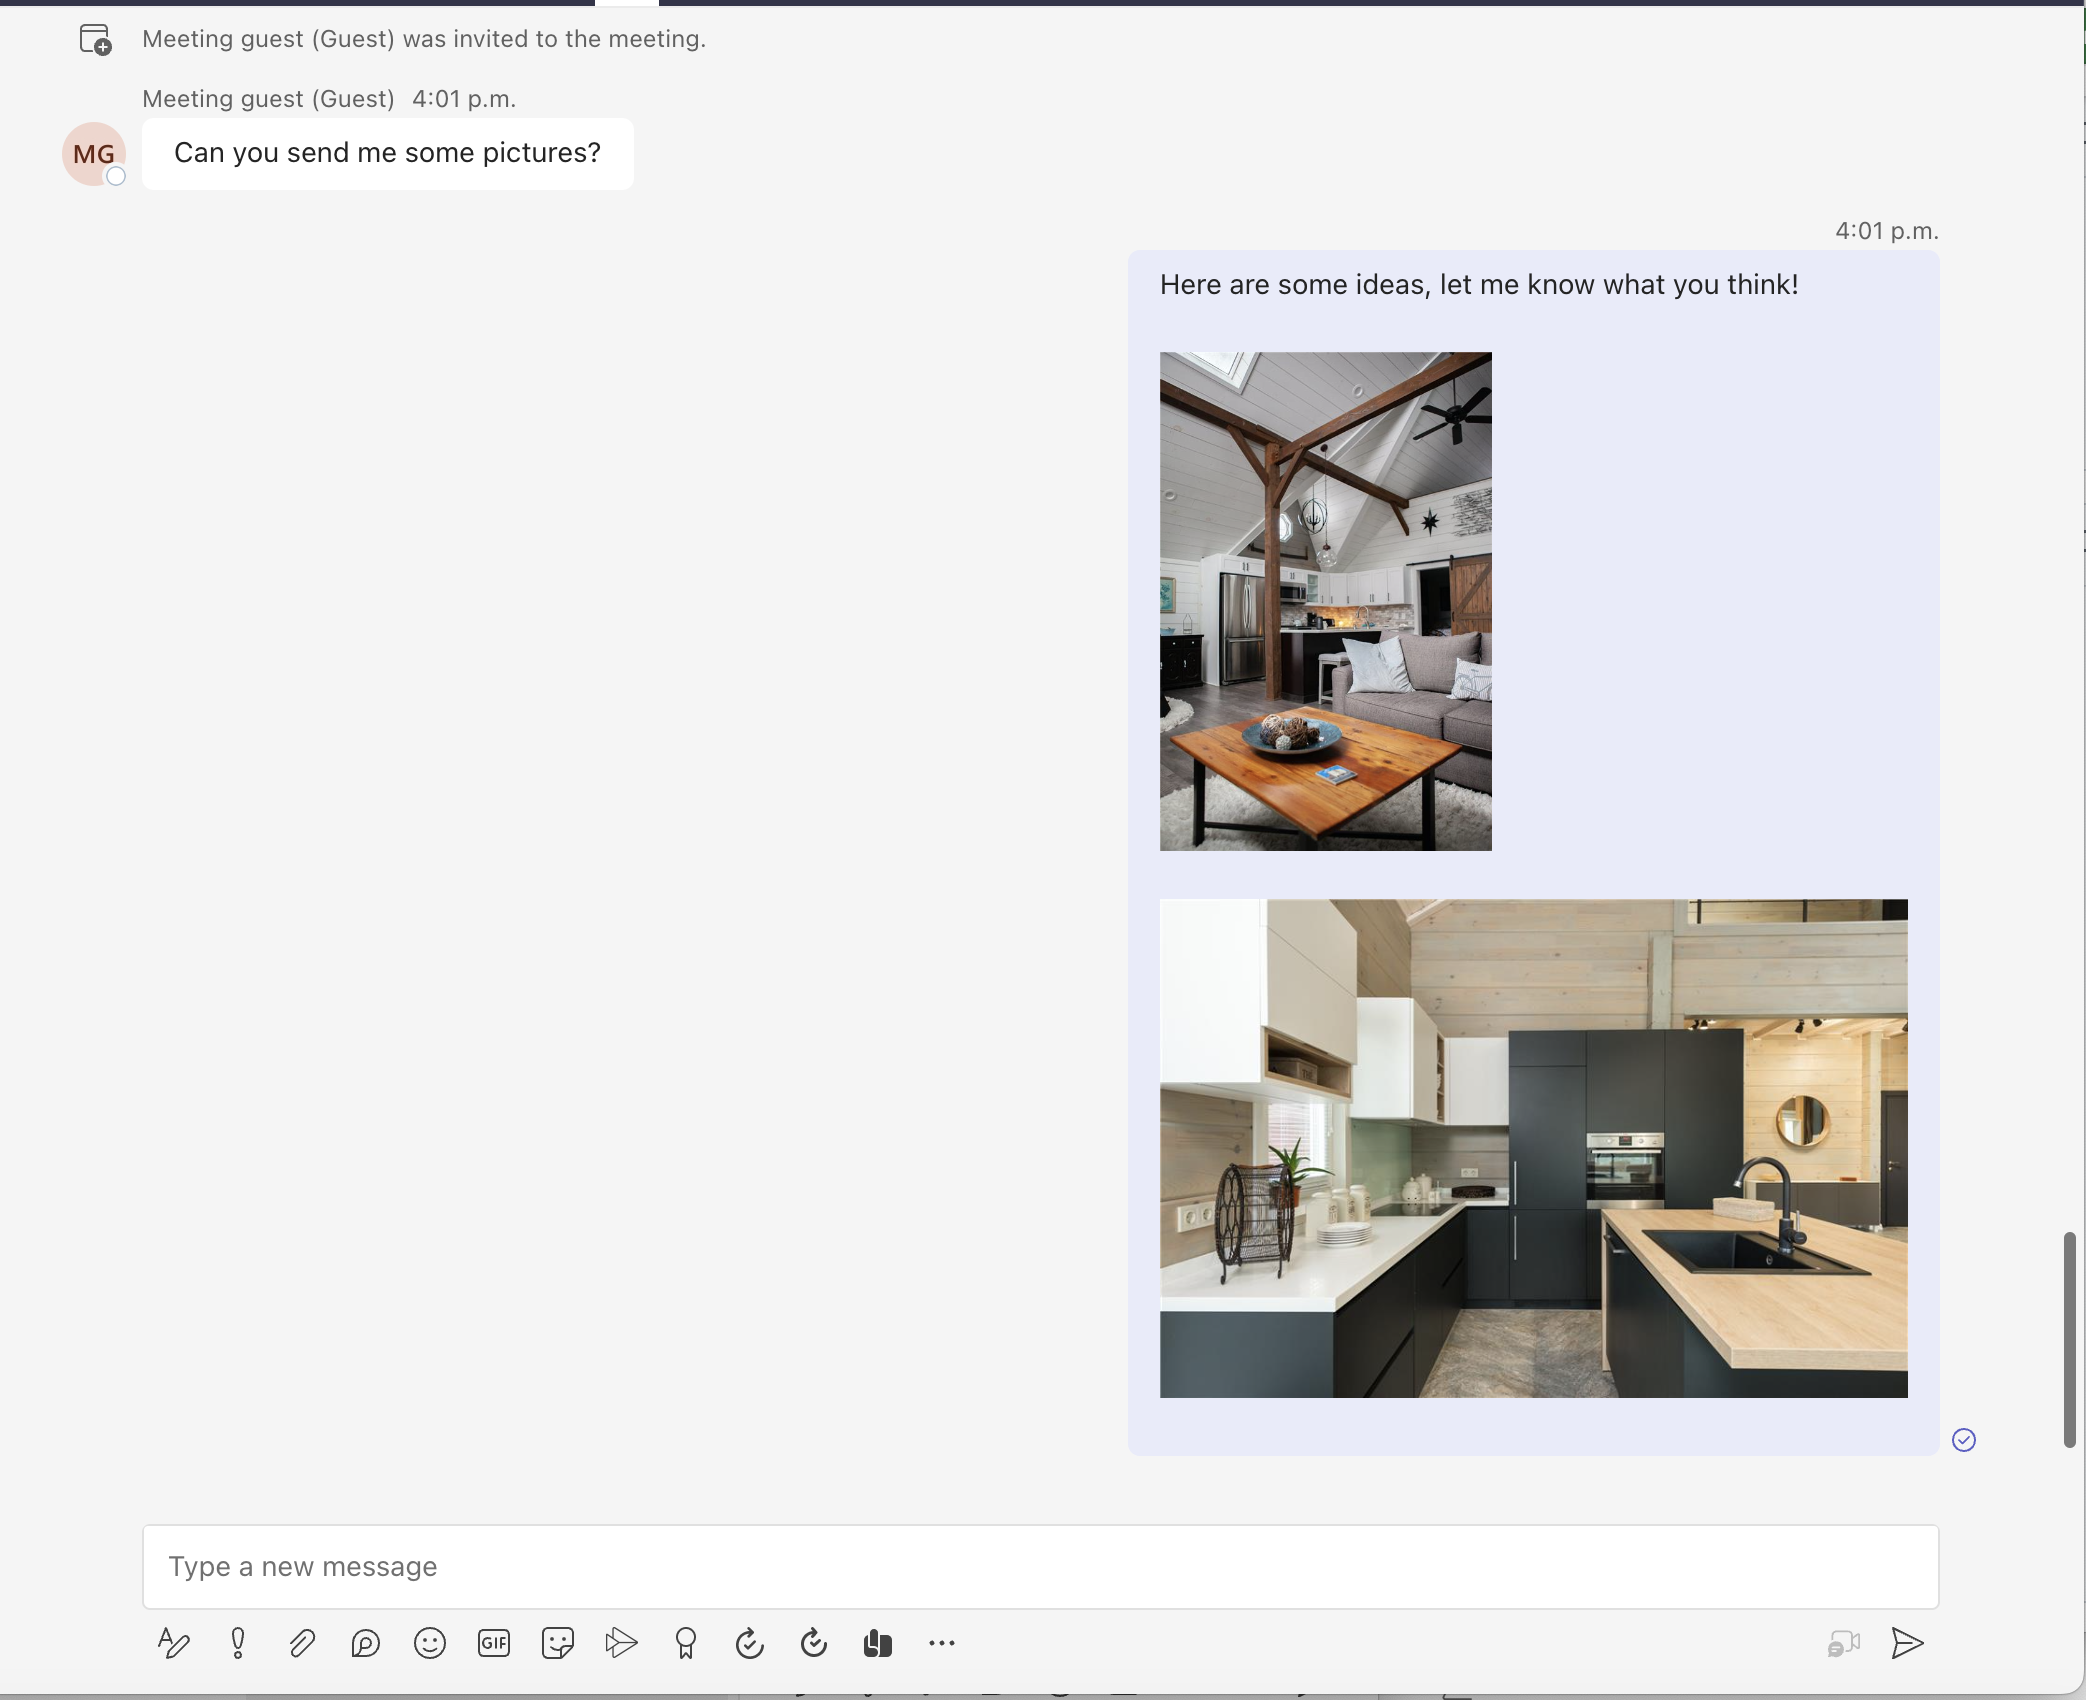
その後、プレビュー イメージと共に新しいメッセージがレンダリングされます。
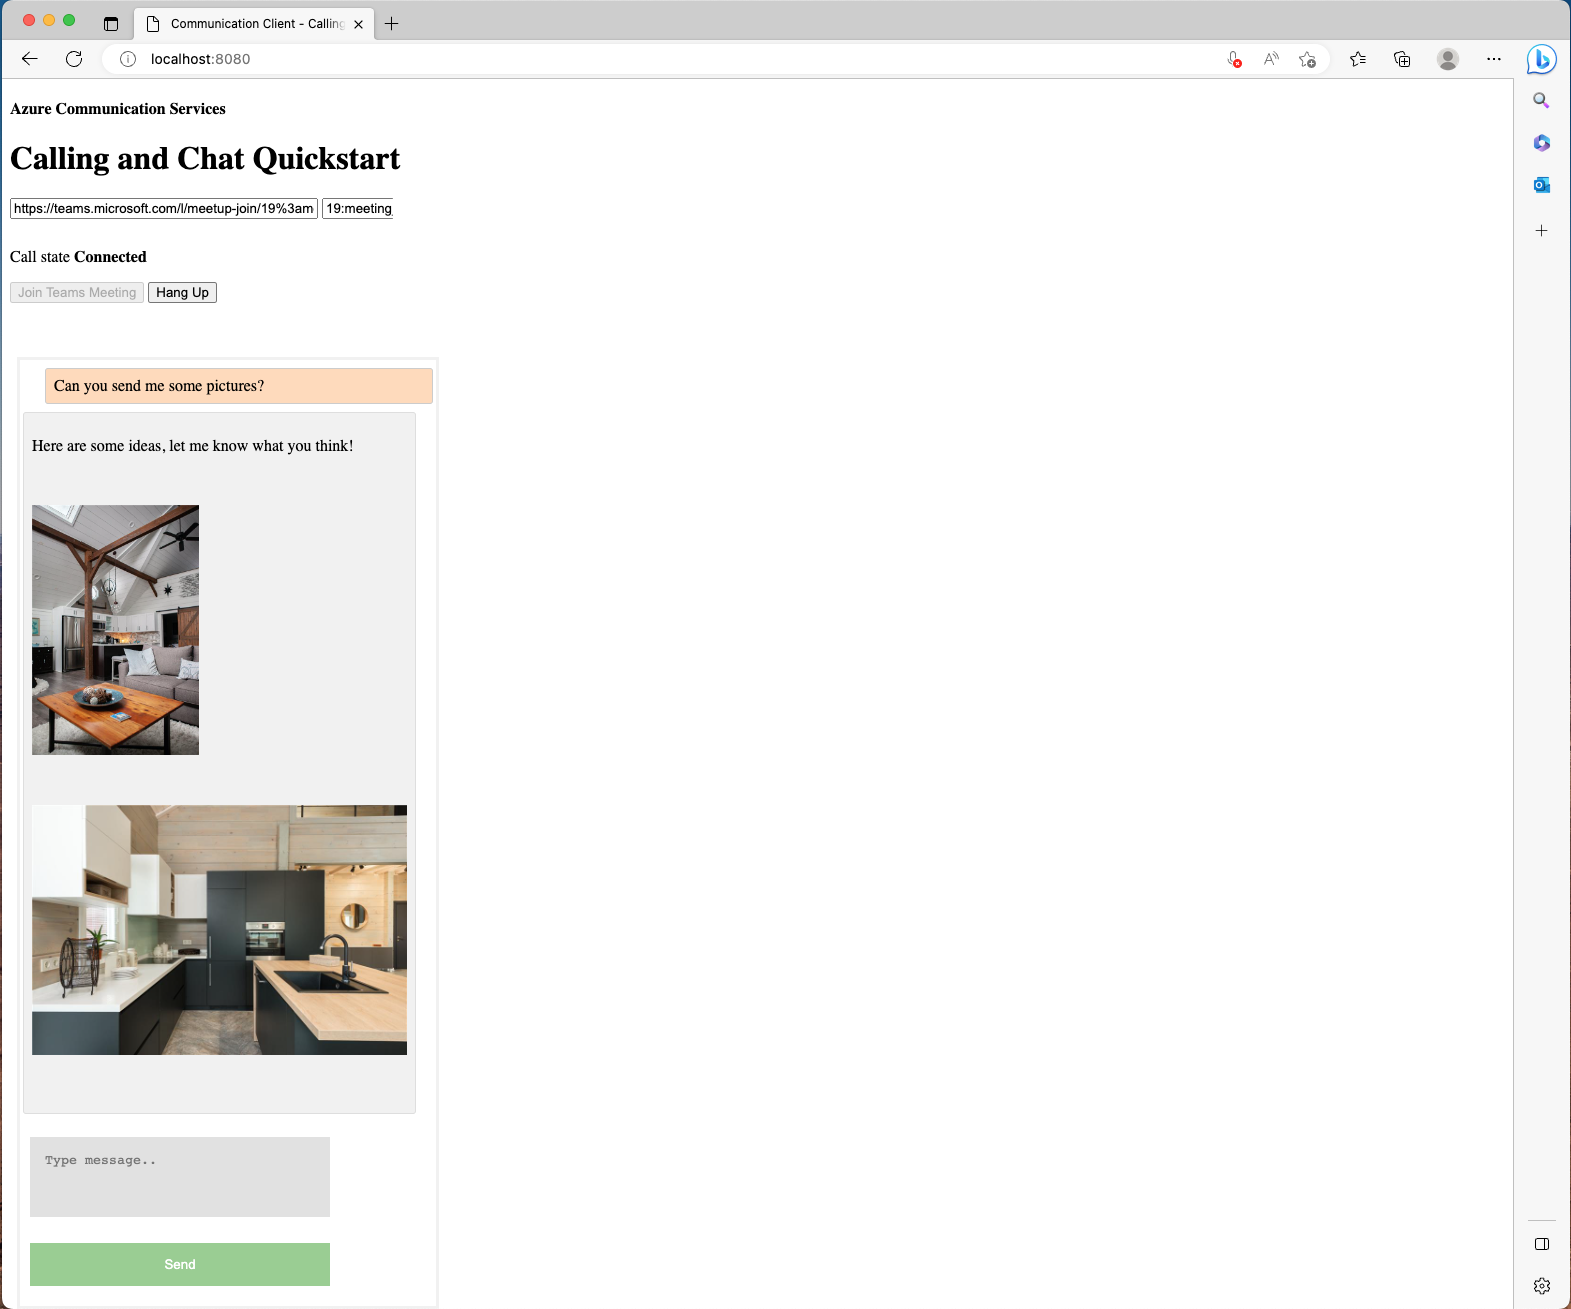
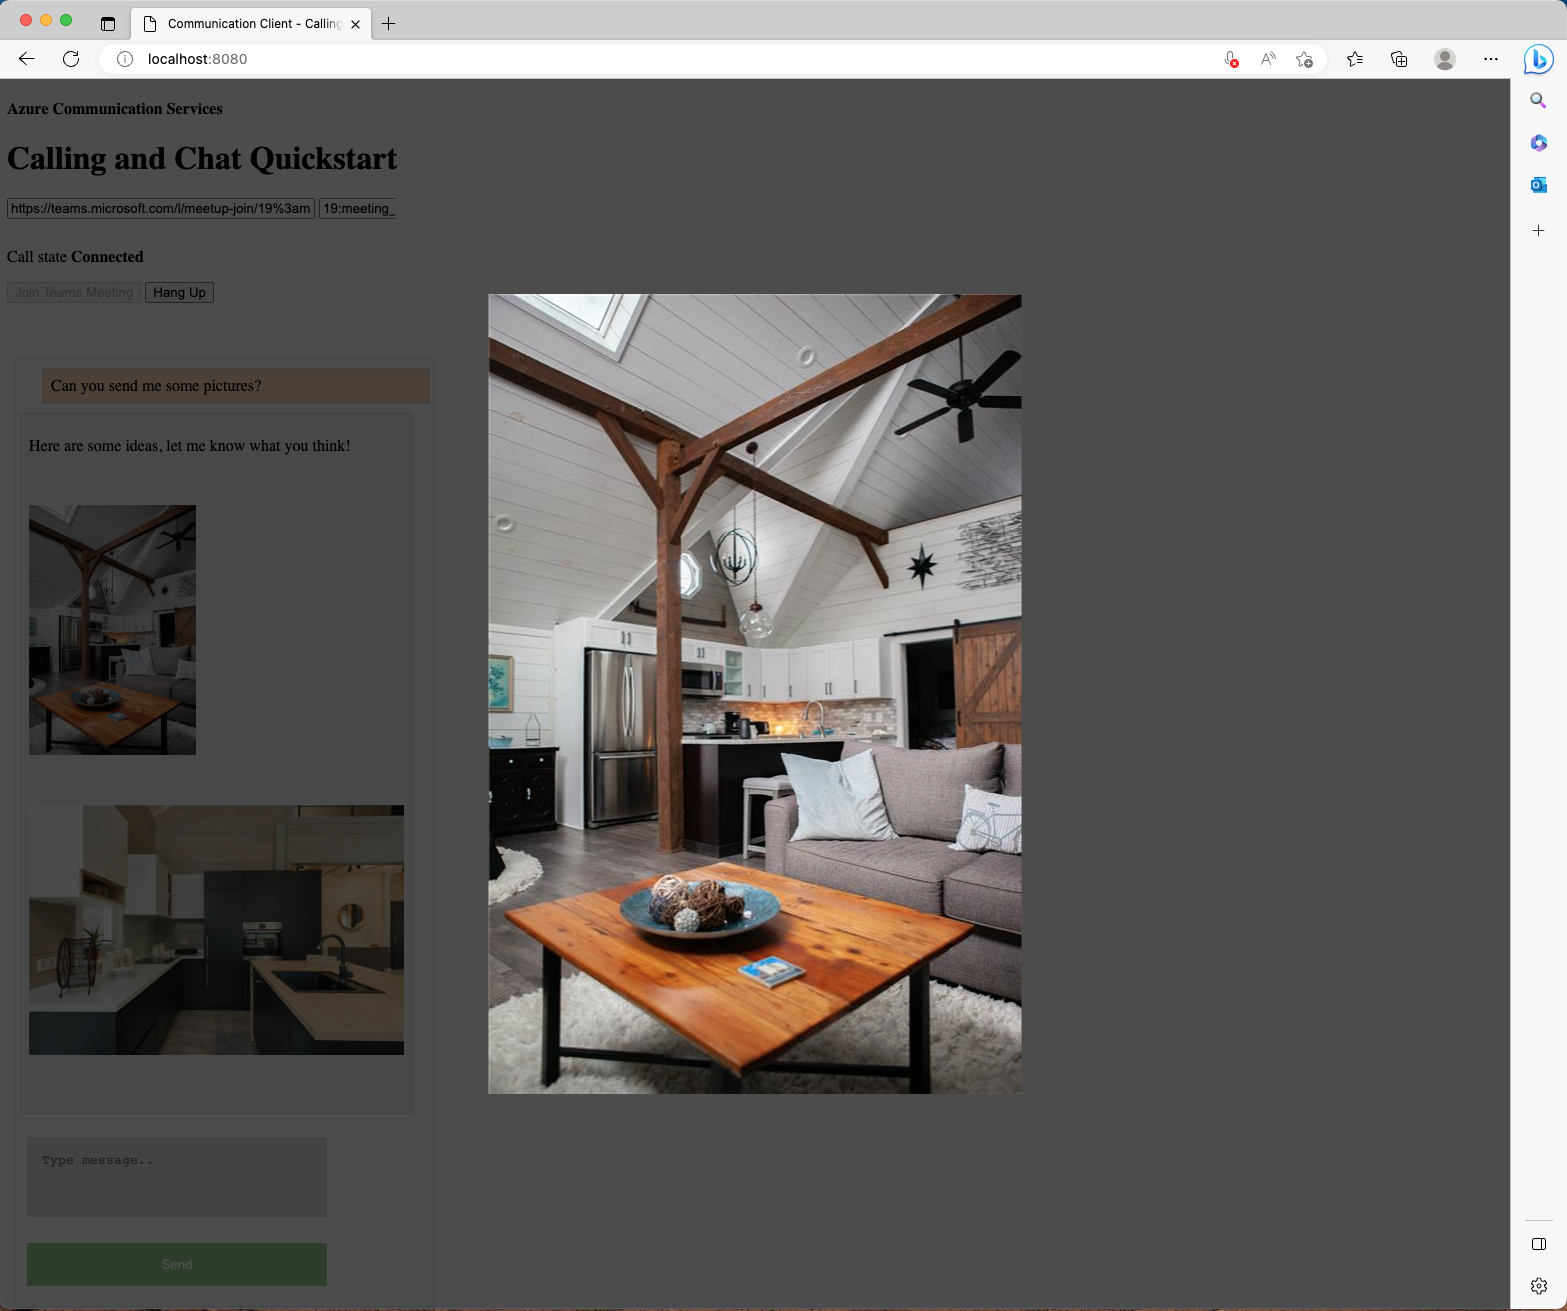
Azure Communication Services ユーザーがプレビュー イメージを選択すると、Teams ユーザーによって送信された本格的なイメージと共にオーバーレイが表示されます。
新しいメッセージ要求でインライン イメージの送信を処理する
重要
Azure Communication Services のこの機能は、現在プレビュー段階にあります。
プレビューの API と SDK は、サービス レベル アグリーメントなしに提供されます。 運用環境のワークロードには使用しないことをお勧めします。 一部の機能はサポート対象ではなく、機能が制限されることがあります。
詳細については、「Microsoft Azure プレビューの追加利用規約」を確認してください。
インライン イメージを含むメッセージを処理するだけでなく、Chat SDK for JavaScript は、通信ユーザーが相互運用性チャットで Microsoft Teams ユーザーにインライン イメージを送信できるようにするソリューションも提供します。
ChatThreadClient からの新しい API を見てみましょう。
var imageAttachment = await chatThreadClient.uploadImage(blob, file.name, {
  "onUploadProgress": reportProgressCallback
});
API がイメージ BLOB、ファイル名文字列、アップロードの進行状況を報告する関数コールバックを受け取ります。
他のチャット参加者に画像を送信するには、次の操作を行う必要があります。
ChatThreadClientからのuploadImageAPI を介してイメージをアップロードし、返されたオブジェクトを保存します。- メッセージのコンテンツを作成し、前の手順で保存した返されたオブジェクトに添付ファイルを設定します。
ChatThreadClientからsendMessageAPI 経由で新しいメッセージを送信します。
イメージを受け入れる新しいファイル ピッカーを作成します。
<label for="myfile">Attach images:</label>
<input id="upload" type="file" id="myfile" name="myfile" accept="image/*" multiple>
<input style="display: none;" id="upload-result"></input>
次に、状態の変化がある場合のイベント リスナーを設定します。
document.getElementById("upload").addEventListener("change", uploadImages);
状態が変化したときに使用する新しい関数を作成する必要があります。
var uploadedImageModels = [];

async function uploadImages(e) {
  const files = e.target.files;
  if (files.length === 0) {
    return;
  }
  for (let key in files) {
    if (files.hasOwnProperty(key)) {
        await uploadImage(files[key]);
    }
}
}

async function uploadImage(file) {
  const buffer = await file.arrayBuffer();
  const blob = new Blob([new Uint8Array(buffer)], {type: file.type });
  const url = window.URL.createObjectURL(blob);
  document.getElementById("upload-result").innerHTML += `<img src="${url}" height="auto" width="100" />`;
  let uploadedImageModel = await chatThreadClient.uploadImage(blob, file.name, {
    imageBytesLength: file.size
  });
  uploadedImageModels.push(uploadedImageModel);
}
この例では、各イメージを base64 エンコードされたイメージとして読み取る FileReader を作成しました。次に、ChatSDK API を呼び出してアップロードする前に Blob を作成します。 Chat SDK からアップロードされたイメージのデータ モデルを保存するためのグローバル uploadedImageModels を作成しました。
最後に、前に作成した sendMessageButton イベント リスナーを変更して、アップロードしたイメージをアタッチする必要があります。
sendMessageButton.addEventListener("click", async () => {
  let message = messagebox.value;
  let attachments = uploadedImageModels;

    // Inject image tags for images we have selected
  // so they can be treated as inline images
  // Alternatively, we can use some third-party libraries
  // to have a rich text editor with inline image support
  message += attachments.map((attachment) => `<img id="${attachment.id}" />`).join("");

  let sendMessageRequest = {
    content: message,
    attachments: attachments,
  };

  let sendMessageOptions = {
    senderDisplayName: "Jack",
    type: "html"
  };

  let sendChatMessageResult = await chatThreadClient.sendMessage(
    sendMessageRequest,
    sendMessageOptions
  );
  let messageId = sendChatMessageResult.id;
  uploadedImageModels = [];

  messagebox.value = "";
  document.getElementById("upload").value = "";
  console.log(`Message sent!, message id:${messageId}`);
});
これで終了です。 次に、コードを実行して動作を確認します。
コードの実行
Webpack ユーザーは、webpack-dev-server を使用してアプリをビルドし、実行することができます。 ローカルの Web サーバーにアプリケーション ホストをバンドルするには、次のコマンドを実行します。
npx webpack-dev-server --entry ./client.js --output bundle.js --debug --devtool inline-source-map
デモ
自分のブラウザーを開き、http://localhost:8080/ にアクセスします。 送信ボックスにイメージを添付する新しいセクションがあります。
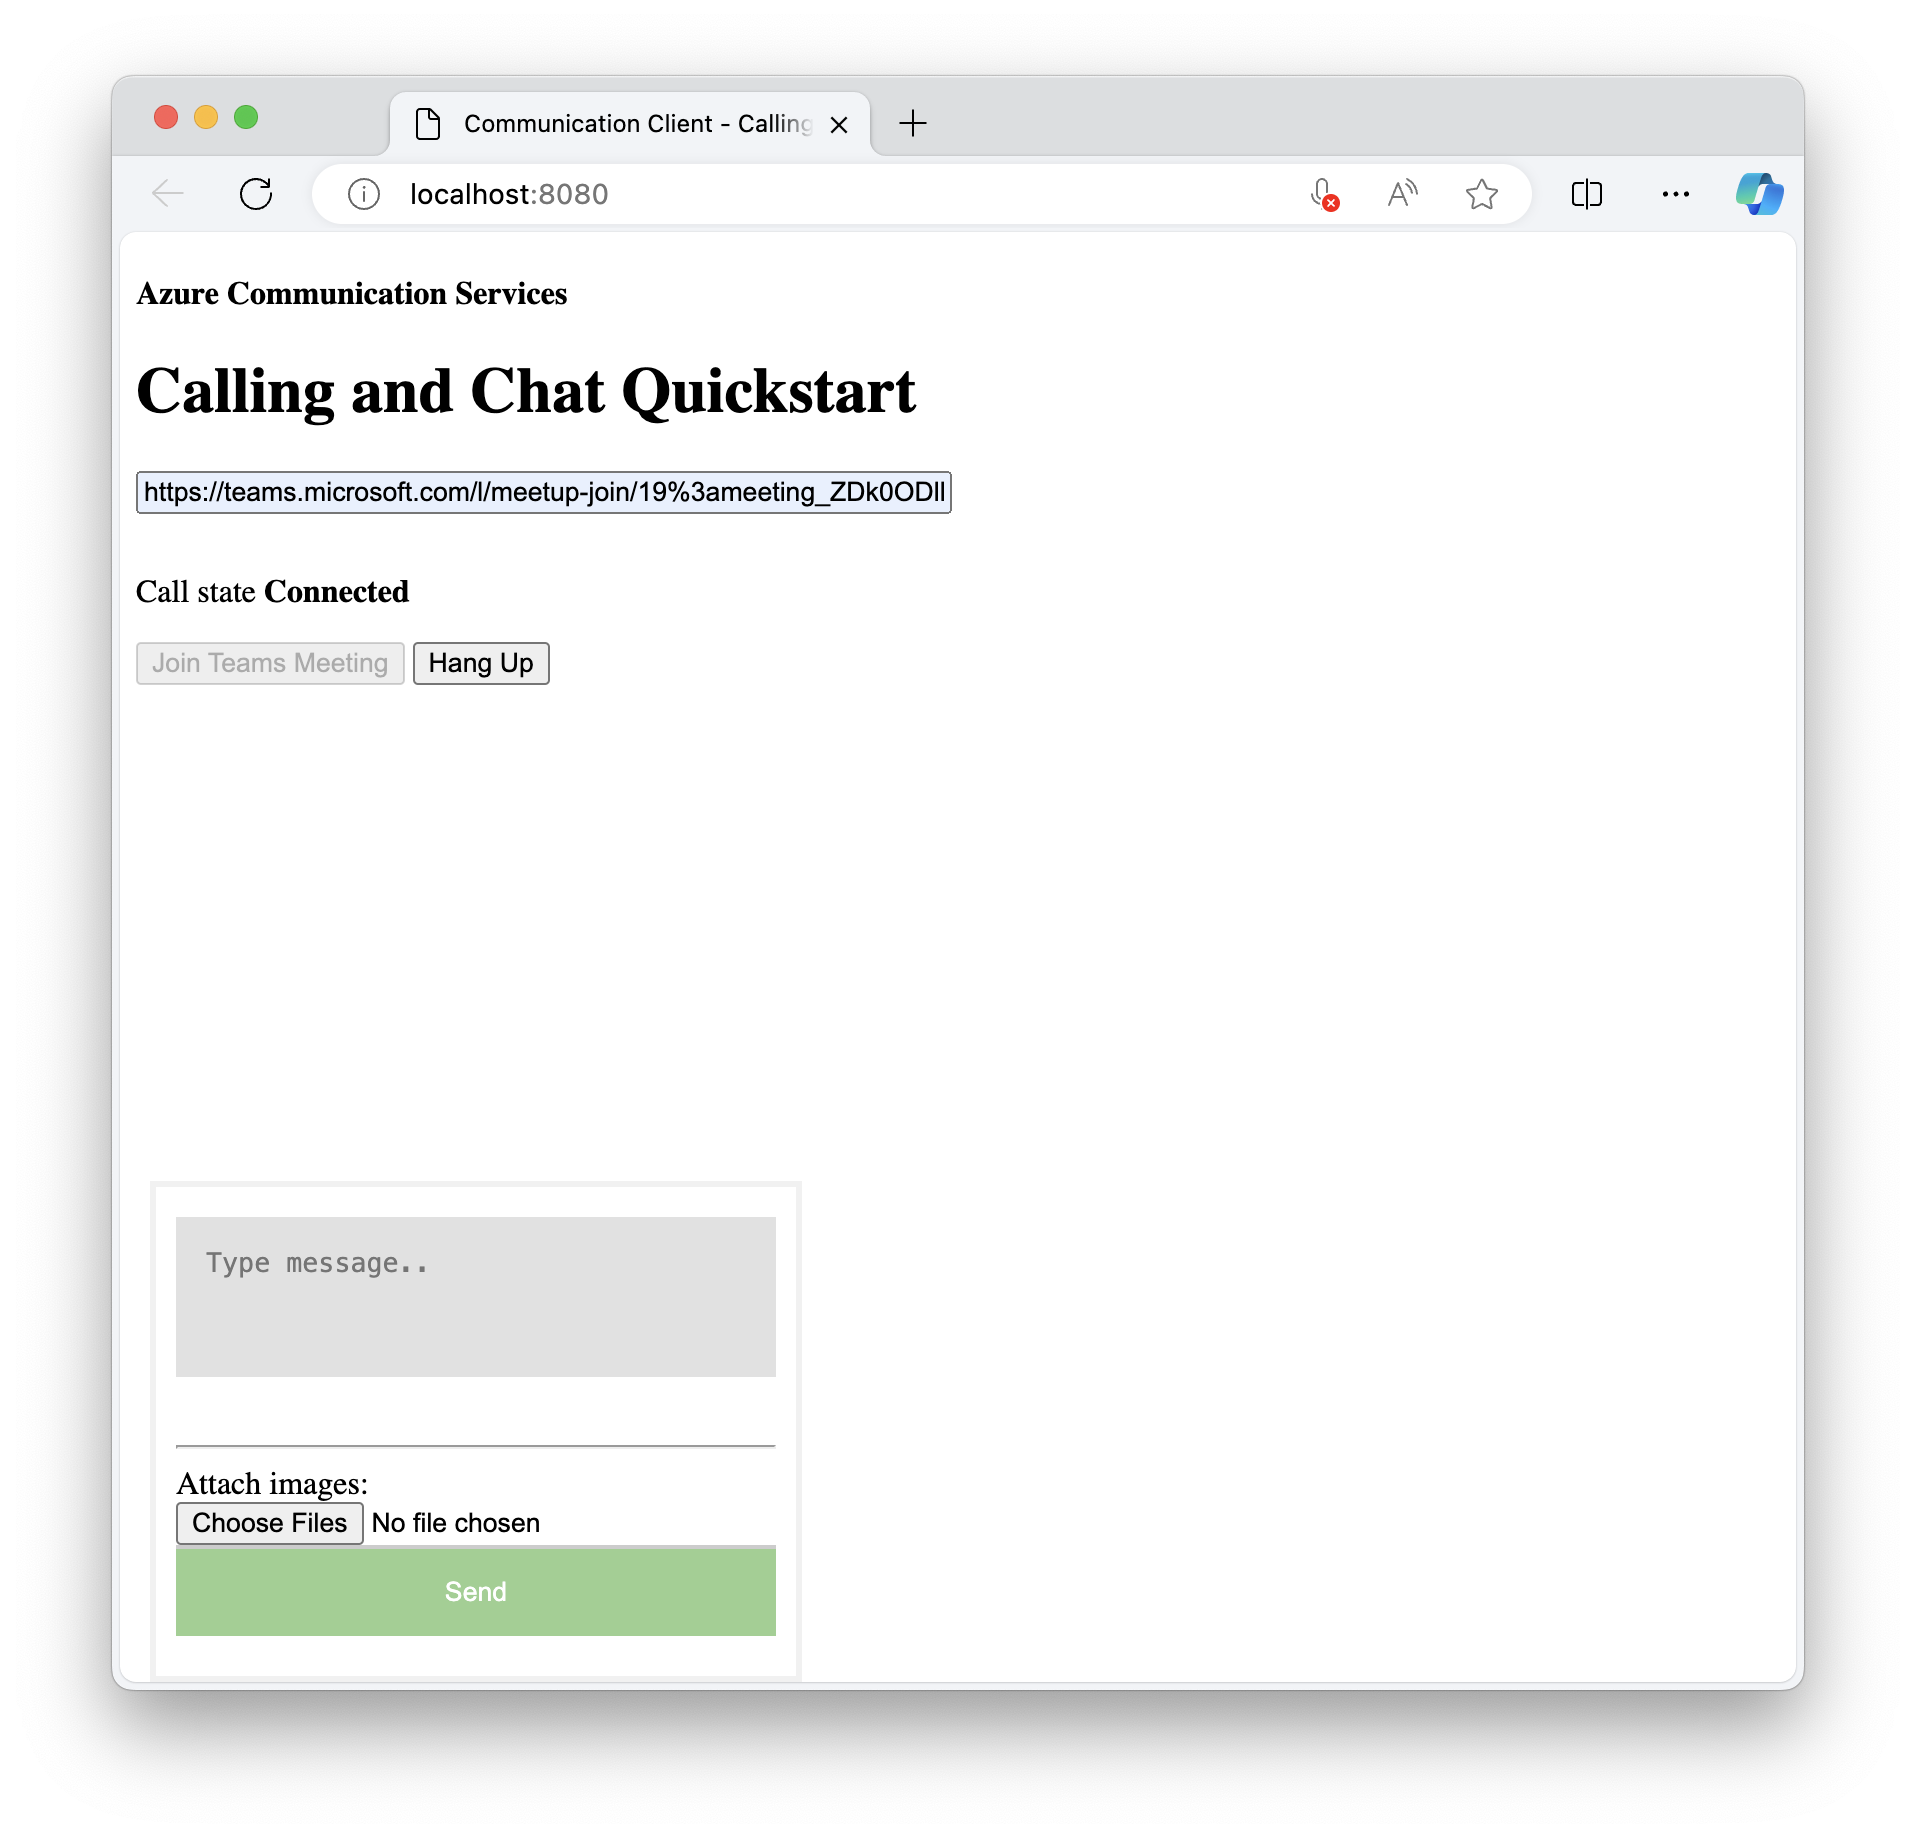
次は、添付するイメージを選択できます。
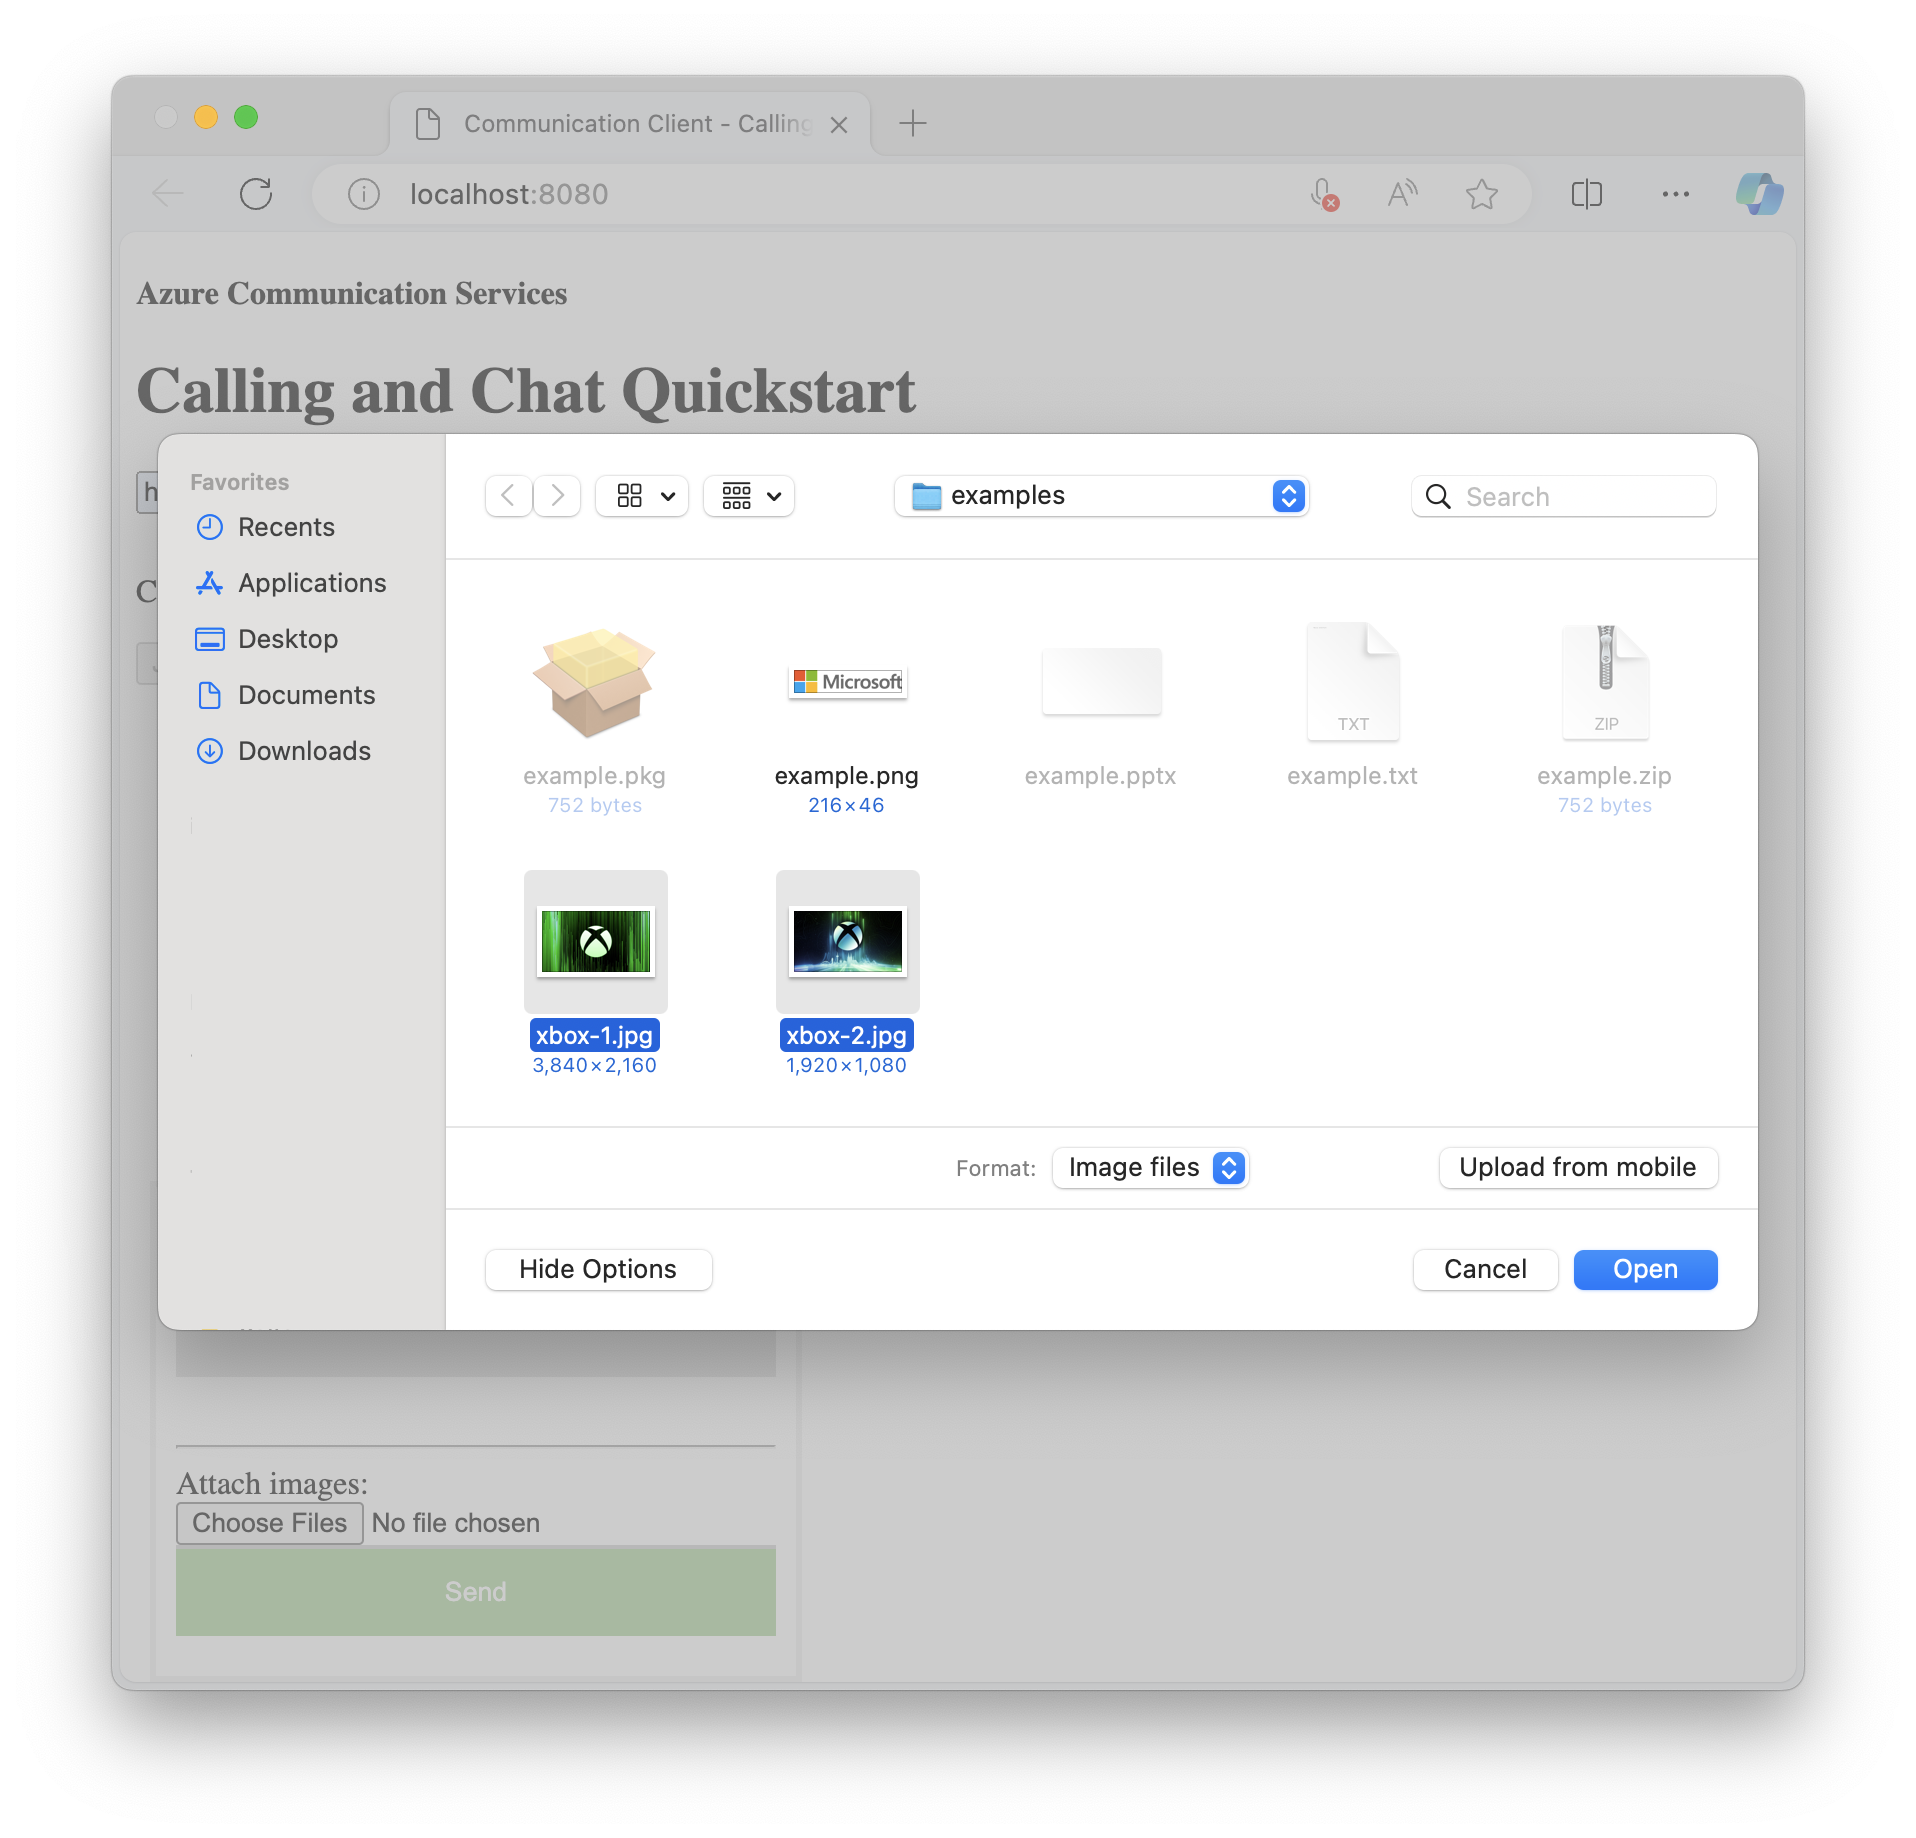
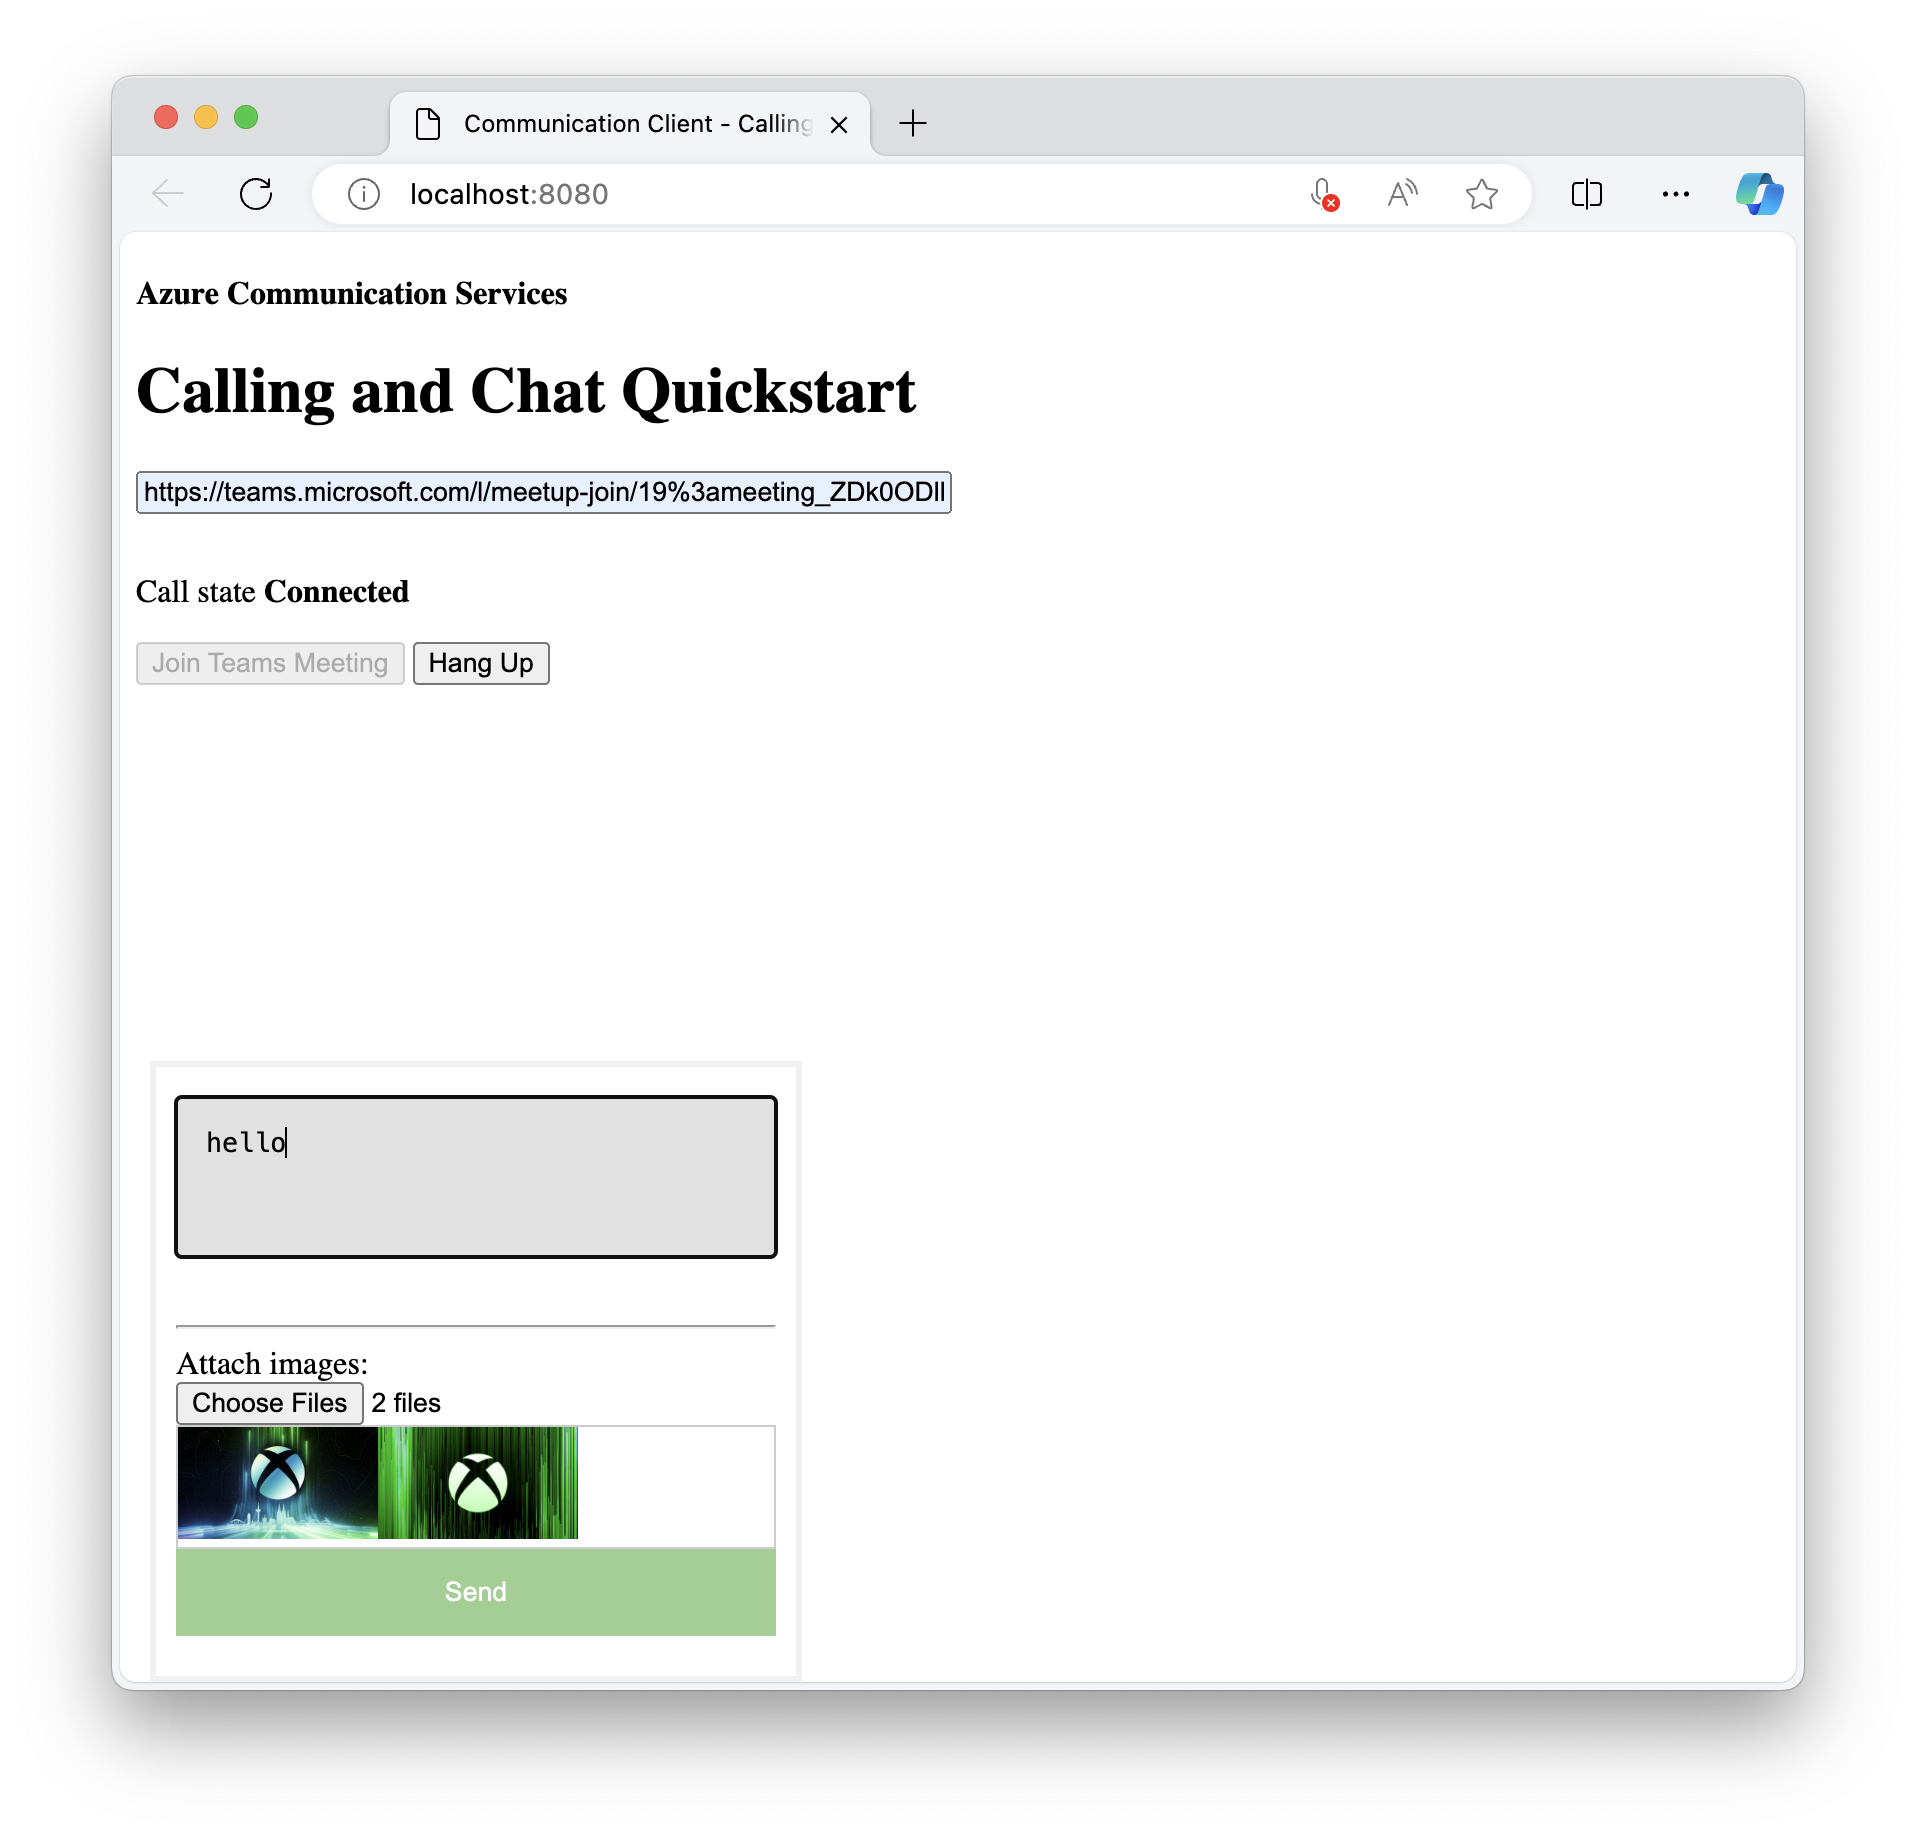
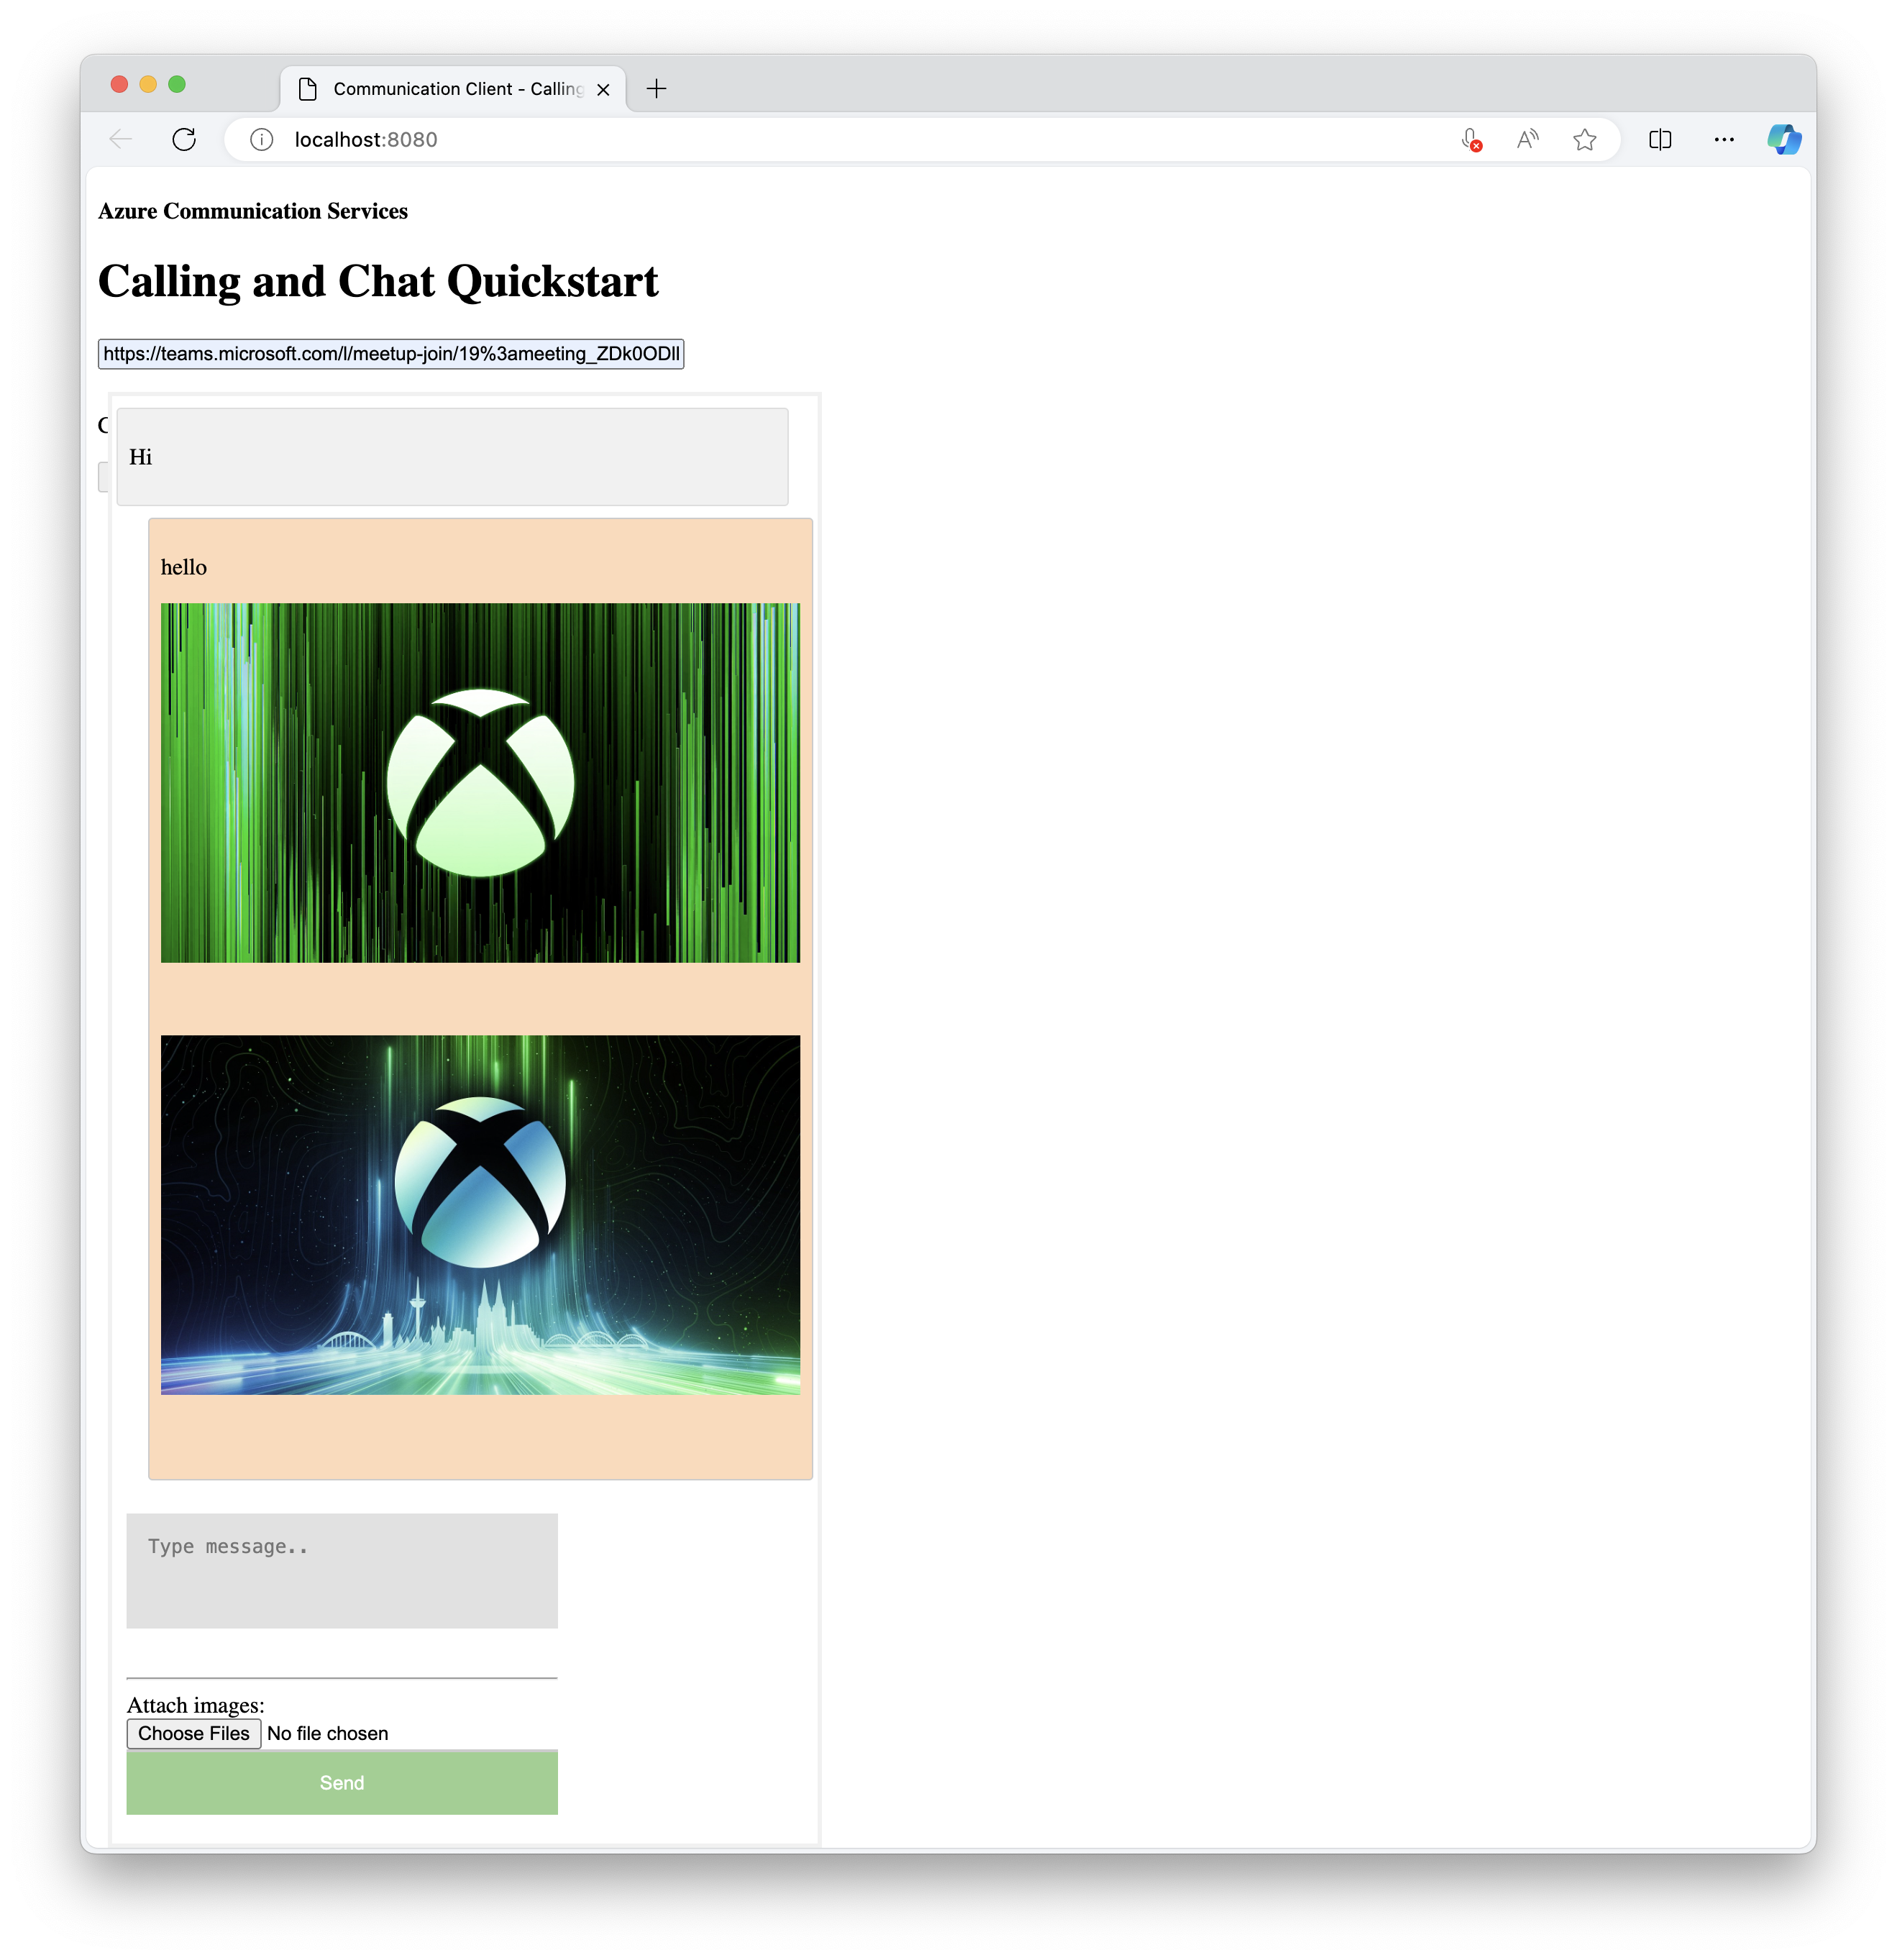
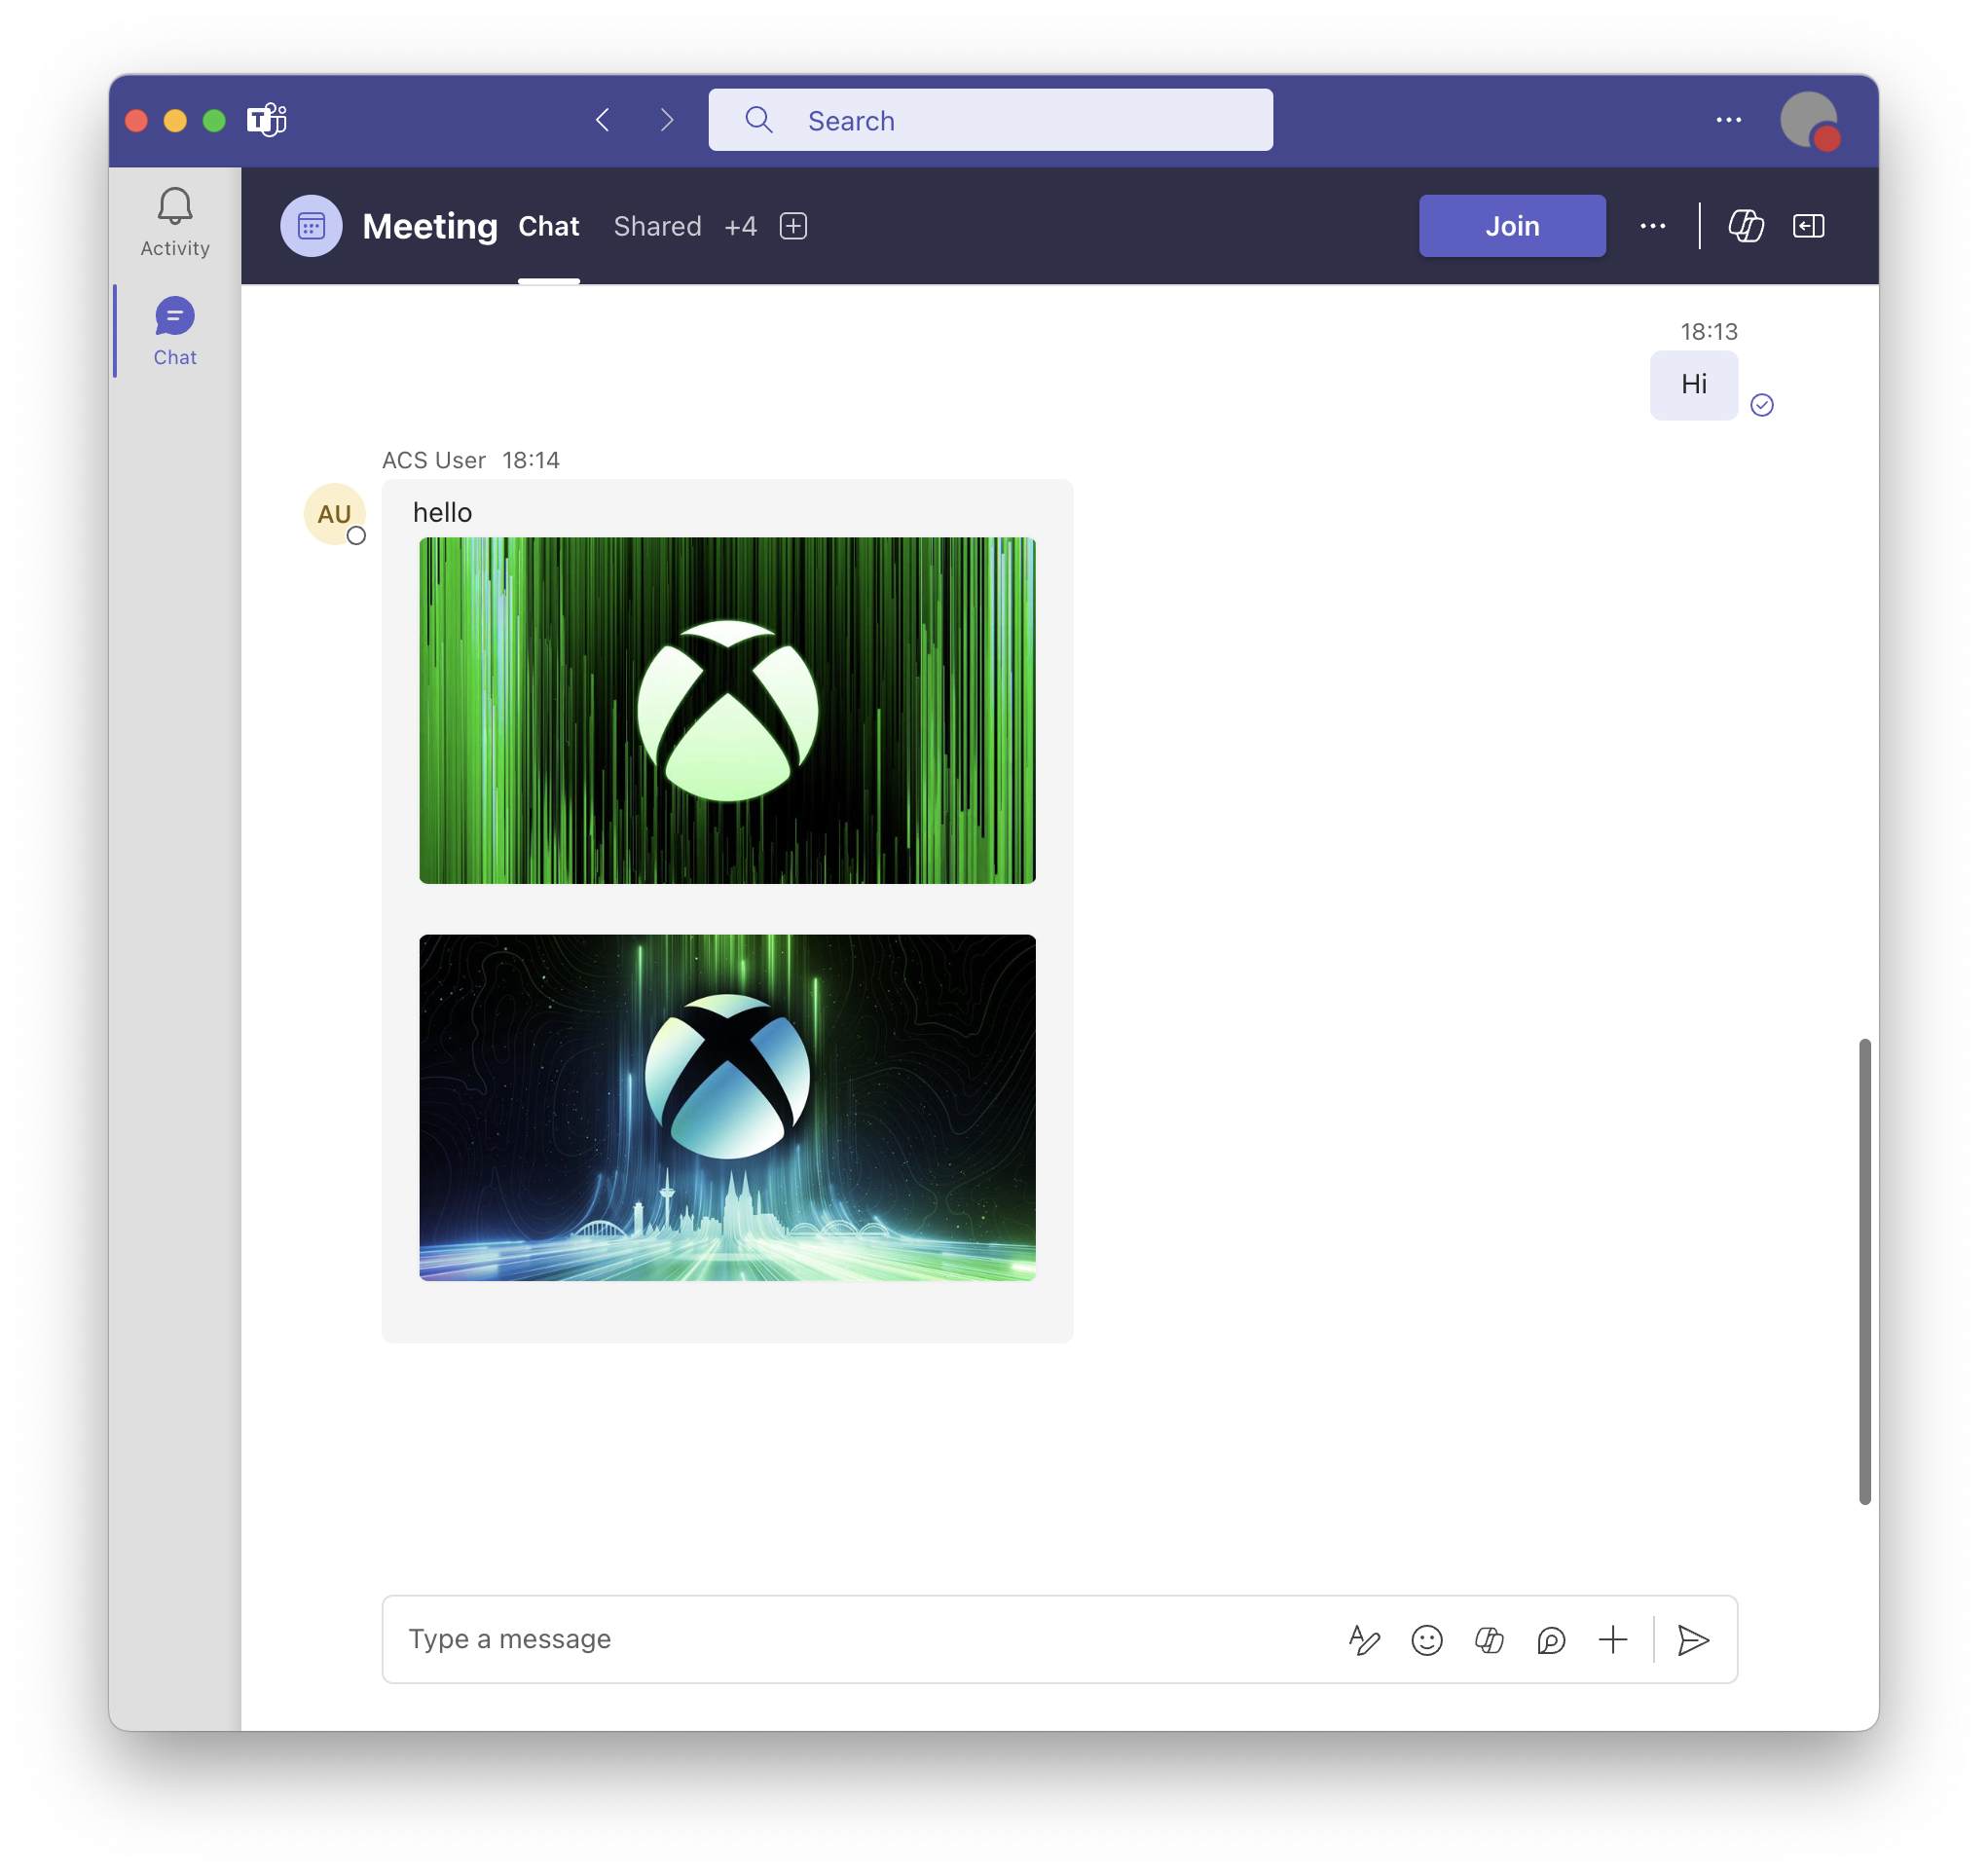
Teams ユーザーは、[送信] を選択したときに送信されたイメージ受け取るはずです。
このチュートリアルでは、C# 用 Azure Communication Services Chat SDK を使用してインライン画像のサポートを有効にする方法について説明します。
このチュートリアルでは、次の作業を行う方法について説明します。
- 新しいメッセージのインライン イメージを処理します。
前提条件
- クイックスタート「チャット アプリを Teams の会議に参加させる」を参照してください。
- Azure Communication Services リソースを作成します。 詳細については、Azure Communication Services リソースの作成に関するページを参照してください。 このチュートリアルで使用する接続文字列を記録する必要があります。
- ビジネス アカウントを使用して Teams 会議を設定し、会議 URL を準備します。
- C# 用 Chat SDK (Azure.Communication.Chat) 1.3.0 または最新版を使用します。 詳細については、.NET 用 Azure Communication Chat クライアント ライブラリに関する記事を参照してください。
目標
- インライン画像添付ファイルの
previewUriプロパティを取得します。
新しいメッセージのインライン イメージを処理する
クイック スタートでは、メッセージをポーリングし、新しいメッセージを messageList プロパティに追加します。 インライン画像の解析と取り込みを含めるよう、この機能を後で構築します。
  CommunicationUserIdentifier currentUser = new(user_Id_);
  AsyncPageable<ChatMessage> allMessages = chatThreadClient.GetMessagesAsync();
  SortedDictionary<long, string> messageList = [];
  int textMessages = 0;
  await foreach (ChatMessage message in allMessages)
  {
      if (message.Type == ChatMessageType.Html || message.Type == ChatMessageType.Text)
      {
          textMessages++;
          var userPrefix = message.Sender.Equals(currentUser) ? "[you]:" : "";
          var strippedMessage = StripHtml(message.Content.Message);
          messageList.Add(long.Parse(message.SequenceId), $"{userPrefix}{strippedMessage}");
      }
  }
ChatMessageReceivedEvent 型の受信イベントから、attachments という名前のプロパティにインライン イメージに関する情報が含まれます。 UI でインライン イメージをレンダリングするために必要な操作はこれですべてです。
public class ChatAttachment
{
    public ChatAttachment(string id, ChatAttachmentType attachmentType)
    public ChatAttachmentType AttachmentType { get }
    public string Id { get }
    public string Name { get }
    public System.Uri PreviewUrl { get }
    public System.Uri Url { get }
}

public struct ChatAttachmentType : System.IEquatable<AttachmentType>
{
    public ChatAttachmentType(string value)
    public static File { get }
    public static Image { get }
}
以下の JSON は、画像添付ファイルの ChatAttachment の見た目がどうなるかの例を示しています。
"attachments": [
    {
        "id": "9d89acb2-c4e4-4cab-b94a-7c12a61afe30",
        "attachmentType": "image",
        "name": "Screenshot.png",
        "url": "https://contoso.communication.azure.com/chat/threads/19:9d89acb29d89acb2@thread.v2/images/9d89acb2-c4e4-4cab-b94a-7c12a61afe30/views/original?api-version=2023-11-03",
        "previewUrl": "https://contoso.communication.azure.com/chat/threads/19:9d89acb29d89acb2@thread.v2/images/9d89acb2-c4e4-4cab-b94a-7c12a61afe30/views/small?api-version=2023-11-03"
      }
]
ここで戻ってコードを置き換えて、画像添付ファイルを解析して取り込むための追加のロジックを追加します。
  CommunicationUserIdentifier currentUser = new(user_Id_);
  AsyncPageable<ChatMessage> allMessages = chatThreadClient.GetMessagesAsync();
  SortedDictionary<long, string> messageList = [];
  int textMessages = 0;
  await foreach (ChatMessage message in allMessages)
  {
      // Get message attachments that are of type 'image'
      IEnumerable<ChatAttachment> imageAttachments = message.Content.Attachments.Where(x => x.AttachmentType == ChatAttachmentType.Image);

      // Fetch image and render
      var chatAttachmentImageUris = new List<Uri>();
      foreach (ChatAttachment imageAttachment in imageAttachments)
      {
          client.DefaultRequestHeaders.Authorization = new System.Net.Http.Headers.AuthenticationHeaderValue("Bearer", communicationTokenCredential.GetToken().Token);
          var response = await client.GetAsync(imageAttachment.PreviewUri);
          var randomAccessStream = await response.Content.ReadAsStreamAsync();
          await Dispatcher.RunAsync(CoreDispatcherPriority.Normal, async () =>
          {
              var bitmapImage = new BitmapImage();
              await bitmapImage.SetSourceAsync(randomAccessStream.AsRandomAccessStream());
              InlineImage.Source = bitmapImage;
          });

          chatAttachmentImageUris.Add(imageAttachment.PreviewUri);
      }

      // Build message list
      if (message.Type == ChatMessageType.Html || message.Type == ChatMessageType.Text)
      {
          textMessages++;
          var userPrefix = message.Sender.Equals(currentUser) ? "[you]:" : "";
          var strippedMessage = StripHtml(message.Content.Message);
          var chatAttachments = chatAttachmentImageUris.Count > 0 ? "[Attachments]:\n" + string.Join(",\n", chatAttachmentImageUris) : "";
          messageList.Add(long.Parse(message.SequenceId), $"{userPrefix}{strippedMessage}\n{chatAttachments}");
      }
この例では、Image 型のメッセージからすべての添付ファイルを取得し、各画像をフェッチします。 承認のために、要求ヘッダーの Bearer 部分で Token を使用する必要があります。 イメージがダウンロードされたら、ビューの InlineImage 要素に割り当てることができます。
また、テキスト メッセージ リストにメッセージと共に表示される添付ファイル URI の一覧も含めます。
デモ
- 統合開発環境 (IDE) からアプリケーションを実行します。
- Teams 会議のリンクを入力します。
- 会議に参加します。
- Teams 側でユーザーを許可します。
- Teams 側から画像を含むメッセージを送信します。
メッセージに含まれる URL がメッセージ一覧に表示されます。 最後に受信したイメージは、ウィンドウの下部にレンダリングされます。
次のステップ
- その他のサポートされている相互運用性機能の詳細をご覧ください。
- チャットのヒーロー サンプルをご覧ください。
- チャットのしくみの詳細をご覧ください。